To avoid these ads, REGISTER NOW!

Above 1200 Sq/FT The Shiloh Shop Project.......................

Wokspaces above 1200 squarefeet.
OP
B

bimmer1980

Well-known member
Joined
Feb 5, 2009
Messages
2,104
Location
York, PA
June of 2011.

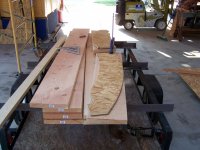
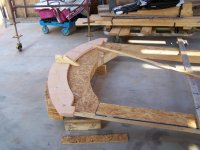
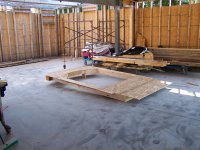
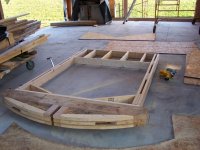
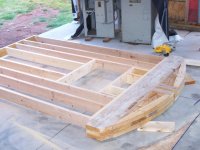
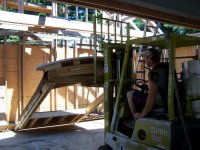
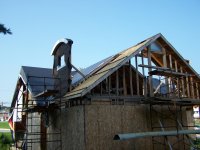
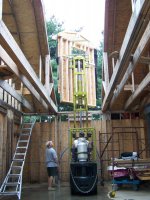
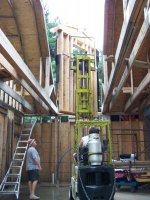
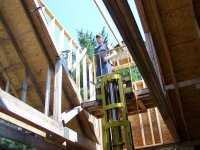
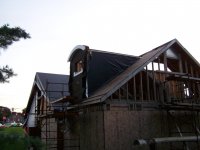
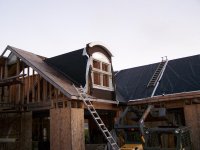
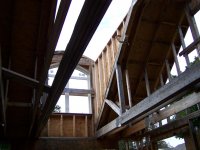
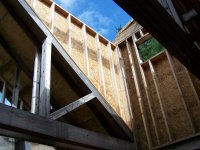
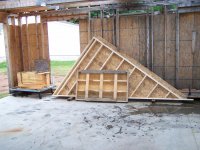
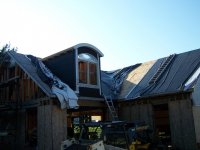
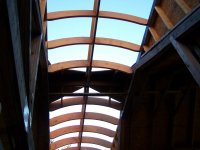
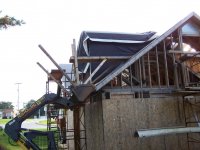
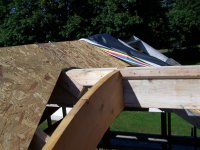
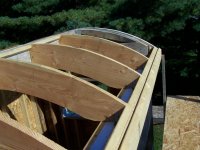
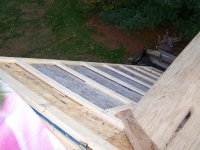
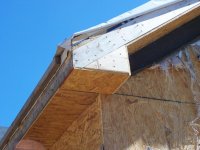
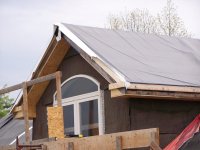
I started the work on the Arch Dormer of the garage....

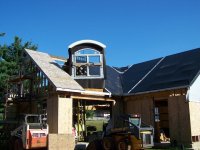
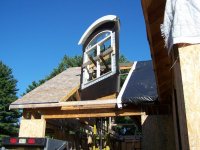
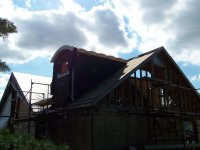
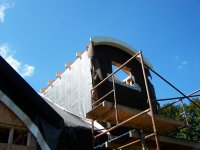
This was a long planning and required a modification to the garage plans prior to ordering the trusses. I wanted to maximize room in the attic area of the garage. While a traditional dormer may have been sufficient, I became fascinated with the arch or barrel dormers on some older houses. I wanted to give this a shot and I thought it would look pretty neat when it was complete.

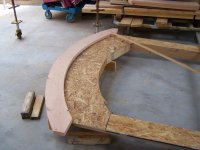
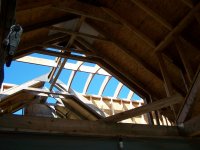
The Dormer width is 72" between the three ply trusses.

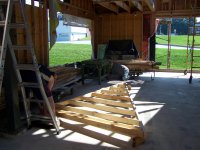
Much design work was done in a 3D CAD program to make this all work....
 

Attachments

  • 102_0209.jpg
    102_0209.jpg
    144.3 KB · Views: 57
  • 102_0244.jpg
    102_0244.jpg
    152.1 KB · Views: 49
  • 102_0243.jpg
    102_0243.jpg
    153.5 KB · Views: 49
  • 102_0242.jpg
    102_0242.jpg
    150.2 KB · Views: 49
  • 102_0240.jpg
    102_0240.jpg
    148.9 KB · Views: 51
  • 102_0233.jpg
    102_0233.jpg
    152 KB · Views: 52
  • 102_0222.jpg
    102_0222.jpg
    151.8 KB · Views: 55
To avoid these ads, REGISTER NOW!
OP
B

bimmer1980

Well-known member
Joined
Feb 5, 2009
Messages
2,104
Location
York, PA
Arch dormer framing continued.....

One end had a large window in it and the other was framed for a smaller glass block window...
 

Attachments

  • 102_0253.jpg
    102_0253.jpg
    147.4 KB · Views: 34
  • 102_0251.jpg
    102_0251.jpg
    91.9 KB · Views: 36
  • 102_0249.jpg
    102_0249.jpg
    144.1 KB · Views: 33
  • 102_0247.jpg
    102_0247.jpg
    148 KB · Views: 32
  • 102_0246.jpg
    102_0246.jpg
    148.7 KB · Views: 30
  • 102_0245.jpg
    102_0245.jpg
    147.5 KB · Views: 31
OP
B

bimmer1980

Well-known member
Joined
Feb 5, 2009
Messages
2,104
Location
York, PA
Continued work on the Arch Dormer in June of 2011.

Once the gable wall of the dormer was assembled, I removed the window panes and used some horizontal boards to provide a lift point for the forklift.

Then it was a matter of lifting and maneuvering into place.....
 

Attachments

  • 102_0265.jpg
    102_0265.jpg
    149.2 KB · Views: 62
  • 102_0264.jpg
    102_0264.jpg
    152 KB · Views: 53
  • 102_0263.jpg
    102_0263.jpg
    158.5 KB · Views: 49
  • 102_0262.jpg
    102_0262.jpg
    159.8 KB · Views: 51
  • 102_0260.jpg
    102_0260.jpg
    154.4 KB · Views: 51
  • 102_0256.jpg
    102_0256.jpg
    154 KB · Views: 51
  • 102_0255.jpg
    102_0255.jpg
    157.3 KB · Views: 59
OP
B

bimmer1980

Well-known member
Joined
Feb 5, 2009
Messages
2,104
Location
York, PA
During this time frame, my father-in-law passed away in a tragic car accident. Due to all the complications and family distress, there was no garage work done for awhile.

This whole ordeal was a shock. The accident happened on Father's Day (June 2011) and then he spent a week in the hospital for about a week before he died. He was unresponsive that week.

It is sobering to look back upon that time.
 

kent_323is

Well-known member
Joined
Nov 13, 2009
Messages
274
Location
South Dakota
Good pics of all the framing work!

Hard to believe it's been that long since your F-n-L (Dale) passed away. He was a good guy.

Did you make all of those steel plate assemblies that tie the trusses to the rafters, shown towards the end of page 4?
 

Growlertdi

Well-known member
Joined
May 17, 2016
Messages
410
Location
Millersport, Ohio
This is a fascinating process and well documented. Thank you for sharing, I look forward to seeing more.

So sorry to hear about your F-n-L. I also had a great F-n-L and miss him daily.
 
OP
B

bimmer1980

Well-known member
Joined
Feb 5, 2009
Messages
2,104
Location
York, PA
Thanks guys!

Yes, I made the large steel bracket pieces for the LVL's to connect to the trusses. Probably a bit overkill with the 3/16" steel plate and 3x3 angle, but you never know if a hoist might need to be connected to them some day......
 
OP
B

bimmer1980

Well-known member
Joined
Feb 5, 2009
Messages
2,104
Location
York, PA
August 6-2011.

I was finally ready to get back to doing some work on the garage.

The rear wall of the Arch Dormer was a little bit different than the front wall due to the shape and size of the window. This made it easier to frame, but required a tight fit with the forklift forks.

Once the wall was up in the air, I had to rotate it on the forks to align it with the wall.

Probably not exactly OSHA approved work surfaces... :bounce:

Then the wall was braced and ready for some walls.
 

Attachments

  • 102_0286.jpg
    102_0286.jpg
    150.3 KB · Views: 50
  • 102_0284.jpg
    102_0284.jpg
    148.4 KB · Views: 54
  • 102_0278.jpg
    102_0278.jpg
    158 KB · Views: 51
  • 102_0276.jpg
    102_0276.jpg
    155.1 KB · Views: 55
  • 102_0272.jpg
    102_0272.jpg
    140.3 KB · Views: 54
  • 102_0270.jpg
    102_0270.jpg
    130.8 KB · Views: 56
  • 102_0266.jpg
    102_0266.jpg
    110.9 KB · Views: 57
OP
B

bimmer1980

Well-known member
Joined
Feb 5, 2009
Messages
2,104
Location
York, PA
As noted previously, I had cut out all the curved rafters in anticipation of the arch dormer framing....

I also build up the wall frames and hoisted them into position to test fit.
 

Attachments

  • 102_0295.jpg
    102_0295.jpg
    150.9 KB · Views: 42
  • 102_0292.jpg
    102_0292.jpg
    156 KB · Views: 44
  • 102_0291.jpg
    102_0291.jpg
    156.3 KB · Views: 41
  • 102_0288.jpg
    102_0288.jpg
    152.1 KB · Views: 38
OP
B

bimmer1980

Well-known member
Joined
Feb 5, 2009
Messages
2,104
Location
York, PA
Had some other travel things happen in August, so it was slow going on the garage.

Finally in Mid September of 2011 I had some more progress.

The walls and sheathed and wrapped. Then hoisted into position and fastened.
 

Attachments

  • 102_0438.jpg
    102_0438.jpg
    113.1 KB · Views: 36
  • 102_0437.jpg
    102_0437.jpg
    137 KB · Views: 38
  • 102_0434.jpg
    102_0434.jpg
    147.4 KB · Views: 30
  • 102_0430.jpg
    102_0430.jpg
    152.7 KB · Views: 27
  • 102_0429.jpg
    102_0429.jpg
    152.2 KB · Views: 25
  • 102_0426.jpg
    102_0426.jpg
    154.4 KB · Views: 28
OP
B

bimmer1980

Well-known member
Joined
Feb 5, 2009
Messages
2,104
Location
York, PA
In the mid September 2011 time frame I was also finally able to start setting the curved rafters after setting the LVL beams into the pockets.

It was quite satisfying for me to set the curved rafters. They were the culmination of lots of planning and preparation work.
 

Attachments

  • 102_0440.jpg
    102_0440.jpg
    114.3 KB · Views: 41
  • 102_0441.jpg
    102_0441.jpg
    126.5 KB · Views: 42
  • 102_0442.jpg
    102_0442.jpg
    139 KB · Views: 41
  • 102_0443.jpg
    102_0443.jpg
    148.6 KB · Views: 43
OP
B

bimmer1980

Well-known member
Joined
Feb 5, 2009
Messages
2,104
Location
York, PA
At the beginning of October, 2011, I was working on the myriad of details associated with the arch dormers.

--Eave boards
--Transition framing from peaked roof to the arch shape.
--Additional blocking on ridge beam for additional nailing of the sheathing...
 

Attachments

  • 102_0575.jpg
    102_0575.jpg
    131.8 KB · Views: 34
  • 102_0577.jpg
    102_0577.jpg
    94 KB · Views: 31
  • 102_0578.jpg
    102_0578.jpg
    113.8 KB · Views: 32
OP
B

bimmer1980

Well-known member
Joined
Feb 5, 2009
Messages
2,104
Location
York, PA
Here are some additional pictures that show the various blocking and framing for the arch dormer.

I also made up some special stands and planks so that I could more easily work on the arch dormer.

The vertical boards on the skid steer bucket helped me move the planks from one side of the garage to the other dormer.

It's hard to see in these pictures, but the sheathing is on in the last couple of pictures. I used two layers of 3/8" 3-ply CDX that is glued and nailed. It was a little interesting to get it to roll over the arch dormer, but it went fairly well... Of course, the more challenging part was to cut the transition area to fit well.....
 

Attachments

  • 102_0593.jpg
    102_0593.jpg
    149.4 KB · Views: 43
  • 102_0592.jpg
    102_0592.jpg
    168.5 KB · Views: 45
  • 102_0583.jpg
    102_0583.jpg
    155.3 KB · Views: 42
  • 102_0582.jpg
    102_0582.jpg
    154 KB · Views: 40
  • 102_0581.jpg
    102_0581.jpg
    151.1 KB · Views: 49
Last edited:
OP
B

bimmer1980

Well-known member
Joined
Feb 5, 2009
Messages
2,104
Location
York, PA
Mid October of 2011.

Here are some additional shots that show some better details of the process of the sheathing....

As it was getting dark as we were finishing up, the one picture got a little blurry.

There's my B-in-L Cory standing on the dormer and admiring our hard work.

I'm loading up the glue gun.... I have used a lot of glue on this garage!!
 

Attachments

  • 102_0617.jpg
    102_0617.jpg
    150.4 KB · Views: 56
  • 102_0619.jpg
    102_0619.jpg
    74.9 KB · Views: 60
  • 102_0615.jpg
    102_0615.jpg
    156.6 KB · Views: 68
OP
B

bimmer1980

Well-known member
Joined
Feb 5, 2009
Messages
2,104
Location
York, PA
It might be worth a post showing how I moved the planks around.....
 

Attachments

  • 102_0614.jpg
    102_0614.jpg
    160.4 KB · Views: 52
  • 102_0613.jpg
    102_0613.jpg
    159.2 KB · Views: 49
  • 102_0611.jpg
    102_0611.jpg
    147.1 KB · Views: 51
  • 102_0610.jpg
    102_0610.jpg
    126.6 KB · Views: 52
  • 102_0607.jpg
    102_0607.jpg
    139.6 KB · Views: 51
  • 102_0602.jpg
    102_0602.jpg
    149.1 KB · Views: 52
OP
B

bimmer1980

Well-known member
Joined
Feb 5, 2009
Messages
2,104
Location
York, PA
Yup, It was a lot of work.......

Skipping ahead thru some details.... Thanksgiving of 2011. 11/25..

I wanted a 2" layer of roof deck insulation, but was required to have purlins for the standing seam roofing to screw onto.... Hence, 2' of foam and purlins...

This was a fair bit of work, but made for a solid roof assembly.
 

Attachments

  • 102_0711.jpg
    102_0711.jpg
    150.3 KB · Views: 30
  • 102_0707.jpg
    102_0707.jpg
    148.9 KB · Views: 31
  • 102_0702.jpg
    102_0702.jpg
    149.5 KB · Views: 32
  • 102_0698.jpg
    102_0698.jpg
    148.9 KB · Views: 27
To avoid these ads, REGISTER NOW!
OP
B

bimmer1980

Well-known member
Joined
Feb 5, 2009
Messages
2,104
Location
York, PA
The purlins and a variety of other work on the garage took awhile. I was also lining up the order for the standing seam steel roofing material.

The curved SSR material was a challenge to get... had I known that, I might have just gone with regular SSR..... oh well... live and learn.

Mid April of 2012 I was working on the box returns for the gable and soffits...
 

Attachments

  • 102_1081.jpg
    102_1081.jpg
    145.6 KB · Views: 30
  • 102_1079.jpg
    102_1079.jpg
    154.2 KB · Views: 34
  • 102_1078.jpg
    102_1078.jpg
    149.6 KB · Views: 34
  • 102_1075.jpg
    102_1075.jpg
    152.5 KB · Views: 30
  • 102_1074.jpg
    102_1074.jpg
    146.4 KB · Views: 30
  • 102_1072.jpg
    102_1072.jpg
    149.5 KB · Views: 36
OP
B

bimmer1980

Well-known member
Joined
Feb 5, 2009
Messages
2,104
Location
York, PA
April 19 thru 21 of 2012. I was moving around the garage to finish the gable sub framing and box returns.

I also made some fork extensions to allow me to move a tower of scaffold. That helped the productivity..... It beats tearing the scaffolding down for each relocation...
 

Attachments

  • 102_1260.jpg
    102_1260.jpg
    159.2 KB · Views: 36
  • 102_1258.jpg
    102_1258.jpg
    155.2 KB · Views: 32
  • 102_1257.jpg
    102_1257.jpg
    155.2 KB · Views: 36
  • 102_1065.jpg
    102_1065.jpg
    155.4 KB · Views: 35
  • 102_1262.jpg
    102_1262.jpg
    139.9 KB · Views: 31
  • 102_1255.jpg
    102_1255.jpg
    143.5 KB · Views: 34
OP
B

bimmer1980

Well-known member
Joined
Feb 5, 2009
Messages
2,104
Location
York, PA
May 4th of 2012.

The Standing Seam Steel arrived. I had also drawn up and ordered some custom steel trim. Of course, the metal fab shop couldn't follow the drawing, so that had to be remade. That was a pain in the rear....

102_1335.jpg

102_1339.jpg

102_1340.jpg

They were able to remake it in about a week and deliver it.

102_1370.jpg
 
OP
B

bimmer1980

Well-known member
Joined
Feb 5, 2009
Messages
2,104
Location
York, PA
Finally in Mid May, the 12th, of 2012, I was able to get started on the trim work.... I wanted to do this before the roofing material to lap all of the weatherproofing materials in a precise manner.....

If I were to do this again, I would proceed with the roof and detail it out slightly differently.... Regardless, here's how I works....

The trim is designed to have minimal exposed fasteners.. The J-channel provides the bottom attachment and room for soffit at a later time.

102_1377.jpg

102_1380.jpg

102_1383.jpg

102_1375.jpg

102_1384.jpg

102_1385.jpg
 
OP
B

bimmer1980

Well-known member
Joined
Feb 5, 2009
Messages
2,104
Location
York, PA
May 17, 18, and 19 of 2012. I was able to start installing the SSR on the west dormer of the garage.

Notice the detailing of the peel and stick underlayment and the synthetic underlayment for the rest of the roof. This stuff is designed for underneath SSR.

You can also see the layer of 2" polyiso insulation.

102_1390.jpg

102_1397.jpg

102_1402.jpg

102_1406.jpg

102_1407.jpg
 
OP
B

bimmer1980

Well-known member
Joined
Feb 5, 2009
Messages
2,104
Location
York, PA
End of May in thru June of 2012 I was focused on the roof and the myriad of details required to get that done.....

102_1449.jpg

102_1476.jpg

102_1481.jpg

102_1488.jpg

102_1493.jpg

102_1494.jpg

102_1496.jpg
 
OP
B

bimmer1980

Well-known member
Joined
Feb 5, 2009
Messages
2,104
Location
York, PA
Continuing the roof the weekend of 6/25 and 26 of 2012....

An older gentleman by the name of Albert was helping on the roof as well. He was a treat to work with. He has since passed away due to cancer, but I greatly enjoyed the time he was helping me!

The valleys were a bit of a challenge to hem. I ended up making a longer hemming tool to do the bend in one shot. The hemming tool I had originally purchased was only good for a straight hem.

102_1499.jpg

102_1501.jpg

102_1503.jpg

102_1505.jpg
 
OP
B

bimmer1980

Well-known member
Joined
Feb 5, 2009
Messages
2,104
Location
York, PA
Into Mid July of 2012. Making some more progress on the roof.

The valley pieces are challenging......

I also was painting the cut edges of each panel.....

The trim brake was handy throughout this roofing project....

Also notice the 6' x 8' window that I found on craigslist for $100. It provides a lot of light into the garage....

102_1634.jpg

102_1635.jpg

102_1636.jpg

102_1638.jpg

102_1639.jpg

102_1640.jpg
 

WhoWhatNow

Well-known member
Joined
Feb 22, 2011
Messages
1,886
Location
Collegeville, PA
Wow, this was so much work. Great job.

Unrelated question, what kind of hitch do you have on your E30? I just picked up a 91 coupe and want to add a hitch for my small 4 X 6 trailer.
 
OP
B

bimmer1980

Well-known member
Joined
Feb 5, 2009
Messages
2,104
Location
York, PA
Thanks guys.

I don't have a picture handy of the BMW E30 hitch. I ended up selling the car after some issues with passing PA inspections.... The hitch had two bolts that attached it to the aluminum bumper and a pad that attached to the bottom of the wheel well. It was on the car when I bought it used. Due to some cracking on the aluminum bumper, I took the steel hitch mount off, then used the aluminum MIG welder to add a doubler plate around the bolt area. I did that work in SD before I moved to PA.

Thanks for looking at the project!
 
OP
B

bimmer1980

Well-known member
Joined
Feb 5, 2009
Messages
2,104
Location
York, PA
Early August of 2011, I was working on installing the ridge cap. That was the worst part of the whole job.

From doing the first part of the garage roof, I figured out that the current "Chicken-Hooks" for the ladder did not allow for ease of working on the ridge.

In Early September of 2011, I worked on fabricating some new chicken hooks that give clearance for the ridge cap.

102_2791.jpg

102_2782.jpg

102_2784.jpg

102_2806.jpg

102_2808.jpg

102_2787.jpg

102_2810.jpg
 
OP
B

bimmer1980

Well-known member
Joined
Feb 5, 2009
Messages
2,104
Location
York, PA
I knew that I wanted a curved window for the front of the garage. In searching craiglist, I eventually found the right size for $40. Then I could work on framing in the opening and installing the window.

September 30, 2012.

Arch window framing.

I also pushed the window frame out a few inches to allow it to coincide with the future brickwork.

102_2869.jpg

102_2868.jpg

102_2871.jpg

102_2876.jpg

102_2880.jpg

102_2886.jpg
 
OP
B

bimmer1980

Well-known member
Joined
Feb 5, 2009
Messages
2,104
Location
York, PA
Next up is the preparation of the work on the Arch dormer..... I need to organize some of my pictures... then I will start posting on that work......
 
OP
B

bimmer1980

Well-known member
Joined
Feb 5, 2009
Messages
2,104
Location
York, PA
Thanks for checking in... I haven't posted in this thread for awhile... I need to get back to digging through my photos and posting.

Currently the Heat is "On" (it's a balmy 62 degrees inside) and I'm working on framing out my bathroom....
 

zanyad

ALLIANCE MEMBER
Joined
Apr 26, 2018
Messages
2,763
Location
NE Ohio
Impressive build. you left off in 2012 when you were working on the roof. Any updates to share?
 
To avoid these ads, REGISTER NOW!
Top Bottom