To avoid these ads, REGISTER NOW!

The Shop

one

Active member
Joined
Oct 12, 2011
Messages
26
Location
Canada
I'll cut right to the chase:

After many years of working out of friends garage's, wrenching for free in trade for shop time, and wrenching in my driveway i finally purchased a house with

a double garage. I'm in the middle of turning it into a shop, it will primarily be used for my addiction to motorsports, but will also provide some side job

cashola.

The garage is attached, 22' x 22' and was in pretty miserable condition when we moved in. I got the keys to the house on Sept 30th, and live in Canada so im

in a hurry to get it all insulated and sealed before winter really hits here.

First order of business was to clean the floor. It seems as it hasnt been swept in 10-15years. The concrete is spalling from all the salt used here, and isnt

very smooth. I'm on a pretty tight budget as i also have to furnish this place but im spending most my hard earned cash on this project. I decided to go with

Behr 2-part epoxy.

IMG_2763.jpg

IMG_2764.jpg

IMG_2765.jpg

IMG_2766.jpg

IMG_2767.jpg


The back wall of the garage is the only "finished" wall, i use that term looseley because its in horrible condition. And the electrical is in one word scary.

IMG_2773.jpg


After sweeping the garage and shop vac'ing it 3-4 times, i purchased a hose and behr degreaser and went at the floor again:

IMG_2778.jpg

IMG_2779.jpg

IMG_2780.jpg


This stuff works great, but its tonss of work.I spent about 3 hours scrubbing and managed to wear out the scrub brush, so i must be making some sort of

progress! The floor is now starting to look epoxy worthy!

IMG_2782.jpg

IMG_2783.jpg

IMG_2787.jpg


Many years of abuse left tons of stuff stuck on the floor even after scrubbing it like a mad man with the stiffest brissle brush i could find. So i resorted

to crawling around and picking at all the left over **** with a screwdriver:

IMG_2785.jpg

IMG_2786.jpg


I then called it a day and let the floor dry

IMG_2790.jpg


At this point its mid october and the weather is getting colder. Behr epoxy recommends to only apply if the surrounding temperature stays above 50f or 10c,

and mid oct in canada has us hitting 3-4c overnight. So i had to put the floor project on hold. Which *****, cause now im going to have to get it all dirty

again, and move some tools in there.

IMG_2792.jpg


There must have been serious humidity issues in here at one point as the whole roof taping has fallen off. That or it was an amature job. Either way, the

humidity levels seem great, it has a new roof, so i'm going to re-screw and re-tape/replace certain peices that look the worst.

IMG_2793.jpg

IMG_2794.jpg

IMG_2795.jpg


I turned my attention to insulating and heating so i can get the garage to a healthy 65-70f to epoxy the floor. This means tearing down that awful

drywall/insulation, and putting up vapour barrier everywhere along with new insulation. I also pulled down a peice of the roof in preparation for using the

ceiling space as storage. Turns out im not the first one wit this idea as theres already 3/4" plywood up there and a handy light with switch! Any suggestions on how to easily get stuff up/down and keep it sealed when not in use? An attic ladder comes to mind, but havnt really researched the idea yet.

IMG_2800.jpg

IMG_2801.jpg

IMG_2802.jpg

IMG_2803.jpg


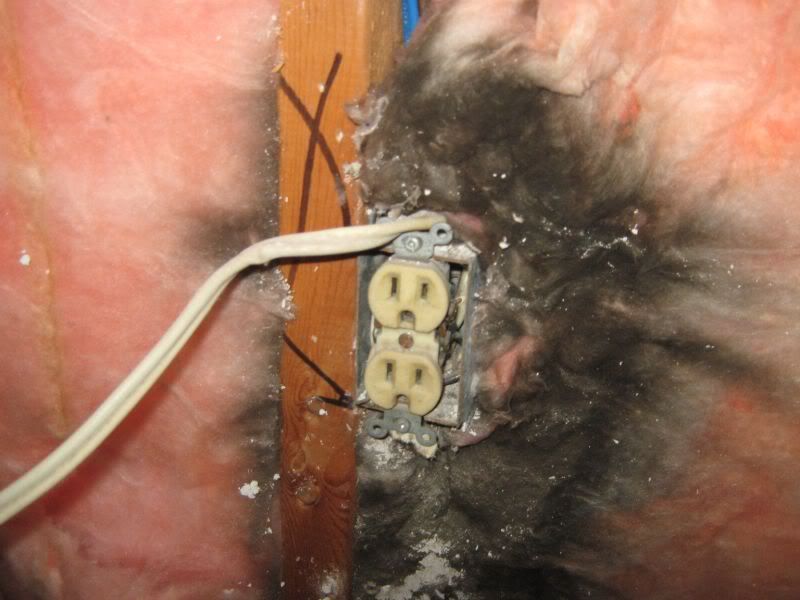
I think this looks worse then it actually is, the blackness is from the lack of sealed drywall. so any dirt CO ect from the cars gets right past the drywall and into the house. A big no no. Luckily theres a vapour barrier on the other side, that seems to have been doing its job. Either way i plan on taping and caulking the entire wall just to be safe.

IMG_2804.jpg

IMG_2805.jpg

IMG_2806.jpg


Next up was run the main power wire for my new 60amp sub panel. The plan is to get it up and running, wire all new circuits for lights/recepticals, add 220 for the welder, and then pull back all the existing ghettofab wiring.

IMG_2807.jpg


I drilled through to the basement and fed in the wire.

IMG_2809.jpg


Then drilled through the endless 2x6's to get to the panel .... on the opposite side of the house unfortunately.

IMG_2810.jpg

IMG_2811.jpg

IMG_2807.jpg


This process also gave me a chance to clean out all the left over dirt from a previous critters habitat. According to the neihbor there were chipmunks hiding out in the drop ceiling 2-3 winters ago. The issues have no been resolved. But wow, what a mess.

IMG_2812.jpg

IMG_2813.jpg

IMG_2815.jpg

IMG_2816.jpg

IMG_2817.jpg


The panel im tapping into. I had my good friend come over and scope everything out and make me a shopping list. He's a master electricion and says he can make room for the big breaker needed. I'm a noob to this stuff, so im glad he knows what hes doing!

IMG_2818.jpg


Thats about as far as im at now, next up is get my other buddie (its good to have friends in the trades!) to come pipe in my Mr. Heater NG infrared heater.

Shouldnt be too hard apparently. His plan is to T off before the NG bbq line and send a 1/2" copper NG line out towards the garage.

IMG_2821.jpg

IMG_2823.jpg


And a quick pic of the material, and my tires awaiting the finished shop so i can install them. They wont fit till i lift my 4runner.So im in a rush to get this shop done.

IMG_2822.jpg


I'm off to mount all my box's and subpanel...

I'll update the thread as i go, and comments suggestions are welcome!
 
To avoid these ads, REGISTER NOW!

Gme

New member
Joined
Oct 29, 2011
Messages
4
Location
Scotland
I know what its like with the floor.

When I moved house I had a window of 5 days to get the floor done. The other half was admittedly very understanding of me doing the work in the garage when we had just moved into out first house.

Would it not make sense to cover the floor just now to avoid oil contamination until you can epoxy it ?
 
OP
O

one

Active member
Joined
Oct 12, 2011
Messages
26
Location
Canada
Thanks for all the kind words, its definately keeping me motivated!
 
OP
O

one

Active member
Joined
Oct 12, 2011
Messages
26
Location
Canada
Its late, im a tad drunk but i feel the need to update my progress from today:

I mocked up the location of my sub panel and popped it in place. My plan is to run all the wires, leaving about 1-2ft after every box, then having my friend who knows what hes doing wire it.

The 60amp sub panel:
IMG_2826.jpg


Opened it up and had a friendly reminder that im not done paying for this... more money needs to be spent on breakers.... hurray.
IMG_2827.jpg


Figured this is a good spot for it, i play on a 2ft bench, with cabinets above it and want it accesible, so i figured this is a good spot.
IMG_2828.jpg


I snapped a few shots of my worn brush to reiterate how sad i am my floors now dirt again.
IMG_2830.jpg

IMG_2829.jpg


The floor products waiting to be used:
IMG_2825.jpg


light switch box in place, mounted higher so its easily used from inside the house prior to entering the garage. Something the previous electricien neglected to do:
IMG_2831.jpg


A quick shot of the heater, i had to throw the thing in place incase i con my buddy to come pipe it for me tomorow.
IMG_2832.jpg

IMG_2833.jpg


Started mounting the rest. I plan to have a drill press, bench grinder, radio, bar fridge, welder, and extra plugs all along the back wall. Please point out anything im missing, because at this point, another receptacle is peanuts.
IMG_2834.jpg


That back door is stealing bench space, but instead of getting rid of it, i plan on putting my welding cart infront of it. Dual purpose space.
IMG_2836.jpg


This will be the main bench work area.
IMG_2838.jpg


The left side of the door will be all bench, with cabinets above, the right side of the door will be a low 72" tool chest with a butcher block top, and i'm going to squeeze in the bar fridge beside it with abother small 2'x2' table.
IMG_2839.jpg


I plan on running all the wires tomorow (today? ... i should get some sleep). I spent the last bit of today cleanign out the attic space above the garage, and laying down some 3/4" plywood so i can use it as storage. Pics of that will come too, i forgot to haul the camera up there this time around.

Till next post!


I spent a few hours deciding the layout of my receptacles and switches. This was tough, it meant determing the final layout and bench heights ect. After a little searching on here i decided on a 38" bench height (im 6'3") and a 44" receptacle height (6" above bench top)
 

Dunc6666

Member
Joined
Feb 9, 2011
Messages
5
Location
Ottawa, Ontario
Gidday:

Nice progress. Feeling your panic. Just insulating our 12'x27' single car garage in Ottawa - father/son project on fathers garage. I'm the father. Need to freshen up an 86 Regal during the winter.

Does your NG heater require an exhaust?

Keep the pics coming, we're following with interest.

Dunc
 

Easterlake

Well-known member
Joined
Oct 16, 2011
Messages
89
Location
Des Moines, iowa
I love watching the process of people building their shops to their liking. Good luck, i'll be watching. Part of me is glad that my small shop is finished (not sure they are ever finished). On the other hand, I would love to start from scratch and go through the whole process again.
Kevin
 
OP
O

one

Active member
Joined
Oct 12, 2011
Messages
26
Location
Canada
Gidday:

Nice progress. Feeling your panic. Just insulating our 12'x27' single car garage in Ottawa - father/son project on fathers garage. I'm the father. Need to freshen up an 86 Regal during the winter.

Does your NG heater require an exhaust?

Keep the pics coming, we're following with interest.

Dunc

Nope the NG heater is "ventless" and requires the garage its in to have some leakage. My plan is not to seal the garage doors. I can see daylight through the sides so i'm thinking thats enough. Combined with the un-taped sealing and soffet vents, it should work quite well.

If you put a ventless heater in an air tight garage it will cause serious moisture issues. The by-products of a clean burning NG heater are CO2 and water. Hence moisture.

Glad to have so much interest. Its halloween and im stuck handing out candy. I wish i could be in the garage re-screwing the ceiling drywall right now. But such is life.
 

BRIANBB

Well-known member
Joined
Aug 27, 2010
Messages
394
Location
Katy Texas
Why not recess that panel into the studs? That way you wont have that box hanging out in the space.
 
OP
O

one

Active member
Joined
Oct 12, 2011
Messages
26
Location
Canada
Why not recess that panel into the studs? That way you wont have that box hanging out in the space.

I'd like to/plan on it if my electrician allows me too. I just mocked it up so that i can start pulling wires for him. I'm just alittle concerned about all the holes that would be needed to be drilled in the studs to fish the wires.

Anyone up to speed on something like that?


.... update

I'm currently rescrewing the drywall ceiling and mounting the light fixtures. My friend is coming to pipe in the heater tomorow while im at work. So hopefully i can get my floor rolled on this coming weekend. Woohoo!
 

ZRX61

Well-known member
Joined
Aug 15, 2006
Messages
28,716
Location
Solar Blight Valley, SoCal
I'd like to/plan on it if my electrician allows me too. I just mocked it up so that i can start pulling wires for him. I'm just alittle concerned about all the holes that would be needed to be drilled in the studs to fish the wires.

Anyone up to speed on something like that?

With mine we mounted the box flush, ran the wires up the inside of the wall (which is covered in T1-11 siding) & then ran the wires through conduit attached to the ceiling. The wiring drops are also in conduit screwed to the T1-11..
 
Last edited:
OP
O

one

Active member
Joined
Oct 12, 2011
Messages
26
Location
Canada
Ok well my friend was in the neihborhood picking up some winter tires off kijiji and stopped in to show me exactly what to do for wiring. And he even took 20 mins and wired up my main feed. I tried to re-screw the drywall but the stuff is stuck in the drooped positon and the screws just pull through the sheets. I'm brainstorming what to do about it. Any suggestions would be great! Anyways...

I did end up mounting the breaker panel flush :) Plan is to run everything into the panel/out of the panel from the top and bottom.

IMG_2841.jpg

IMG_2842.jpg


I had him loop the extra wire so i can move the panel if i even wanted to. When you spend 260 bucks on wire, it would be a big kick in the pants to have to buy it all over again to move it over a stud or 2.

IMG_2843.jpg

IMG_2844.jpg


He does very clean work. I'm super happy he's helping me out with this. Should make for a very clean garage.

IMG_2846.jpg

IMG_2847.jpg


Thats all for tonight, hopefully i'll have some pics of the NG heater install tomorow. Unfortunatly i wont be around while hes doing it to snap pics, so it'll just be before and afters. Either way, progress is fun to post :)

LAter
 

Algoma56

Well-known member
Joined
Apr 16, 2007
Messages
67
Location
Sault Ste. Marie, ON
As far as the drooping drywall, try a block of wood, and floor jack, bottle jack to push the drywall tight to the ceiling. Then put a couple of screws in. Work your way across the droop, and it should work out.
If the infrared heater doesn't work out, try Tractor Supply for the horizontal unit heaters. they are rated at 45K BTU, and will keep it warm. Also, they are power vented, so you don't require leakage in the building to make it safe.
 

NUTTSGT

Super Moderator
Staff member
Joined
Sep 14, 2009
Messages
50,866
Location
Northern Central Ohio
It's looking good so far.

Attic access.. . . Do you really want it above that heater ?

For a few of my access panels, I nailed some 1x4s flat along the ceiling to form a frame. Then I cut a sheet of plywood to fit in the "frame". An area as wide as the rafters and 3' long make a nice access. Screwing some foam sheets to the back of the plywood wil insulate it nicely. Just push the panel up inside the attic when you need to get in there.


EDIT, here's a smaller access I made in my dropped ceiling.

12202010a004.jpg
 
Last edited:
To avoid these ads, REGISTER NOW!
OP
O

one

Active member
Joined
Oct 12, 2011
Messages
26
Location
Canada
Update time:

I've been stuck at the office all week late working on this building going for permit tomorow. But my buddy managed to find some time to come pipe the heater tonight while i was at work. (garage door openers are handy!) This thing is amazing. Worth every penny spent. Plan is to finish pulling all the wiring this weekend and insulate and vapour barrier by sunday night. Wish me luck!

Pics doing the talking:

I came home to this :)

IMG_2849.jpg

IMG_2850.jpg


The attics open becase i tore down a moldy peice of drywall to gain access/clean up there. I plan on finishing the insulation (halfs done and sheeted with plywood) Then adding an attic door infront of the heater.

IMG_2851.jpg

IMG_2852.jpg


Some more trick work by my buddies. I think this is a super clean install. It'll all be insulated and sheeted.

IMG_2854.jpg

IMG_2855.jpg


He piped me a valve at the end of the line so i can be sure its off when i turn it off for extended periods of time, also for servicing and future possible upgrades to a power vented unit.

IMG_2856.jpg

IMG_2857.jpg


I was alittle worried about the beam being close, but it doesnt throw any heat sideways, so it stays cool to the touch. Worked out perfectly as the shut off for the unit heater's pilot is within reach from the doorway.

IMG_2858.jpg


A pic of this weekends project, lights, and wiring:

IMG_2859.jpg


The accumulation of stuff that all needs to find a new home in order to do the epoxy floor.... It really ***** moving in in the fall. Left me 0 time to get things done in the proper order.

IMG_2860.jpg

IMG_2860.jpg


Anyways enough ranting. More pics of the heater install:

The entrance into the basement from the garage:

IMG_2863.jpg

IMG_2864.jpg

IMG_2865.jpg

IMG_2866.jpg


Into the furnace room:

IMG_2867.jpg

IMG_2868.jpg


The fancy work again:

IMG_2869.jpg


Theres the furnace, then the T for the NG heater, complete with valve (code) then the NG bbq line, again with valve.

IMG_2870.jpg

IMG_2871.jpg

IMG_2872.jpg


Ok thats it for tonight, i gota get some sleep, probably another 12hr day tomorow!

Later.
 
OP
O

one

Active member
Joined
Oct 12, 2011
Messages
26
Location
Canada
Update time:


I ran most the wires for the panel. trying to keep things organized, and follow my buddie's instructions.

IMG_2873.jpg

IMG_2874.jpg


I cut more drywall down in preparation for the attic door. Lots of thought going into this one.
IMG_2876.jpg

IMG_2911.jpg

IMG_2912.jpg

Plan is to have a drop down ladder then a hinged access door (backed with insulation) that will latch open.

More wires, i left some slack in the wall incase i decide to drop these side outlets down closer to the floor. Any pro's cons to height? I'm sorta leaning towards dropping them so they are more accesable from under a car door ect while wiring. (soldering iron)

IMG_2878.jpg


IMG_2879.jpg

IMG_2880.jpg


I also picked up these off kijiji today. A sweet find, im really digging the colour and plan to pinstripe the wall to match, something i saw on here and really liked.

IMG_2918.jpg

IMG_2916.jpg


Plan is to hang em in this corner like this:

IMG_2919.jpg


Atleast thats the plan, it may change.

Supplies picked up to finish the back wall and insulate/vapour barrier.

IMG_2896.jpg

IMG_2899.jpg


I plan to fish the wires for the back wall through these "Custom Conduits". Reason being the topplate is hidden under the dividing wall in the attic. I want to beable to fish wire into the wall if needed, and both peices will be hidden.

IMG_2900.jpg

IMG_2901.jpg


IMG_2906.jpg


Plan is to finish the wiring tomorow and insulate/vapour barrier it. Then get the welder up and going so i can fab up some brackets for the cabinets. Hopefully have everything mounted by next weekend so i can get that elusive epoxy floor done.
 

Red Leader

Well-known member
Joined
May 15, 2011
Messages
2,688
Location
Denver, CO
This is looking great!

I like your pictures, they definitely tell a great story with your build.

Keep up the great work and keep taking pictures!

:thumbup:
 
OP
O

one

Active member
Joined
Oct 12, 2011
Messages
26
Location
Canada
Thanks for the encouragement. Its tough to impress with all the other amazing builds on the go on this site. I definately spend too much time drooling over other peoples garages!

Anyways onto the update:

I mounted my "conduit" and had some buddies help me fish the wires.

IMG_2922.jpg

IMG_2923.jpg

IMG_2924.jpg

IMG_2925.jpg

IMG_2926.jpg


The wiring is starting to take shape. Soon i can bug my buddy to come wire the panel.

IMG_2928.jpg

IMG_2929.jpg

IMG_2930.jpg

IMG_2931.jpg

IMG_2932.jpg


I guess a good tip for future builders... label your wires. I'm gona have to crawl around everywhere tugging wires to figure thigns out.

IMG_2933.jpg


After much planning i decided to move my attic access over a joist. This was a comprimise, as i wanted access to the attic with both cars parked in the garage, but it meant that the ladder/attic door would be right where i wanted to put a light. The light took priority, and the door moved over.

IMG_2935.jpg

IMG_2935.jpg

IMG_2936.jpg

IMG_2937.jpg

IMG_2938.jpg

IMG_2939.jpg


Lights going up:

IMG_2940.jpg

IMG_2941.jpg

IMG_2942.jpg


Thats pretty much wehre im at. I also threw up the 2 middle lights, but forgot to snap a few pics. Not a whole lot to see tho.

I'm hoping i can get the other 2 lights up, and insulate/drywall the back wall during my evenings this week. Then i can get my cabinets mounted :)

Later.
 

rickairmedic

Well-known member
Joined
May 31, 2005
Messages
4,165
Location
louisville ,Ky
One I will give you a little hand with chasing all those wires . Get yourself a multi meter that beeps on ohms . You can then take each wire at the end furthest from the panel and one at a time tie the hot and neutral " black and white " together then go back to the panel and check each wire till you find the set that beeps and mark it . Then move on to the next set . This will go quicker than pulling and tugging :D.


Rick
 

Larwyn

Well-known member
Joined
Oct 10, 2011
Messages
378
Location
Texas
One I will give you a little hand with chasing all those wires . Get yourself a multi meter that beeps on ohms . You can then take each wire at the end furthest from the panel and one at a time tie the hot and neutral " black and white " together then go back to the panel and check each wire till you find the set that beeps and mark it . Then move on to the next set . This will go quicker than pulling and tugging :D.


Rick

One trick I have used for sorting a large number of wires is to clip resistors of various values across the each pair. Then an ohm meter can be used to identify the far end of each pair. The far end of the cable should read within a few ohms (wire resistance) of the same value as the resistor on the other end. If you made a list of which value resistor you used at each destination you can then terminate the wires at the box in the location that you planed for that circuit. This method is no more accurate than shorting one end of each cable (one at a time) but could save a lot of steps, many of which could involve climbing ladders. :thumbup:
 
OP
O

one

Active member
Joined
Oct 12, 2011
Messages
26
Location
Canada
Ok well i havnt pinned down my buddy to finish the wiring yet, but i have made some progress..

Got some insulation in:

IMG_2946.jpg

IMG_2947.jpg

IMG_2948.jpg

IMG_2949.jpg

IMG_2951.jpg


Moved the panel down 2 inches to clear the new cabinets.

IMG_2952.jpg


Then threw up a few sheets where no more electrical/or work in general was needed to be done

IMG_2953.jpg


Dont mind my buddie's "Hat" its his dust mask that doubled as a headband. I thought it was funny lookin. He didnt seem to care.

IMG_2953.jpg

IMG_2954.jpg

IMG_2955.jpg

IMG_2958.jpg

IMG_2959.jpg

IMG_2960.jpg


Also scored a sweet new toolbox off kijiji. Original plan was to find a 72" wide bottom box and use it as workbench. That plan went out the window when this box popped up. I couldnt resist the deal.

IMG_2962.jpg

IMG_2963.jpg


Its an International 56" wide box, with top and side cabinet. Its in really nice shape, cant wait to bring all my tools home and fill this thing.

IMG_2964.jpg


I'm a tad nervous about having the box so close to the heater. I flicked it on tonight to test out the new insulation (more on that in a second) and it gets pretty warm being so close.

Any ideas? So far im torn between spacing the heater out 6-8" from the wall so it shoots further infront of the box, ORR possibly removing the top chest and building it into the bottom of the other work bench. The second option would be neat, but i loose use of the hinged top, and loose space under the bench for other odds and ends/knees while sitting working/welding.

IMG_2966.jpg


I cleaned it all out and flipped all the liners, feels like a brand new box to me!

IMG_2967.jpg

IMG_2965-1.jpg


Today i spent 3hrs at the home depot getting more supplies to build a work bench, relocate my hose bibb, and mount my cabinets. Then came home and threw up some vapour barrier one one finished wall. All this while being severly hung over.

IMG_2968.jpg

IMG_2969.jpg

IMG_2970.jpg

IMG_2971.jpg


Tomorow im going to scramble to mount 3 Cabinets in the morning, and clean up the garage. If all goes well, I'll get the wiring done, and drywall up and should beable to get the floor prepped. Wish me luck.
 
OP
O

one

Active member
Joined
Oct 12, 2011
Messages
26
Location
Canada
Ok still no wiring update... but still making progress:

Since the new toolbox ive decided to relocate/fix this hose bibb. It leaks as soon as the shut off in the basement is opened, so heres what i did:

IMG_2975.jpg


The murder scene:

IMG_2984.jpg


Decided it'd be nice to have the option of hot or cold in the garage. So i tapped into the hot/cold going to the slop sink on the other side of the back wall (slop sink is removed in this pic)

IMG_2976.jpg

IMG_2979.jpg


I can switch between the 2 here. Should be useful from time to time, and is much easier to deal with then re-running the old set up...

Cut the old gate valve off here, and because its a low point had to drain the whole house:

IMG_2986.jpg


Capped the Old T:

IMG_2987.jpg


Rest of the old non-freeze hose bibb

IMG_2988.jpg


New location of the hose:

IMG_2974.jpg

IMG_2983.jpg

IMG_2990.jpg


Reinstalling the slop sink:

IMG_2994.jpg

IMG_3003.jpg


All done:

IMG_2995.jpg

IMG_2996.jpg

IMG_2997.jpg


Took 10 mins to move this box up from behind the toolbox too, it'll be the new home of the exhaust fan dimmer/switch:

IMG_2997.jpg

IMG_2998.jpg


Thats about it for now. As you can see ive chosen to keep the box all together. Mounted the side cabinet today.

Plan to move the heater about 6" out from the wall:

IMG_3001.jpg


Hopefully i can get all the loose ends ******* before next weekend, the epoxy will have to wait yet again. At this rate i may not beable to do it if it snaps cold here. I'd hate to have to wait till spring. By then the shop will be full of **** and it will be a big pain to move everything to do the floor.
 
OP
O

one

Active member
Joined
Oct 12, 2011
Messages
26
Location
Canada
Ok, photobucket account went down and i havnt updated in awhile...

Pics:

IMG_3085-1.jpg

IMG_3086-1.jpg

IMG_3093.jpg

IMG_3094.jpg


220 wired

IMG_3096.jpg


IMG_3103.jpg

IMG_3104.jpg

IMG_3105.jpg

IMG_3106.jpg
 
OP
O

one

Active member
Joined
Oct 12, 2011
Messages
26
Location
Canada
IMG_3160.jpg


scored an old sewing table, plan is to turn it into a welding cart/table.
IMG_3161.jpg


Built a bench... Materials used:

-1 sheet of 3/4" plywood ripped in half by home depot ;)
-4 8ft 2x4's
-some 3" screws
-some wood glue
-a few lag bolts

IMG_3162-1.jpg

IMG_3163-1.jpg

IMG_3164-1.jpg

IMG_3165-1.jpg

IMG_3166-1.jpg

IMG_3167-1.jpg

IMG_3168-1.jpg
 
Last edited:
OP
O

one

Active member
Joined
Oct 12, 2011
Messages
26
Location
Canada
Winch waiting for the shop to be done so i can use that red thingy ma jig to install it.
IMG_3169-1.jpg


4" lag bolts all around
IMG_3170.jpg


Screwed the first layer down
IMG_3171-1.jpg

IMG_3173-1.jpg


Then wood glued the 2nd layer on... i put anyhting i had that was heavy on the bench. This thing is SOLID
IMG_3174-1.jpg

IMG_3175-1.jpg


I put the 2x4 on its side to gain the extra few inches, the 2 layers of plywood overhang 2.5" all the way around so that you can clamp things down.
IMG_3176-1.jpg

IMG_3177-1.jpg


I messed up the first attempt at the leg.... and figured the bench cant be TOO strong, so i added another support. Cut it just right and hit it in with a hammer so that it helps support the load.
IMG_3178-1.jpg

IMG_3179-1.jpg

IMG_3180-1.jpg

IMG_3181-1.jpg

IMG_3182-1.jpg

IMG_3183-1.jpg


The truck thats awaiting the winch.
http://img.photobucket.com/albums/v224/Mx3/IMG_3185-1.jpg

Let it dry overnight
IMG_3186-1.jpg
 
Last edited:
To avoid these ads, REGISTER NOW!
Top Bottom