To avoid these ads, REGISTER NOW!

The Snap-Off Puller Cabinet

Finky198

Well-known member
Joined
Feb 25, 2014
Messages
2,120
Location
North East
Sorry about the pic quality. I will update them when I have time...

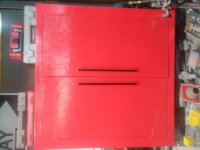
There nothing I like more than tools, but I hate spending money on storage.
My Ingenuity and cheapness get the best of me... My tool cart is a large file
cabinet that’s been customized and it’s worked out great.

So round 2... ding ding. The Snap-Off Puller Cabinet ;)

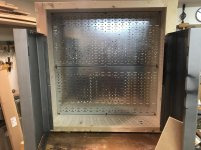
It started a few days ago when I found a 37 1/2” by 40” piece of steel peg board out on the steel pile, and it dawned on me that would be cool for all the pullers and press stuff. Of which are currently jammed in steel box. A true pain in the @$$ and I’d like the nice steel box back for something else... Its full of Snap on and other pullers. Hence the name of my new project...

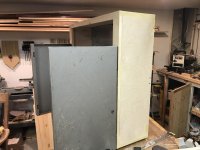
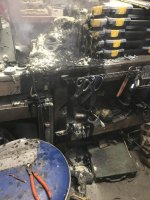
So I cleaned it up and painted it yesterday. Let It dry overnight and I thought I was good. Mount it up and be done...

66vmfr.jpg


and then this happened.
vrfs4y.jpg

ayac9h.jpg

21cb34h.jpg

2modvdw.jpg


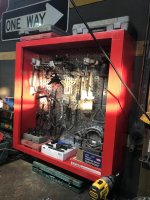
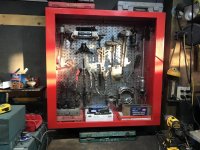
That was as far as I got tonight. The plan now is a set of doors with extra storage. Im going to use nuts and bolts instead of regular pegs. I think it’ll help with weight of the tools and all. Finally a light I have one I saved from another project that should be perfect...

The biggest problem is. I don’t know we’re I’m going to hang the monster... :D
 
Last edited:
To avoid these ads, REGISTER NOW!

gungatim

Well-known member
Joined
Jan 8, 2013
Messages
8,101
Location
west mich
sub'd. I need to do something similar. have all my pullers jammed in an old roller box that hardly opens, jams from the 3-jaws moving around, too heavy, etc.

can't wait to see it finished. the bolt/nut idea is good, I hate peg hooks. are you adding sliding t-hammers and strut compressors to it or just pullers? I may need to make a 2nd for all my c-clamps.

hurry up and finish, I'm dying to see it!!
 
OP
F

Finky198

Well-known member
Joined
Feb 25, 2014
Messages
2,120
Location
North East
Mostly pullers and installers and press stuff. The box it’s in now is 200+ pounds and i can barley close the lid. And I have to unpack it each time I need something So it’s definitely time, To clean it up...

The list of what I’d like to fit...

Bolt grip puller set, 2-3 slide hammers plus their attachments ( a ton ), 2 bearing splitters, Rear bearing pullers, 2 sets lg and sm bearing and seal installers . 5 ton hydraulic puller, 2 enerpac cylinders and pump, 5 or so 2-3 jaw pullers. A few Cross bars and other hardware.

But well just have to see how much room there is once I start to mock it up.
 
Last edited:
OP
F

Finky198

Well-known member
Joined
Feb 25, 2014
Messages
2,120
Location
North East
A little update. So I found some carrige bolts nuts and washer in the right size in the “stock room” and I started playing around, but the first order of business was to unload the box to see what and how I wanted it layed out. Not jammed like it was below....

2enb614.jpg


2dh8z0m.jpg


16jpson.jpg


2mhaemo.jpg


So begins the hard part... :eyecrazy: not really lol. It’s gone pretty smooth and while I’m not done. I have a lot of room to expand and it’ll be very easy to rearrange if necessary.

Here’s everything except the pump for the enerpacs which was also in the box...
1qsjnm.jpg


The first few pegs. And a close up.
w20e1e.jpg

64mftc.jpg
 
Last edited:
OP
F

Finky198

Well-known member
Joined
Feb 25, 2014
Messages
2,120
Location
North East
Unfortunately I’ve been a bit busy with leaf and shop cleanup...
I did manage to hang the cabinet and add a few more pegs...

Its much bigger than I anticipated, but it will offer plenty of additional space as we expand.
I decided against a shelf on the inside as I don’t want to waste the pegboard so,
The boxes on the left ( bolt grip puller, pwr str pullers, and bearing adapters) will sit on top...

More to come soon.

149zc0k.jpg


izccnb.jpg
 
Last edited:

gungatim

Well-known member
Joined
Jan 8, 2013
Messages
8,101
Location
west mich
well after after looking around town off and on for a month or so, I finally ended up ordering some steel pegboard off amazon. 2-18x36 pieces for $30 shipped...unfortunately red cost $10 more so I cheapened out and got the galvanized.

will be laying out this weekend then drawing up the cabinet plans and hopefully getting some nice birch plywood to build the carcass...

thanks for posting, can't wait to get started on mine!!

I may have some questions as I go if you don't mind, looks like you doubled up the top? how did you attach the pegboard to the sides/back?
 

Richard Cranium

Well-known member
Joined
Apr 22, 2011
Messages
18,552
Location
central Washington
I purchased a real snap on wall puller case with pullers last Jan. from an auto shop that was closing due to retirement.
Still have not taken the time to hang it yet.
 
OP
F

Finky198

Well-known member
Joined
Feb 25, 2014
Messages
2,120
Location
North East
Glad to hear I’ve incited some can do sprit...


Gungatim- any questions you have feel free to post. The sides/top/bottom are 1/2” ply wood with 2x top and bottom supports that run the full width 3/4” x 2 1/2”. The frame/cabinet is screwed together and the peg board is bolted to the ply wood on the sides. I clamped the lip of the peg board with the plywood where I wanted it and drilled and bolted Im pretty sure 3 per side. I should do the top and bottom as well just to stiffen up the whole build...

but I’m not done with it yet. I’ve just been busy with other things at the moment. The plan is for doors and more pullers of course.

I just picked up a snap on CJ84 B time to add some more pegs. :evil:
now I need to order some threaded rod for puller legs...
2vbx9uw.jpg

30lmk4m.jpg
 
Last edited:

gungatim

Well-known member
Joined
Jan 8, 2013
Messages
8,101
Location
west mich
Here's my layout so far. probably should put all the long compressors on top and the 2/3 jaw pullers on the bottom but just wanted to see what fits. I like how you doubled up the top so I can stack PS pulley set, split pullers, and other bushing drivers and things that are in plastic cases on top.

I have a pair of steel doors with hinges from that Sun diagnostic machine that I scrapped, these are the silver doors on the side of the computer cabinet. I think they will be the perfect size...kept them just in case I could use them for something like this!
 

Attachments

  • IMG_7767.jpg
    IMG_7767.jpg
    149.2 KB · Views: 98
To avoid these ads, REGISTER NOW!
OP
F

Finky198

Well-known member
Joined
Feb 25, 2014
Messages
2,120
Location
North East
Looks very good. I would suggest stacking some like items double deep as to fit more... The way I stacked the bearing splitters, rear axle bearing puller, and legs saved a lot of space. No need to go all out on space saving but something to keep in mind. As it expands.

Do you think you will add storage to the doors?
 

gungatim

Well-known member
Joined
Jan 8, 2013
Messages
8,101
Location
west mich
Some progress this morning. Not sure I'll keep the repurposed doirs or not
 

Attachments

  • IMG_7815.jpg
    IMG_7815.jpg
    139.3 KB · Views: 61
  • IMG_7816.jpg
    IMG_7816.jpg
    138.9 KB · Views: 62
  • IMG_7818.jpg
    IMG_7818.jpg
    142.2 KB · Views: 58
  • IMG_7817.jpg
    IMG_7817.jpg
    135.1 KB · Views: 54

gungatim

Well-known member
Joined
Jan 8, 2013
Messages
8,101
Location
west mich
got it mounted and filled over the weekend, I decided to save those doors for something else and just make some out of plywood. painted it rustoleum red...now I need to make a few more for hammers and C-clamps, maybe prybars too....gonna be busy this cold winter!

I did mount some double deep to save space, probably will play around with the organization a bit more.

btw, found out Menards actually carries the steel pegboard over in the closet and shelving section. it was about $4 more per sheet than Amazon, but doesn't have the slots and is more of a diamond plate style if anyone else is looking.

Thanks again for this great post! now I need to order me a big Snap-Off decal once the doors are on!
 

Attachments

  • IMG_8562.jpg
    IMG_8562.jpg
    146.2 KB · Views: 132
  • IMG_8561.jpg
    IMG_8561.jpg
    147.8 KB · Views: 128
  • IMG_8094.jpg
    IMG_8094.jpg
    129.4 KB · Views: 81

Coach James

Well-known member
Joined
Jun 24, 2005
Messages
8,932
Location
Sandhills of North Carolina
Glad to hear I’ve incited some can do sprit...


Gungatim- any questions you have feel free to post. The sides/top/bottom are 1/2” ply wood with 2x top and bottom supports that run the full width 3/4” x 2 1/2”. The frame/cabinet is screwed together and the peg board is bolted to the ply wood on the sides. I clamped the lip of the peg board with the plywood where I wanted it and drilled and bolted Im pretty sure 3 per side. I should do the top and bottom as well just to stiffen up the whole build...

but I’m not done with it yet. I’ve just been busy with other things at the moment. The plan is for doors and more pullers of course.

I just picked up a snap on CJ84 B time to add some more pegs. :evil:
now I need to order some threaded rod for puller legs...
2vbx9uw.jpg

30lmk4m.jpg


Does the peg board bolt to the back of the plywood frame or to the sides? From the pics, I can't tell.

Coach
 
OP
F

Finky198

Well-known member
Joined
Feb 25, 2014
Messages
2,120
Location
North East
The sides are 1/2 ply and its bolted to that... the ply wood is really the frame, and the runners (pic 4 ) top and bottom 2 each solid wood 3/4” 2-1/2” x 40” just offer additional support and bulk at the corners for proper fastening of the frame. At this point I only bolted the sides the next step will be to bolt the top and bottom as well and prep for some doors...
 
Last edited:

Coach James

Well-known member
Joined
Jun 24, 2005
Messages
8,932
Location
Sandhills of North Carolina
The sides are 1/2 ply and its bolted to that... the ply wood is really the frame, and the runners (pic 4 ) top and bottom 2 each solid wood 3/4” 2-1/2” x 40” just offer additional support and bulk at the corners for proper fastening of the frame. At this point I only bolted the sides the next step will be to bolt the top and bottom as well and prep for some doors...

Okay, I'm slow. How are you bolting the peg board to the sides unless it goes through the pegboard into the back of the plywood?

Coach
 
OP
F

Finky198

Well-known member
Joined
Feb 25, 2014
Messages
2,120
Location
North East
Correct!!! The peg board has about a 1” lip on the back side, Lol I clamped the lip and the ply together drilled and then bolted both together 3 on each side.
 

gungatim

Well-known member
Joined
Jan 8, 2013
Messages
8,101
Location
west mich
Almost lost my new cabinet yesterday. left a candle in a glass jar I forgot to blow out (like the smell of pine in the shop) and the glass must have cracked and leaked wax all over my newly filled HF storage containers. burnt 5 of them, part of the workbench, and destroyed my Heathkit Ham radio and power supply. fortunately the cabinet only suffered some minor plastic melted on it and smoke damage. pullers are OK, but the plastic case for my sheet metal dies melted.

thank god for the Kidde fire extinguisher recall, used one up. no pics of the fire, I walked out at noon opened the door saw the huge fireball and grabbed the extinguisher and put it out in like 5 seconds...

kids, be careful out there...cost me $90 to replace all the nuts and bolts in the containers. fortunately after cleaning up, the brand new dewalt drill in 2nd pic still works...

what a dumb thing to do.
 

Attachments

  • IMG_8668 (1).jpg
    IMG_8668 (1).jpg
    138.9 KB · Views: 101
  • IMG_8671.jpg
    IMG_8671.jpg
    143.7 KB · Views: 91

gungatim

Well-known member
Joined
Jan 8, 2013
Messages
8,101
Location
west mich
finally got around to installing the doors this weekend. still need to remove and paint but they turned out pretty good (except for one handle is upside down).

doors are cut from the sides of a bathroom vanity I found at the curb, handles were a 4/$1 at habitat...should have bought more, they are pretty nice.
 

Attachments

  • puller cabinet doors.jpg
    puller cabinet doors.jpg
    101.3 KB · Views: 50

gungatim

Well-known member
Joined
Jan 8, 2013
Messages
8,101
Location
west mich
Finally got around to painting the doors and fixing the offset handle (measure twice...duh).

need to order me a snap-on decal off the bay to stick on it still..
 

Attachments

  • puller cabinet finished.jpg
    puller cabinet finished.jpg
    80.5 KB · Views: 24
Last edited:
OP
F

Finky198

Well-known member
Joined
Feb 25, 2014
Messages
2,120
Location
North East
looking Sharp :beer:

cant wait to see more. :thumbup:

I have put mine on hold at the moment. As I bought a bunch of puller and body tools and im in the process of filling in the blanks before I reoganize it agian........:eyecrazy: in time. I looked at it last night before i left... :wtf:
 
To avoid these ads, REGISTER NOW!
Top Bottom