To avoid these ads, REGISTER NOW!

The Texas Sea Chest

rown4au

Active member
Joined
Nov 23, 2008
Messages
43
I have been lurking on here for a couple years now and posted a few questions here and there during my build but ifgured I would finally take thee plunge and post some of the pics and story of the rehash of my shop.

We moved to Texas around two years ago and came across this house listed on the net when I was searching for houses with 4+ car garages just for the hell of it. For better or worse I am (as my wife puts it) a confessed car ***** and between an offroad jeep, a hopped up mustang, and two daily drivers we needed more space than a "normal" family.

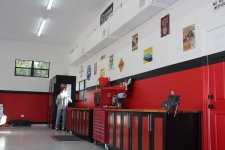
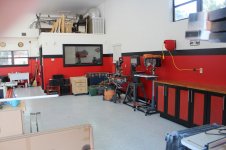
Anyway the previous Owner was a car nut as well and had built a 40 x 60 shop behind it and I immediately wanted to see the property. I wouldn't have cared if the actual house was a pup tent... The other half who was 5 months prego at this point was for some reason a bit pickier and took some convincing but we went to see the house just for the hell of it.

Anyway long story short we came to see the house, I fell in love with the shop and convinced the better half that this was the place for us and we moved in a few months later.

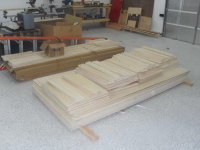
Shortly thereafter I started planning...
 
To avoid these ads, REGISTER NOW!
OP
R

rown4au

Active member
Joined
Nov 23, 2008
Messages
43
Unfortunately due to some camera and computer issues I have lost a few pictures along the proces but this was what the shop looked like before we moved in. Unfortunately the previous Owner had sold off the lift before we even came to see the property and he took the gladiator cabinets and quick air system he had installed with him as well.

So when we moved in we had a large white empty room with a few holes in the walls and not much else.
 

Attachments

  • shop before.jpg
    shop before.jpg
    19 KB · Views: 356
OP
R

rown4au

Active member
Joined
Nov 23, 2008
Messages
43
After a lot of thinking about it I decided to try to break the shop up into three general areas with customized cabinets with slide outs in each area.

My plans called for a set of cabinets for a detailing/cleaning area near the left door so they would be close to the hose connection outside, an oversized cabinet split into a compressor closet and a utility closet on the inside SE corner, two banks of cabinets for the general mechanical work against the back wall, and a final set of cabinets againt the westernmost wall for the woodshop area.
 
OP
R

rown4au

Active member
Joined
Nov 23, 2008
Messages
43
I decided to go with frameless cabinets from hardwood plywood pcket screwed together with my trusty kreg jig. I went back and forth a lot on what to do for doors but in the end I decided to do something different. I knew that I wanted to do black and red for the colors on the walls and cabinet carcasses and thought it would look cool to do a two tone rail and stile door for the cabinets.

I know this is overkill for a workshop but this was as much for enjoyment and to see if I could do it (I have never built a door like this or used a router table before) as it was for the utility.

So after doing some of the cutting my pile of parts started to grow.
 

Attachments

  • lumber at start.jpg
    lumber at start.jpg
    142.8 KB · Views: 89
OP
R

rown4au

Active member
Joined
Nov 23, 2008
Messages
43
I cut the compressor doghouse rails and stiles out of 3/4 " birch plywood as well thinking that the MDF I used for the smaller doors would be too heavy on the larger ones which turned out to be a mistake. I had to spend a fair bit of time filling in gaps with epoxy from the plywood on the cut edges and sanding them down after assembly and I think they would have been fine.

I also quickly found out that a door that large was way too flimsy in only 3/4" plywood so I made them into torsion box doors by ripping 1 1/2 inch stips of plywood and covering the backside with some of the 3mm plywood left over from the door panels. So my final doors are around 2 " thick but plenty strong now.

You can see some of the prestained and polyurethaned door panels drying in the back ground.
 

Attachments

  • compressor door parts.jpg
    compressor door parts.jpg
    142.8 KB · Views: 60
OP
R

rown4au

Active member
Joined
Nov 23, 2008
Messages
43
As I don't have experience in this and was figuring this out as I go I built a mock up of one of the smaller doors to make sure the mdf rails and stiles would be strong enough with only the glue joints holding it together. I also wanted to see how it would look with the prestained red panel and black rails and stiles to see if I liked it.

Pls excuse the dodgy phone pic...:)
 

Attachments

  • door mock up.jpg
    door mock up.jpg
    143.5 KB · Views: 78
OP
R

rown4au

Active member
Joined
Nov 23, 2008
Messages
43
I work pretty long hours and have a young daughter that I have been trying to spend time with so the project was put on the back burner sometimes for weeks at a time and I would just grab an hour here or there but eventually cabinet carcasses started to populate the shop.
 

Attachments

  • carcasses and a few pull outs.jpg
    carcasses and a few pull outs.jpg
    133.5 KB · Views: 53
  • cabinet carcasses 3.jpg
    cabinet carcasses 3.jpg
    133.8 KB · Views: 50
  • cabinet carcass 2.jpg
    cabinet carcass 2.jpg
    146.2 KB · Views: 46
OP
R

rown4au

Active member
Joined
Nov 23, 2008
Messages
43
lots of priming... note to self do this before assembly next time!
 

Attachments

  • ready for primer.jpg
    ready for primer.jpg
    133.4 KB · Views: 47
  • primed carcasses and pull outs.jpg
    primed carcasses and pull outs.jpg
    131.5 KB · Views: 52
OP
R

rown4au

Active member
Joined
Nov 23, 2008
Messages
43
I learned my lesson though and pre primed rails the and stiles (except for the glue surfaces) to make it easier and less likely to screw up the floating red panels during assembly. I also took the advice of a member here and gave the routed edges of the MDF a coat of water and wood glue mixture to seal the mdf to avoid the paint soaking in and getting that "fuzzy" look.

After the doors were fully assembled I routed the edge of each door with a round over bit to knock the edges off and then repeated the sealing and priming process.

FWIW, if I was to do it over again I would have done either another coat of water/glue mix or primer as well because I was still battling this but to a lesser extent in some cases.
 

Attachments

  • primed doors.jpg
    primed doors.jpg
    131.4 KB · Views: 51
OP
R

rown4au

Active member
Joined
Nov 23, 2008
Messages
43
After the priming was done I sanded everything down and fired up my harbor freight HVLP gun and went to town spraying the inside of all the cabinets light grey. I figured I could make my mistakes there before I tried shooting the doors. I was pretty impressed by the gun for $20 but to be fair I don't have anything to compare it to either...

Pics lost as camera died around this point of the project...:mad:
 
OP
R

rown4au

Active member
Joined
Nov 23, 2008
Messages
43
While I was in the process of shooting the cabinet doors black, assembling cabinets on toe kick boxes and installing them and in order to just save some time I had a contractor paint the walls for me while I installed the ikea butcher block tops and seal them with 3 coats of Waterlox on each side.

The painting is the only thing I didn't do myself but it would have taken me at least 3 -4 full weekends and the investment was worth it as it kept the peace at home.

I spent some time over Christmas with my Dad hanging the signs I have been collecting over the last two years and this is the fnished (for now) product.
 

Attachments

  • cabinet pull outs.jpg
    cabinet pull outs.jpg
    139.4 KB · Views: 132
  • cabinet door closeup.jpg
    cabinet door closeup.jpg
    138.6 KB · Views: 95
  • bank of shop cabinets.jpg
    bank of shop cabinets.jpg
    144.6 KB · Views: 116
OP
R

rown4au

Active member
Joined
Nov 23, 2008
Messages
43
View of the back wall of the shop and one looking in with the mustangs in their new home.
 

Attachments

  • shop back wall.jpg
    shop back wall.jpg
    132 KB · Views: 216
  • ponys in the shop.jpg
    ponys in the shop.jpg
    140.4 KB · Views: 275
OP
R

rown4au

Active member
Joined
Nov 23, 2008
Messages
43
View of the woodshop area. Another thing I learned is that if I ever build my own shop from scratch this will be a separate room. Sawdust is always everywhere if I use the table saw.

I did a bit of reserch on curtain walls as a possible solution but they are pretty expensive and not sure it would work on the dust issue anyway. If anyone has firsthand experience on this I would like to hear about it.
 

Attachments

  • woodshop1.jpg
    woodshop1.jpg
    139.9 KB · Views: 182
  • woodshop2.jpg
    woodshop2.jpg
    145.4 KB · Views: 179
OP
R

rown4au

Active member
Joined
Nov 23, 2008
Messages
43
Compressor and utility closet. I overbuilt the compressor side as I figure at some point I may want to upgrade to a larger compressor... and I thought my 5 hp one was probably overkill at the time. :eek7:

I think I also should have built another utility cabinet this size as I am finding I am already out of room on that side but I have a few other ideas before I start building another set of those doors!:lol_hitti

One of the outstanding projects is to install airlines throughout the shop. I am figuring on doing 1/2 inch copper for this when I get around to it but for now its just an open door to the doghouse and an air hose. In some respects I would love to be able to do the quick air system but I am not sure it will be sufficient for a few of the long runs I will need to make (circa 50-75 feet)
 

Attachments

  • compressor closet open.jpg
    compressor closet open.jpg
    141.5 KB · Views: 128
  • compressor closet.jpg
    compressor closet.jpg
    137.6 KB · Views: 100
OP
R

rown4au

Active member
Joined
Nov 23, 2008
Messages
43
Pic looking out, with the detail station by the door and the Jeep waiting to come back in.
 

Attachments

  • shop looking out.jpg
    shop looking out.jpg
    141.3 KB · Views: 115
OP
R

rown4au

Active member
Joined
Nov 23, 2008
Messages
43
Now I know there are those that will give me grief for it being too pretty and that's fine as i know some of this is overkill but for me it was as much about figuring some of this out and doing it myself as it was about the finished product.

That said, I do intend to use it as a working shop but unfortunately my skills are not to the level of a lot of the members here at this point so an engine rebuild is not in my immediate future.(yet) I do some of the basic mechnicals already on our vehicles, brakes, fluid changes, belts, etc and I am generally not too shy about trying something new. For me this is as much a get away/refuge as anything else, the only down side is my mobile phone does get signal there.:rolleyes:

Oh and for the record I am starting my daughter off early in the shop... she loves the place.
 

Attachments

  • Haley helping Dad 1.jpg
    Haley helping Dad 1.jpg
    139.2 KB · Views: 65
  • dads garage sign.jpg
    dads garage sign.jpg
    132.8 KB · Views: 65
To avoid these ads, REGISTER NOW!

machine_punk

Well-known member
Joined
May 14, 2011
Messages
2,540
Location
Napa Valley, California
Nice looking garage and great job on the cabinets. I agree about the table saw and woodworking...dust EVERYWHERE. I'm not sure there is an answer, other than pull the cars out while you cut wood, then clean up and pull them back in (and keep everything you can behind doors, which you are doing).

Looks like a fabulous place to work on your projects.
 

ed_v

Well-known member
Joined
Sep 15, 2007
Messages
1,418
Location
Kentucky
Fantastic job. Your cabinets and doors came out great. How tall of walls do you have in there? Do you plan on a lift?

Ed
 

On Edge

Well-known member
Joined
Jan 25, 2005
Messages
110
Location
Cincinnati, OH
Wow your garage is awesome! What is the overall dimensions of that place? I have a similar theme in my garage with the red and black cabinets. I need to see some more details on your SN95 cobra. Here are a few pics of my place to show you we have the same paint theme.

P1270145.jpg

PA070116.jpg
 
OP
R

rown4au

Active member
Joined
Nov 23, 2008
Messages
43
Fantastic job. Your cabinets and doors came out great. How tall of walls do you have in there? Do you plan on a lift?

Ed


Thanks, the ceiling height is about 13 feet. I would like to put a rotary two post in sometime in the future but not sure when yet.
 
OP
R

rown4au

Active member
Joined
Nov 23, 2008
Messages
43
Wow your garage is awesome! What is the overall dimensions of that place? I have a similar theme in my garage with the red and black cabinets. I need to see some more details on your SN95 cobra. Here are a few pics of my place to show you we have the same paint theme.
Nice! Did you build the large cabinets or repaint ones sourced elsewhere? I am thinking about picking up a metals cabinet for flammables at some point in the near future.

The NS95 is a 98 Cobra that I picked up in Sept from a guy in South Carolina that was racing it in the NASA American Iron series. It has the full Maximum motorsports setup, a rebuilt 4.6 with beefier internals, upgraded radiator, roll and a stripped out interior and roll cage. I use if for HPDE events only as I didn't want to risk balling up the red one. Its a lot of fun and despite it being very loud my daughter seems to like it a lot as well, she gets very excited whenever I start it up and always wants to be involved if I work on it at all.

The silver fox looks pretty nice what is the story there?
 

Attachments

  • Haley supervising 1.jpg
    Haley supervising 1.jpg
    141.5 KB · Views: 45

flybefree

Well-known member
Joined
May 18, 2008
Messages
1,111
Location
Ohio/Kentucky
Wow...that is great to find a house with a cool garage just waiting for you. Great job on the cabinets...your place looks great.

Shaun
 

Nighttrain

Well-known member
Joined
Aug 6, 2009
Messages
2,682
Location
Dripping Springs, Tx
Very nice job on the cabinets. If you are going to keep all the wood tools in place you may want to look into a good dust collector system. Attached up right it should help eliminate 90% of the dust. I have mine about there, just need a new table saw with a better cabinet to get all the dust. (see my build) it has the dust collection in it.
 

On Edge

Well-known member
Joined
Jan 25, 2005
Messages
110
Location
Cincinnati, OH
I built the cabinets out of 2x4 and made the frame and doors out of mdf. I house the kids toys, my table and miter saw and yard tools.

I really like your 98 Cobra. I bought a 98 Black Cobra new back in 98 and I do miss that car. I'd like to do some road racing and autocrossing with my 92 coupe. I bought it sight unseen in October and it needs way more work than I thought. I did get an ok price on it so that is the only plus. So I will restore it over the next few years.

You may want to get a portable/mobile dust collector to hook up on when you are using the woodworking tools. You've got my dream setup there. Very nice place you have there.


OP
R

rown4au

Active member
Joined
Nov 23, 2008
Messages
43
Love it! I just sent this to my future wife since we are buying a house in September and I'm a lot like you...

I am lucky enough to have a very understanding wife, I am in trouble if she ever realizes how much better she probably could have done than me!:beer:
 
OP
R

rown4au

Active member
Joined
Nov 23, 2008
Messages
43
Very nice job on the cabinets. If you are going to keep all the wood tools in place you may want to look into a good dust collector system. Attached up right it should help eliminate 90% of the dust. I have mine about there, just need a new table saw with a better cabinet to get all the dust. (see my build) it has the dust collection in it.

Thanks for the compliment, a dust collection system is definitely on my list. I upgraded to a jet 10"contractor saw before starting this project and it made a world of difference over my crummy previous one. One thing I learned pretty early on though is the factory blade is pretty crummy it came with. I couldn't figure out why I couldn't get a straight cut out of the saw until a clerk at a woodworking store suggested I change the blade. I was absolutely shocked at the difference, it is was a night and day difference.

I think we traded posts on one of my previsou threads asking questions on something as I remember your screen name, great shop by the way!
 

colt zantop

Well-known member
Joined
Apr 20, 2006
Messages
5,422
Location
michigan
wow! awesome shop! that right there looks to be about the perfect size! I really like the cabinets also...the red and black theme looks sharp.
 
OP
R

rown4au

Active member
Joined
Nov 23, 2008
Messages
43
I built the cabinets out of 2x4 and made the frame and doors out of mdf. I house the kids toys, my table and miter saw and yard tools.

I really like your 98 Cobra. I bought a 98 Black Cobra new back in 98 and I do miss that car. I'd like to do some road racing and autocrossing with my 92 coupe. I bought it sight unseen in October and it needs way more work than I thought. I did get an ok price on it so that is the only plus. So I will restore it over the next few years.

You may want to get a portable/mobile dust collector to hook up on when you are using the woodworking tools. You've got my dream setup there. Very nice place you have there.

Thanks, I am learning that the shop is kind of like a project car in that its never really done. I still need to build a wood rack for sheet goods as they are taking up way too much real estate at the moment, sort out my airlines, and probably pick up a flammables cabinet and paint it to match. But there are about another 50 other ideas I have running around in my head for it as well, and then you get 50 more when you read someone else's thread.

I have a soft spot for the early 90's fox bodies, particularly the LX's as they were what I always wanted when I was in high school but could never afford. I traded emails with a number of Owners of fox body track cars that were for sale but never found quite the right one so ended up with the 98 cobra.
 
OP
R

rown4au

Active member
Joined
Nov 23, 2008
Messages
43
wow! awesome shop! that right there looks to be about the perfect size! I really like the cabinets also...the red and black theme looks sharp.

Thanks I found out rather quickly however that gloss black gets dusty pretty quick... yet another vote for the dust collection system...:lol_hitti
 
To avoid these ads, REGISTER NOW!
Top Bottom