To avoid these ads, REGISTER NOW!

Between 265 & 485 SQ/FT The Time Machine: Rebuilding a PNW 1.5 car garage from 1946

Workspaces sized between 265 and 485 squarefeet.
To avoid these ads, REGISTER NOW!

larry4406

Well-known member
Joined
Jan 27, 2006
Messages
20,224
Location
Northern Virginia
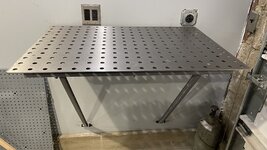
Nice folding fab table! Is that one of the Harbor Freight units?

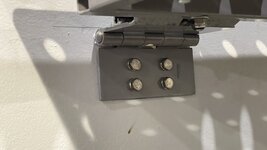
Coffee has not kicked in yet, and I am having trouble understanding the bottom wall mount hinge. Looks like parts of gate hinge.

How do the prop rod legs store when table is folded down?

1762600316841.jpeg
 
OP
T

Tim_with_a_T

Well-known member
Joined
Dec 30, 2013
Messages
215
Location
Vancouver, WA
Nice folding fab table! Is that one of the Harbor Freight units?

Coffee has not kicked in yet, and I am having trouble understanding the bottom wall mount hinge. Looks like parts of gate hinge.

How do the prop rod legs store when table is folded down?

1762600316841.jpeg

Correct- Harbor Freight.

Basically I turned left gate hinge into what you see on the right of your image by drilling out the pin- I didn’t know they made them that way already LOL

It’s likely the rods will store horizontally resting on top of the table hinges as they stick out from the wall a couple inches. The rods are long enough I wouldn’t be able to fold them into the table, so a few minutes of setup will be needed.
Nice table. Are you going to keep the bolts at the bottom, or change them to pins so you can fold it down?

See the last response ^ . It only takes a minute to lift up the table and slide in the rods. I feel having them longer makes it easier to set up than shorter ones. The way the table base is designed from Harbor Freight made it easy to do what I did, but if you wanted to fold up the legs, you’d probably need to redesign the table base as well. I was looking for something I could use with minimal effort. Other than the welding, cutting the steel straps, and drilling holes, everything else was hardware store bought or something laying around, in an effort to save time more so than money.
 
OP
T

Tim_with_a_T

Well-known member
Joined
Dec 30, 2013
Messages
215
Location
Vancouver, WA
One thing to elaborate on, I haven’t figured out all the work spaces yet, but the thought I had was, a couple of the fold down work spaces could share the same prop rods, that way I only have to make a pair of them. Whether or not that’s what happens is to be determined lol.
 

FullRaceMerc

Well-known member
Joined
Jan 9, 2015
Messages
3,907
Location
SoCal (SGV)
Very nicely done. Looks fantastic.

The rods are long enough I wouldn’t be able to fold them into the table, so a few minutes of setup will be needed.

if you wanted to fold up the legs, you’d probably need to redesign the table base as well
Years ago I built a folding workbench for my garage. The legs were too long to easily fold under if the top was hinged down, so the top was made to fold up instead. The hinged legs just hung there. With a 2x4 on the wall to space out the hinges & give everything room to turn, it would stay in place while folded up, but I still used a homemade turn button to latch it there..
 
OP
T

Tim_with_a_T

Well-known member
Joined
Dec 30, 2013
Messages
215
Location
Vancouver, WA
Very nicely done. Looks fantastic.


Years ago I built a folding workbench for my garage. The legs were too long to easily fold under if the top was hinged down, so the top was made to fold up instead. The hinged legs just hung there. With a 2x4 on the wall to space out the hinges & give everything room to turn, it would stay in place while folded up, but I still used a homemade turn button to latch it there..


I considered that as well, but in this area I’m planning some pegboard for tool storage, so I need the table to fold down. Good idea though!
 

Thisistimm

Well-known member
Joined
Jun 3, 2021
Messages
60
Jeez that’s a lot of welding to make that I beam lol. Looks good though.

When you make your metal back splash to protect from welding make sure to curve the corners in deco form, engine turn the entire thing and lay a nice border with brushed enamel to keep up the vibe ;)

Kidding but in a do it do it! Kinda way lol
 
OP
T

Tim_with_a_T

Well-known member
Joined
Dec 30, 2013
Messages
215
Location
Vancouver, WA
Jeez that’s a lot of welding to make that I beam lol. Looks good though.

When you make your metal back splash to protect from welding make sure to curve the corners in deco form, engine turn the entire thing and lay a nice border with brushed enamel to keep up the vibe ;)

Kidding but in a do it do it! Kinda way lol
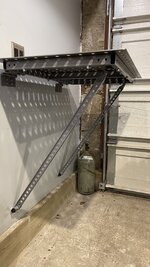

You’re in my brain again
 
To avoid these ads, REGISTER NOW!

Ruffgeezer

Well-known member
Joined
Jun 16, 2012
Messages
214
Location
Lincolnshire, UK
Read this from start to finish today, can I say I hope the shoulder has improved and the redundancy was short lived - I had similar a few years back but was lucky enough to find work fairly promptly.

I do like your 90% rule, perhaps something I can aspire to rather than "f**k it, that'll have to do."
 
OP
T

Tim_with_a_T

Well-known member
Joined
Dec 30, 2013
Messages
215
Location
Vancouver, WA
Read this from start to finish today, can I say I hope the shoulder has improved and the redundancy was short lived - I had similar a few years back but was lucky enough to find work fairly promptly.

I do like your 90% rule, perhaps something I can aspire to rather than "f**k it, that'll have to do."

Thank you - I ended up having a torn labrum in my shoulder, but by the time I had an MRI/got it diagnosed, it was "fine", so I'm just gonna live with it. It hasn't been bothering me too much, so that's good news.
 
OP
T

Tim_with_a_T

Well-known member
Joined
Dec 30, 2013
Messages
215
Location
Vancouver, WA
I keep finding myself stuck in a loop figuring out what’s next- no matter what, I’m missing at least one critical tool station for each project. For example- shelves- ideally I’d have the welding station set up and the table saw set up. I have one of them, but not both. Same goes for workbench, peninsula, etc. I’m slowly figuring out a method though.

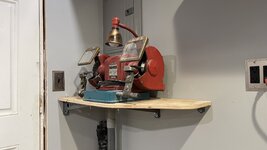
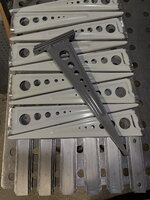
I want a shelf system that complements the jointer table, without the labor of making everything. I can’t get away from all the labor, but I’ve been evaluating shortcuts. One day, I was looking at shelving in Lowe’s and saw these ClosetMaid brackets. I like the stamped shape they have, and figured I could make something work using them as a starting point. So, I bought a couple in each size to take home and scheme.

Fast forward to today, and I forced myself to figure it out. Now that I have proof of concept and templates, I can build the remaining 12” brackets relatively easily. Maybe a full weekend type project. Welding them to the art deco stacked strap is a bit of a challenge due to the different thicknesses, but I’ll get better at that as time goes. The top hole/fastener will be covered by the shelf itself, and the bottom one will be visible.

IMG_3298.jpegIMG_3301.jpegIMG_3302.jpegIMG_3303.jpegIMG_3304.jpegIMG_3305.jpeg
 

Thisistimm

Well-known member
Joined
Jun 3, 2021
Messages
60
I think it’s less of a having time to make the garage which you make projects in be fancy and it’s more the garage is the project.

Still, it’s hard to find time to do much of anything some times.

While completely ridiculous and nothing you have ever seen in a real shop from the era it’s these little details that will make the entire space feel cohesive and special to people who get a chance to wander around it.
 
OP
T

Tim_with_a_T

Well-known member
Joined
Dec 30, 2013
Messages
215
Location
Vancouver, WA
Nice looking brackets. I remember when I had that kind of time. Yeah, kind of jealous.

I think it’s less of a having time to make the garage which you make projects in be fancy and it’s more the garage is the project.

Still, it’s hard to find time to do much of anything some times.

While completely ridiculous and nothing you have ever seen in a real shop from the era it’s these little details that will make the entire space feel cohesive and special to people who get a chance to wander around it.

Thank you - it's like Timm says - the garage is the project being worked on right now, so I ignore everything else falling apart in my life and needing attention until the garage is done or I get too burnt out to keep working on it lol - or something falls apart bad enough I need to stop working on the garage and go fix that something. For the most part, when I set aside time to make something, I try to make it good enough I'm not coming back later (90% rule). For things like the garage, it will be a creative space, so I want to feel inspired when I'm in here.

This stint of unemployment has been a double edged sword - I have time to catch up on projects, but funding them is ambiguous as I'm not sure how long I'll be without work. Getting the T on the road was a MASSIVE win. If I could get the garage pretty much wrapped up before I'm back to work as well, that would also be fantastic. I just need to stay motivated, keep my body healthy, put my head down and turn the music up until it's done lol.
 
OP
T

Tim_with_a_T

Well-known member
Joined
Dec 30, 2013
Messages
215
Location
Vancouver, WA
Let’s see what kind of jig you came
Up with to have those all the same.

For the stamped shelf brackets, after I had the first measured/marked/drilled, I used it as a template by clamping the remaining brackets to the template, drilling through them by using the template as a guide.

For the bases, I just cut them all the same size, marked/drilled/plug welded from the back using some magnets to line them up, then marked/drilled the mounting holes through.
 
OP
T

Tim_with_a_T

Well-known member
Joined
Dec 30, 2013
Messages
215
Location
Vancouver, WA
To avoid these ads, REGISTER NOW!
Top Bottom