To avoid these ads, REGISTER NOW!

the tool shed in oregon

octane33

Member
Joined
Jul 30, 2014
Messages
23
Location
Roseburg Oregon
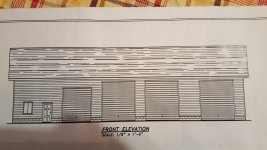
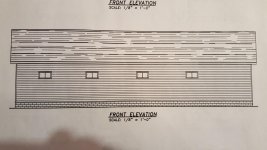
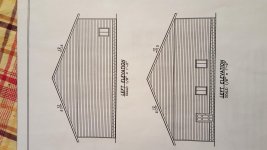
I have been wanting to build this for a long time and now its happening. The build is 50 x 84 x 16 stick built shed with 16' attic. The process of getting permits is Not a very fun task. After a couple months at the engineer then a few weeks waiting on fish and wild life, oh ya there is some bird somewhere in a 5 mile radius that they had to make sure I would not disturb, it went to building dept to get approved. Three weeks and a couple thousand dollars later I was on my way. Naturally I didn't wait tell I had my permits to start the dirt work. January will be a year since I started this project and I figure I would start sharing my story and process. In the next few days I will get my photos that I have.
 

Attachments

  • 20141010_091454.jpg
    20141010_091454.jpg
    149.3 KB · Views: 176
To avoid these ads, REGISTER NOW!
OP
O

octane33

Member
Joined
Jul 30, 2014
Messages
23
Location
Roseburg Oregon
Here are the engineered plans.
 

Attachments

  • 20151123_063048.jpg
    20151123_063048.jpg
    132.5 KB · Views: 112
  • 20151123_063039.jpg
    20151123_063039.jpg
    149.6 KB · Views: 87
  • 20151123_063107.jpg
    20151123_063107.jpg
    146.7 KB · Views: 75
  • 20151123_063119.jpg
    20151123_063119.jpg
    146.9 KB · Views: 77
OP
O

octane33

Member
Joined
Jul 30, 2014
Messages
23
Location
Roseburg Oregon
So as I was doing some prep work for the upcoming build I kept noticing water in a hole that had been occupied once by a stump. Did some digging and found a bunch of water and of course its the back corner of my shop. So now it was time to fix the problem, so I dug a big ditch. Things like this doing it yourself ( with some help from the wife) why it takes sooo long to build stuff. The ditch ended up being about 150' long and about 6 foot deep to
start with.

At the end of the ditch there is no way to keep the fall I needed and go out to the road so I built a collection base and put a pump in it.

The ditch was dug and I put fabric down first, then a layer of washed rock, followed by the perf pipe and a very deep layer of rock after that. It was wrapped like a burrito and then filled back in. When doing this I could watch the water coming out of the side of the trench. In the end it worked very well and pumps like it should.
 

drivesitfar

Well-known member
Joined
Oct 23, 2013
Messages
36,034
Location
Pacific Northwest
Oct: i hear you about the building permit process and looking forward to and NOT looking forward to doing the process for my own shop. I Was a Realtor for builders and developers for almost 30 years so i have some idea of the painful and expensive process.

Id love to see you build that big shop or as you call it a shed so happy to help or just watch as you post pictures. Was the water a small spring or just a low spot where water collected?

Good luck;) ;)
 

Richard Cranium

Well-known member
Joined
Apr 22, 2011
Messages
18,552
Location
central Washington
Welcome to the group, I have only been in Roseburg once, I used to have a friend that worked for Sears who got transferred there, So While I was on vacation, I stopped by the store there to only find out he was on vacation in Yakima, Wa. where is only 4 miles from my house. So we made the best of it and went to the wild animal park there. Richie D.
 
OP
O

octane33

Member
Joined
Jul 30, 2014
Messages
23
Location
Roseburg Oregon
drivesitfar: I believe its just collection from being a low spot. I did dig the trench along the side and the back of the shop to make sure I was collecting all the water I could from entering the foundation area.
 
OP
O

octane33

Member
Joined
Jul 30, 2014
Messages
23
Location
Roseburg Oregon
Richard Cranium, the park is pretty fun. We try to take the kids every couple of months or so. Oh and I wish we still had a Sears in town, they closed it.
 

drivesitfar

Well-known member
Joined
Oct 23, 2013
Messages
36,034
Location
Pacific Northwest
Octane: you might want to put a metal or plastic lid on your plastic barrel that the pump is in because the plywood one will rot eventually. i tend to plan for 10, 20 and more years now when doing something because it seemed like so far down the road a few years ago and now i've been in my house over 25 years and having to re do a few things i thought i'd never have to 20 years ago.

also because those little pumps might need servicing or replacing and it would be easier to do without a bunch of rocks or dirt in with it.

looking forward to your build and ask questions if you have any and we'll try to help if we see them and can.

good luck
 
OP
O

octane33

Member
Joined
Jul 30, 2014
Messages
23
Location
Roseburg Oregon
copy on the lid for service, after I get this thing done I really don't want to work on anything for a long while. Good thing I haven't put dirt over that yet, not really sure what to do. Build a form to pour concrete around it and then a lid or something else. any Idea's? I don't think I just want to put a piece of metal on the ground over it.
 

drivesitfar

Well-known member
Joined
Oct 23, 2013
Messages
36,034
Location
Pacific Northwest
Octane: maybe a form filled with cement with a cover set in the cement sort of like this only big enough for you to be able to take out the pump and clean, inspect or replace as needed.

did you make the tank out of a barrel or just a piece of plastic? if a barrel maybe finding a lid you can put on to keep the debris out and that you can remove as needed.

ask questions as you need to and post lots of pictures for us to sit in our chairs and enjoy your progress.

cheers
 

Attachments

  • WP_20151023_004.jpg
    WP_20151023_004.jpg
    151.4 KB · Views: 51
OP
O

octane33

Member
Joined
Jul 30, 2014
Messages
23
Location
Roseburg Oregon
So I have a friend that had a 10yrd dump truck. He brought me 25 loads and I just had to pay for rock and fuel. Things like this is have been making this build possible. Saved me a bunch just in that. Put a nice 3" minus base and topped it off with 3/4" rolled it with a 54" viber roller. Driveway was layer with road fabric first. That stuff is amazing.

Sent from my SM-G920V using Tapatalk
 
OP
O

octane33

Member
Joined
Jul 30, 2014
Messages
23
Location
Roseburg Oregon
cfe18356e541951d35afdec5ed6a47dd.jpg


Sent from my SM-G920V using Tapatalk
 
OP
O

octane33

Member
Joined
Jul 30, 2014
Messages
23
Location
Roseburg Oregon
They are requiring me to put down 10mil and rebar 2' on center. I also have my rebar in for my block. Along with my ufur ground.

Sent from my SM-G920V using Tapatalk
 
OP
O

octane33

Member
Joined
Jul 30, 2014
Messages
23
Location
Roseburg Oregon
We poured it all in one day. 100 yards of concrete and some really good help had it finished, cut and sealed buy 2 o'clock. We had 4 power trowels on it at one point.

Sent from my SM-G920V using Tapatalk
 
To avoid these ads, REGISTER NOW!

Bib Overalls

Well-known member
Joined
Dec 4, 2006
Messages
3,318
Location
Jonesboro, Arkansas
Nice looking site. Relatively flat with established trees. The soft spot intrigues me. If it was not a spring could you have dug it out and filled with tamped crushed rock? When we built our house we had a stump hole at one corner. When we did the footings we filled the hole with a couple of yards of concrete. Sounds expensive ($200) but we were on a roll and did not have time to fill in layers and tamp. When it comes time to tear this old place down somebody is going to have a big surprise.
 

drivesitfar

Well-known member
Joined
Oct 23, 2013
Messages
36,034
Location
Pacific Northwest
Octane: with all the prep did you end up going with a 4 inch cement floor or do tell? looks great and i love stick built so will be watching all your progress. nicely done. :bowdown:
 
OP
O

octane33

Member
Joined
Jul 30, 2014
Messages
23
Location
Roseburg Oregon
I did forget to mention there was a stump in the corner that I did dig out and put a load of rock in the hole.

Sent from my SM-G920V using Tapatalk
 
OP
O

octane33

Member
Joined
Jul 30, 2014
Messages
23
Location
Roseburg Oregon
Went with 6" concrete. The engineer only wanted a 10" x 18" footing but we went with 12 x 24 plus the height of the slab and being monolithic that is slightly larger too

Sent from my SM-G920V using Tapatalk
 

drivesitfar

Well-known member
Joined
Oct 23, 2013
Messages
36,034
Location
Pacific Northwest
Octane: since it's getting pretty cold are you covering the concrete or what did your cement guy suggest? or did you add some quick drying additive and do tell? happy to hear you are going with 6 inch and rebar because it should be there 100 years from now unless for some reason you have settling issues.

good luck
 
OP
O

octane33

Member
Joined
Jul 30, 2014
Messages
23
Location
Roseburg Oregon
Drivesitfar sorry I wasn't very clear in my first post. I have been working on this for almost a year now. Along with many other big projects around the house and family time of course.

Sent from my SM-G920V using Tapatalk
 

drivesitfar

Well-known member
Joined
Oct 23, 2013
Messages
36,034
Location
Pacific Northwest
Octane: i remember you talking about having a year invested, but i thought that was just in the permit process like we need to do up in my part of the world.

so you've already built it?

looks great so start posting pictures as you have time so we can take a peak and maybe help you as you need any going forward.
 
To avoid these ads, REGISTER NOW!
Top Bottom