To avoid these ads, REGISTER NOW!

The two dollar vise and the SK socket

mcdtommy23

Well-known member
Joined
Aug 27, 2008
Messages
580
Location
Detroit Michigan
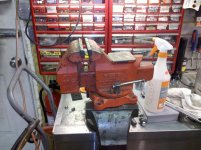
Picked up the Ridgid (USA) vise for $2.00. It was missing the cast nut/ draw block that the leadscrew goes into. So after attempting to find the correct part and not finding anything, I set out to make one.

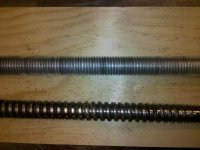
At first I thought that the orig. leadscrew was ACME thread. Well a trip to Fastenal lead me to believe that it is a non "standard" thread. So I resolved myself to the fact that I would need to fab a block and new leadscrew.

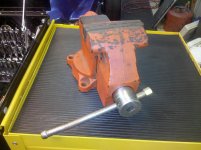
The new block was made from a piece of Unistrut 90, a 3/4" threaded rod coupling, a couple of 7/16" nuts, some machining, and a little bit of welding. I wanted to make the block out of one large chunk of steel but I set out to make due with what I had.

The new leadscrew is made from 3/4" threaded rod, a nut and a 1 1/4" SK socket.

I first welded the nut to the threaded rod, then the socket to the nut. Drilled the socket/end of rod for the handle to go through.

I had a choice of sockets to use; Bonney, Craftsman, Proto, and the SK. I chose the SK due to the fact that I figured the Bonney might be collectable, the Craftsman can (maybe) be warranteed if need be, as can the Proto. The SK may or may not be able to be should the need ever arise. Plus I really hate SK's $5.00 thing, so this way no need to ever worry about a warranty.:lol_hitti
 

Attachments

  • ridgid vise 2.jpg
    ridgid vise 2.jpg
    147.3 KB · Views: 174
  • threads.jpg
    threads.jpg
    145.1 KB · Views: 134
  • 2010-05-31-12.49.44.jpg
    2010-05-31-12.49.44.jpg
    142.2 KB · Views: 153
  • missing bolt.jpg
    missing bolt.jpg
    143.5 KB · Views: 129
  • new nut 2.jpg
    new nut 2.jpg
    143.4 KB · Views: 137
  • new screw on vise with socket.jpg
    new screw on vise with socket.jpg
    145 KB · Views: 162
  • new nut.jpg
    new nut.jpg
    146.6 KB · Views: 135
Last edited:
To avoid these ads, REGISTER NOW!

vjquan

Well-known member
Joined
Feb 23, 2005
Messages
846
That's cool! Now you can use a breaker bar to really crank on it. How's the action? With the finer thread, it must take a lot more revolutions to open/close the vise.
 

atari

Well-known member
Joined
Dec 20, 2008
Messages
555
Location
Carroll, Ohio
I think I would take out the handle and just use the square drive, the handle gets in the way sometimes. Plus, you could move it to were you get the best leverage. Nice work!
 

lathedog

Member
Joined
May 29, 2010
Messages
8
nice work on the repair. the original leadscrew looks like a square thread which was pretty common in vises, I believe.
 

Joe B.

Well-known member
Joined
Jan 2, 2007
Messages
2,752
That is cool. You could always use an impact driver to crank it down hard and fast. Granted, you would probably break something.
 
OP
M

mcdtommy23

Well-known member
Joined
Aug 27, 2008
Messages
580
Location
Detroit Michigan
Thanks for all the replies. I just wanted to share that sometimes what seems impossible is actually possible with some outside the box thinking. It's also rewarding to see something that would have been going to the scrap pile turned into something that can be used for many years to come. With a little story to boot.

Fastenal did not have an ACME thread gauge. I tried looking the info up online but got so frustrated with irrelevant hits that I just said "screw it" (pun intended).

I agree about the handle getting in the way. I threaded the end of the old handle with an NPT die and put a brass pipe cap on that can easily unscrew. I was thinking about one of those Harbor Freight extendible handle ratchets for the square drive?

As for the relatively fine thread, yes it takes some more turning, but it's not as bad as I though it would be. The advantage seems to be that it takes less effort to really clamp things tight? The new piece is 3/4"-8 I think.

Here's a shot of the underside with the orig. spring and retainer, and a shot of the backside with the welds cleaned up.
 

Attachments

  • 2010-05-31-12.56.59.jpg
    2010-05-31-12.56.59.jpg
    145.3 KB · Views: 31
  • 2010-05-31-12.53.49.jpg
    2010-05-31-12.53.49.jpg
    111.6 KB · Views: 33
To avoid these ads, REGISTER NOW!

Arnie C

Well-known member
Joined
Apr 17, 2010
Messages
88
Location
Wauwatosa, WI
Put some Acme thread back in there before you strip those standard threads. Even worse is when you gall them and end up having to cut the damn thing apart with a Plasma cutter.

Acme thread is made specificially with a square profile for this exact usage. If you cant find what you need, anyone with a lathe can cut you some Acme thread for cheap.

McMaster-Carr sells exactly what you need.
http://www.mcmaster.com/#acme-threaded-rods/=7cfbgz
 

Packard V8

Well-known member
Joined
Mar 16, 2009
Messages
7,380
Location
Spokane, WA
Put some Acme thread back in there before you strip those standard threads.
X2 - the standard thread rod will work for light use for a long time, but hard use will kill it quickly. The Acme thread has several times as much engagement surface area.

jack vines
 

zuk123

Well-known member
Joined
Mar 25, 2012
Messages
957
Location
Houston TX via Chicago, Phoenix, LA, and San Diego
I think it isn't an acme thread. I think it has an asymmetrical shape and is called a 'buttress thread?" It has more strength in one direction of loading than the other.

Otherwise, it should be straightforward to do exactly as the OP did, using acme instead of threaded rod. Is it worth it for the difference? Well, I think this was a great way to reuse material on hand in a quick project to get use out of a piece of scrap iron.

Some times getting a project done quickly is the only way it will ever get done at all.

Nicely done.

zuk
 
To avoid these ads, REGISTER NOW!
Top Bottom