To avoid these ads, REGISTER NOW!

Above 1200 Sq/FT The Warthog Hidey Hole

Wokspaces above 1200 squarefeet.

OutlawDrifter

Well-known member
Joined
Jan 20, 2015
Messages
3,871
Location
KS
Progress is progress!

I have a Monster Level 3 behind the 6.0l in my Z28. It is rated at 700ft/lbs...way overkill! Definitely not a clutch you want to use in stop and go traffic or parades. I need an excuse to go to a level 2! It's in or it's out, no slipping.
 
To avoid these ads, REGISTER NOW!

realvc

Well-known member
Joined
Jan 7, 2011
Messages
394
Location
Lake Norrell, AR
Your progress is very impressive as usual.

I don't know anything about your clutch set up but most clutch disc can be rebuilt as in having new clutch material put on the disc. Is that what they are talking about to rebuild your disc?
Your disc may have some kind of material other than standard clutch facing. The place where I get mine done does big truck brakes and clutch and pressure plate rebuilds.
Vince
 

Nlped

Well-known member
Joined
Feb 24, 2014
Messages
151
Location
Hayden AL
I had my twin disc refaced by SPEC here in Alabama for really fair price.


Sent from my iPhone using Tapatalk
 
OP
J

jbmatth

Well-known member
Joined
Jun 3, 2013
Messages
5,681
Location
Northern Ok.
Progress is progress!

I have a Monster Level 3 behind the 6.0l in my Z28. It is rated at 700ft/lbs...way overkill! Definitely not a clutch you want to use in stop and go traffic or parades. I need an excuse to go to a level 2! It's in or it's out, no slipping.

Outlaw,
I suppose I should talk to Mantic and see if this is even a streetable clutch because this is going to be mostly a street car. I'm sure I could get it to slip, I just won't clean the trans fluid off of the disc. :lol_hitti

Your progress is very impressive as usual.

I don't know anything about your clutch set up but most clutch disc can be rebuilt as in having new clutch material put on the disc. Is that what they are talking about to rebuild your disc?
Your disc may have some kind of material other than standard clutch facing. The place where I get mine done does big truck brakes and clutch and pressure plate rebuilds.
Vince

Vince,
The rebuild kit is basically everything new not really rebuilt, the only thing not included is the flywheel, slave cylinder, and throw-out bearing.

I had my twin disc refaced by SPEC here in Alabama for really fair price.


Sent from my iPhone using Tapatalk

Nlped,
I'll have to keep that in mind, I'm really not sure where I'll end up going with this one, I'd like to clean it and install it to make sure it is bad before I replace or rebuild it.

JB
 

oldironfarmer

Well-known member
Joined
Jun 25, 2016
Messages
6,664
Location
Terlton, Oklahoma
I think you'll be fine with the brake cleaner on the clutch facing. Even better if it has a ceramic clutch facing. You may not know until you get it apart. If it's got solid discs are you going to get flexible ones anyway?
 
OP
J

jbmatth

Well-known member
Joined
Jun 3, 2013
Messages
5,681
Location
Northern Ok.
Andy,
I hope so too, but really only time will tell on that front and it'll be a long time before I actually start driving it. Here is an exploded view of the clutch:
attachment.php


And a small blurb from their website:
This kit includes Sprung Center, cushioned discs, using our premium Ceremetalic Friction material.

They also said the pedal feel is only 12-15% higher than stock so that should be good.

JB
 

Attachments

  • Matic Clutch View.JPG
    Matic Clutch View.JPG
    43.2 KB · Views: 496
OP
J

jbmatth

Well-known member
Joined
Jun 3, 2013
Messages
5,681
Location
Northern Ok.
Great progress, by the way.

With the ceramic pads it will clean up fine. May not even need cleaning.

True. Only an organic based friction material would be an issue.


Sent from my iPhone using Tapatalk

Andy and Nlped,
I don't know why but that really never occurred to me. To help my ignorance what is the reason behind that? Is the organic material porous whereas the ceramic has a much tighter grain structure?

JB great progress.:thumbup:

Thank you 1/2, each day I work on it I really don't feel like I make much progress but at the end of the week I do seem to make some forward progress.

JB
 

drivesitfar

Well-known member
Joined
Oct 23, 2013
Messages
36,005
Location
Pacific Northwest
JB: looks like you and your brothers were/are well fed and grew up with a good set of health values.

I won't compare your car to my MOVING MY STUFF, but as you say there are days when you don't think you got much done, but if you keep at it the project WILL GET FINISHED.

I can't add to the conversation about your new ******/clutch and just watching and learning cause i quit working on my cars in the mid 70's when you needed a new tool for every piece. maybe that's why I like old tools from the 20's to late 60's? now I just need a project car and a garage to work on it.

keep up the great progress and last time I checked you only had a piece of frame so looking good from my chair!!

cheers
 
OP
J

jbmatth

Well-known member
Joined
Jun 3, 2013
Messages
5,681
Location
Northern Ok.
JB: looks like you and your brothers were/are well fed and grew up with a good set of health values.

I won't compare your car to my MOVING MY STUFF, but as you say there are days when you don't think you got much done, but if you keep at it the project WILL GET FINISHED.

I can't add to the conversation about your new ******/clutch and just watching and learning cause i quit working on my cars in the mid 70's when you needed a new tool for every piece. maybe that's why I like old tools from the 20's to late 60's? now I just need a project car and a garage to work on it.

keep up the great progress and last time I checked you only had a piece of frame so looking good from my chair!!

cheers

Drives,
Without getting into it too much we didn't have much growing up and meals were typically made with meats we either raised or hunted for. This led to a pretty lean diet that has somewhat carried over for us. Just like most boys/guys we were competitive always trying to outdo one another. This led into racing which most of us still do today albeit not as competitively as a few years ago.

I'm still learning about newer vehicles but know that to do the job right sometimes you have to have the right tool. I keep getting more and more of them but there is always another that I just have to have. Just like older vehicles finding the problem is just troubleshooting, work backwards from the problem until you find something that isn't right and go from there.

The frame is much more intact now and is more complete, stay tuned for this weekends updates.

I have to ask, what is organic? I would think ceramic (clay) is organic.


Sent from my iPhone using The Garage Journal mobile app

Shorty,
I didn't know either so I looked it up, here is a pretty good link to some reading: Clutch Materials

JB
 
OP
J

jbmatth

Well-known member
Joined
Jun 3, 2013
Messages
5,681
Location
Northern Ok.
Back onto Project Pinky Pi it was time to build a transmission cross member. After way more time than I expected here it is completed:
View media item 88208
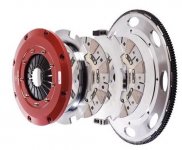
So I used a piece of 1" x 2" x 1/8" tubing, marked it for the trans mount bolt locations, drilled it out to install sleeves, welded them in, ground smooth, built and installed the wings, mocked it up on the frame with the trans located, drilled more holes, welded nuts to the wings, blah blah blah now I have a trans cross member with about 4 hours of work in it.

This is it installed in the frame:
View media item 88209
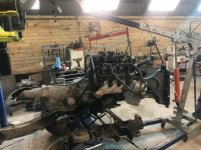
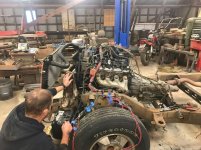
I was then able to pull the engine and trans back out, fully weld the engine mounts and re-install everything:
View media item 88210
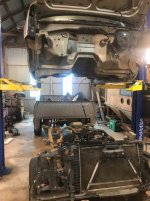
I then lowered the body and to my surprise nothing touched, plenty of clearance so far. The body is on the frame with the engine and trans installed, the intake is set in place and...I didn't take a photo like I thought I had. :(

It now rolls as one again, I then spent the rest of the weekend cleaning up the shop, it got very disorganized doing so much work on the car. I did install a clamp rack on the welding table but again no photos of that, I'll get those at some point.

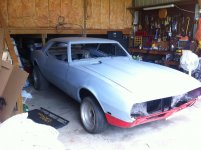
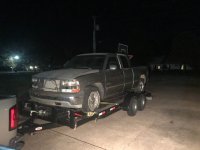
I quite a little early so I could haul in a bunch of firewood after a snow fall yesterday. I have to move Project Pinky Pi out of the way as my brother is hauling a truck over to me and we plan to pull the engine and trans from it so he can use them in his '68 Camaro he is working on.

Keep moving forward,
JB
 
OP
J

jbmatth

Well-known member
Joined
Jun 3, 2013
Messages
5,681
Location
Northern Ok.
Looks good. I love a well executed project.

86 thank you, I'm enjoying it but would like to get the frame knocked out this year if at all possible. We shall see if that all works out though. I like the way things are working out so far.

JB well done on the xmember.:thumbup:

Thank you 1/2, it was a fun little project to see take place. It is fascinating how fast a simple part can become relatively complex. I'm sure there will be many more complex parts to make before I'm all said and done.

JB
 
To avoid these ads, REGISTER NOW!
OP
J

jbmatth

Well-known member
Joined
Jun 3, 2013
Messages
5,681
Location
Northern Ok.
Looking good, JB!

Since you've got some dead time send me the cross member and I'll make an aluminum one for you to try. Just for fun...

I hadn't really thought about it Andy but sure I'll send it your way, thank you very much for the offer that is very kind. I'll try to pack a few other goodies into the box when I send it. I'll try to get it pulled in the morning which will mean pulling the engine and trans out which means pulling the body back off. Not bad for a mornings work, should be easy enough.

Definitely a good plan.
JB chassis is looking good.


Sent from my iPhone using The Garage Journal mobile app

I agree shorty, I mean if I'm going to have one off custom parts I might as well have one off custom cast aluminum parts.

All,
As I mentioned earlier I have the engine and trans in the P.P.P. and have the body back on, here is what I now see is a terrible photo but a picture nonetheless:
View media item 88245
Also here is a clamp rack my buddy made while we were working this weekend:
attachment.php


He hadn't really ever welded much and wanted to get a little practice in, I gave him the 1" x 1" x 1/8" tube and the basic idea and turned him loose. The welds on the corners were pretty good for basically a first time, the overhead welds to the bottom of the table would have been better if he'd remembered to clean the metal off first, but it isn't going anywhere. :lol_hitti

JB
 

Attachments

  • IMG_8112.jpg
    IMG_8112.jpg
    134.4 KB · Views: 643

oldironfarmer

Well-known member
Joined
Jun 25, 2016
Messages
6,664
Location
Terlton, Oklahoma
Those overhead welds would have been a lot easier if you'd just flipped the table over first.:headscrat

Tremendous good fortune that the body set down with no interference.:bounce:
 
OP
J

jbmatth

Well-known member
Joined
Jun 3, 2013
Messages
5,681
Location
Northern Ok.
Those overhead welds would have been a lot easier if you'd just flipped the table over first.:headscrat

Tremendous good fortune that the body set down with no interference.:bounce:

I agree, and thought about it, but was too lazy to go to that much trouble.

The only thing I did to "ensure" no interference was to mark on the frame where I felt the back of the block should be to keep the back of the engine off of the firewall. I'd say it worked out pretty well thus far, I may change my story when I actually try installing everything needed to make it run.

JB
 

BUGTHUG

Well-known member
Joined
Nov 12, 2010
Messages
2,960
Location
Kansas
Hey JB, on your motor mounts, it looks like the mounting plate is bolted directly to the block. Is there suppose to be some kind of rubber on the mounts to keep the vibration down? Maybe you have that under control?:dunno:
 
OP
J

jbmatth

Well-known member
Joined
Jun 3, 2013
Messages
5,681
Location
Northern Ok.
Herb,
From the photos it is tough to see but in this one:
View media item 88024
The cylinder is empty but holds a polyurethane bushing with a metal sleeve. That gets bolted to the mount that connects to the motor with a 9/16" bolt. The poly bushing is what isolates the engine from the frame and will reduce vibration, rubber would be better for that but is also weaker and I suspect I'll overwork rubber mounts which is why I went with poly. Hopefully that all makes since, if not I can get better photos at some point.

Andy,
I have the trans cross member out and some other goodies I'll mail today on my lunch break. Thank you again! :bowdown:

JB
 
OP
J

jbmatth

Well-known member
Joined
Jun 3, 2013
Messages
5,681
Location
Northern Ok.
Gee, I've been away a few days and you still aren't done yet? Slacker.

I know right, I figure if I set the bar low enough your expectations will match that. Then when I knock out a lot at once I just slowly show you over a few weeks so it looks like I'm keeping my normal pace. I guess in other words if I set the bar low enough even if I miss I don't have as far to fall, it keeps me grounded. :shocking:

He's slow.

But wait until he's waiting on me:lol_hitti

Andy,

On the bright side you could just say you are waiting on the mail, I know how it gets this time of year.

All,
I pulled my wife's Jeep into the shop to have a look over everything again before it got too cold out, re-torqued the hardware I touched in the lift install and brought the tires up on pressure for winter. Should be good to go for a few more months. I have my shop "cleaned" out and my brother will be here late tonight then tomorrow the thrashing will begin.

JB
 

mybigwarwagon

Well-known member
Joined
Nov 4, 2009
Messages
4,428
Location
Vale, Nc
I know right, I figure if I set the bar low enough your expectations will match that. Then when I knock out a lot at once I just slowly show you over a few weeks so it looks like I'm keeping my normal pace. I guess in other words if I set the bar low enough even if I miss I don't have as far to fall, it keeps me grounded. :shocking:

It has rained so much here that I haven't gotten a lot done. Not having a shop hinders my progress during monsoons. I did manage to get out between storms and get the head pulled off the Jeep my friends daughter wrecked, and get it off to the machine shop. She bought an identical jeep with a blown head gasket that turned out to have a cracked head:mad:I just got it back today so I know what I am doing this weekend.
 
OP
J

jbmatth

Well-known member
Joined
Jun 3, 2013
Messages
5,681
Location
Northern Ok.
Hopefully it has dried out a bit so you can get some stuff done. Replacing heads is never a fun job when you aren't doing it for more power.

I have some stuff to update but I'll have to get to that a little later, taking off a week has put me more behind than it should have. :(

JB
 
OP
J

jbmatth

Well-known member
Joined
Jun 3, 2013
Messages
5,681
Location
Northern Ok.
As I mentioned earlier one of my brothers was coming over to let me help him pull the engine out of a donor for his '68 Camaro project car. Here is what it looked like when he first picked it up a couple years ago:
attachment.php


Since then he has completely rebuild the front sub-frame with disc brakes and I think the rear suspension and axle. He also had a local vo-tech school paint the car. But the teacher retired before it could be finished so this is what it looks like now:
attachment.php


Not to be detered he wanted to get more of the mechanical stuff done before finishing the paint work. Be bought a 2001 Silverado with a 5.3 LS based engine and 4L60E transmission. We made a deal and he had it loaded up and ready to head to my house:
attachment.php


Last summer he installed a new cam and although it would run it didn't idle very well. The plan was to pull the engine and install it in my run stand so I could tune the computer some and get it working better. Then once he has it installed in his car I'll come do more tuning to make it better. Wasting no time we had the body off in about 2 hours:
attachment.php


We made things harder on ourselves by pulling the engine without draining the cooling system so I could run it a while on the run stand without worry of overheating:
attachment.php


Here it is all hooked up and ready to start:
attachment.php


It didn't want to idle but that was all the time we had for day 1. The next morning before he got out of bed I played with the tune and got it to where it should have idled. Loaded the tune and it started up first try with no throttle manipulation, idled great and came up on temp with no issues, it would rev a bit with a bit of stumbling but no real bit problems. Then I shut it off to make breakfast for everyone, went back out and...it wouldn't idle without cracking the throttle body. :headscrat

No time left to do more tuning we called it good enough for now. He also had new springs and push rods we installed before we pulled the cooling system and got it ready to head down the road:
attachment.php


More to come,
JB
 

Attachments

  • IMG_8135.jpg
    IMG_8135.jpg
    93.6 KB · Views: 394
  • IMG_4005.jpg
    IMG_4005.jpg
    148.6 KB · Views: 390
  • IMG_8129.JPG
    IMG_8129.JPG
    84.2 KB · Views: 393
  • IMG_8131.jpg
    IMG_8131.jpg
    98.4 KB · Views: 390
  • IMG_8130.jpg
    IMG_8130.jpg
    98.7 KB · Views: 393
  • IMG_8132.jpg
    IMG_8132.jpg
    117 KB · Views: 391
  • IMG_8133.jpg
    IMG_8133.jpg
    89.7 KB · Views: 394
OP
J

jbmatth

Well-known member
Joined
Jun 3, 2013
Messages
5,681
Location
Northern Ok.
We loaded it on his trailer and he was ready to take off:
attachment.php


I spent the next two days of my vacation cleaning the shop, tossing a lot of un-needed stuff, making piles of scrap for the scrap yard and an even bigger pile of aluminum for Andy. :thumbup:

We went to my parents house for Thanksgiving and had a great time catching up with friends and family. Back home I decided The Warthog Hidey Hole was too clean so now a project was in order. The metal chop saw I use has always lived on the floor and was a bit of a pain to use so I built a mount on the table where it could live:
attachment.php


It works great there and is level with the table top for one flat surface for cutting material. I then decided to make it more mobile by adding casters that could be raised and lowered when needed. 3 hours later I ran out of welding gas and stopped, no photos until I'm more done. :bounce:

JB
 

Attachments

  • IMG_8134.jpg
    IMG_8134.jpg
    141.9 KB · Views: 393
  • IMG_8126.jpg
    IMG_8126.jpg
    149.8 KB · Views: 744
OP
J

jbmatth

Well-known member
Joined
Jun 3, 2013
Messages
5,681
Location
Northern Ok.
Fantastic work JB!:bowdown:

Are you sure the chop saw won't turn the welding table over?:lol_hitti

Thank you Andy, I was lazy and didn't run any numbers on it but since you asked. On the saw side I have ~108 lbs centered .79166 ft from the tipping point on the left leg where the saw is mounted. The top on the remainder of the table is 276.5 lbs centered 2.5' from the tipping point, and ~130.2 lbs for the leg and vise centered 3.25' from the tipping point. That would give us the equation (X+108)(.79166)=276.5(2.5)+130.2(3.25) =>1299.6 lbs that would have to be centered on the saw to tip the table. :lol_hitti

(Keep in mind I'm using dimensions from my memory to get most of these numbers and completely forgot about the clamps rack when I was doing the math.) I think I'll be okay but a good engineer would have run the numbers beforehand, they also would have designed this before cutting metal they didn't end up using. :headscrat

As a side note I finely used all of the C25 gas for my welder and went ahead and picked up some Argon while I was swapping bottles out :thumbup: Out of curiosity the best deal I could find here in town was $250 for a 10 year lease on each bottle and $28 to refill each 80ft^3 bottle, how does that compare with what everyone else is paying?

Have a good one all,
JB
 

OutlawDrifter

Well-known member
Joined
Jan 20, 2015
Messages
3,871
Location
KS
JB, I ponied up about 7-8 years ago and bought an M sized bottle, 125cf I believe. Current exchange at my place is $78.20 w/tax. Initial purchase was in the $140-160 range. This all relates to C25.
 

rixtrix1

Well-known member
Joined
Aug 25, 2013
Messages
3,010
Location
Chandler, AZ (from west NE)
JB, I ponied up about 7-8 years ago and bought an M sized bottle, 125cf I believe. Current exchange at my place is $78.20 w/tax. Initial purchase was in the $140-160 range. This all relates to C25.
I've got 2 330cu ft bottles I own, 1 for C25 and 1 for Argon. C25 refill is $78 and Argon was $117. I have a 125cu ft for C25 that is aluminum so I can take the MIG to other locations easier. Refills for it are $58. I never use my 40cu ft as it always seemed to run out halfway through an important mission, lol. It cost $48 for a refill. This is ONE time when BIGGER is definitely BETTER! I only had to pay for the alum 125 bottle and it was$205. I obviously got them before you could only lease the big bottles. No one asks if I have a lease; they just exchange them. I always take a regulator to make sure the new one is full. They only guarantee 1800 psi, but they average 2050 to 2150psi. Airgas is more expensive than Phoenix Welding Supply by about 15%.

Sent from my SM-J320V using Tapatalk
 

rixtrix1

Well-known member
Joined
Aug 25, 2013
Messages
3,010
Location
Chandler, AZ (from west NE)
Thank you Andy, I was lazy and didn't run any numbers on it but since you asked. On the saw side I have ~108 lbs centered .79166 ft from the tipping point on the left leg where the saw is mounted. The top on the remainder of the table is 276.5 lbs centered 2.5' from the tipping point, and ~130.2 lbs for the leg and vise centered 3.25' from the tipping point. That would give us the equation (X+108)(.79166)=276.5(2.5)+130.2(3.25) =>1299.6 lbs that would have to be centered on the saw to tip the table. [emoji38]_hitti

(Keep in mind I'm using dimensions from my memory to get most of these numbers and completely forgot about the clamps rack when I was doing the math.) I think I'll be okay but a good engineer would have run the numbers beforehand, they also would have designed this before cutting metal they didn't end up using. :headscrat

As a side note I finely used all of the C25 gas for my welder and went ahead and picked up some Argon while I was swapping bottles out [emoji106] Out of curiosity the best deal I could find here in town was $250 for a 10 year lease on each bottle and $28 to refill each 80ft^3 bottle, how does that compare with what everyone else is paying?

Have a good one all,
JB
Pure argon won't work on MIG. 80/20 at best is what Greg Weld replied to me a few years ago, and with that name, who's going to argue?

Sent from my SM-J320V using Tapatalk
 

Bob Heine

ALLIANCE MEMBER
Joined
Oct 24, 2009
Messages
10,703
Location
Boca Raton, Florida
Pure argon won't work on MIG. 80/20 at best is what Greg Weld replied to me a few years ago, and with that name, who's going to argue?

Sent from my SM-J320V using Tapatalk
Ric, I have one of my MIG machines set up for stainless and use 98% Argon/2% Carbon Dioxide.

I own three 40CF tanks and my 75/25 needs to be refilled. I'll let you know on refill price.
 
To avoid these ads, REGISTER NOW!
Top Bottom