madoc1
Well-known member
every thing is looking better each time I check in! how did you attach the shelving frame to tbw?
jim
jim


Its hard to keep the counter top clean. My started out that way, but now looks like a tornado has hit it.
Thank you Taumac, it is coming along slowly.Looks damn good sir.
every thing is looking better each time I check in! how did you attach the shelving frame to tbw?
jim
JB,
The TBW looks great! Keep up the good work. I am defiantly looking at all that bench space and wishing that during the remodel I could have expanded out.
Keep cranking!
Cheers,
Chris
 All in all it was a 13 hour job with some family time tossed in there and two trips to town one at 1.5 hours the other at 45 minutes as those parts were closer. So maybe 10 actual hours of work, but the good news is it went back together and there were no leaks, it started back up first try and now drives like a whole new truck!
With the Warthog Hidey Hole cleaned out pretty well it was time to tackle the injection pump. From what I read online it was about a 6-8 hour job. I started at 4:30am Saturday morning so I'd be pretty well done by lunch time.
Ready to start:

I had everything I thought I would need but didn't order the coolant crossover pipe gaskets in time so I knew I'd have at least one trip to town to get those, I decided to wait until I was to that point in reassembly so I would know what else I would have to buy if anything came up.
After removing half of the stuff I could just barely see the injection pump, here is a picture as it was going back together:

The injection pump is the shiny thing in the valley.
Closer view of it:

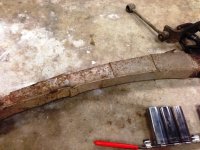
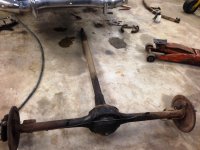
Upon dissassembly I found this:

Yep, it needs changed!
It didn't go as planned and I had to make a second trip to get a few o-rings I didn't think I would need and some gasket maker for the turbo inlet line.
The mess was easy to clean as this is all there was, some coolant, diesel, and a little dirt:

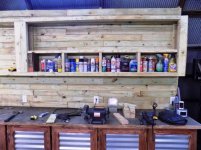
I slept in Sunday and didn't do anything but clean up a bit, then this morning I added the first shelf to the C.O.B.R.A. and put up my spray cans and other assorted cleaners and grease:

That is all for now, I'll get some more screws after work today so I can continue on with the shelves and start on the doors in the near future.
JB
every thing is looking better each time I check in! how did you attach the shelving frame to tbw?
jim
Looks great how did you make your doors for the cabinets under your work bench.

had to check in on your projects.looking good your making some good progress on tons of things love the recycled theme i subscribe to the same concept 3/4 of my shop is all recycled keep up the great work!


JB,
You have your hands full. The 40's hearse is a cool project and super unique. You will have to keep us updated as to how that unfolds.
The bench... It must feel good to have the upper part of the bench filled up and organized. How many bench grinders do you have?
Your thread is always an interesting read never knowing what you will be tackling in the next post. It is one that I defiantly look up when I can't motivate to go into the shop. Class A entertainment, for sure. Keep it coming!
Cheers,
Chris
 I'll look for the battery. I guess if you are really bored you can drop the front spindels down and I can add that my list of parts and cleaning. OK I'm planning to put the carb together tonight when I get home, with the battery in we should hopefully get it to fire off. I'll prepare the engine a little by getting the oil primed, and checking out the ignition as well. I'll probably start taking the front suspension apart this week as well, it was in pretty good shape from what I saw and didn't really need anything replaced. Good luck with the rear end, shocks, and springs. I can't complain much as I've broken more of these than I've been able to remove even on newer cars. I guess if you want to get a job done, you give it to a person that likes to stay busy, and that's you. That is a good trait to have, when you are young and healthy you can kick the worlds ***. But when you get older and the body hurts even in bed, then you are glad that there is young healthy people around that can help with a job like this. Believe me I do appreciate your HELP. So I guess it gave up without much of a fight. I went to Atlas Spring and Axle yesterday and the old guy said well if the car wasn't sagging or leaning, then they are probably good. He said he would probably remove the metal cladding on the outside of the springs, and take them apart and clean and paint and replace the rubber on the ends. He said in the old days they would cut a rubber hose and use for the eyelets on the ends. I have a couple of manuals coming soon, one on the rear end only, and the other is a shop manual on 48 Chevy cars. So I'll get that to you when it gets here.
 That's a stunning garage mate
If u don't mind a might steal your wood on the wall idea
I can't see any pictures in this post. Any idea what happened?I just lost my post, so here goes again...
I had a pretty productive weekend working in The Warthog Hidey Hole. I started off replacing the water pump on The Black Plague, which I determined is where the coolant leak was coming from. The pump was only $65 but the tools needed were more than that. I first had to purchase a tool to remove the water pump, it was the only one available in town and it sadly didn't work. I ended up making my own similar tool, this is how it turned out:

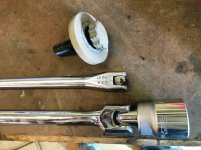
It worked great even if I did break one of my pins off and bent it a little. Next I needed to get a 36mm (1-7/16") 12pt socket, sadly I only had a 6pt so there goes another $13. This socket is needed to remove the harmonic balancer to crankshaft bolt that will be torqued back on to 275 ft-lbs. I was using my U.S.A. made 18" (47 cm) long Napa 1/2" drive breaker bar along with a 20" (51 cm) cheater pipe. I've used this same breaker bar on numerous axle nuts without even a hint of weakness. Not the case on this occasion:

I picked up the biggest available breaker bar at 30" (76 cm) and 3/4" drive. It didn't skip a beat with the cheater along with every bit of energy I could muster up the bolt broke loose. I've guesstimated I put around 400 lb-ft on the bolt to remove it based on the "ease" of installing it to 275 ft-lbs. I had to remove that bolt to pull the harmonic balancer that covered one of the bolts for the water pump housing. Everything went back together without a hitch and the truck is back in running condition again.
Next I worked on trimming out around the H.F. 44" boxes with some of the scraps from the T.B.W. covering. The remainder of the uncovered wall will be covered similar to the main work bench with corrugated roofing metal and stained lumber. Here is the picture:

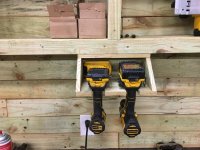
Next I built a little shelf for storing my Dewalt drill and driver so they don't have to set on usable shelf space behind what will eventually be closed doors:

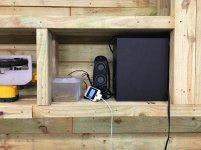
I have also been on the hunt for a stereo for the shop since my last one took on water and was destroyed. I replaced it with an ebay find identical for $7 but while waiting for it to arrive I thought about the computer system I had in the house that wasn't being used. I decided to try it out running it from the 3.5mm headphone jack on my old Iphone, it works beautifully!

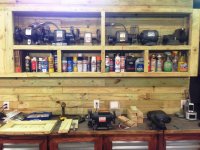
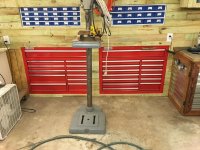
Lastly here is a shot of the current status of the bench area that desperately needs to be cleaned:

On Sunday while my girls were napping I rebuilt the Carter single barrel carburetor for Bugthugs '48 Chevy, I didn't get pictures but will post them within the week.
While not busy on Saturday I started clearing some more of the overgrown areas of the yard and burning some of that brush. No pictures yet as it is still pretty messy and I ran out of light. It is getting there and will take at least one if not two more good days to finish it up, before then I need to sharpen my chainsaw as it was struggling towards the end. I'm tired just thinking about everything I did this weekend even though I didn't feel like as much was accomplished as I'd hoped.
JB
I'll try to have a look at it over the next few days and check in when I do.Yes I am mate
Sunny scotland ha ha
U should check mine out Mate
See the idea I'm copying
Seagoon, Thanks for coming to visit, hopefully this picture fiasco won't deter you from joining in on some of the fun I have around here.I can't see any pictures in this post. Any idea what happened?
I plan to check the oil before I even begin to think about turning it over so no worries there. I did have all of the needed parts, and even a few spare parts.Did you have all the parts for the carb? Need to check the oil in the motor, I can't remember if I put any in it? Did you see if the battery is in the tray where it goes? I'm still looking for it
 I'll have a look around for the battery next time I'm out there.
Taumac, thank you as well. I'm having trouble understanding what you are asking though.
Ok got ya now, on one of them I actually ended up drilling out the pop rivets and swapping them over to the other drawer. There really isn't a good way just the brute force and dumb method.Oh I'm sorry I was talking about the toolbox and the BB slide removal.
Let me know if they are working now, I've re-uploaded them and attached them again. Also the battery is not in the car nor is there any oil.I don't see any of the pictures, just X
I have most of the passenger side of the front suspension off but didn't quite get done before I had to leave.