To avoid these ads, REGISTER NOW!

Above 1200 Sq/FT The Warthog Hidey Hole

Wokspaces above 1200 squarefeet.
OP
J

jbmatth

Well-known member
Joined
Jun 3, 2013
Messages
5,681
Location
Northern Ok.
Excellent


Sorry JB.


Yes, that will be that week.

We need to be back in St Louis, well... Near Wentzville late afternoon on that Friday, so Thursday seems highly likely. We have Rogers picnic on Saturday in O’Fallon.

We will be in Fayetteville before that, which should only be about 2.5 hrs drive, so even possible on the Thursday morning, as all three of us, Dennis, Craig and I are all early risers, as is Clem at www.tubatrucks.com where we will be staying over for a day or so.


I think this is going to be a humdinger of a road trip.


Really do hope to see you there.

I trust Herb will be over as well..

Darn, I've had my outage at work moved up to now starting on the 4th so it looks like I'll miss you guys. :( I talked to Herb last night and he is going to work with Andy to see if he can make it. Wentzville and O'Fallon are places I've spent a lot of time when I was in college and shortly after. I think Wentzville has an old style burger joint that has some great real milkshakes but can't remember for certain.

Have a safe trip and hopefully I'll get to catch a few of the exploits.

I hit my head three different times within a week. any one of which was hard enough to cause a concussion but the three of them together was more than my poor brain can handle.

That is no fun at all War Wagon! Sorry to hear about it and hopefully the soft stuff heals up okay.

All,
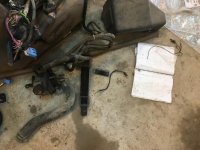
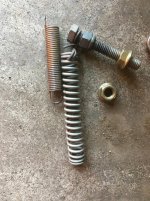
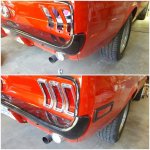
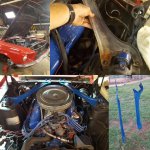
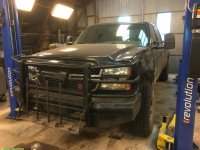
I was able to do a bit more work on BP 2.0 this morning but nothing really photo worthy. Basically just small stuff like the radiator, shrouds, air intake, batteries, belt, bumper, grill, headlights, and misc. wiring connections left. Okay well that sounds like a lot more work now that I type it out. Maybe by this weekend I'll be able to start it up.

JB
 
To avoid these ads, REGISTER NOW!
OP
J

jbmatth

Well-known member
Joined
Jun 3, 2013
Messages
5,681
Location
Northern Ok.
I have made some more progress, one of the first things this morning I decided it was time to install the radiator, it was a little dirty so I wanted to blow it out with air first... That turned into a 30 minute job, I had no idea it could get so dirty and can't believe it was still functioning. I looked like I'd been in a dust storm by the time I got done but it is much cleaner now. I installed pretty much everything I can or want to before making the final battery connections so I went to install the headlights and grill. Tell me do you notice any difference?
Old:
attachment.php


New:
attachment.php


Yep I mistakenly bought the fender to a Sierra instead of a Silverado. :mad: So I pulled it back off and reinstalled the Silverado one. :headscrat

Also I am stumped on something, there is a wire going from the intake air heater that I don't know where it connects, and similarly there is another that goes from the positive cable on the drivers side to somewhere and I don't know where. Of course I don't have quite the right photo of it so does anyone have any idea? Mike?

JB
 

Attachments

  • IMG_7771[1].jpg
    IMG_7771[1].jpg
    151.6 KB · Views: 569
  • IMG_7789[1].jpg
    IMG_7789[1].jpg
    151.1 KB · Views: 575

Kenfab

Well-known member
Joined
Jan 10, 2015
Messages
353
Location
Adelaide, South Australia
there is a cut out for a light on the 2nd photo and the flare is a bit larger I think?

its amazing how much junk accumulates in radiators isn't it. should run nice and cool now :)
 
OP
J

jbmatth

Well-known member
Joined
Jun 3, 2013
Messages
5,681
Location
Northern Ok.
there is a cut out for a light on the 2nd photo and the flare is a bit larger I think?

its amazing how much junk accumulates in radiators isn't it. should run nice and cool now :)

Yes indeed, they would both bolt up just fine but no chance I'd ever get the silverado headlights on. Oh well another lesson learned.

I was surprised at how much was in there, I guess I've just never blown one out with air before. It didn't have any trouble running hot before, in winter I would love for it to run hotter, after my 30 minute drive to work it was just barely warm enough to not need gloves in the cabin.

In other news I actually have a photo to show what I'm dealing with on the wiring:
attachment.php


The positive terminal has three wires coming from it, one goes to the red box by the engine for jump starting and also feeds the starter, one goes to where I have the red circle for power to all of the fuses and relays, and the third has the green circle which I don't have a clue where it goes. The wire in the blue circle goes back to the glow plug module. I also still don't know where the intake air heater wire goes to.

If anyone can help please let me know.

JB
 

Attachments

  • IMG_7791.jpg
    IMG_7791.jpg
    74.9 KB · Views: 527

zmotorsports

ALLIANCE MEMBER
Joined
Oct 20, 2009
Messages
21,348
Location
Northern Utah
JB, I'm not positive but if memory serves on the three 1/0 cables coming off the left battery, one went to the glow plug relay, one goes to the starter and one goes to a junction block mounted along the firewall somewhere.

Also, on some models I have seen the positive cable from the right battery tie directly over to the left battery and on others they tie into the junction box on the firewall.

Sorry I couldn't be more help.
 
OP
J

jbmatth

Well-known member
Joined
Jun 3, 2013
Messages
5,681
Location
Northern Ok.
Not a problem Mike, thank you for the help you were able to provide, it'll give me something else to search for at least. I don't think I connected anything to the firewall junction, I may have to look into that further.

JB
 

22george

Well-known member
Joined
Jan 26, 2011
Messages
1,634
Location
SW Ohio
Yes indeed, they would both bolt up just fine but no chance I'd ever get the silverado headlights on. Oh well another lesson learned.

I was surprised at how much was in there, I guess I've just never blown one out with air before. It didn't have any trouble running hot before, in winter I would love for it to run hotter, after my 30 minute drive to work it was just barely warm enough to not need gloves in the cabin.

In other news I actually have a photo to show what I'm dealing with on the wiring:
attachment.php


The positive terminal has three wires coming from it, one goes to the red box by the engine for jump starting and also feeds the starter, one goes to where I have the red circle for power to all of the fuses and relays, and the third has the green circle which I don't have a clue where it goes. The wire in the blue circle goes back to the glow plug module. I also still don't know where the intake air heater wire goes to.

If anyone can help please let me know.

JB


Moparman1973 on his dodge truck forum came up with what he called a winter front. You fabricate a shield out of sheetmetal that you mount in back of your grille ( in the winter only ). It blocks airflow through your radiator letting it heat up more. This was for the second generation dodge cummins trucks, because they don't heat up to operation temperature in the winter very well leaving you with a cold cab. I did this on my dodge 01 3/4 ton quad cab 4x4 cummins auto, and it does help warm the cab in the winter. My truck has never overheated with the shield in place. Don't know how it would work on your chevy, But worth thinking about.
 

CanadianJason

Member
Joined
Sep 19, 2016
Messages
7
Most of the duramax's (or at least the ones I've seen) sold in Canada come from the dealer with a 2 piece vinyl cover that covered both the front bumper, as well as the grill to cover over the radiator and allow the engines to heat up better in the winter. If it works here, it oughta work where you are. I know my father left his on well into the spring, and there was never any concerns about overheating.
 

C_F

ALLIANCE MEMBER
Joined
Jan 21, 2005
Messages
9,675
Location
Utah...SNOW BLOWS!
there is a cut out for a light on the 2nd photo and the flare is a bit larger I think?

its amazing how much junk accumulates in radiators isn't it. should run nice and cool now :)

No kidding! A couple years ago, my Lincoln Aviator sprung a pinhole leak in one of the radiator tubes, so I decided to pull it out to see if it was fixable. It still cooled the engine just fine. Actually, most of the reason to pull it was to try & straighten some of the fins that were banged up thanks to the previous owner. He did a timing chain guide "fix" prior to me buying it, and I'm pretty sure a hammer was used at some point. :mad:
Engine side...

QbgtvZ7t.jpg


Front side, the A/C condenser did a good job of hiding this mess...

20ptvZ7t.jpg


LhttvZ7t.jpg


fPxtvZ7t.jpg


I gave up & just bought a new radiator. :thumbup:
 

Redwolf947

Well-known member
Joined
Feb 13, 2015
Messages
613
Location
South East WI
Jb, I hope you find an answer to the wiring problem. Seeing some of these radiator pics makes me wish I had pulled mine out and cleaned it when I did my water pump and had the system drained.
 
Last edited:
OP
J

jbmatth

Well-known member
Joined
Jun 3, 2013
Messages
5,681
Location
Northern Ok.
Moparman1973 on his dodge truck forum came up with what he called a winter front. You fabricate a shield out of sheetmetal that you mount in back of your grille ( in the winter only ). It blocks airflow through your radiator letting it heat up more. This was for the second generation dodge cummins trucks, because they don't heat up to operation temperature in the winter very well leaving you with a cold cab. I did this on my dodge 01 3/4 ton quad cab 4x4 cummins auto, and it does help warm the cab in the winter. My truck has never overheated with the shield in place. Don't know how it would work on your chevy, But worth thinking about.

22george,
I hadn't thought about using metal before but a nice one that is easy to remove might not be a bad idea. Better looking than the cardboard and ratchet straps I've used before. LOL

Most of the duramax's (or at least the ones I've seen) sold in Canada come from the dealer with a 2 piece vinyl cover that covered both the front bumper, as well as the grill to cover over the radiator and allow the engines to heat up better in the winter. If it works here, it oughta work where you are. I know my father left his on well into the spring, and there was never any concerns about overheating.

CanadianJason,
Wow your first post on GJ in on my thread, thank you! I've seen those covers before and as mentioned above I've used cardboard before and it really didn't seem to do much for me. I'll look into what they have available but with my bumper I'm not sure how much good it'll do.

No kidding! A couple years ago, my Lincoln Aviator sprung a pinhole leak in one of the radiator tubes, so I decided to pull it out to see if it was fixable. It still cooled the engine just fine. Actually, most of the reason to pull it was to try & straighten some of the fins that were banged up thanks to the previous owner. He did a timing chain guide "fix" prior to me buying it, and I'm pretty sure a hammer was used at some point. :mad:
Engine side...

QbgtvZ7t.jpg


Front side, the A/C condenser did a good job of hiding this mess...

20ptvZ7t.jpg


LhttvZ7t.jpg


fPxtvZ7t.jpg


I gave up & just bought a new radiator. :thumbup:

Wow, that is really nasty, pretty similar to mine but mine was all dry and mostly really fine dust. I think replacing it was a good call for you.

Jb, I hope you find an answer to the wiring problem. Seeing some of these radiator pics makes me wish I had pulled mine out and cleaned it when I did my water pump and had the system drained.

I'm starting to wonder if I should pull others and clean them as well... Nah just when I have to pull it anyway unless there is an issue calling for the removal. I did find the problem and will post about it shortly.

JB
 
OP
J

jbmatth

Well-known member
Joined
Jun 3, 2013
Messages
5,681
Location
Northern Ok.
As I mentioned before I found the missing link as it were for my truck. I looked at another in town that the owner was kind enough to let me see. Both wires connect to a 175a Maxi Fuse at the back of the fuse box next to the firewall. I went home excited to finish it and...I didn't have the fuse or studs that it mounts to. :mad:

Looked around and finely found it hiding at my feet essentially:
attachment.php


Cleaned it up and installed it, good to go now:
attachment.php


Ready to go except I didn't buy enough coolant, 4 gallons wasn't enough. I should have it running in the morning if all goes well fingers crossed.

Part of my normal weekend routine this time of year is mowing, all was going well until the mower stopped moving. I determined it was because the drive belt tension spring had broken (the small one in the photo below):
attachment.php


I didn't have a replacement and doubted I could get one on a Sunday afternoon but I did have the larger spring. With a little bailing wire and some zip ties I was back in business:
attachment.php


It isn't dumb if it works right? LOL

Yes I did order the right spring today so I can remove that mess. Next up I'll tell you about some Mustang fun.

JB
 

Attachments

  • IMG_7801.jpg
    IMG_7801.jpg
    149.1 KB · Views: 407
  • IMG_7803.jpg
    IMG_7803.jpg
    92.3 KB · Views: 408
  • IMG_7805.jpg
    IMG_7805.jpg
    150.8 KB · Views: 409
  • IMG_7806.jpg
    IMG_7806.jpg
    115.6 KB · Views: 412
OP
J

jbmatth

Well-known member
Joined
Jun 3, 2013
Messages
5,681
Location
Northern Ok.
So Alex decided it was time to make the manual drum brakes work a little better on his newly acquired Mustang. What is the best way to fix manual drum brakes? Replace them with power disc brakes of course:
attachment.php


Four piston disc brakes at that, after taking way too much time to install the new brake pedal they are in and bled ready to rock.

He decided to clean up the strut tower braces and to paint them, he really enjoyed using the blast cabinet and decided on Ford engine blue:
attachment.php


Next up was making the tail lights a little brighter, he picked up some LED complete replacements with sequential blinkers as well as LED reverse lights:
attachment.php


Now time to test them out:
attachment.php


Oops the steering wheel is still removed for the brake job. LOL

Last but not least were seatbelts that cause cancer according to the warning label.
attachment.php


That was that, everything is back on and ready to go, this weekend we will replace the pinion seal on the axle, trans output seal, and reroute the trans lines that are currently under the front sub frame. :headscrat

It was a long fun project that he really enjoyed.

JB
 

Attachments

  • IMG_7809.jpg
    IMG_7809.jpg
    121.4 KB · Views: 408
  • IMG_7808.jpg
    IMG_7808.jpg
    140.7 KB · Views: 412
  • IMG_7807.jpg
    IMG_7807.jpg
    122.5 KB · Views: 409
  • IMG_7810.jpg
    IMG_7810.jpg
    114.3 KB · Views: 418
  • IMG_7811.jpg
    IMG_7811.jpg
    92.9 KB · Views: 410
OP
J

jbmatth

Well-known member
Joined
Jun 3, 2013
Messages
5,681
Location
Northern Ok.
NIce project

Thanks War Wagon, I really enjoyed the mower repair...OOOOHHHHHH you meant the Mustang, yeah I guess that is nice too. :lol_hitti

A seatbelt that causes cancer? Now I’ve seen everything.

This is why I drive GM. ;)

There you have it, drive a GM so you don't get cancer. LOL

Top job on the Mustang JB:thumbup:

Thank you 1/2, I helped out on it a lot but Alex did a majority of the work really. He was a complete novice when we started and it making great strides to learn as we go.

Nice work on the mower and mustang! Do the seatbelts cause cancer from wearing them or eating them? Asking for a friend :rolleyes:

Ken,
I'll have a bite, I mean have a friend have a bite, yeah that's it and let you know in a few years. :wtf:

All,

Good news is BP 2.0 is alive, it starts and runs just fine. This morning I got an early start (1:30 today will be a heavy coffee day) and filled it with trans fluid, changed the oil, installed the batteries, installed a few other odds and ends, then put the bumper on. I'm glad it is all back together and at least driveable. I still have a few things on the to-do list like re-oiling the air filter, changing one of the window regulators, and figuring out why the fuel level gauge reads zero (it has been doing that for a while now), but I'm very happy it at least runs. :beer:

JB
 
To avoid these ads, REGISTER NOW!

zmotorsports

ALLIANCE MEMBER
Joined
Oct 20, 2009
Messages
21,348
Location
Northern Utah
JB, glad you found the block on the firewall where your cables were supposed to land.

Nice job on the spring. I know it doesn't look the greatest but it worked on a temporary basis to get the job done. Been there done that and some of mine didn't look as good as yours which I am embarrassed to admit.:spit:
 
OP
J

jbmatth

Well-known member
Joined
Jun 3, 2013
Messages
5,681
Location
Northern Ok.
JB, glad you found the block on the firewall where your cables were supposed to land.

Nice job on the spring. I know it doesn't look the greatest but it worked on a temporary basis to get the job done. Been there done that and some of mine didn't look as good as yours which I am embarrassed to admit.:spit:

Mike,
Little things like those wires drive me nuts, it was so simple but I couldn't find what wasn't there. I can assure you I'll never make that mistake again. :thumbup:

In the words of National Lampoons Family Vacation, "If you think you hate it now, wait until you drive it." I'm really not sure how that applies but I like the quote and it just came to mind so I'm sharing it with everyone. It might look dumb but it worked and as you said that is all that matters.

JB
 

mybigwarwagon

Well-known member
Joined
Nov 4, 2009
Messages
4,428
Location
Vale, Nc
Thanks War Wagon, I really enjoyed the mower repair...OOOOHHHHHH you meant the Mustang, yeah I guess that is nice too. :lol_hitti

JB

As long as that isn't what I call a "temporarily permanent" repair. I can't tell you how many quick fixes I have done, and forgot about them, and found them years later.
 

oldironfarmer

Well-known member
Joined
Jun 25, 2016
Messages
6,664
Location
Terlton, Oklahoma
Getting the spring repaired so you can finish mowing is the key. Good job!

If you like using broken springs, (I do) and they always break at the end it seems, try putting a tube inside the spring with a cross hole close to the end, then shove a nail or cotter key through the second wrap on the spring and through the hole in the tube. Attach the tube to the mount and you'll have most of the original spring. It will generally stay put.

Mustang looks pretty good too! According to the State of California, air causes cancer. They have proven their clout, stuff straight from China has that little label, just in case.:lol_hitti
 
OP
J

jbmatth

Well-known member
Joined
Jun 3, 2013
Messages
5,681
Location
Northern Ok.
As long as that isn't what I call a "temporarily permanent" repair. I can't tell you how many quick fixes I have done, and forgot about them, and found them years later.

War Wagon,
I deal with that all the time both at home and work. I've found some of my ingenious temporary repairs and am shocked at how long they last.

At work we occasionally have thin piping or flanged connections that no longer seal as intended. It may sound strange to some but the worst culprit is water be that in the form of a liquid or in steam, steam leaks are a constant battle. One of the repair methods we have at our disposal is to design, build, and install engineer clamps that fully encase the leaking component. These by policy are to be temporary repairs that will be fixed properly at the next maintenance opportunity. One issue is that some of these steam lines supply multiple parts of the plant that never come down at the same time. That is how they become temporarily permanent repairs that could likely still be installed when I retire.


Getting the spring repaired so you can finish mowing is the key. Good job!

If you like using broken springs, (I do) and they always break at the end it seems, try putting a tube inside the spring with a cross hole close to the end, then shove a nail or cotter key through the second wrap on the spring and through the hole in the tube. Attach the tube to the mount and you'll have most of the original spring. It will generally stay put.

Mustang looks pretty good too! According to the State of California, air causes cancer. They have proven their clout, stuff straight from China has that little label, just in case.:lol_hitti

Good idea on the spring Andy, I'll have to remember that for next time. I've started to keep a good stock of old springs on hand for those just in case times and this one just so happened to work.

If I don't get cancer from the air I'll get silicosis from the dust on my gravel road, but who knows I may get it from wearing my seat-belt. Then I can sue the state for requiring me to wear cancer causing materials. Those jerks never thinking about our safety. :lol_hitti

JB
 
OP
J

jbmatth

Well-known member
Joined
Jun 3, 2013
Messages
5,681
Location
Northern Ok.
I have the truck back to a driver now, trans fluid is finely at the right level and I was able to take it for a short test drive yesterday. I had to snap a photo, it is rough and shows its past life as an abused truck but mechanically it is getting much better:
attachment.php


That is when things went south on me while heading east I was confused and didn't know which way to turn. The ABS light was on, the parking brake light would go on and off repeatedly, then the display told me to service the 4wd and wouldn't let me go into 4 high or 4 low. :headscrat

Drove it back into the Warthog Hidey Hole, crawled under and looked for something out of place. after a while I noticed two ground wires that didn't look right. I'd reinstalled the bolt but didn't tighten it. Oops, cleaned them off as one does then tightened and all is well. :thumbup:

This morning I replaced the rear passenger window regulator with one from the green Suburban that I'd saved and now that window will roll down and up, sweet.

I'll knock the last few things out this weekend and other than the fuel level, but may start on it we shall see.

JB
 

Attachments

  • IMG_7825.jpg
    IMG_7825.jpg
    150.4 KB · Views: 497
OP
J

jbmatth

Well-known member
Joined
Jun 3, 2013
Messages
5,681
Location
Northern Ok.
Man that is a wicked looking guard on that thing.

After using it a few times the spool holders and platform are great for putting a tire for pushing vehicles around and the platform is nice to stand on when getting into the engine bay. I've threatened to put pumpkins and witches heads on it for Halloween. :)

JB
 

XJSuperman

Well-known member
Joined
Jan 26, 2018
Messages
3,087
Location
Central Iowa
What did they originally use the added rods for? You could loop a rope and tire through the original part of the brushguard easily enough, Id cut the rod part off.
 
OP
J

jbmatth

Well-known member
Joined
Jun 3, 2013
Messages
5,681
Location
Northern Ok.
XJ Superman,
I bought the grill guard used from the 2nd owner, it was on a welding truck at the time. I can't say for sure what they were used for but the pain is messed up in a circle around each of the 5. (One has since broken off and hasn't been fixed. But now that it is in my shop I will do just that in the morning.) I will most likely keep them as they don't hurt anything and are convenient for wrapping a chain or tow strap around when I'm doing that sort of thing in the pasture.

JB
 
OP
J

jbmatth

Well-known member
Joined
Jun 3, 2013
Messages
5,681
Location
Northern Ok.
Ah, so they were carrying welding leads/tank hoses most likely. Thanks for the response.

Not a problem, thank you for reading along and joining in on the conversation. The welding bed (pictured below) on the back had some places to mount hose/leads so I really don't know. Too bad he welded the bed to the frame or I'd have taken that too before I parted it out. That truck did donate the tinted window, leather interior, and lots of other odds and ends to my truck at least.

View media item 63562
JB
 

XJSuperman

Well-known member
Joined
Jan 26, 2018
Messages
3,087
Location
Central Iowa
Heck, Id have kept the bed just for the steel plate to have on hand when I need it. Run out to the tree line and cut a piece off for a project and run back inside
 

OutlawDrifter

Well-known member
Joined
Jan 20, 2015
Messages
3,871
Location
KS
I would imagine they were there for building barbed wire fence. Slide the spools on the rods and your able to back up and spool out wire as you go.

5 rods for a good solid 5 wire fence.

Doesn't look like it had the add on for carrying the pre dug post holes, however. Rare and expensive option!
 

rixtrix1

Well-known member
Joined
Aug 25, 2013
Messages
3,010
Location
Chandler, AZ (from west NE)
I would imagine they were there for building barbed wire fence. Slide the spools on the rods and your able to back up and spool out wire as you go.

5 rods for a good solid 5 wire fence.

Doesn't look like it had the add on for carrying the pre dug post holes, however. Rare and expensive option!

Spoken like someone who's spent a little time out of the farm house!
 

C_F

ALLIANCE MEMBER
Joined
Jan 21, 2005
Messages
9,675
Location
Utah...SNOW BLOWS!
I would imagine they were there for building barbed wire fence. Slide the spools on the rods and your able to back up and spool out wire as you go.

5 rods for a good solid 5 wire fence.

Doesn't look like it had the add on for carrying the pre dug post holes, however. Rare and expensive option!

That's the first thing I thought of too, spools of barbed wire! :thumbup: Although if that's what the real purpose was, I would have mounted it on the rear of the truck.

That welding bed looks cool! I wonder why the guy didn't paint it after doing all that fabricating & welding?
 

oldironfarmer

Well-known member
Joined
Jun 25, 2016
Messages
6,664
Location
Terlton, Oklahoma
Unfortunately they are way too close for full spools of 12-1/2 ga barbed wire. Maybe electric fence wire, or THHN for pulling into conduit.:lol_hitti

The guard does not look so bad in person.
 
OP
J

jbmatth

Well-known member
Joined
Jun 3, 2013
Messages
5,681
Location
Northern Ok.
Heck, Id have kept the bed just for the steel plate to have on hand when I need it. Run out to the tree line and cut a piece off for a project and run back inside

I thought about it but I ended up selling the bed and frame for $200, I had lots of other stuff going on then but looking back I'd have made almost as much scrapping it out. Yeah I should have kept it, thanks for telling me now. :lol_hitti

I would imagine they were there for building barbed wire fence. Slide the spools on the rods and your able to back up and spool out wire as you go.

5 rods for a good solid 5 wire fence.

Doesn't look like it had the add on for carrying the pre dug post holes, however. Rare and expensive option!

Spoken like someone who's spent a little time out of the farm house!


That's the first thing I thought of too, spools of barbed wire! :thumbup: Although if that's what the real purpose was, I would have mounted it on the rear of the truck.

That welding bed looks cool! I wonder why the guy didn't paint it after doing all that fabricating & welding?

Unfortunately they are way too close for full spools of 12-1/2 ga barbed wire. Maybe electric fence wire, or THHN for pulling into conduit.:lol_hitti

The guard does not look so bad in person.

Outlaw, Rixtrix, C_F, and Andy,
Andy is correct they are way too close to fit spools of barb wire, electric fence maybe but why on the front? Oh well they are there and I plan to keep them that way. I decided to install the missing one this weekend but I couldn't find it. :( I even did a pretty big shop clean and I didn't find it then. :headscrat

Alex and I finished up the last few things on his Mustang we had on the books, bled the brakes one last time, realigned the steering wheel, he blasted and painted a few odds and ends, replaced the pinion seal and changed the gear oil, then there was this:
attachment.php


He filled the holes with JB Weld, then I filed them down with a bunch of flat files and a few jewelers files, then he painted them to match the other trim. I think all in all they turned out pretty well and will help to fill in some of the gaps he as on the exterior.

I was able to pull the roof and doors off of my wife's Jeep and we took it for a spin around the farm:
attachment.php


The girls had a blast and it was fun to take it off road even if it was just in our pasture.

Lastly I decided it was time to clean out our dump a bit more but wanted to get rid of some of the limbs and wood that had accumulated:
attachment.php


I have my trailer and truck full of metal to take to the scrap yard as well as some aluminum, brass, and copper set aside for Andy. :thumbup: I didn't realize there was so much in there, I have a stove, two washing machines, two water heaters, two dish washers, part of a cast iron tub, and a bunch of misc. All in all I'm sure at least a ton of metal to scrap at some point. All in all a productive weekend.

JB
 

Attachments

  • IMG_7843[1].jpg
    IMG_7843[1].jpg
    155.9 KB · Views: 330
  • IMG_7835[1].jpg
    IMG_7835[1].jpg
    156.8 KB · Views: 329
  • IMG_7833[1].jpg
    IMG_7833[1].jpg
    154.8 KB · Views: 331

oldironfarmer

Well-known member
Joined
Jun 25, 2016
Messages
6,664
Location
Terlton, Oklahoma
Great job on the trim!!

You got your pictures out of order and it is a hoot. Took your wife's jeep out for a spin on the farm:lol_hitti:lol_hitti:lol_hitti

I was able to pull the roof and doors off of my wife's Jeep and we took it for a spin around the farm:
attachment.php


The girls had a blast and it was fun to take it off road even if it was just in our pasture.

I bet she was pissed!:lol_hitti:lol_hitti
 
To avoid these ads, REGISTER NOW!
Top Bottom