rixtrix1
Well-known member
Thx, JB. Thanks for sharing all your endeavors. Best wishes to you and yours!
Sent from my SM-J320V using Tapatalk
Sent from my SM-J320V using Tapatalk

Merry Christmas JB!
Bret
JB: looks like you got your Christmas presents early. have fun!!
MERRY CHRISTMAS and have a great 2019 which looks like it's off to an early start heading that way with those boxes.
cheers
JB thats some nice shiny gear you have got there, it will be interesting to see how your foray into forced induction goes..
Merry Christmas and a great New Year to you and yours..
Merry Christmas JB
Thx, JB. Thanks for sharing all your endeavors. Best wishes to you and yours!
Sent from my SM-J320V using Tapatalk
Merry Christmas to you and your family JB! May the snail make your vehicle a whole bunch faster!!!
Joe

May you and yours have a merry Christmas.
JB,
Just stopped in to wish you and your family a Merry Christmas.
Looking forward to your "Year in review" post for 2018.
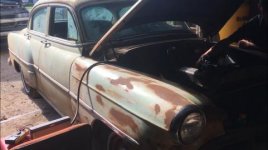
I did receive a few more packages from the man in the brown suit though. They are starting to stack up:") I did work on the ’57 on two occasions in 2018 the first I mention was actually finishing the install of the C4 front and rear suspension:
I did work on the ’57 on two occasions in 2018 the first I mention was actually finishing the install of the C4 front and rear suspension:


Holy moly you're a busy guy. Whew, I'm wore out.
Great job JB! I've been looking forward to your "year in review".
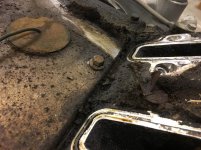
 I easily removed the threaded part and removed the caliper bracket to work on pulling the pin. After heating it with a butane torch (Yes I really need to buy a proper OA torch set up) and soaking it with penetrating oil I wasn't having any luck. Fine out comes the welder, after a few heat cycles and more penetrating oil I finely was able to remove it. Then after calling 6 parts stores I found it and I was done with the oil change 3 hours later.
 Great year JB. Your bandwidth continues to amaze me. I wish my wife had a passion for Jeeps.
Sent from my iPhone using Garage Journal
 I like the Jeep for Jeep things, but as a family car...not so much. They are something you can dump a bunch of time and money into and won't get that much back out, but on the other hand resale value is really good for them.
A couple of turns of baling wire would have kept the caliper from moving around until the other guide bolt broke.
Glad to see you are getting some quality shop time in.
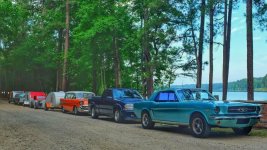
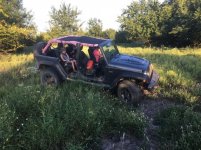
Here is the situation at my place.
https://scontent-atl3-1.**.fbcdn.net/v/t1.0-9/49069681_10157245566809739_4128221637478711296_n.jpg?_nc_cat=105&_nc_ht=scontent-atl3-1.**&oh=307179fc7a330ba8832540e5a32b5ae9&oe=5CD6AEB0
And it is supposed to rain tomorrow.
We have gotten a little rain over the past week and it doesn't want to dry up much. Luckily it isn't too bad, just lots of cleaning, I now know why I don't clean very often, it just takes so long.Good to see you are making progress working through your ADD. Lol. Hope things are starting to settle down a bit and you can get back on the 57. What do you think about turbo power ?? Pretty impressive isn’t it!
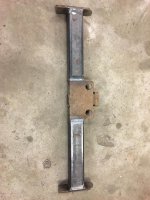
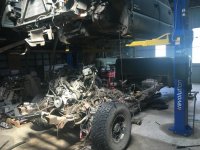
So rather than spend $20 and wait a week I picked one up locally for $45.  Back in business I finished installing everything else I can until I install the engine back in the frame:
Looking good JB.
JB: I've never rebuilt an engine or did much work on my cars especially since 1975 when it seemed you needed to buy a new tool or computer to do so, but I sure like watching guys post pictures and talk about it so maybe one day i'll take on an old truck and try it.
looks like you were the ALPHA DOG in the shop today cause looks like the engine is almost ready to install. WELL DONE!!!
another thing you might do if you have a fair amount of mud you have to walk over or around is maybe buy some 4x6 or 4x8 rubber mats that are 3/4 inch thick. most equestrian centers up here carry them cause the farms like them for their horses and I guess the cows too. I put them in my garage cause I had a gym in there for years. I know the 2x8's are probably a bit cheaper, but you can keep using these thick rubber mats for years and years once you own them. the 4x6's I own probably weigh about 80-90 pounds each so when you put them down they usually stay put.
keep up the good work.

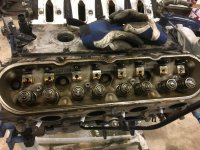
Wow, those Heads and valve covers really cleaned up nice, I didn't even know they were aluminum after seeing the before picture the first time you posted it.
Good job!
Top job JB it cleaned up well.
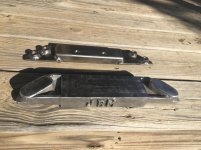
JB, you found a steal on the tool! I built mine out of some grade 10.9 metric "all thread".
I'll let you know if I stole it after I find out if it works, it is similar to yours, all thread, two washers and a nut. I'll end up using another nut and weld it onto the end.
JB
I guess I'll have to do a leak down test and see if I have a valve sealing issue, hopefully it can be solved by lapping the valves. Better order a gallon of POR15 for all the stuff you work on.
Some good oil based implement paint will do a decent job JB. That is what I used on the frame of the '49.
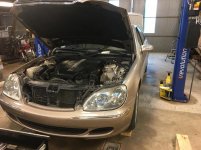
I'll put an order in today and see how far I can get until it arrives. Stainless isn't cheap and making a mistake could be costly.Before installing it I did install it into the "test stand", wired it all up connected it to a battery and hit the starter. To my surprise it started almost instantly. It idled as well as could be expected for an engine with a larger cam and no tuning, it eventually got oil to the valve train and ran like a top...well a top that needs a tune.
I have the headers installed and am working on the exhaust now and I can already tell I need more exhaust pipe.
JB
I'm finally caught up on your thread again after getting behind for several months - you've been busy. I enjoyed reading your year in review, and it highlighted just how busy your shop has been!
I'm really impressed by your engine test stand - that's a really useful and convenient tool, especially with all the engine swaps you do. At your current pace, I'm sure you'll have the truck running before the turnaround starts.
Yeah I know what gives right? Well my welding helmet quite on me, it was an auto darkening helmet that stopped auto darkening for some reason. I tried to find a way to replace the batteries but couldn't in my limited time by that point, it has lasted 7 years now so I decided to retire it. Picked up a new helmet, opened it today only to find it was missing one of the hinge "bolts" and of course the old helmet's bolts were different. I rigged it up for the time being and was able to make one weld before leaving for work.
![IMG_8249[1].jpg](/forum/data/attachments/714/714483-02036d9fa3615c6b517a02e6739bfb7a.jpg)


![IMG_8256[1].jpg](/forum/data/attachments/682/682365-14976b13c82ddaa474109de0e2f8f00d.jpg)