To avoid these ads, REGISTER NOW!

Above 1200 Sq/FT The Warthog Hidey Hole

Wokspaces above 1200 squarefeet.
OP
J

jbmatth

Well-known member
Joined
Jun 3, 2013
Messages
5,681
Location
Northern Ok.
A while back I got a bucket full of used horse shoes from a friend for some projects, previously I have made some bottle openers, shoe racks, and a couple other small things. The process is pretty simple, get horse shoes:
attachment.php


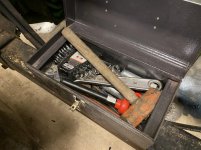
Then using a variety of tools pull all of the nails out:
attachment.php


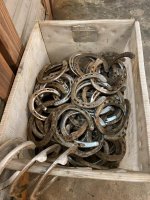
End up with a box of shoes ready to be cleaned:
attachment.php


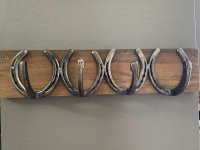
Then wire wheel, clean, cut, and weld, tap holes for mounting to a board and hang on the wall. Nice morning project that takes about an hour (once all of the nails are pulled):
attachment.php


I dropped the S10 transmission off this weekend and he expects to have it done in a week, woo hoo.

JB
 

Attachments

  • IMG_2027.jpg
    IMG_2027.jpg
    157.7 KB · Views: 300
  • IMG_2029.jpg
    IMG_2029.jpg
    156.3 KB · Views: 302
  • IMG_2028.jpg
    IMG_2028.jpg
    132.1 KB · Views: 303
  • IMG_2030.jpg
    IMG_2030.jpg
    123.8 KB · Views: 302
To avoid these ads, REGISTER NOW!
OP
J

jbmatth

Well-known member
Joined
Jun 3, 2013
Messages
5,681
Location
Northern Ok.
Next up was the welding table, previously I'd built it and have used it a ton, but to increase versatility I wanted to drill a grid of holes to be used with clamps for holding down projects. I picked up a 1/2" (12.7mm) annular cutter and already had 2 7/16" (11.1mm) cutters. Start by removing everything from the table and cleaning up surface rust from the still slightly leaking roof:
attachment.php


Then start drilling:
attachment.php


Broke the 1/2" (12.7mm) bit on the third hole :( 
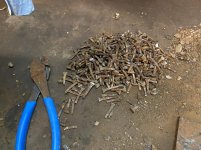
I was able to eventually fish it all out:
attachment.php


I then started drilling with the 7/16" bit and came back with a 1/2" (12.7mm) twist bit to finish them off:
attachment.php


Continue drilling for hours with lots of swarf and oil everywhere:
attachment.php


You may have noticed the three broken cutters, I ended up breaking the two 7/16" (11.1mm) cutters as well. Not sure how or why the broke, it was cutting fine and everything seemed to be going great then it caught something and snapped off. Fishing out all of the broken parts was a pain when the hole is partially complete and the last of the parts were 3/4" (19mm) in the table with very little room to work with. I had to make a trip about an hour away to get one more 1/2" (12.7mm) bit to finish it all off.

Once done clean the table a bit more and deburr the holes:
attachment.php


Followed by making 4 clamps from some HF clamps previously purchased for this task:
attachment.php


All in all I'm pretty pleased with the outcome, I realized once done that I needed to deburr the holes from the bottom too, oops. Also I debated for a bit on hole layout and eventually settled on a 4" (100mm) grid, that way with the clamps I could reach any location on the table and even overlap if needed.

JB
 

Attachments

  • IMG_2037.jpg
    IMG_2037.jpg
    147.6 KB · Views: 292
  • IMG_2036.jpg
    IMG_2036.jpg
    147.3 KB · Views: 295
  • IMG_2035.jpg
    IMG_2035.jpg
    148.3 KB · Views: 296
  • IMG_2034.jpg
    IMG_2034.jpg
    153.8 KB · Views: 301
  • IMG_2033.jpg
    IMG_2033.jpg
    150.8 KB · Views: 303
  • IMG_2032.jpg
    IMG_2032.jpg
    124.4 KB · Views: 304
  • IMG_2031.jpg
    IMG_2031.jpg
    152.8 KB · Views: 304
Last edited:
OP
J

jbmatth

Well-known member
Joined
Jun 3, 2013
Messages
5,681
Location
Northern Ok.
Nice work on the table JB!

Coat rack looks very western...I like it!

Thank you, these were projects that have been on the to do list for a while and while the trans was out I had a good excuse to knock them out. I already have another "order" for a coat rack. No rest for the wicked.

JB
 

zmotorsports

ALLIANCE MEMBER
Joined
Oct 20, 2009
Messages
21,347
Location
Northern Utah
The table turned out great JB.

I too recently added a few holes to my long time fabrication table to increase its versatility. Not quite as many as you added but, baby steps.....:D
 

drivesitfar

Well-known member
Joined
Oct 23, 2013
Messages
36,003
Location
Pacific Northwest
JB: nice work on the table. is it an inch thick? I wonder if a different drill and better quality bits might have helped?

before I moved out of my big shop I was looking for a good mag drill and prices were always high and bits weren't cheap either. since I didn't have an immediate need and just wanted one i never pulled the trigger, but I've seen them work and drill holes in thick steel plate like it was butter.

your table looks great now and i'm sure we'll see a few cool projects this summer.

nice work on the coat rack too!!

best of luck on the ****** rebuild and install.
 
OP
J

jbmatth

Well-known member
Joined
Jun 3, 2013
Messages
5,681
Location
Northern Ok.
Lovely work on the coat hooks.


And that table rocks.


Bret made a similar setup for woodwork recently.

Thanks for the visit Rian, it was a fun little project the girls are already using.

The table turned out great JB.

I too recently added a few holes to my long time fabrication table to increase its versatility. Not quite as many as you added but, baby steps.....:D

Mike,
Your table and the one another fellow member did are part of the reason I decided to get this done now rather than keep pushing it off. (Wish I could remember his name, he is building the goat built rig.) I debated on the hole spacing and was pretty much set on 5" until I started to lay it out and would have made some odd placed holes near the edge and I had to have them even to all edges. So thanks for the inspiration. :thumbup:

Digging the table for sure. I need to build a fab table. My workbenches aren't really cutting it anymore.

It isn't a very big fab table, but is very nice to use when needed. When not needed I just roll it and the welders off to the side out of the way. Kinda heavy though at 700 pounds (318 kg) (50 st). If I were to build one from scratch with no limitations I'd build it slightly bigger, and higher, when working on the surface I'm bending over too much. However, when working on stuff on the table it is about perfect. :headscrat

JB
 
OP
J

jbmatth

Well-known member
Joined
Jun 3, 2013
Messages
5,681
Location
Northern Ok.
JB: nice work on the table. is it an inch thick? I wonder if a different drill and better quality bits might have helped?

before I moved out of my big shop I was looking for a good mag drill and prices were always high and bits weren't cheap either. since I didn't have an immediate need and just wanted one i never pulled the trigger, but I've seen them work and drill holes in thick steel plate like it was butter.

your table looks great now and i'm sure we'll see a few cool projects this summer.

nice work on the coat rack too!!

best of luck on the ****** rebuild and install.

Drives, yes the top is 1" thick, the annular cutters were carbide and were either Hougen or another quality manufacturer I can't remember, either way they were between $30 and $45 each. :scared: 
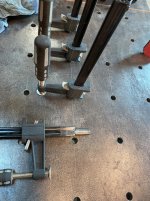
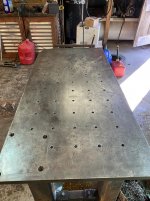
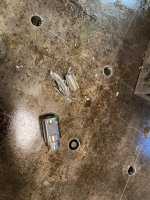
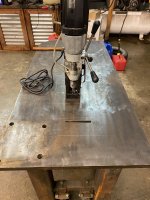
Drill is similar, I used my mag drill so it was a very stable setup and cut incredibly well. I used cutting oil just as recommended by the machinists at work. I did take my time, drill for 1-2 seconds, back off, and repeat. The only thing I can think is I had something between the drill base and the table that allowed it to rock ever so slightly and bind the bit.

I know there will be plenty of projects built on the table in the coming years.

JB
 

shopnut

Well-known member
Joined
Feb 22, 2006
Messages
4,237
Location
Florida
The weld/fab table looks great! It IS weird that bits kept breaking on you. That can be super frustrating. The hole grid might make it useful for many things besides welding.
 

racer-john

Well-known member
Joined
Apr 1, 2008
Messages
1,461
Location
Newmarket, ON Canada
I have seen recomendations to NOT remove the cutters from the holes until the hole is complete.
I just received my MagDrill and am anxious to start using it. Right now my shop is still too cold.
John S. Evelyn, C.E.T.. retired
 
OP
J

jbmatth

Well-known member
Joined
Jun 3, 2013
Messages
5,681
Location
Northern Ok.
The weld/fab table looks great! It IS weird that bits kept breaking on you. That can be super frustrating. The hole grid might make it useful for many things besides welding.

I assure you it was very frustrating, but luckily it is behind me now. I do envision it being used for a few layout jobs upcoming.

I have seen recomendations to NOT remove the cutters from the holes until the hole is complete.
I just received my MagDrill and am anxious to start using it. Right now my shop is still too cold.
John S. Evelyn, C.E.T.. retired

Just to make sure I'm understanding you correctly, once you start drilling you would keep constant pressure on the handle until the hole is complete? Do you know the reasoning behind that? What I was doing was more akkin to peck drilling, pressure for a couple seconds, relax to break the chip, and repeat. This prevents huge chips from forming and allows more oil to get into the hole. I'm curious to find out, maybe it will be an expensive lesson but at least it is behind me now.

JB
 

Bob Heine

ALLIANCE MEMBER
Joined
Oct 24, 2009
Messages
10,703
Location
Boca Raton, Florida
JB, in my early 30s I pulled the big block heads out of the Corvette's engine bay. Hard to balance with one hand so I bolted a chain to both ends and over my neck. Piece of cake then but the thought of doing it now sends shivers up my spine. Every time I think of aluminum heads I remember the iron ones have to come off.
 
OP
J

jbmatth

Well-known member
Joined
Jun 3, 2013
Messages
5,681
Location
Northern Ok.
JB, in my early 30s I pulled the big block heads out of the Corvette's engine bay. Hard to balance with one hand so I bolted a chain to both ends and over my neck. Piece of cake then but the thought of doing it now sends shivers up my spine. Every time I think of aluminum heads I remember the iron ones have to come off.

I've moved some BB Chevy heads by hand and they would not be fun to pull over the fender on a Corvette. Just one more story on why BH is the master of ingenuity.

JB
 

drivesitfar

Well-known member
Joined
Oct 23, 2013
Messages
36,003
Location
Pacific Northwest
JB: FYI all the holes i've seen drilled with mag drills it seems like they didn't pull back out til hole was drilled and some pretty thick plate too. not sure what drills and bits they were using, but thought i'd mention this in case you have to drill a few more holes.

i've seen that picture of Bob pulling out an engine with a strap around his neck and don't think i'll ever forget that cause it didn't even look like he was straining.
 
OP
J

jbmatth

Well-known member
Joined
Jun 3, 2013
Messages
5,681
Location
Northern Ok.
JB: FYI all the holes i've seen drilled with mag drills it seems like they didn't pull back out til hole was drilled and some pretty thick plate too. not sure what drills and bits they were using, but thought i'd mention this in case you have to drill a few more holes.

i've seen that picture of Bob pulling out an engine with a strap around his neck and don't think i'll ever forget that cause it didn't even look like he was straining.

I'll have to ask around, I couldn't find a definitive answer looking for about 5 minutes earlier.

I have as well, and it was pretty cool to see.

JB
 

drivesitfar

Well-known member
Joined
Oct 23, 2013
Messages
36,003
Location
Pacific Northwest
JB: I asked a friend of mine that really speaks METAL and he owns at least one Mag drill if not a few and he said you need to keep constant pressure on the bit. I hope he has time to make a post here cause I told him you had questions so I hope he finds your thread.

anyway your end result looks AMAZING so WELL DONE!!
 

Lwel9226

Well-known member
Joined
Jun 7, 2014
Messages
764
Location
So Oregon
I have seen recomendations to NOT remove the cutters from the holes until the hole is complete.
I just received my MagDrill and am anxious to start using it. Right now my shop is still too cold.
John S. Evelyn, C.E.T.. retired

That is how I use mine... Once you start keep steady pressure (not overly hard) on your cutter until it is through.... If you do pull out... COMPLETELY clean all of the chips from the tool and the hole before going back in....
Of all the holes I have drilled with mine I have only broken one cutter and that was after pulling out and going back in.... :lol_hitti Learning the hard way... (I think it was a 5/8 cutter)

LynnW
 
Last edited:
OP
J

jbmatth

Well-known member
Joined
Jun 3, 2013
Messages
5,681
Location
Northern Ok.
JB: I asked a friend of mine that really speaks METAL and he owns at least one Mag drill if not a few and he said you need to keep constant pressure on the bit. I hope he has time to make a post here cause I told him you had questions so I hope he finds your thread.

anyway your end result looks AMAZING so WELL DONE!!

After discussing with a few machinists here at work they all said the exact same things, looks like I was wrong trying to play it safe. :eek: Now I know, hopefully I don't forget before my next set of holes to drill, none planned for now but good to know.

Thanks for the cudos on the table, I'm glad to have it done and should start a project on it this weekend if all goes well.

That is how I use mine... Once you start keep steady pressure (not overly hard) on your cutter until it is through.... If you do pull out... COMPLETELY clean all of the chips from the tool and the hole before going back in....
Of all the holes I have drilled with mine I have only broken one cutter and that was after pulling out and going back in.... :lol_hitti Learning the hard way... (I think it was a 5/8 cutter)

LynnW

As above, thank you for the information, the most lasting lessons come from bad experiences and this is one that will stick with my hopefully. Thanks for dropping in.

JB
 
To avoid these ads, REGISTER NOW!

racer-john

Well-known member
Joined
Apr 1, 2008
Messages
1,461
Location
Newmarket, ON Canada
Just to make sure I'm understanding you correctly, once you start drilling you would keep constant pressure on the handle until the hole is complete? Do you know the reasoning behind that? What I was doing was more akkin to peck drilling, pressure for a couple seconds, relax to break the chip, and repeat. This prevents huge chips from forming and allows more oil to get into the hole. I'm curious to find out, maybe it will be an expensive lesson but at least it is behind me now.

JB

The possibility of chips building up under the bit and causing it to jamb and break.
 

drivesitfar

Well-known member
Joined
Oct 23, 2013
Messages
36,003
Location
Pacific Northwest
OK I let this simmer a bit to see if anybody else or maybe you would give more details.

TELL US ABOUT FARM AUCTIONS??

are they different from online or other auctions if you have some cash in your pocket?

cheers
 

XJSuperman

Well-known member
Joined
Jan 26, 2018
Messages
3,087
Location
Central Iowa
OK I let this simmer a bit to see if anybody else or maybe you would give more details.

TELL US ABOUT FARM AUCTIONS??

are they different from online or other auctions if you have some cash in your pocket?

cheers

Farm Auctions are dangerous because of the nature of the people and equipment there. Usually good people who work with you (read: fellow bidders) so everyone is happy. The equipment is often expensive, but can go REALLY cheap depending on the crowd. What this forum is mostly interested in is the small stuff that the farmers aren't really there for: vises, tools, etc. Those items can get you into trouble because you are likely to buy them all. :bounce:
 

OutlawDrifter

Well-known member
Joined
Jan 20, 2015
Messages
3,870
Location
KS
Farm Auctions are dangerous because of the nature of the people and equipment there. Usually good people who work with you (read: fellow bidders) so everyone is happy. The equipment is often expensive, but can go REALLY cheap depending on the crowd. What this forum is mostly interested in is the small stuff that the farmers aren't really there for: vises, tools, etc. Those items can get you into trouble because you are likely to buy them all. :bounce:

Better to get a number about 20min before the item you went to buy goes up for auction...keep your hands in your pockets the rest of the time :lol_hitti
 
OP
J

jbmatth

Well-known member
Joined
Jun 3, 2013
Messages
5,681
Location
Northern Ok.
OK I let this simmer a bit to see if anybody else or maybe you would give more details.

TELL US ABOUT FARM AUCTIONS??

are they different from online or other auctions if you have some cash in your pocket?

cheers

Well farm auctions are typically when a farmer either folds or passes away and the family sells their assets and runs away. :bounce: Well I haven't been to one in probably 30 years because I know I went with my dad from stories, but don't ever remember going to one.

The one coming up at the end of this month is close to my house and probably fortunately for me it is all online. There are a few things I really want from it including a couple tractors and a few pieces of equipment. I have some allowance money to spend and am very worried about how it is going to go.

Farm Auctions are dangerous because of the nature of the people and equipment there. Usually good people who work with you (read: fellow bidders) so everyone is happy. The equipment is often expensive, but can go REALLY cheap depending on the crowd. What this forum is mostly interested in is the small stuff that the farmers aren't really there for: vises, tools, etc. Those items can get you into trouble because you are likely to buy them all. :bounce:

Sadly there isn't much small stuff there I liked or "needed" but as mentioned above a tractor on my list goes early then shortly after another I've been considering. We shall see, this whole farming/ranching thing is starting to take shape. :eyecrazy:

Better to get a number about 20min before the item you went to buy goes up for auction...keep your hands in your pockets the rest of the time :lol_hitti

Luckily all online, I just need to make sure I don't have any drinks laying around giving me too much confidence.

JB
 

mybigwarwagon

Well-known member
Joined
Nov 4, 2009
Messages
4,428
Location
Vale, Nc
The last auction I went to the stuff was selling for stupid amounts. I went to bid on a Ford 1720 like Gertie. High hours and non running, but it had descent body panels and a goof FEL. It went for $10,000. There was some old guy there who was buying every tractor. I left after that.
 
OP
J

jbmatth

Well-known member
Joined
Jun 3, 2013
Messages
5,681
Location
Northern Ok.
The last auction I went to the stuff was selling for stupid amounts. I went to bid on a Ford 1720 like Gertie. High hours and non running, but it had descent body panels and a goof FEL. It went for $10,000. There was some old guy there who was buying every tractor. I left after that.

Yeah it can and does happen all the time, some people have more money than sense, I hope they decide to miss out on this one for my sake.

JB
 
OP
J

jbmatth

Well-known member
Joined
Jun 3, 2013
Messages
5,681
Location
Northern Ok.
I wanted to let everyone know the trans builder called last night and my trans is ready for pickup, I'm headed down Sunday to get it and be ready to put it in starting next week. Woo Hoo!

Sadly I'm rolling over to an outage starting next week and start on nights in 2 weeks that will last 5 additional weeks. I'll probably not have access to a computer very often and even less time to do anything with it other than work. :( Ya'll take care and I'll see you in May.

JB
 
OP
J

jbmatth

Well-known member
Joined
Jun 3, 2013
Messages
5,681
Location
Northern Ok.
I for one am going to miss you and hope you are making lots of cash while you’re working. Did farm auction happen today AND?

Take care!!

I submitted my time last week and will hear approval in a few more weeks I believe. I was eligible for 171.75 hours in the 5 weeks I worked and used 250 hours to qualify for them, so an average of 84.35 hours a week but I had to take 1 day off every two weeks so the average was essentially 87.55 hrs/wk. :scared:

Hi, I love the table!

Which trans did you have rebuilt? I have 10 trans on the shelf and I recently decided to sell off a few to free up space.

I replaced the trans in my S10 after destroying a lot of parts when a hose came loose and lost all of the fluid while driving over a couple days. I'll give more info shortly, still trying to catch up with everything still.

Nights are killing my updates.


I trust you are surviving though.

I did survive and still managed to get plenty of work done while working long hours and sleeping short hours. :spit:

JB
 
OP
J

jbmatth

Well-known member
Joined
Jun 3, 2013
Messages
5,681
Location
Northern Ok.
Okay, I have a dump of photos and progress I need to post and will be doing them in no particular order other than how I pulled them from my phone. To start off when I was on nights I walked out of the shop around 2 pm and noticed this little guy:
attachment.php


The cheap horse that found its way to our house turned out to be pregnant and had a foal, we didn't know anything about it until I found it. Oh fun :sad:

As a joke mostly I picked up this, my masters degree in mechanical engineering from HFU:
attachment.php


I received a sticker pack for the Chitbox from a fellow Gambler 500 participant:
attachment.php


Got my order confirmation:
attachment.php


On my way home one morning I hit a rock in the road that blew out one tire, broke cords in another, and my spare was flat, decided to ruin the spare and possibly rim rather than take a chance on ruining my aluminum rims:
attachment.php


I also took a few dozen photos of Lil Bo Jeep trying to make a deal work out on a trade with it for something way more fun:
attachment.php


attachment.php


More to come,
JB
 

Attachments

  • IMG_2232.jpg
    IMG_2232.jpg
    125.4 KB · Views: 184
  • IMG_E2251.JPG
    IMG_E2251.JPG
    41.2 KB · Views: 186
  • IMG_2204.jpg
    IMG_2204.jpg
    147.2 KB · Views: 185
  • IMG_2203.jpg
    IMG_2203.jpg
    119 KB · Views: 186
  • IMG_2125.jpg
    IMG_2125.jpg
    170.7 KB · Views: 186
  • IMG_2134.jpg
    IMG_2134.jpg
    147.2 KB · Views: 185
  • IMG_2133.jpg
    IMG_2133.jpg
    150.3 KB · Views: 186
OP
J

jbmatth

Well-known member
Joined
Jun 3, 2013
Messages
5,681
Location
Northern Ok.
Took the Jeep to Alex's house for safe keeping since it was pretty clean and closer to town:
attachment.php


I also finished the electrical fan wiring on his Mustang after all of the other work we had done on it and took it for a spin. Now it is all ready for summer road trips when he gets back from deployment:
attachment.php


Sold the OEM rims from my S10:
attachment.php


The day before I left to the outage I was able to pick up my transmission, just in the nick of time:
attachment.php


It was roached, all bands, clutches, planetary, and a few other parts I couldn't name needed to be replaced. :sad:

I installed the Circle D torque converter with a billet front:
attachment.php


Installed in the truck:
attachment.php


Then during one of my two days off in that time I installed the rest of the truck and have been driving it, much crisper shifts with the shift kit and upgraded internals. :3gears:

Also built a coat rack for my parents like the one for our house:
attachment.php


More to come,
JB
 

Attachments

  • IMG_2048.jpg
    IMG_2048.jpg
    157 KB · Views: 185
  • IMG_2202.jpg
    IMG_2202.jpg
    155.8 KB · Views: 184
  • IMG_2200.jpg
    IMG_2200.jpg
    93.1 KB · Views: 187
  • IMG_2051.jpg
    IMG_2051.jpg
    152.4 KB · Views: 189
  • IMG_2194.jpg
    IMG_2194.jpg
    155.9 KB · Views: 188
  • IMG_2277.jpg
    IMG_2277.jpg
    147.8 KB · Views: 189
  • IMG_2273.jpg
    IMG_2273.jpg
    152.4 KB · Views: 187
OP
J

jbmatth

Well-known member
Joined
Jun 3, 2013
Messages
5,681
Location
Northern Ok.
While cleaning up the area behind the shop last year I found an axe head, picked up a handle, cleaned up the head, put an edge on it:
attachment.php


It took a pretty good edge, sadly it is pretty beat up now as I've used it to cut roots out while doing more work in the same area:
attachment.php


Also just because I saw this grinder at work and took a photo, that is a 16 oz drink cup on it, 25 hp 3ph:
attachment.php


Also as it is nice to have a few tools I added a small tool box I picked up at a yard sale:
attachment.php


Holds about everything I need to keep with me while working on it:
attachment.php


More to come,
JB
 

Attachments

  • IMG_2049.jpg
    IMG_2049.jpg
    149.8 KB · Views: 181
  • IMG_2050.jpg
    IMG_2050.jpg
    147.4 KB · Views: 182
  • IMG_2157.jpg
    IMG_2157.jpg
    154.9 KB · Views: 607
  • IMG_2170.jpg
    IMG_2170.jpg
    154.9 KB · Views: 182
  • IMG_2171.jpg
    IMG_2171.jpg
    153 KB · Views: 181

XJSuperman

Well-known member
Joined
Jan 26, 2018
Messages
3,087
Location
Central Iowa
What do you mean sell the jeep for something more fun? I am confused, there is nothing more fun than a jeep...:wtf:

I warned you about the horses....
 
OP
J

jbmatth

Well-known member
Joined
Jun 3, 2013
Messages
5,681
Location
Northern Ok.
I for one am going to miss you and hope you are making lots of cash while you’re working. Did farm auction happen today AND?

Take care!!

Hi, I love the table!

Which trans did you have rebuilt? I have 10 trans on the shelf and I recently decided to sell off a few to free up space.

I had a bucket of horse shoes, gave most away.

Maybe its time to make them into something

Good job.

I don't have any photos but for Bear I made one into the shape of the St. Louis Arch for a school project. Plenty of things could be made with them, I probably have a few hundred now.

JB
 
To avoid these ads, REGISTER NOW!
Top Bottom