To avoid these ads, REGISTER NOW!

The Wild Oak Garage Brewery

OP
G

goofiefoot

Well-known member
Joined
Jun 24, 2016
Messages
196
Location
Rockport, TX
When measuring for the windows and screens, my numbers weren't matching up on one side. I triple and quadruple checked the measurements, but kept coming up short. Then I realized the mistake. The rafters are meant to line up with the supports between the front windows, then match up with corresponding studs on the back wall. When installing one rafter, I lined it up with the wrong stud, so it was off about 6-7 inches. Of course, I discover this now, with the roof in place.

By some miracle, I was able to remove the nails from the hurricane ties without damaging it, and had the forethought (yeah, right) to use screws to connect the purlins to the rafters instead of nails. What I thought might be a lost cause, and a something to nag at my OCD, turned out to be a 30-minute fix. Whew.
 
To avoid these ads, REGISTER NOW!
OP
G

goofiefoot

Well-known member
Joined
Jun 24, 2016
Messages
196
Location
Rockport, TX
After a long week, which included my first day as a full-time employee at my job, I woke up this morning to rain. The girls planned to be out of town so I could work on the shed uninterrupted, so I started some inside work. Around 11, the rain broke, and I started moving tools out to the shed. The humidity was stifling, and I probably lost 2-3 pounds in sweat today, but I'm pleased with what I got done.

The screens between the rafters came out pretty good. I used cedar 1x2s and 2x2s, which I stained with Cedar-tinted Thompsons to keep them looking fresh. I plan to do this with the rest of the trim and paint the siding to match the house.

2017-05-20%2019.33.10.jpg


The window plans call for custom 1/8" glass to be cut and sandwiched between the 1x2s with silicone. I plan to install the glass last, after I've painted and installed all the exterior trim and doors. I don't want to be banging around and chance breaking them.

2017-05-20%2018.57.55.jpg


Next steps are caulking and prepping the siding for paint, painting, then start on the trim. I need to build the doors as well. My dad set aside for me some heavy-duty hinges he found in his shop, and I plan to modify the door design from the original plans to add some thickness and heft to the doors, now that they'll be swinging. Stay tuned.
 
Last edited:
OP
G

goofiefoot

Well-known member
Joined
Jun 24, 2016
Messages
196
Location
Rockport, TX
Between work, travel, and rainstorms, I got the painting done. I even enlisted my little helper to keep her out of Mom's hair for a while. She did pretty well for a while, then got bored. She's as rough-and-tumble as any boy her age, but when I asked her to put on some old clothes to paint, this is what she picked:

2017-05-24%2019.06.58.jpg


I stained trim boards yesterday, but ran out of my first gallon of Thompsons. This evening, I was able to get the front trim complete, except for the door surround, and each of the rear corners.

2017-05-30%2020.32.49.jpg
 
Last edited:
OP
G

goofiefoot

Well-known member
Joined
Jun 24, 2016
Messages
196
Location
Rockport, TX
Your helper did a great job. I'm thinking you should wear the same outfit. lol

I think I already frighten the neighbors enough already, so I'll pass. :D

I'm really pleased with the stained cedar around the windows, and on the corners, but I'm not sold on the battens. As you see in the last photo, I've placed the front two on either side of the door. The plans call for battens at all the 16" stud locations on each wall. I'd love opinions on staining the battens, or painting them to match the wall color, or leaving them off altogether.
 

shortykorte

Well-known member
Joined
Sep 1, 2014
Messages
8,039
Location
Tallahassee, Fl
I think the stained battens will make it look busy. I'd go with body color or leave them off. I imagine seeing in person would allow one to make the best choice.


Sent from my iPhone using Tapatalk
 

bj383ss

Well-known member
Joined
Sep 29, 2011
Messages
3,166
Location
TX
I vote for staining the battens. Your build is already very unique. Why not go some more with it. I think they would look better if the paint was a little darker. JMHO.

Can't wait to see it finished.

Bret
 

strength_and_power

Well-known member
Joined
Apr 26, 2015
Messages
1,429
Looks good. When will you be brewing beer again? Seems like a long time to not have beer


Sent from my iPhone using Tapatalk
 
OP
G

goofiefoot

Well-known member
Joined
Jun 24, 2016
Messages
196
Location
Rockport, TX
I think the stained battens will make it look busy. I'd go with body color or leave them off. I imagine seeing in person would allow one to make the best choice.

I vote for staining the battens. Your build is already very unique. Why not go some more with it. I think they would look better if the paint was a little darker. JMHO.

Can't wait to see it finished.

just found this. good job! i vote for no battens.

For the time being, I'm leaving the battens off. I have plenty of 1x2's if I change my mind, but I'm liking the cleaner look.


Looks good. When will you be brewing beer again? Seems like a long time to not have beer

I'm hoping to start brewing again soon. I agree, it's a long time without my own beer. I've had to make do with store-bought. At least it's given me time to catch up on some the many local breweries sprouting up around Austin.
 
OP
G

goofiefoot

Well-known member
Joined
Jun 24, 2016
Messages
196
Location
Rockport, TX
A nice, productive Saturday!

2017-06-10%2017.52.25.jpg


My doors came out really heavy, so I've been dreading installing them on my own. I ended up stacking extra lumber to support the doors while I got the hinges lined up and screwed in. I could have probably gotten things a little straighter, but overall, they do the job well.

2017-06-10%2011.18.30.jpg


Once I got the door trim on, I made the final decision to go without battens.

Before:

2017-06-10%2012.53.23.jpg


After:

2017-06-10%2013.03.12.jpg


2017-06-10%2013.03.30.jpg


I wanted some big, chunky handles for the doors, but couldn't find anything suitable in the gate/shed hardware section, or in the cabinet hardware section, but I ended up in the bathroom section, and found some 9" safety handles I like the look of. They are nice and solid, and should hold up well to the exterior, since they're made for the damp of showers.

2017-06-10%2017.48.16.jpg


The window glass is the only remaining step. I hope to get that cut and installed this week, so it will be completely closed in. It's usable as it is, and I'm pleased with the results.

2017-06-10%2017.47.46.jpg


I moved the stuff back in from the garage, but did not take the time to organize. I plan to use leftover lumber to build shelves and hangers to take advantage of the extra wall space. For the time being, though, the Jeep has its spot back in the garage!

2017-06-11%2008.15.34.jpg


I'm looking forward to having this part completely done so I can start focusing on the garage (this is ultimately a garage thread, after all). While I've been trying to put everything back where it goes as I've been building, new tools and supplies that don't have a place are haphazardly being placed, and need a permanent home.
 
Last edited:
OP
G

goofiefoot

Well-known member
Joined
Jun 24, 2016
Messages
196
Location
Rockport, TX
The windows are in!

2017-06-15%2019.38.13.jpg


2017-06-15%2019.39.26.jpg


I will admit, I bought some glass and a glass cutter at Home Depot to try to cut my own windows. I completely screwed that up, and cut the hell out of one of my fingers, so I returned the uncut glass, and called up a local glass shop.

Once I got the glass cut to size, this was one of the easiest parts of the install. Silicone and some finish nails, and about an hour of work, and it's all sealed in!

Next step is organizing the tools and equipment inside, and find a place to store the lumber and kayak. I'm really excited with all the usable space, and look forward to finding the right spot for everything.
 
Last edited:

madoc1

Well-known member
Joined
Dec 11, 2012
Messages
1,242
Location
spicewood, tx
looks great! how about storing the wood and ka-ak on the back of the shed with a small overhang above it? out sight and prett- much covered.

jim
 
OP
G

goofiefoot

Well-known member
Joined
Jun 24, 2016
Messages
196
Location
Rockport, TX
The whole Photobucket fiasco has put a damper on my posting, but I finally got around to transferring all my PB photos to Dropbox. I've done a little work on the shed to organize things.

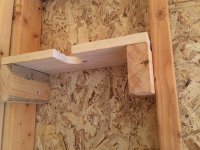
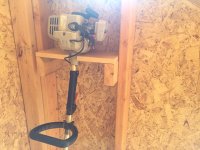
I started with my yard equipment, finding ways to maximize space. I've been wanting to hang my weedeater, so I built a bracket out of scrap that works well.

2017-06-17%2015.49.41.jpg
2017-06-17%2015.50.05.jpg

Some shelves and a hook for my chainsaw keep everything reachable, but compact within this one corner.

2017-06-17%2017.07.17.jpg
 

m coop

Member
Joined
Apr 5, 2013
Messages
21
Great great shed! Hoping to build similar to this in the not to distant future!

-coop
 
OP
G

goofiefoot

Well-known member
Joined
Jun 24, 2016
Messages
196
Location
Rockport, TX
Some actual garage news (kinda): I ordered my new brew rig!

It's a custom 20-gallon 240V single-vessel brew-in-a-bag system that should allow me to brew almost any style beer in up to 10-gallon batches. I have to tie into the 50a line that's leftover from my kitchen remodel and run the plug into the garage, and should have that done by the time the equipment is delivered. I'm super-excited to get back to my brewing. The garage will live up to its namesake soon!

I got all my receipts together last night for the shed build. It came in right around $2000 for materials. Of course, I didn't completely build it up from the foundation, and I was able to reuse quite a bit from the old shed, but I'm pretty proud of doing this for far less than I'd be able to buy turnkey. Plus, I have the pride of doing it all myself.

My wife's F150 has developed a miss when driving, which at around 100k miles was the plugs. At 160k miles I'll be going back in now and replacing the coil pack, and will probably go ahead and replace the plugs again. The first round, the truck had the notorious 5.4L 3V spark plugs that like to break off in the block, and I had 3 break on me then. I replaced them with the newer, better design, so when I replace them this time, they should behave. I'll try to document as I go.

The laundry room still needs attention, and I may focus on that as my next big project. Other than moving some of the fixtures around, it should be a pretty cut-and-dry process. More to come.
 
To avoid these ads, REGISTER NOW!

BoilermakerFan

Well-known member
Joined
Apr 17, 2006
Messages
2,188
Location
Indianapolis, Indiana
Some actual garage news (kinda): I ordered my new brew rig!

It's a custom 20-gallon 240V single-vessel brew-in-a-bag system that should allow me to brew almost any style beer in up to 10-gallon batches. I have to tie into the 50a line that's leftover from my kitchen remodel and run the plug into the garage, and should have that done by the time the equipment is delivered. I'm super-excited to get back to my brewing. The garage will live up to its namesake soon!

I got all my receipts together last night for the shed build. It came in right around $2000 for materials. Of course, I didn't completely build it up from the foundation, and I was able to reuse quite a bit from the old shed, but I'm pretty proud of doing this for far less than I'd be able to buy turnkey. Plus, I have the pride of doing it all myself.

My wife's F150 has developed a miss when driving, which at around 100k miles was the plugs. At 160k miles I'll be going back in now and replacing the coil pack, and will probably go ahead and replace the plugs again. The first round, the truck had the notorious 5.4L 3V spark plugs that like to break off in the block, and I had 3 break on me then. I replaced them with the newer, better design, so when I replace them this time, they should behave. I'll try to document as I go.

The laundry room still needs attention, and I may focus on that as my next big project. Other than moving some of the fixtures around, it should be a pretty cut-and-dry process. More to come.

Cool! I used to home brew in college then again in the early 2000s. One of my favorite recipes was Rocky Racoon's Honey Lager, but with local unfiltered honey and a different hops blend. In July 2012 I found out I had Celiac Disease so no more beer for me unless it is Omission. I wish they made a bock or other dark beer though. I sold, traded, or gave away my beer collection and equipment.

That's a great deal on that shed! I'm seriously considering doing a lean-to on the side of my garage to get all the lawn equipment out of the garage.

I had a 2012 Focus that I used for work. I didn't replace the plugs at 100K. I gave the care to my daughter at 147K. About a month ago at 148K it threw a check engine light and was running rough. Changed the plugs and pulled the battery cable. It cleared and is running great now. So that prompted me to go ahead and change the plugs in my wife's 2006 Pilot which had 132K on it. She noticed it started and drove better right away. I haven't driven it on a trip to see how much the mileage improved.
 

920kip

Well-known member
Joined
Aug 11, 2011
Messages
168
Location
Titletown USA
Your shed came out great. And very budget friendly.
Out of all the Family Handyman shed projects, this one looks the nicest to me.

Keep up the nice work.

Kip
 
OP
G

goofiefoot

Well-known member
Joined
Jun 24, 2016
Messages
196
Location
Rockport, TX
Two updates:

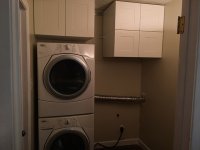
First, I got a wild hair on Sunday, and ripped out the laundry room cabinets. I have some IKEA cabinets that need to be assembled and set into place. As of Sunday (the washer and dryer are back in place now to keep the chores moving along):

2017-07-23%2015.13.06.jpg


And, as a reminder, this is hopefully how it will end up once I move my freezer in from the garage:

Screen%2520Shot%25202017-01-16%2520at%25204.06.29%2520PM.PNG


My second update is a little more exciting:

2017-07-26%2020.21.07.jpg


I did open it up to check everything, but I'll keep it under wraps here until I can get the electrical in place and assemble everything.
 
OP
G

goofiefoot

Well-known member
Joined
Jun 24, 2016
Messages
196
Location
Rockport, TX
Laundry room is coming along. Everything is up and running, just a few updates to finish it out.

Paint, trim and cabinets went up Saturday
2017-08-06%2012.51.08.jpg

The dryer outweighs my wife, but she pitched in and helped me lift it onto the washer. The stacking kit went on easily, and everything got hooked up
2017-08-06%2017.16.12.jpg

I bought two 12" wide base cabinets and stacked them, then placed them on casters in case I need to quickly get to the connections. My plan to build some shelves between the two upper cabinets with a bottom even with lower height. The stacked cabinet will roll right under that. I also plan to create a removable toe kick for the roller cabinet that attaches with magnets or clips to easily access the wheel locks.
2017-08-06%2023.49.40.jpg

I'm so glad to get the freezer out of the garage. I took all the deer/pig meat out and defrosted it, then moved it into place. With a new LED light fixture, and the fresh paint, it's really coming together!
2017-08-07%2023.03.23.jpg
 

shortykorte

Well-known member
Joined
Sep 1, 2014
Messages
8,039
Location
Tallahassee, Fl
Very nice transformation. I'll be setting up a laundry room and the double stack 12" base might be a useful idea.


Sent from my iPhone using Tapatalk
 
OP
G

goofiefoot

Well-known member
Joined
Jun 24, 2016
Messages
196
Location
Rockport, TX
I put together my brew rig this week. I'm very impressed with the fit and finish. It's killing me not to just get some brews going, but I'm waiting on my dad to come over and help me drop the 240V into the garage.

2017-08-14%2021.50.50.jpg


2017-08-14%2021.15.46.jpg


With a 5000W heating element and electronic temperature control, I'll be able to mash and boil in the same pot, up to 10 gallon batches.
 
OP
G

goofiefoot

Well-known member
Joined
Jun 24, 2016
Messages
196
Location
Rockport, TX
Both the Jeep and F150 were overdue for oil changes, so I knocked those out this morning, including tire rotations. Already sweaty and dirty, I decided to start considering the layout of the garage, and ended up spending the day rearranging the space.

This is what I started with this morning:
2017-08-19%2013.38.47.jpg


2017-08-19%2013.38.53.jpg


2017-08-19%2013.38.58.jpg


At 6 this evening, this is what I ended with:
2017-08-19%2017.36.39.jpg


2017-08-19%2017.36.46.jpg


2017-08-19%2017.36.54.jpg


All the large pieces are where I planned them to be, but I haven't done anything to organize the space. I moved the ice chests, some camping supplies, and a few other items to the storage building, which freed up a ton of room.

My brewing supplies will move in and around the blue cabinets, which current house many of my power tools. The power tools will then move over to the steel rack I have all my brewing stuff. I'll build my workbench to fit between the tool chest and water heater, and both rolling carts will fit underneath.

The wall cabinet on its side to the right will be refinished, hardware updated, and hung over the workbench, replacing the need for the open shelves on the left wall.

I'm really liking this layout, as it gets a few large items out of my way, up against the wall. There's still a ton to do, and I will have to pull everything out when I scrape the ceiling and paint the space, but I will wait for cooler weather for that. I probably lost a gallon or more of sweat today.
 

BuffettFan

Well-known member
Joined
Jul 11, 2017
Messages
10,928
Location
Central Illinois
What model is your brewkettle?

I've looked at their stuff some but haven't seen the electric ones. Must not be looking in the right place.

Thanks!
 
OP
G

goofiefoot

Well-known member
Joined
Jun 24, 2016
Messages
196
Location
Rockport, TX
What model is your brewkettle?


I've looked at their stuff some but haven't seen the electric ones. Must not be looking in the right place.


Thanks!


I bought the kit through High Gravity Brewing in Tulsa, and designated this kettle for the build. They did all the drilling and setup using parts for their single-vessel electric kit, so I was able to get exactly what I wanted. With the larger, nicer kettle and upgraded pump, plus a couple of extras i paid just a couple hundred dollars more for this than their typical single-vessel kit.
 
OP
G

goofiefoot

Well-known member
Joined
Jun 24, 2016
Messages
196
Location
Rockport, TX
My dad came up on Saturday and helped me install the 240V service in the garage, and we performed a successful test run on the brew system. Later that day, I went out and bought ingredients for a impromptu 10-gallon brew session - my first brew in well over 2 years!

I set it up temporarily on top of my garage cabinets, which I found too tall for comfortable access, but I got it done. I'm building a cart for the brew kettle which will accommodate the pump and chiller, and sit at a better height.

2017-09-23%2019.23.16.jpg


2017-09-23%2019.23.25.jpg


The Auber controller is pretty simple to master, so I was able to get up and running quickly. My tap water was 84° and it took 13.5 gallons 28 minutes to reach the 157° strike temp with the 5000W heating element.

2017-09-23%2019.23.33.jpg


I bought a Cereal Killer mill with some birthday money, since I read a finer crush does better for brew-in-a-bag applications. The mill came with a handle, which I removed after about 30 seconds of turning, and attached my drill. Much better, and it improved my brew efficiency by a large amount.

2017-09-23%2019.33.16.jpg


Going from mash to boil was pretty quick, though I didn't time it this go 'round. The controller knob made quick work of controlling the hot break without any worry of boil-over, and the adjustable alarm for getting close to boil temp kept me alert. I maintained a good, rolling boil for 60 minutes at 70% power.

2017-09-23%2021.23.18.jpg


I neglected to take any more photos of my session, but it all went fairly well. It's amazing how quiet it all is. My last setup, with propane jet burners and a loud march pump, made for an annoyingly loud brew day, and I look forward to having voice-level conversation, and listening to music while I brew.

I am extremely pleased with my purchase, and looking forward to my next session, which I plan to start working on brew day time efficiency. Stay tuned.
 
OP
G

goofiefoot

Well-known member
Joined
Jun 24, 2016
Messages
196
Location
Rockport, TX
Happy New Year from the Brewery!

I'm realizing my absence from posting coincides, not coincidentally, with deer season. It was a hard season, as our typical large population of deer hardly showed up. I finally took a doe in early December, and finally closed the deal on my shooter buck this past Saturday.

2017-12-30%2008.38.15-1.jpg


I have brewed a couple more batches of beer on the new system, and continue to tweak the process. There is finally beer in the kegerator again!

2017-12-10%2013.37.59.jpg


2017-12-17%2013.32.59.jpg


2017-12-10%2014.44.31.jpg


2017-12-10%2014.58.59.jpg


2017-12-17%2013.37.12.jpg


2017-12-10%2016.47.56.jpg


The only garage-y task was to change the coils and plugs in the F150. It started missing under load, so I switched them all out. At 165k miles, it runs like a champ again.

2017-10-29%2014.29.42.jpg


I realized when reviewing my maintenance records that I hadn't cleaned the K&N air filter in a while. This is the **** I knocked out of the filter before I cleaned it:

2017-10-29%2014.30.34-1.jpg


And found this, and more, in the filter box:

2017-10-29%2014.35.32.jpg


Ready for another 165k at least. Looks good with some rare New Years Eve snow on it, too!

2017-12-31%2022.35.57.jpg
 
OP
G

goofiefoot

Well-known member
Joined
Jun 24, 2016
Messages
196
Location
Rockport, TX
More to come this year. Just a few items on the list:

  • Finalize laundry room
  • Scrape garage ceiling popcorn and repaint walls
  • Rearrange tools and brewing equipment
  • Install garage cabinets
  • Build workbench
  • Install shelving for air compressor and shop vac
  • Build a new deer blind
  • Finish organizing shed

Oh, and we will probably buy a new rental property, so whatever fixing up that needs.
 
To avoid these ads, REGISTER NOW!
Top Bottom