
You are using an out of date browser. It may not display this or other websites correctly.
You should upgrade or use an alternative browser.
You should upgrade or use an alternative browser.
The wildcats garage
- Thread starter Wildcats
- Start date


Jayman17
Well-known member
Nice looking benches and a nice spacious woodshop. Officially jealous....
Jay
Jay
sublime68charger
Well-known member
Welcome and nice looking space you have!
turbowoodworker
Well-known member
Nice space, thanks for posting.


captain14
Well-known member
Very nice work bench .
What’s the size of the shop?
What’s the size of the shop?
Very nice work bench .
What’s the size of the shop?
This is my 3rd shop now. 36x32 and still too small lol. Started off in a detached one car garage that was still in use as a garage. Then moved into a 24x32. Got lots of build pics I’ll get around to posting one day.
Sent from my iPhone using Garage Journal
Welcome and nice looking space you have!
Thanks!
Sent from my iPhone using Garage Journal


Got to spend some quality time today in the garage. Had to rework one of the systainer drawers as it’s fit was a little too tight. Also made 8 more drawers. Hopefully I can get them all mounted tomorrow. The drawers were all made from 1/2 inch sandply from the local big box. I actually like the sandply for this a lot better than 3/4 I used for the cabinets themselves. I’m still on the fence if I’ll use the 3/4 stuff again. It just seems too soft. Several times a pocket hole screw would shoot right through it if I wasn’t super careful.


Sent from my iPhone using Garage Journal
Sent from my iPhone using Garage Journal


Got all the drawers installed, at least all the ones I have slides for. The plans I used for this called for using shelf pin holes and euro screws to mount the drawer slides. I actually like this method a lot as it makes lining up the slides a breeze.
Sent from my iPhone using Garage Journal
turbowoodworker
Well-known member
Great progress.
brainypencil
Well-known member
- Joined
- Dec 5, 2013
- Messages
- 123
What a very nice workbench and space you have!!

There is more order in these photos than in my office)) Keep up the good work!
Thanks! Sometimes I feel like I spend more time organizing and cleaning than actually building things.
Sent from my iPhone using Garage Journal
MacTexas
Well-known member
Is wood working your profession or you hobby. Nice looking shop. Where in Kentucky is the shop located?
Is wood working your profession or you hobby. Nice looking shop. Where in Kentucky is the shop located?
Thanks. Just a hobby for me. Been making toothpicks and sawdust for as long as I can remember though. I grew up in muhlenberg county but live in PA now.
Sent from my iPhone using Garage Journal
Haven’t posted any updates as I’ve been working on a small present for the wife and frankly wasn’t sure if it was gonna turn out.
The plan is to build a small keepsake box. This required me to learn all about re-sawing in the bandsaw.
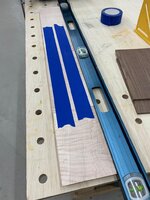
First issue was I didn’t have a fence for my old hand me down craftsman bandsaw. So I built one and tried it out.


The scrap walnut I had laying around seemed to work out pretty good.
Next I went and got a couple of pieces of nice curly maple. First time working with it and boy is it something.

Apparently, it’s way harder to resaw than walnut. So that didn’t go so well. In fact I pretty much wasted a $40 slab trying to get 1/2 boards out of the 5/4 I bought. My bandsaw would drift all over the place. Spent 2 days in the shop tuning my bandsaw to try and account for it but to no avail.
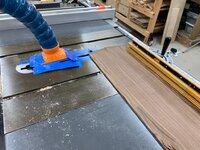
In the pic above, you can see the small prices I finally ended up with. I had to run them back through the table saw after I realized how bad they were. Apparently, jointing planing and resawing releases a lot of pressure causing some cuppage.
Finally started over with a new peice and just used my table saw to get them down to 3/4 after jointing and planing.


The chip out from my old porter cable planer was terrible. So spent a couple of hours replacing the blades, greasing and waxing that old guy.


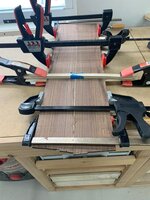
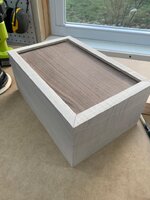
Finally got to making a couple of walnut panels which turned out really nice. First time doing that and was happy with the results.
Sent from my iPhone using Garage Journal
The plan is to build a small keepsake box. This required me to learn all about re-sawing in the bandsaw.
First issue was I didn’t have a fence for my old hand me down craftsman bandsaw. So I built one and tried it out.
The scrap walnut I had laying around seemed to work out pretty good.
Next I went and got a couple of pieces of nice curly maple. First time working with it and boy is it something.
Apparently, it’s way harder to resaw than walnut. So that didn’t go so well. In fact I pretty much wasted a $40 slab trying to get 1/2 boards out of the 5/4 I bought. My bandsaw would drift all over the place. Spent 2 days in the shop tuning my bandsaw to try and account for it but to no avail.
In the pic above, you can see the small prices I finally ended up with. I had to run them back through the table saw after I realized how bad they were. Apparently, jointing planing and resawing releases a lot of pressure causing some cuppage.
Finally started over with a new peice and just used my table saw to get them down to 3/4 after jointing and planing.
The chip out from my old porter cable planer was terrible. So spent a couple of hours replacing the blades, greasing and waxing that old guy.
Finally got to making a couple of walnut panels which turned out really nice. First time doing that and was happy with the results.
Sent from my iPhone using Garage Journal
Attachments
-
 1138d86472b45a883aa6c9d672be170b.jpg69.1 KB · Views: 0
 -
 d6288f9351050ef3e63fa1ba26598275.jpg86.7 KB · Views: 0
 -
 29457da45e123225fadf344888d03ed7.jpg91.5 KB · Views: 0
 -
 80462eb08d47475eb038a4788b466d64.jpg109.3 KB · Views: 0
 -
 7cc533c744cc2bd7f8508b3683beb98b.jpg80.4 KB · Views: 0
 -
 1c1972894c5798d9fa4ad2ea9b299b69.jpg102.6 KB · Views: 0
 -
 246ebfc7fe0ca2c33636f4eb8a46dcb7.jpg74.3 KB · Views: 0

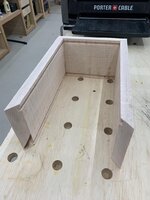
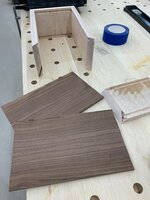
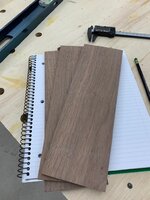
Once it looked like the maple could be useable, went to to work on the walnut inserts.


This pic shows a near fatal mistake. I planed the wrong side in the piece in the front. [emoji35]

Dry fit seemed successful.
Sent from my iPhone using Garage Journal
Attachments
-
 25cfb1edc28ccf6de39b74a21b70a333.jpg106.6 KB · Views: 0
 -
 b5c8294063794a16fa9ffe6aaad9349d.jpg128.5 KB · Views: 0
 -
 dc191c2b0f69cf2a2bf41eca89cd03ef.jpg89.1 KB · Views: 0
 -
 a1bfab831f518d4b51cca7f1678e4443.jpg93.8 KB · Views: 0
 -
 8c191699ab827fcc096604bd65eafc86.jpg92.1 KB · Views: 0
 -
 86d212c89b219c150f2568a08725626b.jpg90.7 KB · Views: 0


Needed to resaw more walnut for the inside inserts.
Also the mobile app keeps crashing while writing posts. [emoji35][emoji35][emoji35]
Sent from my iPhone using Garage Journal
Attachments


racer-john
Well-known member
How wide is your re-saw blade?
I used a blade 1" wide and a point support on the table to correct for any warpage of straight line of cut.
I used a blade 1" wide and a point support on the table to correct for any warpage of straight line of cut.
How wide is your re-saw blade?
I used a blade 1" wide and a point support on the table to correct for any warpage of straight line of cut.
Heh - so I only have a 1/2 blade for now so at least a 3/4 would def help. I’m actually not sure if my old craftsman can take anything larger though. Really doesn’t look like a 1 inch will work.
Haven’t heard of a point support either. I’ll have to look that up for sure.
Sent from my iPhone using Garage Journal