To avoid these ads, REGISTER NOW!

They wore out a Reed 204 1/2....

383 240z

Well-known member
Joined
Dec 4, 2006
Messages
4,295
Location
Findley Twp. Allegheny Co.
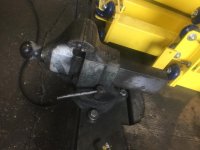
Yep, you read it right, the monkeys in my fabrication shop managed to wear out a Reed vise. Now to fair to them, it is a very old vise and has been in an industrial (heavy use) environment for many many years with nobody ever lubricating the lead screw.

I had fixed this vise once before with a brazing repair for these guys, and I noticed the wear on the lead screw and the fixing nut then.

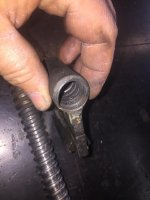
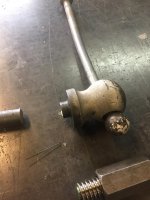
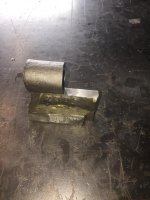
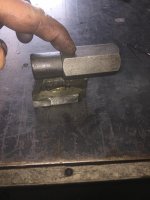
This time the lead screw had pulled all the threads from the fixing nut. I opened my thread specification book and tried to figure out what thread the lead screw has. I wanted to braze a coupling nut to the fixing nut after I milled the worn one off. However, I could not find any ACME thread specs that matched the lead screw.
 

Attachments

  • IMG_7680.jpg
    IMG_7680.jpg
    86.2 KB · Views: 226
  • IMG_7682.jpg
    IMG_7682.jpg
    67.6 KB · Views: 233
To avoid these ads, REGISTER NOW!
OP
3

383 240z

Well-known member
Joined
Dec 4, 2006
Messages
4,295
Location
Findley Twp. Allegheny Co.
Once I hit a brick wall trying to figure the threads out, I texted Kevin54 for his help. Sent him a bunch of measurements and he decided that the lead screw is a 3 1/3 pitch square thread or an obsolete Buttress thread. Either way, I was not going to be able to find a coupling nut in either of these obsolete pitches to fix this vise. If I scrap it, my boss will just tell me to get a cheap HF vise to replace it. So fixing this one is now on my to-do list.
 
OP
3

383 240z

Well-known member
Joined
Dec 4, 2006
Messages
4,295
Location
Findley Twp. Allegheny Co.
I called up McMaster Carr and ordered a length if 7/8x6 ACME threaded rod and a matching coupling nut. Put the lead screw in the horizontal band saw and cut the threaded portion off. Then I cut the ball off the handle. No chance of going back now.
 

Attachments

  • IMG_7683.jpg
    IMG_7683.jpg
    86.9 KB · Views: 144
OP
3

383 240z

Well-known member
Joined
Dec 4, 2006
Messages
4,295
Location
Findley Twp. Allegheny Co.
I then chucked what was left of the lead screw in the lathe. Center drilled and then bored a pocket a few thousandths under the OD of the ACME rod. Then pressed the rod into the pocket, a quick trip to the mill and I had crossed drilled it for a .250 pin. My original plan was just to weld the two parts, but the handle part is cast iron, not steel. The original lead screw was held in with a pin. I found this out when I bored the handle.
 

Attachments

  • IMG_7684.jpg
    IMG_7684.jpg
    64.8 KB · Views: 141
  • IMG_7685.jpg
    IMG_7685.jpg
    69.3 KB · Views: 136
OP
3

383 240z

Well-known member
Joined
Dec 4, 2006
Messages
4,295
Location
Findley Twp. Allegheny Co.
Back to the lathe to make the pin to lock the shaft again with an interference fit and pressed in.

Next order of business is the fixing nut. Since the threads were so far gone I could not use that to determine the centerline. So I had to go a different route.

The fixing nut got put on the mill and about half of it got milled away. this gives me a datum to work from and the best part of what threads were still left as a reference.
 

Attachments

  • IMG_7686.jpg
    IMG_7686.jpg
    92.9 KB · Views: 132
Last edited:
OP
3

383 240z

Well-known member
Joined
Dec 4, 2006
Messages
4,295
Location
Findley Twp. Allegheny Co.
I just kept lowering the datum until the centerline of the old cast iron "nut" was in line with the coupling nut. I used my hairy eyeball to gauge the centerline. I am actually amazed at how well this LOW TECH solution worked. Once I found the height that was correct, I milled the rest of the fixing nut away.
 

Attachments

  • IMG_7687.jpg
    IMG_7687.jpg
    77.2 KB · Views: 118
Last edited:
OP
3

383 240z

Well-known member
Joined
Dec 4, 2006
Messages
4,295
Location
Findley Twp. Allegheny Co.
I then clamped the coupling nut and the remains of the fixing nut to my table got out the oxygen-acetylene rig and brazed it in place.

A quick test fit in the vise and it seems to work, but something is just not right. It feels smooth but very tight.
 

Attachments

  • IMG_7691.jpg
    IMG_7691.jpg
    77.3 KB · Views: 146
  • IMG_7688.jpg
    IMG_7688.jpg
    147 KB · Views: 158
Last edited:
OP
3

383 240z

Well-known member
Joined
Dec 4, 2006
Messages
4,295
Location
Findley Twp. Allegheny Co.
The round recess in the dynamic jaw is just a few thou shy of a slip fit. A little time on the belt sander and it screws in nice and easy.
I didn't get a pic of the sanded part. All I did was ease the corners of the flats.

In the second pic you can see that there is nothing that physically holds the fixing screw in the body of the vise. I cut a small plate that slips between the dovetails and is fixed to the base via a grub screw. The base was drilled and tapped for a 3/8" UNC screw. I drilled a 3/8" clearance hole in the locking plate. The plate gets put in place, and a grub screw goes through the plate and into the base. For some reason I really did not want a bolt head here, I again didn't take a pic of this part.
 
Last edited:
OP
3

383 240z

Well-known member
Joined
Dec 4, 2006
Messages
4,295
Location
Findley Twp. Allegheny Co.
I slipped the cut off handle back in place and welded the ball back on. A little time with a flap wheel and it looked just fine.

Here is the finished job. Vise was "tested" by me clamping a 1" steel plate in the vise and barring down on it with a 3' pipe slipped over the handle. I then took the fixing nut back out and inspected the brazed area for any sign of distortion or cracking. It looks just fine. In the worst case, I will just machine a new one from a solid block of steel and weld a new coupling nut to it.

Cheers
 

Attachments

  • IMG_7692.jpg
    IMG_7692.jpg
    72.5 KB · Views: 174
  • IMG_7693.jpg
    IMG_7693.jpg
    110.9 KB · Views: 215

EOC_Jason

Well-known member
Joined
Jun 25, 2012
Messages
11,388
Location
Bentonville, AR
Very cool...

FYI, Reed is still in business. You could have just contacted them to ask about the thread. They may or may not have known as I think a lot of their old paperwork got destroyed by flood or fire some time back...
 
OP
3

383 240z

Well-known member
Joined
Dec 4, 2006
Messages
4,295
Location
Findley Twp. Allegheny Co.
Very cool...

FYI, Reed is still in business. You could have just contacted them to ask about the thread. They may or may not have known as I think a lot of their old paperwork got destroyed by flood or fire some time back...

When Kevin and I were talking about it he did locate a replacement fixing nut for sale. $110. I know my boss well enough that he would not allow me to purchase that. He, however, had no problem spending $60 on the ACME rod, $22 on the coupler and paying me to do the machine work. Go figure...

It was just a fun little side project I thought you guys might like to see.
 

captain14

Well-known member
Joined
Dec 19, 2012
Messages
7,013
Location
Near College Park Maryland 20740
Good description of the relay and an assist to Kevin54.

20 years ago this never would have happened but maybe there were many older machinists
Around To brainstorm with locally?

Start to finish how much time do you think you worked on this side project?
 
OP
3

383 240z

Well-known member
Joined
Dec 4, 2006
Messages
4,295
Location
Findley Twp. Allegheny Co.
If I take out the time on the phone with Kevin, the head scratching time, and the time I spent grinding a tool to do the boring, I figure I could do it all over again in about 3 hours if I had no interruptions.
 
To avoid these ads, REGISTER NOW!

Ole Slewfoot

Well-known member
Joined
Feb 22, 2016
Messages
5,098
Location
Freedom, CA
attachment.php


Looks like you were never there :beer:
 

ZipSnafu

Well-known member
Joined
Mar 8, 2011
Messages
410
Location
Virginia
Very well done.... I bet it was fun to resurrect that old piece of equipment. They don't make em like they use to.
 

bubinga

Well-known member
Joined
Jul 26, 2014
Messages
12,744
Location
Bridgeport Ohio. (Across River From Wheeling WV)
:beer:
When Kevin and I were talking about it he did locate a replacement fixing nut for sale. $110. I know my boss well enough that he would not allow me to purchase that. He, however, had no problem spending $60 on the ACME rod, $22 on the coupler and paying me to do the machine work. Go figure...

It was just a fun little side project I thought you guys might like to see.
Love it Love It! Great Job!!:beer:
You seem like A good machinist.
I'm just a novice (sp?), only have a 10" Wards/Logan, and drill presses and grinders, sanders, etc. No Mill.
 
OP
3

383 240z

Well-known member
Joined
Dec 4, 2006
Messages
4,295
Location
Findley Twp. Allegheny Co.
:beer:
Love it Love It! Great Job!!:beer:
You seem like A good machinist.
I'm just a novice (sp?), only have a 10" Wards/Logan, and drill presses and grinders, sanders, etc. No Mill.

Thank you, the reality of it is I’m really not. I just have a knack for figuring out how to do this kind of stuff. I learned a ton from watching the Mr. Pete222, and Turn Wright Machine videos on YouTube (plus reading a ton on here) I learned enough there to BS my way into an entry level job in a screw machine shop. I hated that place, I left there and got into a CNC shop. I couldn’t take working 52 hours a week on 2nd shift while I was a full time college student so I left there and landed this gig.

I’ve never had any actual machine shop training, not even in high school. About 1/2 way through the videos I had the chance to pick up a big Cincinnati Toolmaster mill and a 13x40 lathe. I learned a bunch on there just by doing. Most of my tooling was bought used or chi-com imported stuff. Same with the tools in my box. I found good deals on used calipers and stuff. I picked up my 6” Mitatoyo absolute vernier and my 0-1” Fowler digital mic new.
I really just jumped in with both feet and gave it my all.
 
OP
3

383 240z

Well-known member
Joined
Dec 4, 2006
Messages
4,295
Location
Findley Twp. Allegheny Co.
attachment.php


Looks like you were never there :beer:

That was the goal!

Nice work!

Did you lube it before putting it back together?
Oh yes!! A dollop of Exxon red high pressure grease. Just to give it a fighting chance at surviving another 50+ years.

Very well done.... I bet it was fun to resurrect that old piece of equipment. They don't make em like they use to.
It was a good way to break up the monotony of my normal day.
 

bubinga

Well-known member
Joined
Jul 26, 2014
Messages
12,744
Location
Bridgeport Ohio. (Across River From Wheeling WV)
Thank you, the reality of it is I’m really not. I just have a knack for figuring out how to do this kind of stuff. I learned a ton from watching the Mr. Pete222, and Turn Wright Machine videos on YouTube (plus reading a ton on here) I learned enough there to BS my way into an entry level job in a screw machine shop. I hated that place, I left there and got into a CNC shop. I couldn’t take working 52 hours a week on 2nd shift while I was a full time college student so I left there and landed this gig.

I’ve never had any actual machine shop training, not even in high school. About 1/2 way through the videos I had the chance to pick up a big Cincinnati Toolmaster mill and a 13x40 lathe. I learned a bunch on there just by doing. Most of my tooling was bought used or chi-com imported stuff. Same with the tools in my box. I found good deals on used calipers and stuff. I picked up my 6” Mitatoyo absolute vernier and my 0-1” Fowler digital mic new.
I really just jumped in with both feet and gave it my all.
Good job!

Sent from my MotoG3 using Tapatalk
 

SweetD

Well-known member
Joined
Feb 8, 2010
Messages
3,261
Location
Rhode Island
Really nice save.

I had a similar situation with a Illinois Iron & Bolt vise, which I think is a pretty rare bird. The front half of the main nut had broken off at the threads. You can see the original nut on the right, next to what was becoming the replacement.

DSC_0102.jpg

I hired a young machinist that does side work to help me out. He was able to replicate the unique thread pitch and create a custom tool to cut a new threaded nut.

mms_picture (2).jpg

mms_picture (3).jpg

mms_picture (4) (1).jpg

The result was pretty much a perfect match to the old, made from cast iron as well.

1020170748.jpg

1020170829.jpg

So, I can really appreciate your effort to kick-save that old vise.

Cheers!

Dave
 

jimreed2160

Well-known member
Joined
Aug 7, 2016
Messages
3,589
Location
Tallahassee FL
383--Good save and thanks for the blow by blow repair. Maybe this vise was too close to grinding dust and the abrasive helped it go bad. But then again, don't rule out those clever ham fisted monkeys...
 
To avoid these ads, REGISTER NOW!
Top Bottom