ptgb
Well-known member
Started by simply buying a new table saw. No where to put it, so became a “2 birds, one stone” situation as I also was out of room for my Milwaukee cordless tools as well.
This is the original setup where this project took place.

Original cordless tool storage. Currently additional tools were stacked inside… I hate tools stacked up in a pile!

Tore out the floor and wall cabinets and countertop. Decided on this layout at first, but couldn’t use the cabinet on the right, not enough space.

Wanted a “wall" of cordless tools, but it would have been too far of a reach over the saw and floor cabinets to mount them on the actual wall especially up high. Decided to move the tool wall forward for easier access.


Built a false wall for about a 10 inch depth of the tool area and decided to make use of the dead space behind that false wall.

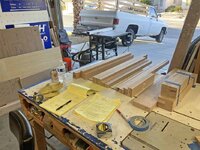
Three bunks that will hold hard wood lumber as my soft wood lumber (treated and regular) is already stored on wall racks.

Pulled electric to the front false wall for outlets.

The original wood counter top in that area was already cut at the proper angle on one end, so I repurposed it as the top.

Two areas of the tools wall, one for tools and the other for batteries and chargers.

Faced and trimmed entire thing with 1x poplar which gave the cabinets a built-in look.


Wood putty-ed (Durhams Water Putty is awesome) gaps, nail and screw holes, then sanded. Primed all the bare wood.

Of course, Milwaukee red. 3 coats of enamel cabinet paint (this is second coat), third was needed for better coverage.

Ready for tools.

These are the 3d printed tool mounts, all from Etsy stores. Can be rotated to any angle to allow the tools/batteries to be mounted vertical or horizontal.


Battery storage and charging area.

All of my current tools mounted up. Big blank space = more tools!!!


All that for a table saw.
This is the original setup where this project took place.
Original cordless tool storage. Currently additional tools were stacked inside… I hate tools stacked up in a pile!
Tore out the floor and wall cabinets and countertop. Decided on this layout at first, but couldn’t use the cabinet on the right, not enough space.
Wanted a “wall" of cordless tools, but it would have been too far of a reach over the saw and floor cabinets to mount them on the actual wall especially up high. Decided to move the tool wall forward for easier access.
Built a false wall for about a 10 inch depth of the tool area and decided to make use of the dead space behind that false wall.
Three bunks that will hold hard wood lumber as my soft wood lumber (treated and regular) is already stored on wall racks.
Pulled electric to the front false wall for outlets.
The original wood counter top in that area was already cut at the proper angle on one end, so I repurposed it as the top.
Two areas of the tools wall, one for tools and the other for batteries and chargers.
Faced and trimmed entire thing with 1x poplar which gave the cabinets a built-in look.
Wood putty-ed (Durhams Water Putty is awesome) gaps, nail and screw holes, then sanded. Primed all the bare wood.
Of course, Milwaukee red. 3 coats of enamel cabinet paint (this is second coat), third was needed for better coverage.
Ready for tools.
These are the 3d printed tool mounts, all from Etsy stores. Can be rotated to any angle to allow the tools/batteries to be mounted vertical or horizontal.
Battery storage and charging area.
All of my current tools mounted up. Big blank space = more tools!!!
All that for a table saw.