To avoid these ads, REGISTER NOW!

TIG newbie

dr_clyde

Well-known member
Joined
Jan 7, 2009
Messages
6,425
Location
Holland, MI
Yes I do not stop the torch. Don’t know who is right or wrong on YouTube or maybe I missed the pause. They weld like a autonomous robot.

Is the dull gray color normal before brushing?

You're looking really hot. You should check out t Jody at welding tips and tricks on YouTube. He has some great videos for TIG beginners.
 
To avoid these ads, REGISTER NOW!

matt_i

Well-known member
Joined
Mar 14, 2008
Messages
10,722
Location
SE Michigan
Not suggesting I'm right at all, just what I learned, which was pre-internet :D the stopping creates a pool that overlaps the one you just finished right behind it.


You can see the undercut on my bottom fillet weld, should have been pushing faster with the filler rod...
 
OP
P

PoorOwner

Well-known member
Joined
Feb 10, 2007
Messages
5,032
Location
CA
Thanks for the tips.

Here is the heat turned down and pausing to add filler compared to the one before.
 

Attachments

  • F4629FB7-0A06-4555-BCF8-782FAAB7BB7F.jpg
    F4629FB7-0A06-4555-BCF8-782FAAB7BB7F.jpg
    150.7 KB · Views: 67
OP
P

PoorOwner

Well-known member
Joined
Feb 10, 2007
Messages
5,032
Location
CA
Getting a little more consistent
 

Attachments

  • 6D9F1FB4-0866-469C-BDA2-C217AB97164F.jpg
    6D9F1FB4-0866-469C-BDA2-C217AB97164F.jpg
    110.3 KB · Views: 51

kb1982

Well-known member
Joined
Mar 8, 2017
Messages
590
Location
Kentucky
I'm right there with you on this whole tig welding thing. Definitely gonna follow along for some pointers.
01a2caf1eb5c0f5216cc1a30e7dd94c3.jpg
da998eba85166ee5c74361b790dd7970.jpg


Sent from my LML713DL using Tapatalk
 
OP
P

PoorOwner

Well-known member
Joined
Feb 10, 2007
Messages
5,032
Location
CA
I think I am happy with the middle 3. The first one I cannot see the edge.

Then the next 3 I used my hand to glide along the table edge to get a straight bead.

The last one the rod was too short and I didn’t fill enough and went back to fill it again.
 

Attachments

  • 450431C6-9974-4308-9CA1-60641954F5CA.jpg
    450431C6-9974-4308-9CA1-60641954F5CA.jpg
    112.3 KB · Views: 60
OP
P

PoorOwner

Well-known member
Joined
Feb 10, 2007
Messages
5,032
Location
CA
Not suggesting I'm right at all, just what I learned, which was pre-internet :D the stopping creates a pool that overlaps the one you just finished right behind it.


You can see the undercut on my bottom fillet weld, should have been pushing faster with the filler rod...

Hi, how do you do this? I tried but cannot get the "stacked" look at least not that prominent... I fill the rod from above, shoved from lower edge etc, tried to have different torch angle.

Is it more distance between fills?
 

matt_i

Well-known member
Joined
Mar 14, 2008
Messages
10,722
Location
SE Michigan
Im not 100% sure but one thing I've seen teaching others is they sometimes place the work parallel with their chest, and then lay the torch over (rotate around its handle) in order to see the puddle and filler rod better. But, it gives a long arc that's hard to control and is not very focused.

So what I do is set the workpiece on the bench at say a 45 degree angle to my chest, really whatever feels comfortable to you, I'm right handed so the right side is farther away and I'm welding towards my chest. Now I can look down the valley to see what's happening and I can get the tungsten more normal to where I'm striking the arc.
 
To avoid these ads, REGISTER NOW!

mlyonsdc

Well-known member
Joined
Nov 23, 2018
Messages
238
Location
USA
Nice job Poorowner, I have a new AHP tig on the way I can't wait to get started.

Thanks for the solid info Dr Clyde I appreciate the advice you gave both on this thread and the Everlast thread I have been following.
 
OP
P

PoorOwner

Well-known member
Joined
Feb 10, 2007
Messages
5,032
Location
CA
I did some angle this afternoon.
It was much harder than I thought. Holding the torch is different, i had the arc wander and spraying everywhere. Dropping turds if not careful. I lucked out on the short one which was the first one I did. The other I did an inch at a time.

It was parallel to me and not able to see the arc length that way. Need to try welding towards myself. The stacked appearance is there as long as no screw ups. I didn’t try to use the cup to help or lay wire just trying the hard way.
 

Attachments

  • FE50B896-CF50-48C3-AF13-EDA399A869D2.jpg
    FE50B896-CF50-48C3-AF13-EDA399A869D2.jpg
    150.9 KB · Views: 82

matt_i

Well-known member
Joined
Mar 14, 2008
Messages
10,722
Location
SE Michigan
There you go, the basics are there now. Its just going to take more practice. Keeping the tungsten sharp and not contaminated will help focus the arc as will more pedal (more energy). Also keeping the arc short and not dipped is the skill you will need to build so you don't even have to think about it any more. Dont be afraid to hold the arc longer in one spot, it just helps fusion by melting wider and deeper in low carbon steels.

My advice is to just do a couple inches per day, rather than long marathon sessions where you can get physically and mentally fatigued.
 
OP
P

PoorOwner

Well-known member
Joined
Feb 10, 2007
Messages
5,032
Location
CA
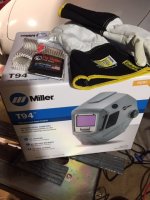
Got thicker gloves with kevlar lining, it's a little stiffer but less heat got to the fingers.

Tig finger. Self explanatory.

I kept getting flashed starting the arc, so bought a new helmet.

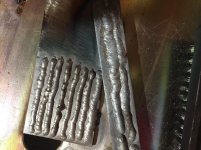
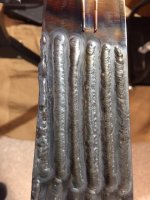
Worked on arc length and checking the HAZ.

I found this video is helpful explaining if the steel looks dull.


I tried to up the amps to 125, moved fast, adding more filler rod, still too hot and was cutting into the metal. I think when I grinded the millscale on both side the metal got a bit thinner than the original 1/8".

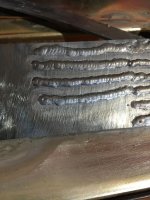
Settled at 95 amps and still have shiny bead. I know from MIG welding just running beads on a flat plate tend to just set amps lower, but when really doing lap or fillet the heat needs to be cranked up because there are now 2 pieces or metal.
 

Attachments

  • IMG_2010.JPG
    IMG_2010.JPG
    111.4 KB · Views: 34
  • IMG_2009.JPG
    IMG_2009.JPG
    121.7 KB · Views: 47
Last edited:

sqznby

Well-known member
Joined
Oct 26, 2013
Messages
981
Location
Coastal NC
That was a great video.

Remember what he said about arc length. You want to be as close to the material as possible, 1/16 to 3/32 of an inch away. The further you get the wider the arc the longer it will take to heat and your haz will show. Look at the last 30 seconds of the video.

That is a common issue with when learning how to tig. Practice with small beads and short runs. No need to run a 6 inch long bead at first. Get comfortable to. Start with tacks, get familiar with your puddle and where its going to form.
 

dr_clyde

Well-known member
Joined
Jan 7, 2009
Messages
6,425
Location
Holland, MI
If you haven't already, dive in to Jody's videos.

Here is a good one for TIG beginners.

I've met Jody, he's an outstanding advocate for welding education and a super humble, nice guy.

He's got over 10 years worth of great videos on youtube about welding, and they all have some good nuggets in them.
 
OP
P

PoorOwner

Well-known member
Joined
Feb 10, 2007
Messages
5,032
Location
CA
Yes I will try to watch Jody’s videos. In my opinion fascinating even before I started welding I watched them, but I was not able to pick up much because it goes from showing a puddle then next thing he’s welding a space rocket or something.
 
OP
P

PoorOwner

Well-known member
Joined
Feb 10, 2007
Messages
5,032
Location
CA
By the way I can see a bit of light reflected into the helmet’s lower area if there is a gap between the helmets bottom and my shirt. is this concern for UV?

Wear black?

The arc time for tig is so much longer than other welding process.
 

dr_clyde

Well-known member
Joined
Jan 7, 2009
Messages
6,425
Location
Holland, MI
By the way I can see a bit of light reflected into the helmet’s lower area if there is a gap between the helmets bottom and my shirt. is this concern for UV?

Wear black?

The arc time for tig is so much longer than other welding process.

If there is bare skin exposed it will get a sunburn. For TIG up to about 150 amps I find just a T-shirt with long sleeves is sufficient, and I burn easily. Anything above 150 amps I will put on a denim shirt or a light welding jacket.

Edit, If the light reflecting off your shirt is bothering you, you can get a flag of leather that attaches to the bottom of your helmet and that should solve that. I've never had it be a problem. I would also be sure you're wearing safety glasses for this very reason. Again, I've never had it be a problem.
 

sqznby

Well-known member
Joined
Oct 26, 2013
Messages
981
Location
Coastal NC
By the way I can see a bit of light reflected into the helmet’s lower area if there is a gap between the helmets bottom and my shirt. is this concern for UV?

Wear black?

The arc time for tig is so much longer than other welding process.

If you Google "welding helmet accessories" you will find there are quite a few options to help with the reflection. One item that is popular are neck guards.

Here's an example of one https://www.weldersupply.com/P/1303/MillerDigitalInfinityWel
And some options. They can also be hand made to your liking quite easily.
https://www.angstu.com/which-are-the-best-welding-helmet-neck-guards-available-in-2019/
 
To avoid these ads, REGISTER NOW!
Top Bottom