To avoid these ads, REGISTER NOW!

Tiling - Floor-Wall Interface

sam_i02

Well-known member
Joined
May 12, 2012
Messages
67
Location
Kanata, Ontario
Enjoying lurking on this forum for about a month now. Finally ready to start working on my 10' x 20' townhome garage. Will post step-by-step pics when I begin.

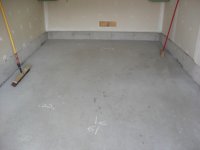
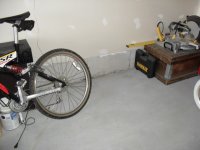
Found a sweet deal on porcelain tile at the local Home Depot and ready to put that on the floor myself (first tiling project). Looking for ideas on how I would handle the floor to wall interface. The drywall in the garage is not all the way to the floor - it stops about 12" shy of it. Also the concrete on the wall is recessed about 1/2" behind the drywall. (see pics)

Ideas welcome :rocker:
 

Attachments

  • SAM_4676.JPG
    SAM_4676.JPG
    60.1 KB · Views: 136
  • SAM_4677.JPG
    SAM_4677.JPG
    70.2 KB · Views: 111
To avoid these ads, REGISTER NOW!
OP
S

sam_i02

Well-known member
Joined
May 12, 2012
Messages
67
Location
Kanata, Ontario
yes it is 12" tile and i think my problem is solved! thanks for the quick response.
Every so often on the wall, there are some "nubs" of concrete. I think I will just put a chisel to them and break em off.
 

Kevin54

MEMBER EMERITUS
Joined
Jan 12, 2005
Messages
29,341
Location
Urbana, Ohio
Definitely bust the nubs off and if possible grind them down smooth. If you get 12" tile, it should work perfect for going up the wall to cover the concrete. You may have to trim some to fit. By the time you have them on the wall, then you should be able to put some type of moulding / base trim to cover the drywall and tile.
 
OP
S

sam_i02

Well-known member
Joined
May 12, 2012
Messages
67
Location
Kanata, Ontario
Thanks Kevin. That is my plan. Got the tiles, will pick up rest of the material (grout, thinset, tools..etc) in a few weeks as soon as funds are available and will be good to go
 

shoot summ

Well-known member
Joined
Jun 8, 2010
Messages
2,949
Get some caulk that matches your grout also. The joint that transitions the wall to the floor should be caulked. You might get away with grouting it but there is a high probability it will crack over time.
 

Dakota00

Well-known member
Joined
Mar 9, 2008
Messages
1,078
Location
Woodbridge, Ontario
Thanks Kevin. That is my plan. Got the tiles, will pick up rest of the material (grout, thinset, tools..etc) in a few weeks as soon as funds are available and will be good to go

Make sure you get a thinset with a latex additive, so that the floor will last for years to come during all seasons.

I'll recommend for thinset, Mapei Kerabond/Keralastic system. Grout: Mapei Ultracolor Plus, which is an exterior grout. Very similar to epoxy grout but user friendly to work with.

Good luck, have fun and take your time!!
 

slickgt1

Well-known member
Joined
Oct 11, 2010
Messages
1,674
I would suggest epoxy grout. It will be a one time mess, that will last forever.
 

bdamico

Well-known member
Joined
May 8, 2012
Messages
2,303
I would suggest epoxy grout. It will be a one time mess, that will last forever.

I would probably try what Dakota suggested as an alternative. The epoxy grout was such a mess on my job. I was happy to get it cleaned off my tile soon enough
 
OP
S

sam_i02

Well-known member
Joined
May 12, 2012
Messages
67
Location
Kanata, Ontario
Thanks for the ideas/feedback everyone. Good stuff to know before I jump into the install. Stay tuned for install pics coming later this month.
Cheers
 

OJ Bartley

Well-known member
Joined
May 18, 2009
Messages
605
Location
Toronto, ON
Sam, any progress on the floor? I'm looking into tile now as well. I have investigated epoxy, and narrowed it down to the one I liked, but now I'm curious to see if tile is a better option. Let us know how things are going!
 
To avoid these ads, REGISTER NOW!
OP
S

sam_i02

Well-known member
Joined
May 12, 2012
Messages
67
Location
Kanata, Ontario
Hi OJ -
Just saw this post from you, after I responded to your other post. Yes getting ready for my install possibly starting this weekend. Had to delay it due to funding issues ;)
Stay tuned for pics coming soon...
S
 

OJ Bartley

Well-known member
Joined
May 18, 2009
Messages
605
Location
Toronto, ON
Thanks Sam! Don't worry, if funding issues didn't pop up from time to time, I would probably already have epoxy down. Not that that would be a bad thing, but at least it gave me some time to investigate further. Good luck this weekend, and I'm looking forward to seeing how it goes.
 
OP
S

sam_i02

Well-known member
Joined
May 12, 2012
Messages
67
Location
Kanata, Ontario
Had planned the tile-laying project for this past weekend, but got slammed with the flu Friday, so progress has been slower than expected.

Based on recommendations by GF members (earlier in this thread) I headed over to Lowes Friday night and picked up the thinset. Realized that the Kerabond system may be overkill ($200 for my space) to downgraded to this ($66 for my space)

Maipei, Ultraflex for $22 a bag (covers appx 70 sq ft per 50lbs bag). I got 3 bags for my 200 sq.ft space

Saturday AM, emptied out the garage, busted the numbs on the walls where tile will eventually go and cleaned, clean, cleaned. In spite of the fever I had, swept the floor 5 times and it removed more dirt than I could ever imagine. Its amazing how dirt is attracted to a bare concrete floor. Happy I wont have to deal with this once this project is complete

Next I did the tile layout and all looked good.

Then I began laying the actual tile. By the end of Sunday I had about 30% of the garage done.

Hopefully will make some more progress next weekend as I am working late almost everyday this week and wont get back to it till Friday night.

Some progress pics attached. Nothing too exciting, but I owed you all an update!
 

Attachments

  • SAM_4744.JPG
    SAM_4744.JPG
    51 KB · Views: 73
  • SAM_4745.JPG
    SAM_4745.JPG
    61.1 KB · Views: 68
  • SAM_4754.JPG
    SAM_4754.JPG
    67.9 KB · Views: 81
  • SAM_4759.JPG
    SAM_4759.JPG
    69.6 KB · Views: 93

Dakota00

Well-known member
Joined
Mar 9, 2008
Messages
1,078
Location
Woodbridge, Ontario
I headed over to Lowes Friday night and picked up the thinset. Realized that the Kerabond system may be overkill ($200 for my space) to downgraded to this ($66 for my space)

Kerabond system is not overkill, it's made for that exact application you're doing right now. I hope to God that your floor doesn't fail, through it's thawing and climate changes during the seasons.

With that a side, your flooring is looking good.
 
OP
S

sam_i02

Well-known member
Joined
May 12, 2012
Messages
67
Location
Kanata, Ontario
Kerabond system is not overkill, it's made for that exact application you're doing right now. I hope to God that your floor doesn't fail, through it's thawing and climate changes during the seasons.

With that a side, your flooring is looking good.

Thanks Dakota.
The coldest my garage has seen in the past year is 5C; this was when it was -20C outside. What helps is that the garage is recessed into the house, has living space above it and has a very well sealed + insulated door. The slab itself has a 1' layer of foam underneath. So I do not see the temp swings.

If I had the money I would definitely do the Kerabond system as it is bullet proof, but I too am hoping this one holds up....

Thanks for telling me about the Kerabond product though. Very good stuff
 

OJ Bartley

Well-known member
Joined
May 18, 2009
Messages
605
Location
Toronto, ON
Sam, that "before" shot looks startlingly familiar. Great progress so far, especially with the flu! It hit me last week and Tuesday/Wednesday was a miserable patch of fever, constant nose blowing, and exhaustion.

Are you going to tile the lower wall sections as well? EDIT... duh, I just looked again at the thread title and a few posts up, and remembered you are going to do the walls. Can't wait to see how that looks.

How are you going to handle the lip at the front?
 
Last edited:

Dakota00

Well-known member
Joined
Mar 9, 2008
Messages
1,078
Location
Woodbridge, Ontario
Thanks Dakota.
The coldest my garage has seen in the past year is 5C; this was when it was -20C outside. What helps is that the garage is recessed into the house, has living space above it and has a very well sealed + insulated door. The slab itself has a 1' layer of foam underneath. So I do not see the temp swings.

If I had the money I would definitely do the Kerabond system as it is bullet proof, but I too am hoping this one holds up....

Thanks for telling me about the Kerabond product though. Very good stuff

Best of luck man!! :beer:

One suggestion I would like to make, where the floor ends along the walls and the backsplash meet use a quality silicone to seal the joint instead of grout. Makes for a crackless joint if there is any movement in the floor, and helps with waterproofing as well.
 

OJ Bartley

Well-known member
Joined
May 18, 2009
Messages
605
Location
Toronto, ON
Dakota, would the normal process be to lay the floor tiles right to the edge of the wall, and then to add the wall tiles on top, kind of overlapping them? Then just remove the spacers and use silicone instead of caulking like the rest of the tiles?
 
OP
S

sam_i02

Well-known member
Joined
May 12, 2012
Messages
67
Location
Kanata, Ontario
Best of luck man!! :beer:

One suggestion I would like to make, where the floor ends along the walls and the backsplash meet use a quality silicone to seal the joint instead of grout. Makes for a crackless joint if there is any movement in the floor, and helps with waterproofing as well.

Yes, this is exactly what I plan to do. You mentioned it earlier and I have noted it.

Dakota, would the normal process be to lay the floor tiles right to the edge of the wall, and then to add the wall tiles on top, kind of overlapping them? Then just remove the spacers and use silicone instead of caulking like the rest of the tiles?

I have left about a 1/4" between the wall and the first row of tile that bumps up against it. This helped aesthetically too because the wall-floor edge is uneven and cracked. Even with this gap, the wall tiles overlap somewhat as the tiles are 1/4" thick and there is about 3/16" of grout behind the tiles as well.
 
OP
S

sam_i02

Well-known member
Joined
May 12, 2012
Messages
67
Location
Kanata, Ontario
How are you going to handle the lip at the front?

I am going to do something like you have proposed in your post - some sort of a (metal?) transition strip. Will cross that bridge when I get there. Too much else to do yet.... Plan to finish up the full tiles this Friday before we head down to Belleville on Saturday for the long weekend.
Next weekend I will do the cutting and put in the partial tiles and possibly the walls. After that get to the finishing like entrance strip, grout...etc.

Definitely a slow project and what makes it even more fun is the very enthusiastic 7 year old helping me :)
 

OJ Bartley

Well-known member
Joined
May 18, 2009
Messages
605
Location
Toronto, ON
Lol... I bet your helper is having a great time! Let me know what you find for the lip. I've looked around a bit but haven't been out to any stores yet to check what's available locally. I'd like to go for the strongest thing I can find (steel?) but it will depend what's around, and I haven't seen many options better than the original Schluter aluminum tile-in one.

This looks like a decent retrofit option, but I'd rather do it properly and integrate right into the tile/thinset. http://www.boltseal.co.uk/?page=products&category=0104&product=782
 

Dakota00

Well-known member
Joined
Mar 9, 2008
Messages
1,078
Location
Woodbridge, Ontario
Dakota, would the normal process be to lay the floor tiles right to the edge of the wall, and then to add the wall tiles on top, kind of overlapping them? Then just remove the spacers and use silicone instead of caulking like the rest of the tiles?

That's fine, lay the floor tiles up to the wall and then the wall tiles on top. Use shim spacers or thin pieces of cardboard to adjust the height of the wall tiles to keep the grout lines looking good. When ready, grout everything floor and walls, then go back the next day and cut out any grout that ended up in the floor and wall joint. Clean and vacuum the loose grout and then silicone that joint.

For a perfectly smooth silicone line. Fill a plastic cup half way with water, add some dish soap, should feel slippery when rubbing your fingers together. Next apply the silicone on the joint, one wall at a time. Go back where you started place your finger in the soapy solution and run it on the silicone joint, keep your finger wet. Might take a couple of passes to make it nice and smooth. You'll get the hang of it quickly.
 
OP
S

sam_i02

Well-known member
Joined
May 12, 2012
Messages
67
Location
Kanata, Ontario
For a perfectly smooth silicone line. Fill a plastic cup half way with water, add some dish soap, should feel slippery when rubbing your fingers together. Next apply the silicone on the joint, one wall at a time. Go back where you started place your finger in the soapy solution and run it on the silicone joint, keep your finger wet. Might take a couple of passes to make it nice and smooth. You'll get the hang of it quickly.

Awesome! cant wait to do this. Couple weeks out, yet but good stuff nonetheless
 
To avoid these ads, REGISTER NOW!
Top Bottom