To avoid these ads, REGISTER NOW!

Till death do us part........ Garage revamp

Double B

Well-known member
Joined
Nov 13, 2011
Messages
83
Location
North Shore of Lake Erie
Well decide to log my progress on my porject this winter. My project is the garage! With talking to the wife for the past couple of months, we have finally decided to stay in the current house we own. We have been here for 10 years when it was built new with the intention of moving to a bigger house eventually. But with the economy doing what it has been doing, It has openned our eyes to what we don't want, bigger bills. So we are staying.

With this said the wife has given me free reign on redoing the garage. Within reason that is. Meaning no walls of high end tool boxes and No huge bills while doind it. So basically a beer belly budget. This budget is due to us having 4 kids, The oldest is 9 and the youngest is 4. So as you can understand things go wild around here ever once and a while, But more importantly I am in desparate need of storage! Not only for my stuff but for the family **** as well.

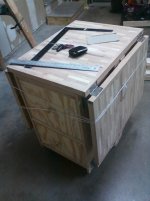
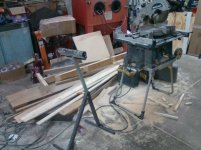
I have developed a plan that is fairly simple and fits my needs. It is going to be long drawn out process due to having a ton of **** already in the garage that I can not get rid off. Here is a few pics of what the garage looks/looked like before starting.

SSPX0062.jpg

SSPX0065.jpg

SSPX0068.jpg

SSPX0069.jpg

Sorry about the pics, a couple of them are from two different days. One set is the wall That I am strarting on and the other is after clearing that wall and boxing everything up for construction mode.

My hobbies in the garage include all of the following, small engine repair, outboard/marine engine repair, autobody, auto repair, wood work, and painting. The gargae layout needs to be able to facilitate alls the activities.

My plan is a multi step approach. Starting in sections on walls. The deviding line between walls is where doors are located. I plan on replacing the doors down the road to get in my boat in the back yard. Some would say to start here first, but I need storage before then. I currently have a place to store it in that is off site anf secure. So that portion is not a priority.

The wall I am starting will eventually look something like this...

wall.jpg

I got the inspration here on this forum where everyone seems to follow the idea where the top of anywall need to be utilized with cupboards. I loved this idea and I plan on using every available wall. This will accomidate the blue 150 lite storage bins that seam to multiply every six weeks. Hell those things must get luck more than I do!!!! They're offspring are taking over my garage!!!!!

So I started this project with removing everything from the one wall I am working on and started rought framing the suports coming from the ceiling. Here is where the project is at this morning....

SSPX0070.jpg

Right now while I wait for a trailer to become available to go to Home depot for some supplies, IE drywall and mud, I am putting in the storage supports from the ceiling. Here is a pic of the half finished one. I still need to back up the one other side of the hanging down 2x4 with another cross stud. These will be hanging down every 4' and should be able to cary the weight of the x-mas tree and **** all along this wall. Here is the pic....

SSPX0071.jpg

The next step sfter finishing 4 more of these is hanging the 1/2' drywall and mudding. The fun stuff! Not.... Then the storage self construction. There is some ideas I want to float by everyone here for the opinions, but I need to scan the drawings I have at work tomorrow. Sorry no scanner at home...

Hope you guys don't mind me posting this project here, but from cruising around here, It seams you guys like this sort of thing. As long as there is a ton of pic'c. I plan on post a ton of them.... Hope you like them.
 
To avoid these ads, REGISTER NOW!

rickairmedic

Well-known member
Joined
May 31, 2005
Messages
4,165
Location
louisville ,Ky
Double B looks like you are well underway on your project and this is the place to put it :D. Looking forward to lots of pictures .


Rick
 
OP
D

Double B

Well-known member
Joined
Nov 13, 2011
Messages
83
Location
North Shore of Lake Erie
Well I hope you guys like this garage makeover.....

Did not get much done last night. Sundays are normally our family night. I did get two more posts from the ceiling done. One more to go. Tonight after work I'm heading to Home Depot for supplies. So there will not me much completed as well.

Here is the plan for the "Mood Lighting". In the summer time I like watching TV in the garage but will all the ceiling lighting there is way to much light to see the TV clearly. So I though I would install some multipurpose lighting. The one purpose it to be able to turn these on and be able to wall around the garage without running into anything. And to provide light to see my tools on the peg board and in the tool boxes. Plus I thought it would look pretty cool! Here is the concept.

Lighting-concept.jpg

I plan on putting the lights in the center/front of the overhang to be able to iluminate all the layers of peg board. For the tool box area the plan is to run them just under the outside edge to provide light into the drawers.

Here is how I plan on doing the tool box area. It was a bit of a callange due to space and trying to make everything fix into the alocated areas.

Lighting-tool.boxes.jpg

I plan on using aluminum channel for my panel doors for the selving. I will screw this to the outside plywood facer plate.

I have talked about how I want to increase the amout of pegboard in my garage, but I have a limited amount of wall space. This is how I plan on overcoming this issue. I plan on making sliding frames of peg board just like in stores shelving. Here is a first plan on how I am going to do it. If anyone has a better plan please let me know.

Peg-board-rollers.jpg

This is still a working concept. The major chanllenge is not to hang the weight of the tools from the underside of the over hang. I want to have the floor carry the weight. If anyone has any better ideas please let me know. I started another thread before this one and there on one Idea of pull out pegboards. But I don't want it to go that direction with the sliders.

That is it for today........
 
OP
D

Double B

Well-known member
Joined
Nov 13, 2011
Messages
83
Location
North Shore of Lake Erie
Update 11-22-2011

Well did not get anything done yesterday on the garage, but I did get all the drywall supplies from Home Depot. So the drywall portion will be done this weekend. Then the self goes in.

Went out for a couple of pops with the guys last night after I got unloaded. I ran the ideas for the peg board across them and my one buddies had a better idea. They have this at Ford's Essex Engine plant's tool crib. They have story book panels for their pegboards. Basically you have panels that you can open like as story book. They rotate out of the way to get at the tools. I though this was a great idea so I sketched it up for my application. Here it is......

Angle.peg-board.jpg

The frames are hinged at the corners and in the center of the 12' span. I loose some space on the back wall's pegboard, but gain it on the two panels in front of it. This is by not having to have to make space for the front panels to slide out of the way like with the other proposal I had. I think this will give me more pegboard for the floor space I have alocated for this.

Also with talking to the wife and the guys, I am going to make the outside layer that locks, melimine for use as a white board writing surface. I'll have 12 ft or writing space. Might also use it for logo or mural when I get done. We'll see, that's a long time off.

So what do you guys think? I need to make a decission before I close up the wall with drywall. I need to put some more reinforcements in the wall to lag the corner structures to. Thinking of the weight that will be hanging off that wall. Maybe some heavy duty spring loaded wheels on the tips of the frames to help carry the load of the pegboards. The springs should adjust for the slope of the garage floor in this area. Just another thought to comment on.
 
OP
D

Double B

Well-known member
Joined
Nov 13, 2011
Messages
83
Location
North Shore of Lake Erie
I take no one has an opinion on pegboard....

After figuring out actual resulting pegboard area between the the two designs, I am better off with the first option. It's a little less but alot easier to build.
 

Omphaloskeptic

Well-known member
Joined
Oct 11, 2008
Messages
2,346
Location
Ultima Ratio, Wa.
I like the concept of the hidden 'storybook' pegboard storage. The only thing I would suggest is that you picture frame each pegboard section with aluminum 'U' channel to provide both warp resistance for the pegboard material and also give each panel sufficient strength for hinge attachment and tool weight. The aluminum frame would stiffen the whole assembly when in motion and even provide attach points for magnets and metal contact pads to keep each panel from swinging out from the stowed position. If the channel is sized correctly to the pegboard thickness, you might be able to use construction glue in a caulk gun to assemble a strong/stiff panel unit; corners might need a re-enforcement clip/triangle pop riveted to adjacent channel pieces.

Another thought about hinges; you could buy piano type hinges in bulk, cut them to the length required and use pop rivets to attach the the 'bottom' portion of the 'U' channel. This would hide the attach plates of the piano type hinge when the panel is in the closed position. For greater strength, you could buy longer pop rivets and fasten the piano type hinge to the front face of the 'U' channel and the rivet would extend through the hinge plate, the 'front' face of the 'U' channel, the pegboard itself, and also through the 'rear' face of the 'U' channel. Piano style hinges have bolt holes pre-drilled, but you could drill additional holes for as many pop rivets as you would care to install. I think this would make a very strong, stable, and durable assembly. Just my $0.02. lol
 
OP
D

Double B

Well-known member
Joined
Nov 13, 2011
Messages
83
Location
North Shore of Lake Erie
I like the concept of the hidden 'storybook' pegboard storage. The only thing I would suggest is that you picture frame each pegboard section with aluminum 'U' channel to provide both warp resistance for the pegboard material and also give each panel sufficient strength for hinge attachment and tool weight. The aluminum frame would stiffen the whole assembly when in motion and even provide attach points for magnets and metal contact pads to keep each panel from swinging out from the stowed position. If the channel is sized correctly to the pegboard thickness, you might be able to use construction glue in a caulk gun to assemble a strong/stiff panel unit; corners might need a re-enforcement clip/triangle pop riveted to adjacent channel pieces.

Another thought about hinges; you could buy piano type hinges in bulk, cut them to the length required and use pop rivets to attach the the 'bottom' portion of the 'U' channel. This would hide the attach plates of the piano type hinge when the panel is in the closed position. For greater strength, you could buy longer pop rivets and fasten the piano type hinge to the front face of the 'U' channel and the rivet would extend through the hinge plate, the 'front' face of the 'U' channel, the pegboard itself, and also through the 'rear' face of the 'U' channel. Piano style hinges have bolt holes pre-drilled, but you could drill additional holes for as many pop rivets as you would care to install. I think this would make a very strong, stable, and durable assembly. Just my $0.02. lol

Seeing I was planning on making this all out of steel the aluminum, although light weight, will not be used. I have no way of welding it. Thanks for the ideas thou. They are appreciated!
 
OP
D

Double B

Well-known member
Joined
Nov 13, 2011
Messages
83
Location
North Shore of Lake Erie
Update 11-27-2011

Haven't been working on this as much as I sould be, but did fonally get the first coat of mud up last night. Ran out and will need to pick up more right away. I'm not a dry waller and do not pretend to be. I do put it on a bvit thick and tend to sand off alot. But hey, isn't it about the project anyways....

I give my hats off to those guys that do do this work everyday. It is deffinately not my cup of tea! Here is a few shots of where it is this morning.

SSPX0072.jpg

SSPX0073.jpg

SSPX0074.jpg

SSPX0075.jpg

It's not the bvest god and its not nearly done, but when it is it will the best I can do!

Today is an off day. It Gray Cup day. So off to my buddies to watch the game and have a few pops. Need to pick up som more mud anyways. Might get into sanding/shaping abit before I go though. We'll see how that works out.

Sorry for the boring post, just thought I would give an update!
 

twocoda

Well-known member
Joined
Nov 9, 2011
Messages
126
Location
Saugeen Shores Ontario Canada
i feel your pain with the drywall portion of your project...it isnt my cup of tea either and i build houses for a living ....when it comes to drywall i always contract it out...i see your on the north shore of erie...if your any where near london Ont and give up on the drywall i have very good drywallers down there....good luck with your reno...
 
OP
D

Double B

Well-known member
Joined
Nov 13, 2011
Messages
83
Location
North Shore of Lake Erie
i feel your pain with the drywall portion of your project...it isnt my cup of tea either and i build houses for a living ....when it comes to drywall i always contract it out...i see your on the north shore of erie...if your any where near london Ont and give up on the drywall i have very good drywallers down there....good luck with your reno...

Not close enough to London. I have buddies who do this type of work, but I never want to do this for someone else, so I just grit my teeth and get-r-done! I hate how favours works for this type of work.

I'll do roofing and insulating favours all day, but not drywall! I hate mudding and sanding.

Just finished sanding the first coat. I'll be doing this all week from what I was just looking at! God I hate this ****! Wind is helping with the dust thou. Just open up the the front and rear doors and have at her. Makes clean up way more easier! Sure the neighbours are not going to like it though! Especially with the rain....
 
OP
D

Double B

Well-known member
Joined
Nov 13, 2011
Messages
83
Location
North Shore of Lake Erie
Just as an update, I still love doing drywall! The sanding is my favorite part of the whole process. Not being able to see out of my dust clogged eyes makes me want to take up this trade full time. I think it's time for a career change! But in all seriousness, to those guys that do do thisfor a living, my hats off to you. I don't know how you do it!

Did the main sand last night after two good coats of mud. Now its only filling the pin holes and a bit more feathering out of a couple of splices. Here the pics as promised.

1129012129.jpg

1129012129a.jpg

1129012130.jpg

I know it does not look like much but hey, it's drywall mudding. It all looks the same!
 
OP
D

Double B

Well-known member
Joined
Nov 13, 2011
Messages
83
Location
North Shore of Lake Erie
Update 12-07-2011

Be slowly working on the garage remodel for since the last post. Only about an hour or two a night after the kids are in bed. I am making progress though.

Was able to finish the mudding along the ceiling and then prime and paintedn with an oil based paint. When with Painters White for a color for the walls. It's an off white tinted grayish. When I get all the walls done I will eventually paint her ceiling White. Just for more light. Can never have enough!

After this, I started into the selvesalong the ceiling. Got them up and the electrical semi finished last night. Took a couple pics ad thought I would share them for those of you that like this sort of thing. Here they are.

SSPX0076.jpg

SSPX0078.jpg

These are with the mood lighting turned off. I went with Flourescent lights instead of the standard pot lights like most do here. I wanted the most light I can get, and want to be able to see into all my drawer in the tool boxes. Don't like shadows. Here is with the lights turned on.

SSPX0079.jpg

SSPX0081.jpg

Sorry about the mess. It was getting late last night. Was more interested in getting some sleep than cleaning. First thing on the agenda for tonight.

There will be a fracer plate/trim board allaround the opening in the selves. It will hide the light on the front faces. This will make it look more like it is incased in the housing. I'll get into more of that when I get the drywall up in place hopefully tonight.

Need to finish the electrical tonight and get everything sealed up with drywall hopefully tonight. Wish me luck!
 

Dickey

Well-known member
Joined
Oct 28, 2011
Messages
930
Location
Chapin, SC
If you use a wet rag/sponge instead of sand paper, you won't have to deal with white boogers when you're done.


//shop is looking good btw
 
Last edited:
OP
D

Double B

Well-known member
Joined
Nov 13, 2011
Messages
83
Location
North Shore of Lake Erie
The white boogers make me feel like I really lived thru the late 70's and earliy 80's. Didn't everyone have them back then?????

I always wanted to be part of the "IN" crowd.. lol I thought this was my way in without all the ligal problems.......
 
OP
D

Double B

Well-known member
Joined
Nov 13, 2011
Messages
83
Location
North Shore of Lake Erie
Just an update on the project. Thank god I'm not trying to get this done in a day! Deffinately would not be. Got the last of the drywall up last nigth for this wall and gever her the first coat of mud. Here is how it came out.

SSPX0092.jpg

SSPX0124.jpg

SSPX0121.jpg

SSPX0123.jpg

As you can see more sanding is in my imediate future. Hope to have all the mudding done by tomorrow night. Prime and paint by Monday night.

Picked out the accent colours for the garage. I'll be going white for the ceiling, Painter's White for the walls, and Pewer Ring for the accents. All oil bases and semi gloss. Here is a pic.

SSPX0122.jpg

So thats it for now.... Be back after paint....
 
OP
D

Double B

Well-known member
Joined
Nov 13, 2011
Messages
83
Location
North Shore of Lake Erie
Werll finally got the paint done yesterday and waiting for a couple of days for it to dry before stacking boxes on it. Here are some shots of how it came out.

SSPX0126.jpg

SSPX0127.jpg

I had to move all the tools from the center of the garage becuase I need to do some work on my vehicles. So the Garage is one hold for a couple of days. Shouldn be able to start into it by next Wensday. Which is the same day that I start X-mas shut down. So I get a whole week to work on the garage. Looking forward to it.

The plan for over the holidays it to scoot the wife out the door for her week long visit to the inlaws 4 hrs away. Then I'm on my own living the bacholar's life. I want to finish off the side I started with the trim and doors. Then move on to the other side and start the drywall process again. This side, as it sits today.

SSPX0125.jpg

I plan on tackling above the garage door when I do. So long as the I don't get too many buddies stopping by for drinks. We will see what gets done.
 
OP
D

Double B

Well-known member
Joined
Nov 13, 2011
Messages
83
Location
North Shore of Lake Erie
Posting again with some more updates. Finished off the Pre-Xmass vehicle maintence. So I am back on the garage project.

Finished off making the trim for the wall, Also was able to complete the doors for the over head storage selves. These I made out of underlayment plywood and pine boards. I also am using the door hanger kits from Home depot for tracks. I stole this idea from XcYZ build. Here is a pic of the boards and doors layed out read for filling and sanding before paint.

SSPX0007.jpg

I hope to get all this trim done filling and sanding by the weekend. That way while we are out visiting I can give them the paint they need. I figure a coat of paint go visit, get back and another coat. This way I will avoid the fumes from the oil based paint.

Also Tonight while I am still generating dust on the filling the boards dents and voids, I am going to move to installing the peg board. I plan on strapping the wall and screwing the peg board to it.

Here is how the wall looks right now.

SSPX0005.jpg

After this wall is finally done, after my holiday break from work, I will be moving over to this wall. I need to maximize storage of the tools on this wall. Also need to add a sink, laundry tub. This is for my other hobby, Need some place for washing and packaging my fish catch. I also plan on trying to incorporate some kind of tackle and fishing station on this wall. Don't quite know how I am going to get this one. If any one has any kind of suggestions reguarding this fishing tackle storage, please let me know. I have over 40 plano 3700 storage containers. Need to make some kind of desk/work station for this.

Here is a pic of this other wall with all the cardboard storage boxes removed.

SSPX0004.jpg

Still need to get the wall cleaned up for drywall and the self. Going to add the shelf like the other wall, along the top of the wall. Also I have my air compressor tucked up there. Need to make an enclosure that both hides and deadens the sound of it running. I currently **** air from the attic. I need to think on how I will keep this compressor head cool in an enclosed area. I have seen where other's have done this, but I have not seen anything that will work for where I want to keep it. I want to keep this as cool as possible. If anyone has any ideas please post them.

I'll post as I make more progress. Probably after the peg board is up.
 
OP
D

Double B

Well-known member
Joined
Nov 13, 2011
Messages
83
Location
North Shore of Lake Erie
Got the painting done yesterday morning and was able to start putting up the doors late last night. Started some of the trim, but had to stop due to the time of night. Also was starting to get a bit unstable on the ladder from all the beers! lol Here is a pic of the doors up, basically what I finished last night.

SSPX0009.jpg

While I waited for the paint to dry I unpacked the pegboard tools. I still have a couple of boxes, so I do need that track system. Also want the white board covers. Have a couple of ideas to make them muti-functional. We'll see when I get there. Here is what the jig saw puzzel turned out to be.

SSPX0010.jpg

Anyone ever take all the stuff off thier peg board and put it back up again. It's a hell of job! Fun, but work.

Hope today to finish the trim as much as I can. Before the present wrapping starts! I have a couple of hours of that to do tonight. Anyone else leave it to the last minute?
 
To avoid these ads, REGISTER NOW!
OP
D

Double B

Well-known member
Joined
Nov 13, 2011
Messages
83
Location
North Shore of Lake Erie
Thanks Guys! It's nice getting some positive feedback from someone other than my wife. I catually think she hates my garage, but you never can tell. Maybe she love it but for the fact that is gets rid of me in a safe way....

Yesterday I was able to finish off hanging the trim. Still need to fill all the holes and gaps with mono caulking, and then touch up the paint. Probablly tomorrow. Family is stopping by today for the big day. Here are some pics.

DSCN0163.JPG

DSCN0164.JPG

DSCN0165.JPG

Not bad pics. I took them with the kids new toy cameras. About the same quality as our phone cameras...

Today I shoot for the big time. The old man is stopping in for day. He is a master carpenter, I have had him working on a solid hardwood table top. It's 2 inches thick x 28" wide x 5'6" long. I made the mistake by asking him is he could cut it up for the type of beck I want, it sort of set him off. So I get to try to talk him into making it into a fishing table/bench. This should be fun. I need tables, but not the fishing table right now. I wanted a wood working table, but with fold down table tops on both sides. We'll see how this day goes.

I truely hope I don't set him off to bad! He knows what I want, but he is un willing to make it for me. He stated that he has never seen any of my benchs clean so why go to all the effort to make a piece of art.

Like I said we'll see how I make out. Wish me luck. Just an idea. Next week if I am over there I get some pics of his wood shop. I'm sure you guys would like a couple good pics of it. It's the only place on this earth where a 68 year old man can be found between normal working hours.
 

RamMan4x4

Member
Joined
Sep 30, 2011
Messages
18
Looks good! I like the storage cubbies at the top of the wall. I recently built something similar but it's just heavy duty shelves for storing large bins.

The only advice I can give...albeit late advice is to use wood paneling or boards on the walls. Drywall seems to continually create dust. I have it in my garage and have thought many times about just ripping it down.
 
OP
D

Double B

Well-known member
Joined
Nov 13, 2011
Messages
83
Location
North Shore of Lake Erie
Looks good! I like the storage cubbies at the top of the wall. I recently built something similar but it's just heavy duty shelves for storing large bins.

They are all connected. They only look like short storage areas. But I can put the largest bins end to end along the whole wall. There is nothing stopping me from pushing a bin from one end to another. This way I can maxim ize the space and options with this.

The only advice I can give...albeit late advice is to use wood paneling or boards on the walls. Drywall seems to continually create dust. I have it in my garage and have thought many times about just ripping it down.

I'm noticing this effect of drywall. I already have drywwall repairs to do! A couple nicks from the trim touching the wall with a corner. But I am still going to go with it. I do thank you for the advise.
 
OP
D

Double B

Well-known member
Joined
Nov 13, 2011
Messages
83
Location
North Shore of Lake Erie
Thanks. Yesterday I finished filling them while I started removing/cleaning up the other wall.

Like I said, started the other wall. That was fun cleaning that side up. I have never brushed off that sides shelving in the 10 years I have lived here. Made was some of that dust thick. Not to mention hazardous. I like to get into everything, from wood, steel, to fiberglass. I probably should have wore a dust mask! Here is how the new side looks this morning.

SSPX0012.jpg

SSPX0013.jpg

I am not getting into the last corner where the toilet is going. That will be last. I'm only going up to the centerline of the door to the house. Here is a pic of the last corner that will need to be done. I have planns for the one that include a TV/Cupboard from the ceiling. along with the vaccum and fridge all in this corner. Need to get done this other wall first thou.

SSPX0011.jpg

A vast improvement from what was there! Today I hope to get all the framing for the air compressor done. This is along with all the electrical rerouting. Basically get everything done for drywall again. Hope to have the drywall up by Friday morning. Maybe even mudding again by Friday night!

Wish me luck.... Or better yet hope the guys don't stop by and distract me with a couple of pop's.

Also stopped by the old man's house this morning for coffee. I lined him up on the table I want him to build for wood working. I forgot to bring the camera for you guys that would like to see a ture wood shop. Next time I get over there I will snap a few a post them. He has a couple of great Ideas for pipe clamp storage that I am going to steel from him......

Well off to work on the garage some more!
 
OP
D

Double B

Well-known member
Joined
Nov 13, 2011
Messages
83
Location
North Shore of Lake Erie
Update 1-2-2011

Just a quick update. Got all the electrical done and started into the plumbing on this wall. No pics, sorry, just still a plain borring wall that looks like it did before. I guess a bit few to many beers going down the gullet over the holidays to really get anything done.

Tomorrow going for the drywall and supplies. So hopefully some progress by the end of the week.

Happy new year to all. Mine was one to remember, with out getting into it all.
 
OP
D

Double B

Well-known member
Joined
Nov 13, 2011
Messages
83
Location
North Shore of Lake Erie
Sorry this is going to be a rather long post as I have not posted anything for a while. Again sorry...

I don't have much progress with the drywall in he new wall as I have been goofing around with the elecrical. Every time I thought I was done pulling wires and moving things, I would have a new idea on where and how I wanted things. This would require me to rip into the plastic and insulation again and add/revise something else. Even now I want to add another switched plug for my media blast cabinet. It would be for the dust vacuum.

Here is how it looks now.

SSPX0018.jpg

SSPX0019.jpg

I'm on hold right now due to having to sort out my attic. I need to clean and get rid of a ton of **** that I have packed rat in there in the 10 years I have lived here. Also Need to finally add the insulation and some storage shelfs up there. Also want to relocate the access opening due to having to move the heater. After all this is done I am going to mud the ceiling at the same time as the wall. The ceiling is in rough shape as well.

Here is what it looks like.

SSPX0014.jpg

SSPX0015.jpg

SSPX0016.jpg

SSPX0017.jpg

I went to the old mans last night and got some pics of his wood shop and my new work bench. I'll post the pics in the next post.
 
OP
D

Double B

Well-known member
Joined
Nov 13, 2011
Messages
83
Location
North Shore of Lake Erie
New work bench arrives

Here is the new work bench that I had the old man make over the holidays. As I posted before I have limited space in my garage. So I need to maximize what I have. The way I plan on doing this is to make my work benchs collapsable to 1/3 the width when set up.

I found this work bench in an old Woodworking Work Shop magazine. We revised it for my application. I made it wider and had drawer added to hold all my wood working sanding equipment. See below for how it cam out.

The folded size is 32" deep by 24" wide.

SSPX0022.jpg

The fully spread out size of the table top is 32" deep by 6' long. The top is made out of all my father scrap from his wood working buisness. They are all different types of wood. From red, white maple to while, golden, red oak, hickory, katelpa.

SSPX0020.jpg

Here are the drawers...

SSPX0028.jpg

Here is where the sand paper goes and the belts...

SSPX0026.jpg

This is one solid table. The top is 2" thick. I had the wife on it wigling around last night and it does not move! So I will start the finish sanding and paint tonight while I wait for the funds to show up for the attic.
 

Attachments

  • SSPX0021.jpg
    SSPX0021.jpg
    125.7 KB · Views: 101
OP
D

Double B

Well-known member
Joined
Nov 13, 2011
Messages
83
Location
North Shore of Lake Erie
Here are some quick pics of the old mans shop. It's quite the nice little place for wood working.

Just as a little background on the old man. He is 68 years old. He is a home taught master carpenter. He has been building with wood since he was 3 years old. Family trait handed down from generation to generation. He has always had a wood shop. He use to have his own Construction/Drafting buisness. I still remember as a very young kid (3-5years old) my dad up all night drawing up house plans for people and going to work in the morning at the plant.

History on this shop is as follows. My mother had both her hips replaced 4-5 years ago and could not navigate the stairs in our old home. Lived there for 31 years. So they moved to there current home because it is a ranch. When they bought it it did not have a shop. Only a semi dettached 2 car garage. After the moved in I got a call from the old man about 2 months after the moved in asking for me to stop by for a visit. Seeing I was not by for a while. Busy fishing season. I show up in my work cloths because I know my father and he will have something for me to do. I was right I have to shigle his roof that day on this shop. It was semi finished/framed. He had sone it all him self. With my mother help. They even reclaimed all the birck the took off the back wall and rebricked the out side. Nearly killed my mother over that one.

Needless to say now adays if you can get ahold of him he is out in his shop building something. Right now he has a women make hime build dog sleds. That is a fun job for him. With all the steaming.

Anyways here is the shop. A bit messy. And don't touch anything. You will walk away with a very thick coat od wood dust!

SSPX0033.jpg

SSPX0034.jpg

SSPX0035.jpg

SSPX0036.jpg

I don't know if you can see them or noth on the one wall he has a great idea for pipe clamp storage I am going to steal. Look for it. He has over 40 pipe clamps in that rack. It works great!

Hope you don't mind the verring off the beaten path....
 
OP
D

Double B

Well-known member
Joined
Nov 13, 2011
Messages
83
Location
North Shore of Lake Erie
Update 01-14-2012

Have not posted much lately. Been up in the attic cleaning/insulating. What a fun job that is. Just to give you a mental picture of why it has been like, think about storage wars.

For the past 10 years we (my wife and I) have been living here, we have been using the garage attic as our storage bin. Any and all stuff we wanted to keep has been thrown up there. It has never been insulated or plywood been added to hold the items off the dry wall. To be honest every box for every major item we have ever boughten was up there.

Now add on top that, I married a pack rat who does not want to throw anything away, then you get a pretty good idea of what I been dealing with. I wait for her to go to work, then start pitching! What she does not know, does not hurt her.... In only on this topic that is.

Also with reguards to the insulating part, type to picture a 300 lbs male contorsionist trying to spider crawl across 2' on center roof trusts, with only 2-3' of head room. Not the most plesant looking feat when you add all the bracing up there. But it is almost done. I have a bit more electrical work to clean/fix up and add a couple circuts to the other side of the garage. Then I can start mudding the ceiling and walls. I wanted to get all my banging/crawling around done before I started. I'll post pics later today, or tomorrow.

I also used 1x3 rough cut strapping from home depot to hold all the items off the floor for storage. I still want to add some shelving and more strapping, but it is good enough for now. I basically have a 16' x 12' storage space to equally distribute the weight. I can finally put the camping/boating gear up there safely without worring if something is going to fall thru the ceiling after I'm done.

Well back to work.....
 
OP
D

Double B

Well-known member
Joined
Nov 13, 2011
Messages
83
Location
North Shore of Lake Erie
Update 1/18/2012

Finally finished the attic portion of this project last night. What a fun job that was. Besides throwing out my knee while insulating, I got rid of a ton of stuff/junk! Only thing left is the Holloween decorations and parts for the Focus and 120 HP outboard!

I took pics last night, but I'll warn you that they are not very exciting. All they show is an insulated attic and some strapping on the roof trustes. Here they are;

SSPX0041.jpg

The old attic access opening. Still some junk there. Also still need to insulate under after I get rid of it.. It is only a 4' x 4' area though.

SSPX0043.jpg

The new hole opening.

SSPX0045.jpg

SSPX0047.jpg

SSPX0048.jpg

A panoramic view (sort of) of the attic. I have 3.5" of insulation everywhere with an additional 3.5" where there is no storage. I'm sure this could be increased, but hey, I lived here ten years with no insulation and heat with no problems. So It will be another ten untill I get around to adding another 3.5". Maybe a bit sooner than I think, when I need to start paying for 4 wedding for my kids.....:shocking:

SSPX0049.jpg

This is how I straped the area I plan on using for storage. I used 1" x 3" x 8' pine strapping from Home Depot. It worked out pretty good. I can walk on any single board and not go thru. Eventually I would like to throw some 1/4" ply down on top of it but it is not in the budget at this time.

Tonight I start into constructing the other walls' overhead shelving and electrical. I already put all my hanging 2x4's up when I was up in the attic. So the progess should be alot faster! I'll post as it goes along.
 
OP
D

Double B

Well-known member
Joined
Nov 13, 2011
Messages
83
Location
North Shore of Lake Erie
Update 1-19-2012

Did manage to get some of the framing done for the over head selving. Taking my time while doing it, when I can get time. These after school activities with the kids are in are killing me! It is stealing the 4-5 hours I would normally have to work on things, to 1-2 hrs between after they are in bed to the time I have to get to bed. Who ever said there is not enough time in the day was spot on!

The progress is not much to look at other then the shell of the selving. After the wife and I got this up, we stopped and planned out how we (I) want lighting/electrical to look. Then I started forming a plan on how it will be installed. So tonight if I can get to it, we should make some serious progress I hope. Nothing on the agenda tonight. Here is what it we got done looks like for those that love pics of anything and everything.

SSPX0050.jpg

SSPX0051.jpg

Wish me luck that the guys or family does not show up tonight. That way I can get some stuff done!
 
OP
D

Double B

Well-known member
Joined
Nov 13, 2011
Messages
83
Location
North Shore of Lake Erie
If you havn't figured it out yet, this is a make work project with no real dead line on when it gets done. Just my main winter project that keeps me sane with all my free time. I don't work hard, and don't get a ton done in the hour or two I get to work on it, but it does relieve the stress.....

Anyways, The other night the guys did stop by, so nothing got done. Last night I was able to finish framing in and roughed the electrical into the selving. I was able to test thr lights aand they all work. Just need to buy some more light bulbs. Here what got done....

SSPX0053.jpg

The new aircompressor cove. I plan on lining this with egg cartons to help with the noise. Anyone ever try this?

SSPX0055.jpg

The rest of the selving is just regular storage space. Tonight I will get the reat of the drywall buttoned up. Hopefully I can rough in the switch/light box undure the aircompressor cove. That will take a bit of figuring due to the sand blaster needs to tuck under it. We'll see what happens.
 
OP
D

Double B

Well-known member
Joined
Nov 13, 2011
Messages
83
Location
North Shore of Lake Erie
I know this in not the most exciting thread, but hey it's mine and it full of pic's...

Just an update, finally got to the next step, Mudding. Finished sanding/cleaning up all the old mud and taping from when the house was built last night. That was fun not. Hope to get into putting on a coat or two tomorrow night. Today's it's bee 10 yr's with my lovely wife, so you guessed it, taking her out! so no work. But tomorrow is another day, and back to work.

Here the pics of where it is at.

SSPX0057.jpg

SSPX0058.jpg

SSPX0059.jpg

To say this is the fun part of the project it's not, but I do sort of like putting it on. Until you actually do it once or twice, you need really get an understanding for those guys that do this work every day. It is deffinately a form of art. Tjose guys that can go in and out and get a whole house done in a couple of days are talented to say the least! I just try not to put too much on and hope for the best. The worst that can happen is having to add another coat and resand!

Any pointers would we helpful.
 
OP
D

Double B

Well-known member
Joined
Nov 13, 2011
Messages
83
Location
North Shore of Lake Erie
Update 2-11-2012

Haven't chimed in in the last couple of weeks due understanding that you guys and girls probably didn't want to hear my b*tch'n and moan'n about mudding drywall. But here is a progress report just the same.

Work out in the garage till 3am after giving everything a final 180 grit sand job. Then pulled out the primer and supplies and gave the drywall a quick coat to see how things where. Boy can you reall tell all your flaws that you missed with primer. Here is how it was before the touch ups this morning with another coat of mud!

SSPX0060.jpg

SSPX0061.jpg

SSPX0062.jpg

SSPX0063.jpg

SSPX0064.jpg

After taking the pics I got out the box of finish compound and gave the few areas a quick coat. I had two tape seams that where a bit subflush after sanding and a couple areas with a couple dings that I misses. Also those damn tear in the sheetrock paper are a pain to get just right. Always sand too much off. Here is the pics after touch up.

SSPX0066.jpg

SSPX0067.jpg

Too say I hat dry wall is an understatment, but I am getting better at it as time goes on. Only one more wall in this garage after this one.

I talked my wife into giving me a hand painting tonight instead of going out for the V-day. She fa good woman because she agreed! Even though it's her first saterday off in a three or so weeks.

Anyone else bribe their wives with the promise of cheap booze for work in the garage? Mine agreed! Can't complain about that, she'll probably be a liability after the third beer on the lader! lol

Thats it for now, I get some shots after paint posted.
 
OP
D

Double B

Well-known member
Joined
Nov 13, 2011
Messages
83
Location
North Shore of Lake Erie
Well I thought I would check in with an update, seeing I have not done so in a while. Not much done in the way of progress. My personal scedual is driving me nuts, between the kid events; Archery on Mondays nights, Air rifle on Wensdays, then there is the wife at the Gym for boot camp on Tuesdays and Thursday evenings, (As she says Bikini season coming up fast, and if I want her in one on the boat this summer, then she has to go!) I have very little time to get anything done. Hell She just signed up all 4 kids to soccer for the first time. What did she get me into???? Please tell me that it does get better!

Anyways back to the project of sanity! I got out to the garage this weekend and painted. I screwed up the 5 gallons of paint I had by mixing in the top skin that had formed on the paint. So next time I break out that can I will have to screen it to remove all the **** from it. More work, just love it! Anyways here is a few pics of how the painting came out.

SSPX0070.jpg

SSPX0071.jpg

I'm getting better on the mudding stage, but I'll be honest, I'm no expert! This semi gloss paint shows averything! I did get out in the garage on Sunday afternoon and got all the electrical done. Now it is time for doors and trim for up above. Then some air lines and a cabinet sand blaster rework. I might put the blaster off for a while and just finish the last wall. Here it is;

SSPX0069.jpg

Either way, fishing season is fast approaching. Need to decide what I want to get done now and what to get done this summer. Thinking the dust and mud now and play with the cabinets and stuff during summer. Either way need to start getting the supplies for the boat reworks I want to do, so money for the garage is going to com scarce. We'll see and I'll keep you guys posted......
 
OP
D

Double B

Well-known member
Joined
Nov 13, 2011
Messages
83
Location
North Shore of Lake Erie
Just posting an update for those guys that like to have a see of what is going on. Did get a couple of hours of work put into the garage rework. Of course all after dark and on Friday night while the wife was at work adn kids where asleep.

Started making the doors for the overhead storage. Here is couple of pics.

SSPX0076.jpg

SSPX0089.jpg

SSPX0092.jpg

Basically they are 3/16" panelling cut to rough size (+1/8"), then I rip a 1X3 strapping in half and laminate that to the perimeter. I use wood glue and 3/4" brad nails. Then after its dry I belt sand the edges flat and router with a 1/4" round all sides. Little bit of wood filler and sanding again. Then they are ready for prime & paint. These are fun to make. Got all of them done for the one side including the air compressor hole.

I also got the molding done for this side all router. Here is a quick pic.

SSPX0094.jpg

I started into the one corner triming it out. I started by hangin the pegboard up. Next is the frame for the doors. I will be putting the air regulator and dryer in this elcove behind doors. I am thinking of making the doors out of peg board for more storage. Well see what the outcome is. Here is another quik pic.

SSPX0093.jpg

Hoping tonight to get the sanding and elcove done after the kids archery classes. We'll see. By the end of the week I want to have the painting done for the trim and doors. That way I can hang all this up and start in ont he last wall. I'll post as more progress is made.
 

Attachments

  • SSPX0078.jpg
    SSPX0078.jpg
    69.4 KB · Views: 40

Omphaloskeptic

Well-known member
Joined
Oct 11, 2008
Messages
2,346
Location
Ultima Ratio, Wa.
Looking good! Do you feel that you are in the 'home stretch' yet?
It reads like you started this garage revamp about 11/11 and it seems to me that you've been at it pretty steady through the winter; good on you! Hope you keep at it during the fishing season and keep us posted.

That workbench your old man built for you is one mighty fine Christmas present! Are you keeping the top clean to show him you're mending your ways? lol
 
To avoid these ads, REGISTER NOW!
Top Bottom