To avoid these ads, REGISTER NOW!

Time to update the garage

MPSmith1

Well-known member
Joined
Jan 14, 2015
Messages
46
Location
O Fallon, MO
This is my first post.

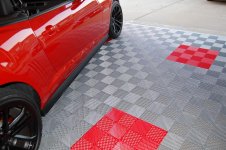
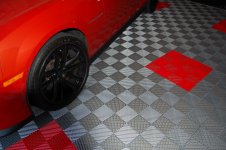
I've been lurking for a couple weeks and based on a number of great threads I've read, I decided to dive into my next project; a new home for my 2013 Inferno Orange Metallic Camaro ZL1 convertible. She's a manual transmission and boasts 580hp out of the gate. She's my pride and joy and deserves a better place to sleep than I've been giving her. So in that sense, I'm creating a 5th bedroom for the house. :lol:

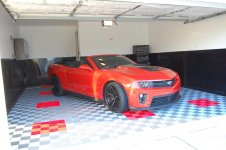
We are starting from quite cramped and humble beginnings and I thought I'd take some time and post my progress. My two car garage is a small 18' 5" x 18' 5" with an extra little 4' x 8' entryway to the house. So, it's a total of ~370-sq. ft. I've done nothing with it since I bought the house new around 8 years ago.

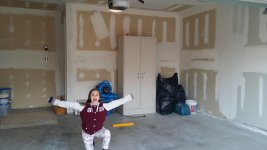
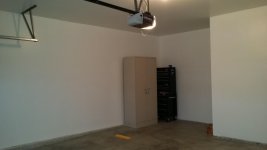
I started by cleaning out the garage completely. I already took out 90% of the storage that was in there and only have one cabinet yet to remove. The tool box stays. Overall, this garage will not have much storage. I've got other areas for that. But more on that later...

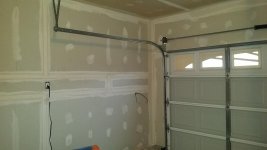
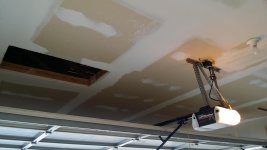
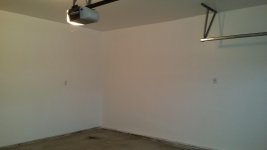
These first two photos show where I'm beginning from. I've got a couple of drywallers in there today to fully insulate, drywalls, finish and paint it (satin white). So there should be an update quite soon. I decided to start with a white box and go from there and see where it takes me. By the time I'm done, I hope to have as nice an area in my garage as anywhere else in my house. That's the goal.

Wish me luck!

Mike, aka MPSmith1 (no, I'm not a military MP. My middle initial is P.) :p
 

Attachments

  • 20150126_170618.jpg
    20150126_170618.jpg
    133.6 KB · Views: 296
  • 20150126_170609.jpg
    20150126_170609.jpg
    128.1 KB · Views: 258
To avoid these ads, REGISTER NOW!
OP
M

MPSmith1

Well-known member
Joined
Jan 14, 2015
Messages
46
Location
O Fallon, MO
Drywall sheets are all up and first coat of tape is done. The current schedule is to continue taping tomorrow, finish it Monday then complete seal and paint on Monday and into Tuesday.

These guys did a great job today. Very professional work. I personally **** at dry wall and was happy to have someone else do it. One item of note is that they moved the entire garage door back for me, so that that they could drywall behind the door brackets. Very nice and it'll give a seamless look.

I decided to remove all cabinetry and shelving from the sides and front of the garage, to give me more room.
 

Attachments

  • image.jpg
    image.jpg
    135.3 KB · Views: 220
OP
M

MPSmith1

Well-known member
Joined
Jan 14, 2015
Messages
46
Location
O Fallon, MO
Here's a second photo. I can only post one photo at a time on my iPad. Unless I'm doing something wrong. Lol. :willy_nil

Fyi, the cable coming out of the wall is for my sprinkler system controller. I added a couple of electrical outlets with GFCI before they started on the drywall and a wood bracket behind the drywall where I expect to put the TV. Probably isn't necessary, but a little extra support couldn't hurt.
 

Attachments

  • image.jpg
    image.jpg
    135.4 KB · Views: 144
Last edited:
OP
M

MPSmith1

Well-known member
Joined
Jan 14, 2015
Messages
46
Location
O Fallon, MO
They had to spend some time correcting some "issues" I had with my front wall. ;-)
 

Attachments

  • image.jpg
    image.jpg
    137.8 KB · Views: 168
OP
M

MPSmith1

Well-known member
Joined
Jan 14, 2015
Messages
46
Location
O Fallon, MO
Day 2

The drywallers have made some nice progress today. Two coats of mud. I love the way they are giving attention to the little details like hiding the wires to the garage control and finishing the attic door. I'm so glad I decided to let professionals do this work for me!

I'm hoping the painting work can start on Monday. I decided to use an exterior latex white satin paint. I'd like it to be pretty bright with a bit of gloss to it. An interior paint would probably work just fine, but it couldn't hurt to use an exterior one.

I also spent some time emailing Ashley with RaceDeck about a free flow tile floor. I've been all over their design program, which I'd highly recommend. It's a great way to figure out what looks good and how many tiles you need. After seeing what other users have done here on GJ, I seem to be leaning toward a black perimeter, with a red stripe inside that and an alloy field. I picked Alloy because it matches the doors of the Gladiator storage cabinets I've already bought. Ashley has been REALLY helpful in asking my questions and helping get an order ready. She's going to send me a sample to make sure it's what I want.
 
OP
M

MPSmith1

Well-known member
Joined
Jan 14, 2015
Messages
46
Location
O Fallon, MO
I hear ya thewatusi, but yeah they hid it under the tape. There was no access to the wall behind the wall plate, so hiding it was a decent way to go. I wish it could have been fished through the wall, but that wasn't a viable option. Shouldn't be a problem for a low voltage wire, though.

I'm just happy not to see it stapled to the drywall anymore. Lol
 
OP
M

MPSmith1

Well-known member
Joined
Jan 14, 2015
Messages
46
Location
O Fallon, MO
My plan is to install some steel or aluminum billet on the walls, perhaps going all the way around the perimeter up to the four foot level. My first thought was to use black, but I'm wondering if that would darken the room too much.

A local vendor (Shapiro's) near downtown is supposed to have an excellent supply of diamond plate of all shapes and colors. Supposedly the prices are good, too. If I can get out of the house for a couple hours, I'm going to scope it out tomorrow and see what they have. Will let you know what I discover.

Would appreciate anyone's thoughts on thickness they've used for their own wall installations and how they attached it. This place will make shear cuts for free as needed, so im hoping I can get all the cuts I need.

Mike
 

LXCam

ALLIANCE MEMBER
Joined
Apr 23, 2013
Messages
19,104
Location
AZ
Very cool ride and project. As for the plate, just get the thinnest gauge they offer and use stainless button head sheet metal screws for attaching it to the studs. Do not use self tapers because you won't need them for drilling the aluminum and those don't work worth a **** in wood. Also be careful not to sink them to deep or it will dimple your sheets and look like ****, just take your time. Also if you have any outside corners, you have two options. One would be to have them bend it for you of have them make you a corner cover. Also see what they offer for a extruded piece to use for the vertical joints, that way it will eliminate waves and that uneven look. And for the final touch, get a J metal extrusion for the cap, that'll really set it all off. OH OH wait, I'm gonna spend just another small chunk of change. Get that J mold powdered coated black to really make it pop.

BTW, I know someone is going to suggest attaching the sheeting with adhesive. Don't do it, make the effort to attach it in a mechanical fashion in the event you change your mind about receptacles of other items you may want to add later. If you glue it, you'll destroy the sheeting and the drywall removing it.

Good luck dude, this is going to be cool
 

LXCam

ALLIANCE MEMBER
Joined
Apr 23, 2013
Messages
19,104
Location
AZ
Hey I forgot to ask about the ride. So 580?, by what means. All motor or forced induction?. I'm a modern mopar guy but like my cheby's too.
 
OP
M

MPSmith1

Well-known member
Joined
Jan 14, 2015
Messages
46
Location
O Fallon, MO
Great point about the sheets. I was wondering if I could go pretty thin and still have the appearance of a "heavy duty" metal. You've confirmed that for me. I will just need to be extra careful when handling it so it doesn't ripple. I believe I can get them to pre drill it for me, then I will just need to install some mollies where I don't hit a stud. Stainless steel screws will look awesome! I was gonna use box heads or hex heads, to give it an industrial look. And I hadn't even thought of bending the sheets at the outside corners instead of shearing them. Also a great look, but Ive only got one outside corner. Black was my preference, but I'm only concerned that it might make the room too dark. But OMG.... I doooooo love me some black!
My ZL1 is one of 60 convertibles ever built in this color that are a manual transmission. The vert was only made in orange one year. It uses Chevy's LSA engine, which is a 6.2L supercharged with 580 hp and 556 fp of torque. So it's definitely uses forced induction. I'm not an engine expert, I just love driving it. Handles like a dream and she's a real beauty in the sunlight. I've been tempted to make some mods, but I have left her completely stock.

:3gears:
 

LXCam

ALLIANCE MEMBER
Joined
Apr 23, 2013
Messages
19,104
Location
AZ
Awesome car, I had no idea they offered that package in a vert. For sure black is awesome but here's were I see an issue. First, yup dark, but whatever. Second, every little fiber partical will get stuck on the rough edges of the raised tread and being black will really stand out. You can't truly wipe this stuff down with a rag because if that too. You can pressure wash it though, so if that works for you there ya go. I build jails for a living now and this is what we have installed in the kitchen and laundry areas, but in 3/16", so after witnessing the aftermath have noticed the downside. Being OCD is not healthy I tell ya :p
 
To avoid these ads, REGISTER NOW!
OP
M

MPSmith1

Well-known member
Joined
Jan 14, 2015
Messages
46
Location
O Fallon, MO
Went to look at the aluminum diamond cut sheets today, but am not ready to buy yet. Pretty cool place! Metal, metal eveywhere!!! The ones I want are $100 per 4 x 10 sheet. Looks like I will need a little more that 6 pieces. LXCam makes good sense with the dust and particle accumulation, but I will probably just live with it. The painted sheets don't seem to have a lot of sharp edges, so I hope won't be a big issue. I'm a little OCD from time to time, as well. ;-)

The shop will make two cuts per sheet, so that ought to take care of whatever I need. I thought about having them bend sheets for corners, but they warned that it could break the painted surface. Will need to think on that a bit.
 
OP
M

MPSmith1

Well-known member
Joined
Jan 14, 2015
Messages
46
Location
O Fallon, MO
Drywall phase - complete!

The drywallers finished their work and the result is excellent! I had them use a Behr exterior satin white paint throughout to make it nice and bright, as well as durable. They improved my attic access trim, as well. The old one consisted of what appeared to be some left over 2x4's. LOL...

Even though the door isn't insulated yet, I can already tell a difference with having the walls and ceiling fully insulated. The outside temp last night was 12 degrees and the garage was still 41 degrees. Not bad.

My next step is to install the 2 - 30" Gladiator cabinets, paint the perimeter concrete curbing to match the future RaceDeck flooring and install the door insulation kit. The weather is supposed to be nice this weekend, so I might get a good portion of that stuff done between rounds of golf. ;-)

I gave that tan cabinet to a friend of mine, so the only item that will remain on the floor is the Craftsman tool box. Space is at a premium in this small garage! :)

The street was plenty slick last night and after a few attempts, I was able to drive the ZL1 into its home. I believe that's the first time she's been snowed on! :shocking:
 

Attachments

  • 20150204_160939.jpg
    20150204_160939.jpg
    123.4 KB · Views: 123
  • 20150204_160951.jpg
    20150204_160951.jpg
    124.8 KB · Views: 104
  • 20150204_160959.jpg
    20150204_160959.jpg
    128.2 KB · Views: 109
  • 20150204_161011.jpg
    20150204_161011.jpg
    122.9 KB · Views: 103
  • 20150204_175312.jpg
    20150204_175312.jpg
    136.9 KB · Views: 204
OP
M

MPSmith1

Well-known member
Joined
Jan 14, 2015
Messages
46
Location
O Fallon, MO
Spent last night insulating the garage door. Nice and easy job. Here's a photo about halfway through. It doesn't provide a 100% sleek look, because the insulation has a slightly wrinkled look (did I mention I'm a little OCD? Lol). My first thought was to cover it with some kind of flat paneling, but I like the way it turned out. The door is much quieter going up and down, without all the rattling and creaking it used to have.

I also had to conduct a minor repair. Water tends to stand directly under the door. A couple nights ago, we had an extremely cold snap and it froze. The ice clung to the bottom of the door and nearly tore the bottom off! Each of the tapping screws pulled completely out, so I just had to put a few more in.

Door Project..... COMPLETE!

After a round of golf today, I plan to tackle some trim paint and storage cabinet installs. Who knows, I might even get around to cleaning and sealing the floor!
 

Attachments

  • image.jpg
    image.jpg
    134.5 KB · Views: 146

CRF8

Well-known member
Joined
Nov 18, 2014
Messages
117
What's the brand of insulation and where did u buy it? Does it weigh down the door to where u have to adjust the opener? Price also if u don't mind, thanks


Sent from my iPhone using Tapatalk
 
OP
M

MPSmith1

Well-known member
Joined
Jan 14, 2015
Messages
46
Location
O Fallon, MO
What's the brand of insulation and where did u buy it? Does it weigh down the door to where u have to adjust the opener? Price also if u don't mind, thanks


Sent from my iPhone using Tapatalk

Sure thing. Had to buy two kits at Home Depot. I think they were $60 - $70 per kit. It's made by ADO Products. Btw, I always use the 10% off Lowes coupons that I buy from www.mycheapcoupons.com (which my Home Depot accepts as well). I used nearly 1 1/2 kits to do my small two car door.
 

Attachments

  • image.jpg
    image.jpg
    143.3 KB · Views: 69
OP
M

MPSmith1

Well-known member
Joined
Jan 14, 2015
Messages
46
Location
O Fallon, MO
Very cool ride and project. As for the plate, just get the thinnest gauge they offer and use stainless button head sheet metal screws for attaching it to the studs. Do not use self tapers because you won't need them for drilling the aluminum and those don't work worth a **** in wood. Also be careful not to sink them to deep or it will dimple your sheets and look like ****, just take your time. Also if you have any outside corners, you have two options. One would be to have them bend it for you of have them make you a corner cover. Also see what they offer for a extruded piece to use for the vertical joints, that way it will eliminate waves and that uneven look. And for the final touch, get a J metal extrusion for the cap, that'll really set it all off. OH OH wait, I'm gonna spend just another small chunk of change. Get that J mold powdered coated black to really make it pop.

BTW, I know someone is going to suggest attaching the sheeting with adhesive. Don't do it, make the effort to attach it in a mechanical fashion in the event you change your mind about receptacles of other items you may want to add later. If you glue it, you'll destroy the sheeting and the drywall removing it.

Good luck dude, this is going to be cool

I'm to the point in my project where I need to decide about how to attach the aluminum plate and I'm torn between gluing/taping it down or screwing it to the wall. LXCam makes a strong case for screwing it down, but I would love to hear from people who have tackled this project.

Here are my concerns...

There's no doubt in my mind that using good double sided tape and/or liquids nails would be easier. I've watched a number of youtube videos showing how to do it and it looks pretty simple. Of course the down side is that the plate would be messy to remove.

Attaching with screws would be a great look, but I fear it would be very difficult. My floors are not very level and it would be a challenge to drill the holes in the correct place and either hit the studs or correctly place the mollies in the drywall. Also, the plate is easily prone to bending, deflection, etc. I don't want to ruin it. Overall, there would be little room for error.

Let me know your thoughts.

Mike
 
OP
M

MPSmith1

Well-known member
Joined
Jan 14, 2015
Messages
46
Location
O Fallon, MO
I did some searching on site since posting this question and found www. Outwaterscatalog.com. They have a great supply of channels and extrusions. Great site!

Still not sure about gluing vs. screws. :-(
 
OP
M

MPSmith1

Well-known member
Joined
Jan 14, 2015
Messages
46
Location
O Fallon, MO
Got the insulation completed, but not the cabinets. I decided to wait until the diamond plate was up, so I could ensure the placement was correct.

I took the opportunity to tackle a new aspect of the project. Like many garages, mine has a curbed footing around the perimeter. It wasn't finished in any fashion and was in fact, pretty rough. Since the perimeter of the floor as well as the diamond plate would be black, I decided to paint the curb black as well. Also, I applied some thin set concrete to it to improve the look. It took some work, but I like the result. It's not 100% smooth and finished, but a vast improvement. I didn't worry too much about getting a little paint on the walls and floors, since they will be covered.

I've mapped out the diamond plate cuts and hope to make an order this week and have it delivered on Presidents Day. I'm leaning towards screwing it on now (I've gone back and forth on this issue... Lol)
 

Attachments

  • image.jpg
    image.jpg
    130.1 KB · Views: 101
OP
M

MPSmith1

Well-known member
Joined
Jan 14, 2015
Messages
46
Location
O Fallon, MO
Big day today....Pulled the trigger on my .025 black aluminum diamond plate! I have seven sheets of 4 x 10 arriving on Monday (after I return from a quick vacation to New Orleans). The cost was $100 per sheet.

I gave them my cut list and can't wait to get it installed. Looks like I will be applying it with heavy duty vinyl tile, double sided tape after all. I've never been so back and forth on something so simple and it's kind of making me crazy. In the end, I decided I want a very sleek look and no screws will provide that look. Stay tuned.... Lol.

I also purchased vinyl cap molding from CutsMetal, to give it a nice finished touch. I bought enough to cover the entire top and even the vertical seams, if needed. I spoke to their customer service and they indicated that they don't make an H channel, but that some customers are using the cap molding on the vertical seams. I don't find that to be a great solution, but it might be a way of eliminating gaps. I will do some experimenting and see what happens....
 
OP
M

MPSmith1

Well-known member
Joined
Jan 14, 2015
Messages
46
Location
O Fallon, MO
I'm a little behind with my updates....and so much has happened!

Step one is that I put up the diamond cut .024 aluminum sheeting. It was a bit of a chore but well worth the effort. It turned out great! I ended up using liquids nails as well as galvanized hex head roofing screws. On the top edge, I installed a plastic molding to give it a finished appearance. I love the look. Here are a few photos. Bear with me, because my iPad only allows one picture to be attached per post.
 

Attachments

  • image.jpg
    image.jpg
    141.4 KB · Views: 140
OP
M

MPSmith1

Well-known member
Joined
Jan 14, 2015
Messages
46
Location
O Fallon, MO
Then, two weeks ago I installed the Gladiator cabinets. Pretty easy job: just the way I like it!
 

Attachments

  • image.jpg
    image.jpg
    143.9 KB · Views: 94
OP
M

MPSmith1

Well-known member
Joined
Jan 14, 2015
Messages
46
Location
O Fallon, MO
Guess what got delivered today?!? (Sorry it's a sideways photo. I blame the stupid ipad).

I was amazed how quickly the Racedeck tiles came. Nine boxes arrived today. Ashley lived up to her reputation and treated me so well. I asked a lot of questions and she was very patient and nice to me. That meant a lot.

I feel like I got a great deal and would highly recommend RD to anyone looking for a tile floor. The product went down so easily. At least three people stopped to admire my floor even before it was done!
 

Attachments

  • image.jpg
    image.jpg
    147 KB · Views: 72
OP
M

MPSmith1

Well-known member
Joined
Jan 14, 2015
Messages
46
Location
O Fallon, MO
I got the field of the floor done in about 45 minutes, but haven't tackled the "edge cuts" yet. I don't have a good skil saw or jig saw, etc... Here's some photos of the job 75% done.
 

Attachments

  • image.jpg
    image.jpg
    146.8 KB · Views: 114
OP
M

MPSmith1

Well-known member
Joined
Jan 14, 2015
Messages
46
Location
O Fallon, MO
My next job is to complete the "edge cuts". As you can see in the attached photo, I have a 3 inch cut on the side of the garage. It's similar on the back of the garage. And I'm a little concerned about cutting it. I don't own a "skil saw", but I'm thinking one is in my future.

I tried using my 10 inch chop saw on a test piece, but that's clearly not going to cut it (no pun intended). I understand that there are a number of accepted ways to make the cuts and I've read a bunch of threads on the topic. But I seem to like the shearing method best. It seems very clean in the Racedeck video. I wonder where I can rent one?
 

Attachments

  • image.jpg
    image.jpg
    170.5 KB · Views: 56
OP
M

MPSmith1

Well-known member
Joined
Jan 14, 2015
Messages
46
Location
O Fallon, MO
I can't help myself. Here are a few extra photos I liked. Granted, I had to ditch the iPad and pick up the laptop to get it done... ;-)
 

Attachments

  • DSC_4801.jpg
    DSC_4801.jpg
    147.2 KB · Views: 44
  • DSC_4802.jpg
    DSC_4802.jpg
    152.1 KB · Views: 37
  • DSC_4804.jpg
    DSC_4804.jpg
    149.6 KB · Views: 37
  • DSC_4805.jpg
    DSC_4805.jpg
    145.5 KB · Views: 35
  • DSC_4797.jpg
    DSC_4797.jpg
    142 KB · Views: 45
To avoid these ads, REGISTER NOW!
Top Bottom