To avoid these ads, REGISTER NOW!

Tiny Shop+ Carport Addition

shedfullatools

Well-known member
Joined
Apr 10, 2016
Messages
834
Location
Nova Scotia
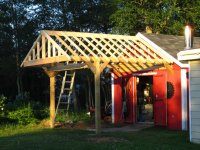
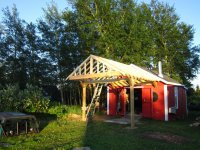
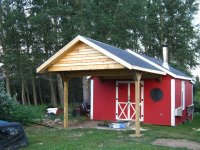
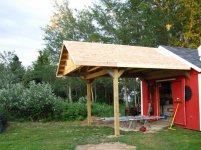
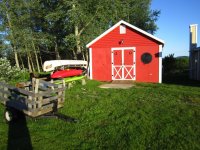
This thread is sort of a combination of my tiny shop and the Carport I added this summer. Shop is a 16x16 shed that is roughly finished inside and has a 4x16 lean too off the back as well as a loft with folding stairs inside. It works well for my needs which is mostly fabrication and repairing sleds, atvs mowers etc. After doing way too many repairs to my truck last year during snowstorms, heavy rain and your average perfectly timed crappy weather :lol_hitti I decided it was time for something better, decided an actual garage addition is out of reach but a small carport was doable. This project is deeply inspired by Thomas with the 1930s Auto Shop as I love all his carports and decided I wanted one of my own. Sketch up drawing is attached to this post and my next one will show the existing shed and materials I used for the carport. Disclaimer before I start showing the construction this thing is currently standing completely finished and quite sturdy, if/when it decides to fall over/ collapse I will be sure to let you know :lol_hitti Beyond that I don't want to hear all the usual that wont work, its not strong enough and if you were smart you would do this instead comments :beer:
 

Attachments

  • ScreenHunter_01 Nov. 05 21.34.jpg
    ScreenHunter_01 Nov. 05 21.34.jpg
    10.1 KB · Views: 42
  • ScreenHunter_02 Nov. 05 21.35.jpg
    ScreenHunter_02 Nov. 05 21.35.jpg
    15.5 KB · Views: 49
To avoid these ads, REGISTER NOW!
OP
S

shedfullatools

Well-known member
Joined
Apr 10, 2016
Messages
834
Location
Nova Scotia
So this is the barn here before the carport and a picture of my first day of adding the carport. You can see the header that holds up the end of the carport attached to the barn and also the two posts set. For the posts I dug holes 28" deep and 24" around and poured 4" of concrete in the bottoms effectively making two slabs for the posts to sit on, there is mesh and some rebar in these pads to help prevent cracking. After those cured I drilled two holes through the bottoms of the posts and ran 2 24" pieces of rebar through in a cross, after the posts were lined up in the holes I put some mesh in and poured 12" of concrete around them. Once that concrete cured I tamped in 12" of soil 4" or so at a time and paced it hard. They were surprisingly sturdy after I removed braces, sturdy enough that I was simply leaning the ladder on them to cut the tops and notches. Sono tubes and bigfoots would have been proper but Im happy with this and it saved a bit of money :thumbup:
 

Attachments

  • IMG_2932.jpg
    IMG_2932.jpg
    151.8 KB · Views: 50
  • IMG_2933.jpg
    IMG_2933.jpg
    145 KB · Views: 43
  • IMG_2934.jpg
    IMG_2934.jpg
    148.8 KB · Views: 50
  • IMG_3390.jpg
    IMG_3390.jpg
    144.4 KB · Views: 44
OP
S

shedfullatools

Well-known member
Joined
Apr 10, 2016
Messages
834
Location
Nova Scotia
Finally some progress that looks like something, original plan was all 6x6 for the beams and posts but the cost was prohibitive and I managed to get two Lvl's for free. I laminated the Lvl's to 2x8's to make the long beams and both the front and the middle crossbeam are two 2x8's laminated together. The beam going across at the barn is a single 2x8 lagged into the long beams and heavily into the barn, this essentially is what holds the Carport against the shed. The posts are set 12 feet from the barn and the roof is cantilevered over the posts by 4 feet, I was forced to cantilever it because the posts would have landed on top of the septic tank cover if I went the correct distance :willy_nil 
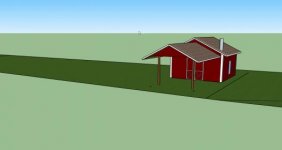
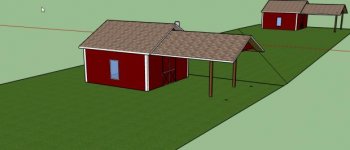
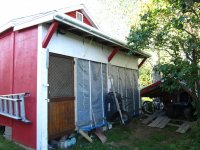
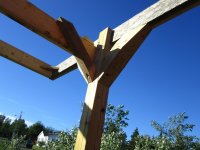
This was a tough decision but I couldn't get the correct materials to do a 20' span and that would have put the cost through the roof, I also didn't want to make the carport longer than the barn.
 

Attachments

  • IMG_3396.jpg
    IMG_3396.jpg
    136.6 KB · Views: 30
  • IMG_3395.jpg
    IMG_3395.jpg
    138.3 KB · Views: 32
  • IMG_3393.jpg
    IMG_3393.jpg
    137.1 KB · Views: 31
  • IMG_3391.jpg
    IMG_3391.jpg
    152.1 KB · Views: 40
OP
S

shedfullatools

Well-known member
Joined
Apr 10, 2016
Messages
834
Location
Nova Scotia
Next up was framing the stud walls that will support the Ridge pole and hold the siding on the front. After they were in place the rafters were the next task, original plans were for 2x6 rafters, that plan was scrapped because flush roofs would have made the tie in more difficult and I also didn't want the same ridge line from one end to the other. I settled on 2x4 rafters on 16" centers instead of the 24" I was planning with the 2x6 rafters, in the end the price was slightly better and the result is extremely strong. I went with ridge pole construction for the roof because its what I know best and trusses would have added a bit to much cost for my liking. Done well I still feel that a roof framed in this fashion has very few disadvantages to trusses. I hung every rafter in a joist hanger at the ridge pole and tied every single one with a hurricane tie at the bottom. Being wide open with the high winds we get it I figured it was worth the extra time to tie them all.
 

Attachments

  • IMG_3398.jpg
    IMG_3398.jpg
    151.8 KB · Views: 34
  • IMG_3399.jpg
    IMG_3399.jpg
    151.5 KB · Views: 45
  • IMG_3400.jpg
    IMG_3400.jpg
    151.6 KB · Views: 35
  • IMG_3404.jpg
    IMG_3404.jpg
    150.7 KB · Views: 41
OP
S

shedfullatools

Well-known member
Joined
Apr 10, 2016
Messages
834
Location
Nova Scotia
Next up was sheathing and shingling, sheathing is 7/16" osb with clips in between every rafter. Shingles are plain old 25 yr Marathon three tabs, I under laid the roof because I had some left over and also did eave shield against the barn because I had some left over. Did step flashing against the barn tucked under the drip edge on the barn roof, extremely impervious to leakage the way it is done even though leaks wouldn't be a huge deal as it would only leak into the carport.
 

Attachments

  • IMG_3416.jpg
    IMG_3416.jpg
    151.2 KB · Views: 44
  • IMG_3414 (2).jpg
    IMG_3414 (2).jpg
    133.1 KB · Views: 37
  • IMG_3405 (2).jpg
    IMG_3405 (2).jpg
    150.3 KB · Views: 42
Last edited:
To avoid these ads, REGISTER NOW!

jonti48310

Well-known member
Joined
Nov 11, 2013
Messages
238
Found this thread doing researh to build a carport off my current shed so I could have something to build my hot rods under. It's not in my budget to build a shop at this point. Great work man!
 
OP
S

shedfullatools

Well-known member
Joined
Apr 10, 2016
Messages
834
Location
Nova Scotia
Found this thread doing researh to build a carport off my current shed so I could have something to build my hot rods under. It's not in my budget to build a shop at this point. Great work man!
Was checking out the garage gallery and surprised to see this thread updated, was no interest before. This worked out/is working out great so far, I have since done a concrete block pad underneath and added lots of lights and some eaves trough to help with dripping water blowing in on rainy and breezy days. I enjoy it so much even if I end up with a proper garage you can bet your *** it will be getting a carport in front of the door :beer:
Nice craftsmanship!
Thanks, Its still standing and withstood some of the highest winds I have witnessed last fall so I'm quite happy :beer:
 
To avoid these ads, REGISTER NOW!
Top Bottom