To avoid these ads, REGISTER NOW!

Tips for installing ceiling insulation

Spacey_G

Well-known member
Joined
Dec 31, 2015
Messages
492
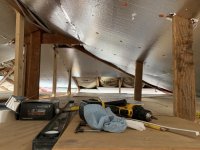
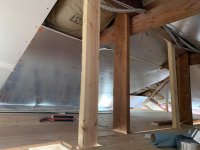
I'm starting to install insulation in my garage ceiling. The ceiling is 9' high and consists of 2x8 joists on 16" centers. There's an OSB floor over the top of the joists, so I need to work from below. I have about 500 sq. ft. to insulate, so 50+ batts of paper-faced R19.

I started last weekend thinking this would be a pretty quick/easy job. Just put the batt up and staple the tabs to the joists, right? Well, I did the first couple and realized what an enormous PITA it is to try to hold a batt in place and get it stapled, all while working overhead on a step ladder.

The best I've come up with is to put the batt in place and then screw a strip of wood between the two joists at the center of the batt to keep it from falling until I can get some staples in. It makes the job doable, but it's still awkward, slow, and frustrating.

Does anyone have any tips for this job? What methods do the pros use? This would be much easier with two people, one on each end of the batt, but I'm working alone.
 
To avoid these ads, REGISTER NOW!

AffableCurmudgeon

Well-known member
Joined
Jan 26, 2009
Messages
1,906
Location
Triad Area NC
Take two 10 ft 2x4s. Put one end of the batt on one 2x4, raise it and wedge the 2x4 between floor and underside side of the osb, pinching the batt between the underside of the osb floor and the 2x4 . Do the same at the other end. The batt is now up. Climb up your ladder and staple the batt. Remove the 2x4s and proceed to the next one.
 
Last edited:

ducatithunder

Well-known member
Joined
Dec 15, 2016
Messages
317
Location
Annapolis-ish, MD
There should be enought friction fit with the batt and joist that you can’t push it in, fluff it, slide it to where the batts overlap a bit, then pull the tabs down and flush to staple it.

I’m assuming your using batts 4ft sections and not a roll of faced insulation. The roll would require a different method as stated above with a wood support to keep the rest of the roll from dragging the insulation out of the space.


Sent from my iPhone using Garage Journal
 

strutaeng

Well-known member
Joined
Dec 12, 2011
Messages
2,261
Location
Dallas, TX
I was working similarly in my garage, but on the 2x16 @24 rafters. Only did about 3 bags. No ceiling joists in my case. I installed those resilient channels @24" o.c. perpendicular and that helped, but I still hade to staple and you are right, PIA. PPE is a must!

At my addition project I just completed I used R38 on 2x12 @24 ceiling joists with 1x4 @ 24" o.c. strapping perpendicular to the joists. That insulation was easier. Just friction fit.

Simpson Strong-Tie actually makes these little wires for this:https://www.homedepot.com/p/Simpson...sulation-Support-100-Pack-IS16-R100/100375163
 
OP
S

Spacey_G

Well-known member
Joined
Dec 31, 2015
Messages
492
ducatithunder - I'm using 8 ft. batts. I think they're 94" actual. Definitely not enough friction for one end to stay up while I staple the other.

Wedging with a stick is a decent idea, but those Simpson Strong-Ties really look like the ticket. Should be really easy to install one-handed.

I see pictures on the HD website where people have insulation seemingly permanently installed with the Strong-Ties, but I'm wondering if I should instead use them as temporary holders and still overlap and staple the paper tabs for a continuous vapor barrier.
 

Glemon

Well-known member
Joined
Aug 29, 2020
Messages
2,160
Location
NE
I am doing the same job now, or similar, I also thought it would be a lot faster and easier. When I did the shop side of my garage I did the big rolls of insulation, major pain, fought me the whole way. For the garage side I am using the 8' bats now and they do stay up (I am using R-13 on 2 x 4" trusses) more or less on their own, but I just don't have a lot of room to operate and it is a lot more ftime consuming than I ever thought. No good tips, but other good ones here and I certainly sympathize.

Just remember the rule of units when planning projects, if you think it will take a day it will take a week, if you think a week it will take a month. Have fun.
 

jjwithers

Active member
Joined
Nov 18, 2012
Messages
30
I'm half way through the same project. I stapled up R19 insulation just fine for 2/3 of the garage ceiling so far. Garage has more or less of an 'A' frame shape to it. The beams are 24" apart going to the peak.
I will build a plywood storage loft above the joists for the 'A' frame space. The joists are currently 4' between one another and I plan to add more.

I'm wondering what to cover the insulation with? Drywall will be tricky to hang due to the joists in place already, and it will never get seen because of the loft.

But I don't want to leave the fiberglass insulation exposed. Paneling? 1/4" drywall?

It makes me think I should have used sheets of foam instead and I'd be done already.

It's a southern California garage so I don't have many elements to deal with.
 

Snip

Well-known member
Joined
Jan 9, 2011
Messages
446
Location
Crossville, Tennessee
1/2" poly straping, the kind that they "band" around shipping boxes. Staple to the bottom of the truss at one end of the garage/shop going across all to the trusses to the other end, pull tight and staple to each truss. You can build as wide a grid as needed to hold the batts up. slide the batts up and over the grid and staple in place. No need to remove the straping when done. 200" rolls are 20-25.00. This would also work well for un-faced batts until vapor barrier and ceiling was installed
 

metlmunchr

Well-known member
Joined
Sep 10, 2011
Messages
1,278
I didn't have any flooring above mine so I just laid a couple sticks across the truss chord and moved them along from space to space. For me, the single biggest help was a $20 air stapler from HF as opposed to squeezing a manual stapler a couple thousand times.

If I'd thought of Snips idea of poly strapping, I would've done that rather than fooling with the sticks. Definitely a good and quick solution.
 
OP
S

Spacey_G

Well-known member
Joined
Dec 31, 2015
Messages
492
I did the first couple of batts with a hammer tacker because, yeah, nobody wants to squeeze a staple gun thousands of times. But the hammer tacker has its own challenges. You sort of need to have the right body position/angle to get a solid and accurate hit, which is difficult working overhead on a step ladder.
 
To avoid these ads, REGISTER NOW!

earl84

Well-known member
Joined
Dec 15, 2013
Messages
215
Location
Colona, CO
I used to own a house with 2 car attached garage that had a bedroom built over it. Had the Simpson brackets permanently holding up the insulation. It was sagging horribly, so I wouldn’t recommend that except to hold up while stapling.
 
OP
S

Spacey_G

Well-known member
Joined
Dec 31, 2015
Messages
492
Yup, I wouldn't use the wires to hold it up permanently. The paper facing needs to be stapled to the joists to work as a vapor barrier, I assume.
 

thammel

Well-known member
Joined
Oct 3, 2005
Messages
2,242
Location
Maryland
Regarding staplers.....smartest thing I did was buy an electric one. Easy trigger pull.
 

67CarGuy

Well-known member
Joined
Feb 6, 2008
Messages
763
Location
Outside Boston, MA
Just remember that without a good air barrier (drywall taped and mudded, plywood/OSB with each panel seam sealed, etc.) your R-x insulation job will act more like an R-1/2x. Insulation won't stop the movement of air from hotter to colder, just slow it down. So if you can slow the air down with drywall, etc., then you help your insulation do an even better job.

For any stud cavity, it benefits you to take the extra time to split your batts around wires, plumbing lines, etc. so that the insulation is in full contact with the exterior sheathing AND your interior sheathing. You don't want any voids where insulation is missing, because this is where you can have convective currents (yes, inside your walls). These currents will further reduce the R-value of that area. It can be a pain, I agree, but your heating/cooling bills should thank you.

Additionally, if you're using friction fit batts, make sure you're using the correct size. An extra 1/2" or so is all you need, if that. A batt that is too wide will generally bow out in the middle, leaving the center of the stud bay without any insulation contacting the exterior sheathing. If your batt is too narrow, now you have a section of a stud bay without any insulation. Even 1/4" gap along the height of a stud will hurt you. If you're stapling with tabs, make sure you don't compress the batt more than the width of the tab. Any more than that and guess what, you're lowering the effective R-value of the batt.

I'll get off my soapbox now, but if you want more helpful info on this sort of thing, search for "Grade 1 insulation". There are some good references out there, complete with 8x10 glossy photographs.
 

p00p

Well-known member
Joined
Nov 23, 2019
Messages
1,997
Location
42.4974° N, 82.8964° W
spray adhesive applied in the centers & at the very ends of the section in each cavity. Push the insulation up. It should hold long enough to allow you to do a dozen rows before you back track to staple it in place.
 

jjwithers

Active member
Joined
Nov 18, 2012
Messages
30
Here is what I have going on. An attic ladder going up to the loft above the garage. Insulation in the garage. Plywood floor which acts as a ceiling to the garage. Drywall where it is visible to cover the insulation near the stairs, and foam for the rest of the loft to cover the insulation where it is out of sight (unless you go up on the loft).
 

Attachments

  • IMG_5501.jpg
    IMG_5501.jpg
    136.6 KB · Views: 29
  • IMG_5500.jpg
    IMG_5500.jpg
    150.3 KB · Views: 29
  • IMG_5499.jpg
    IMG_5499.jpg
    136 KB · Views: 27
Last edited:

nadogail

Well-known member
Joined
Jan 23, 2009
Messages
31,928
Location
Coronado, CA
I build "crutches", tees to temporarily support overhead work while I install the fasteners to hold the items in place.
 
To avoid these ads, REGISTER NOW!
Top Bottom