To avoid these ads, REGISTER NOW!

Tips for Welding Thin Metal Without Warping?

kevincalori

New member
Joined
Jul 21, 2024
Messages
3
Location
Phoenix
Hi everyone,

I am currently working on a project that involves welding thin metal sheets (about 1/16 inch thick), and I am facing issues with warping and distortion. I am using a MIG welder with a 0.023-inch wire.


Does anyone have tips / techniques to minimize warping? Are there specific settings I should be using on my welder? I have checked https://www.garagejournal.com/forum/forums/general-rpatool-discussion.4/ discussions but still need help .


Any advice on managing heat and positioning the workpieces would be greatly appreciated!


Thanks in advance!
 
To avoid these ads, REGISTER NOW!

slowtwitch73

Well-known member
Joined
Apr 18, 2019
Messages
5,876
Location
Hellgate
You have to go slow... use air to cool if you have it. By slow I mean do a tack, stop. let cool... move way down panel repeat...crank up your post flow and let it cool the weld.

There are a number of good videos on youtube from car panel welders about how to do it.
 

Gutman

Well-known member
Joined
Jan 10, 2019
Messages
292
Location
ENC
Pics or a better description of what you're welding might lead to more specific advice.

Size of panels, position, size and types of welds, in place or on a bench, etc.
 

Jswain

Well-known member
Joined
Apr 26, 2013
Messages
2,457
Location
Calgary, AB
Good recommendations so far. People tend to turn the welder too LOW as well, then have to sit there for longer, or their tacks don't penetrate so when they grind they have to reweld. Set it so a quick tack fully penetrates quickly and move to a new area. If you are grinding the welds flat there is an art to that as well, as you will have to watch the heat while grinding.

Having the sheets clamped to some aluminum will help draw out the heat. If you're welding a corner joint use some aluminum angle in behind.

Very good fitup is also key. Do a few tacks and let everything cool to touch.
 

KwikFab

Well-known member
Joined
Jul 27, 2024
Messages
1,173
Location
Central Valley, CA
Clamp aluminum stock, or even thick mild steel to the backside to draw away some of that heat; it'll act as a heatsink.

You can also prevent distortion by clamping everything down as needed and giving it ample time to cool after welding.

I normally run 16 gauge with .035 wire and have no issues especially if using some of the above methods.
 

e015475

Well-known member
Joined
Jul 24, 2012
Messages
640
Location
Show Low and Mesa Arizona
Just my opinion, but there's no finer sheet metal welder than Pat M, who frequently posts in the "Fabrication and Techniques" forum at GC as MP&C.

You can find everything you need to know in this post - https://www.garagejournal.com/forum/threads/mp-c-shop-projects.182565/

The good stuff starts around post 10

I'm not much of a MIG welder myself - My Lincoln MIG sits in the corner and the cover-gas tank I bought with it 20 years ago is still about half full.

I have done a fair amount of sheet metal welding with a TIG machine. I try for the absolute best fit ups possible and weld with minimum filler or autogenous if I can. I start with tacks every inch or so, use a hammer and dolly to get the metal to align, then final weld mostly in one go. There's less distortion than a MIG, and any filler added is much softer than MIG wire and easier to metalwork. There's also less possibility of pinholes with a (mostly) continuous weld from the TIG. Just my preference though - most guys use a MIG

But MIG works fine too. Heck, I've even seen old-timer body guys weld sheet metal with bailing wire and a OA torch and achieve excellent results.

Whatever welder you use is going to shrink the metal in the HAZ and you'll have to planish it to stretch it back out to flatten it - hammer and dolly, *******, english wheel or a pneumatic planishing hammer will all work, some faster than others.
 
Last edited:

Rockable

Well-known member
Joined
Jan 6, 2019
Messages
482
Location
Oak Ridge, NC
Actually, @MP&C is Robert McCartney and yes he has excellent tips on sheet metal fabrication and welding. He has helped me improve my skills a bunch.

The first thing you need to understand is that every time you heat metal and let it cool, it shrinks. Doesn't matter if it's TIG, MIG or other. All welds shrink, some worse than others. The best way to deal with it is to fit your panels as tightly as possible to start. Then, tack the panel every inch or so with an amperage setting high enough to penetrate the metal with a short blast. Next, if you can, grind the welds to about .020 proud of the panel and hammer them "on dolly" to stretch them back out. Next, stack another tack alongside the first tacks, grind, hammer and repeat. You must stretch the welds as you go. Also, as someone mentioned, allow the panels time to cool between welds. Practice will improve your results and, if you have the equipment and skill, TIGS are easier to hammer than MIGS.
 

JackOfDiamonds

Well-known member
Joined
Jul 31, 2020
Messages
706
Location
Idaho (USA)
Don't weld it; braze it. Brazing is practically zero distortion, reworkable, and cheap. They use laser brazing a lot for car body panels btw.

I'm convinced if people knew how much they could do with brazing, about 90% of hobby welding would disappear.
 

Attachments

  • PXL_20240725_200136647~2.jpg
    PXL_20240725_200136647~2.jpg
    1.6 MB · Views: 66
  • PXL_20221019_045540224.PORTRAIT~2.jpg
    PXL_20221019_045540224.PORTRAIT~2.jpg
    779.5 KB · Views: 64
  • PXL_20220719_044652353.PORTRAIT~2.jpg
    PXL_20220719_044652353.PORTRAIT~2.jpg
    321 KB · Views: 65
  • PXL_20230309_033855150.jpg
    PXL_20230309_033855150.jpg
    778.1 KB · Views: 64
  • PXL_20210926_023815523.jpg
    PXL_20210926_023815523.jpg
    405.1 KB · Views: 64
  • PXL_20210102_191954416~2.jpg
    PXL_20210102_191954416~2.jpg
    241.7 KB · Views: 64

rsanter

Well-known member
Joined
Dec 22, 2007
Messages
18,503
Location
visalia ca
Use a copper backer to pull away excess heat , the Mig weld won’t stick to copper

Make lots of small tacks spaced apart, not a bead
 
To avoid these ads, REGISTER NOW!

kerrynzl

Well-known member
Joined
Nov 8, 2013
Messages
5,054
Location
Tauranga, New Zealand
google “back step welding”.

Add to that "Hammer Welding"

@kevincalori warpage is caused by the expanded "molten filler" cooling and pinching the parent material when it shrinks.
You cannot avoid this shrinkage with any form of welding, so there are a few methods used
1: preheat the parent material so it cools and shrinks at the same rate as the filler material [a common method with Cast Iron welding]
2: prestress the parent material and allow for controlled shrinkage
3: Use a Hammer and Dolly and flatten the weld as it cools [pushing it sideways as it thins out]

Steel is very malleable ,it can be stretched or shrunk, thinned or thickened with a hammer.

Also google "heat shrinking"
 

yhprum

Well-known member
Joined
Jul 27, 2006
Messages
1,385
Location
Brisbane Australia
Minimal gaps when welding, consistent heat affected zone around the welded area, and Planishing the welds to stretch out the weld joint. Some guys will jump around with tack welds, letting them cooled down and Planishing until the whole thing is welded.
 

MoonRise

Well-known member
Joined
Nov 5, 2010
Messages
4,028
Location
NJ
Agree with most of what has been said so far.

+99 on MP&C (Robert McCartney). Read through the linked thread. LOTS of good info and tips there. note: it's a LONG thread. Well worth the reading though.

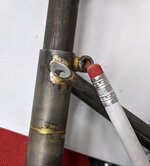
Good fit up is important.

A backing bar or "chill bar" is sometimes helpful if you have access to the back of the weld. I prefer copper as it conducts heat very well and a steel weld won't stick to it if you melt through your sheet metal. Still makes a mess if you do blow through your steel sheet to the copper backing. Aluminum can work too, just not quite as thermally conductive as copper. You can buy or make a 'welding spoon'.

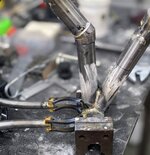
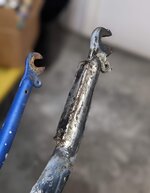
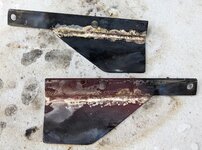
Lots of weld 'dots', not a continuous weld bead when welding thin sheet metal. Make a weld dot, move several inches away to another spot and make another weld dot. Grind away some of the weld dot if it is too high/proud of the surface (don't overheat and warp your sheet metal while grinding!). Planish the weld dots and try to keep the original shape of your workpiece as you go, don't try to weld the whole thing and then try and beat it back into shape at the end. Repeat the weld-cool-grind-planish until the entire joint/seam is fully connected by weld dots and fully welded

Each weld dot still has to be a GOOD weld. Adequate/correct fusion/penetration of the weld dot fully into the workpiece.

It's a different mindset from running a nice long weld bead on a seam/joint on thicker material. You need to adjust your overall pacing and realize that although you might be able to weld a bead the entire seam long in 5 minutes or less, when doing sheet metal the overall pace is more like 'Make a few well spaced weld dots and let them cool. Grind them down and then planish them. Repeat for the next hour or so.' :lol:

As mentioned, ANY weld will shrink as it cools (hot molten metal has a bigger volume than room temp metal, so the weld bead and the surrounding HAZ will shrink and warp/distort as they cool after welding. Brazing does it too, just a slightly lower amount of shrinkage usually because the temperatures are lower than welding although being ham-handed with the torch can make the shrinkage/warpage worse than welding).

Use C25 gas and not 100% CO2. Pure CO2 runs a 'hotter' bead (more thermal energy into the weld not actually a hotter temperature arc or puddle) than C25.

.025 solid wire is the usual go-to for welding thin stuff. Bigger wire can work, but it's a different dance.

Clamp the workpieces well and tack them in several places along the joint/seam. There are small panel clamps that can be used to hold the joint/seam together, sometimes they are helpful and sometimes they are more trouble to deal with.

If you started on one end of the joint/seam and tried to weld the length without clamping and doing some tack welds at least near the ends of the joint/seam, as you progressed along the joint/seam the thermal expansion WILL make your panel gap grow. A LOT.

Welding thin sheets together is a dance of weld penetration but not blowing a hole or holes through your panel, while managing thermal distortion. You HAVE to place your weld dots relatively far apart to not get too much heat into one section of the panels at a time.

Oh, and practice. Practice some more.

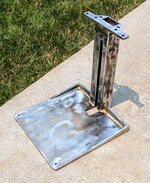
Do you have any pics of what you are trying to do? Pics might help someone here to give you some more hints or tips or critiques.

:beer:
 
Last edited:

cannuck

Well-known member
Joined
Nov 30, 2021
Messages
4,606
Location
Rural SK
warpage is caused by the expanded "molten filler" cooling and pinching the parent material when it shrinks.
You cannot avoid this shrinkage with any form of welding,
Just a bit more exotic than most shop work, but yes, you can almost 100% avoid distortion by furnace brazing. I say almost as even though the substrate and filler go through same temperatures at same time there can be a difference in coefficient of thermal expansion leaving a little residual stress on cooling. One reason why it was used in many "socket joint" manufacturing processes. Worth pointing out that most brazing filler metals will wet out well below steel UCT.

Any time you are welding a "cold" piece of material, though, there is as you say NO WAY to avoid distortion - even with perfect jigging. While mild steels (what 99% of what we do is using - i.e. under 20 points carbon) do indeed have an HAZ they don't form enough cementite to get too excited - as they virtually do not harden from the quench (or cold substrate). If the work is really critical it should be stress relieved (heating above LCT but below UCT). BTW: planishing probably creates more work hardening and structural change than what happens in the HAZ but it can indeed stress relieve a thin sheet joint (and is likely to produce better/stronger structure within the weld bead.
 

phivelug

Well-known member
Joined
Apr 17, 2023
Messages
87
Location
Florida
Hook up your air gun to the compressor. Tack a spot, blow air. Move 6 inches and repeat.
Do not do this. This is going to make your panel shrink more. As mentioned above by some, you will need to stretch your tacks and weld out after each process. Back-stepping is also problematic as it creates many small shrink spots as apposed to running longer weld beads when tig welding for a generally even shrink, this makes it much easier when stretching back out with a hammer and dolly.
 

KSJeff

Well-known member
Joined
Dec 19, 2011
Messages
761
Location
Andover, Kansas
Do not do this. This is going to make your panel shrink more. As mentioned above by some, you will need to stretch your tacks and weld out after each process. Back-stepping is also problematic as it creates many small shrink spots as apposed to running longer weld beads when tig welding for a generally even shrink, this makes it much easier when stretching back out with a hammer and dolly.
Anything you weld and cool is going to shrink. Compressed air isn't going to make is shrink any more. You could argue that rapid cooling could harden it, but there's not enough carbon in sheet metal for that to be an issue.
 

Riverrat

Well-known member
Joined
Jun 26, 2021
Messages
82
Check out Carter Auto Restyling on youtube. He has some excellent tips on mig welding auto body panels and explains what he is doing.
 

no704

Well-known member
Joined
Apr 27, 2016
Messages
5,209
I’m hopeful the answer to this question is a laser welder. Although this is not what I bought one for.
 

speed bump

Well-known member
Joined
May 28, 2008
Messages
6,317
Location
Butte Montana
Pre load the sheets so they cool to where you want them and backstep your welds. Don't get in a rush, as soon as you blow out, stop and let it cool.
 
To avoid these ads, REGISTER NOW!
Top Bottom