To avoid these ads, REGISTER NOW!

Tool Box ID Help

Craftsman86

Well-known member
Joined
Jan 19, 2012
Messages
323
Location
Savage MN
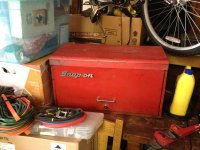
In the nature of never having too many projects, I was on CL late last night and found another used snappy top box in need of help. I am picking it up tonight but the seller doesnt know anything about it other than it says Snap on. I am picking it up for $60 and plan to restore it to its original condition (along with the top box that is currently in progress)

Does anyone know what the model # is for this one, and if it is possible to get roller bearing slides for it?

Thanks in advance
 

Attachments

  • Top Box I.jpg
    Top Box I.jpg
    35.6 KB · Views: 48
  • Top Box II.jpg
    Top Box II.jpg
    39.5 KB · Views: 33
To avoid these ads, REGISTER NOW!

zkling

Well-known member
Joined
Jan 23, 2007
Messages
16,939
I believe it is a mid 80's to early 90's KRA58. A little different drawer layout than normal though. Looks like a solid box for a great price. 99.9% sure it is friction slides. Could you convert it to ball bearing? Probably, but it will require heavy mods to account for the thickness increase. In my opinion it would not be worth it, nothing wrong with friction slides on a small top box like that.

Edit, while your out, you may also want to pick this up. http://minneapolis.craigslist.org/ram/tls/3860564512.html

~$120 for a snap on top and side box seems good to me. Then just sell the cman middle separate for ~$40
 
Last edited:
OP
C

Craftsman86

Well-known member
Joined
Jan 19, 2012
Messages
323
Location
Savage MN
zkling

I ma picking that up tomorrow over my lunch break as well. It looks like I will have plenty of sand blasting and painting to do over the next couple of weeks if the weather cooperates. I was going to use the rustoleum paint, but last night I was looking over another box I painted and the rustoleum scuffs by running a finger nail across it so I ma going to have to buy some better quality paint. Any suggestions on an epoxy primer paint combination that is reasonable priced?
 

zkling

Well-known member
Joined
Jan 23, 2007
Messages
16,939
To me that side box looks really nice as is. I wouldn't worry about painting that. Funny, I am working on a side box currently that is much rougher than the one I linked. If only that was closer.

I am very far from someone that should be called a good painter. Definitely something I want to change before I leave. I typically purchase boxes that don't need to be repainted as I have found that not much except the high end paints are good at competing with factory stuff. I am not sure what matco used back in the day, but I have spilled acetone on my vintage matco box and it didn't even phase the paint.

Usually I use rustoleum in the quart and spray it with an HVLP gun. Slightly thinned out with acetone if need be. To me it seems that the quart containers of paint are better quality than the aerosol cans. :dunno: price wise the quarts win hands down. Prep is everything. I have heard that tractor supply has some nice paint that people like around here. Other than that I think it gets pretty expensive pretty quick, but I as well would like to hear some opinions from the more experienced paint folks on the forum.
 

nine4gmc

Well-known member
Joined
Mar 24, 2012
Messages
14,357
Location
Dallas
I was going to use the rustoleum paint, but last night I was looking over another box I painted and the rustoleum scuffs by running a finger nail across it so I ma going to have to buy some better quality paint. Any suggestions on an epoxy primer paint combination that is reasonable priced?


The problem is not the rustoleum, it's the preparation. I don't want to sound like an *** but prep is 99% of a paint job. The paint MUST have something to grab on and a good foundation is mandatory. If you are sand blasting, be sure to remove all dust, wax and grease, then hit it with a few coats of Etching Primer. Read the directions for top coats, some primers can be top coated in 15 minutes, some longer.

The only time I have had a problem with rustoleum, it was my fault for not scuffing the oem paint in a corner good enough and the rustoleum easily scraped away, like you mention, only in the corners. I had to get in there with a stick and sandpaper to scuff all the way into the corners, then respray and had not further problems.
 
OP
C

Craftsman86

Well-known member
Joined
Jan 19, 2012
Messages
323
Location
Savage MN
I was not going to paint the locker just that top box, and the other top box that I am roughly a third of the way through painting currently. I have used the rattle can primer and paint so far as it was a spall job and I didnt want to set up my HVLP. So I wheeled the garbage can outside and used the rattle cans.

Nine4GMS, What is an etching primer going to do in contrast to an epoxy base primer? I am still very new to the painting game so any info is appreciated.
 

nine4gmc

Well-known member
Joined
Mar 24, 2012
Messages
14,357
Location
Dallas
I prefer the etching because it attaches itself chemically, using acid to bond to the bare metal. Epoxy primer is a mechanical bond, the surface must be roughed up more to bond. This is just my personal preference, a lot of people use epoxy but I myself prefer etching and have not had any problems with using Duplicolor Etching under Rustoleum paint.
As zkling mentioned, quarts or gallons will give more coverage per dollar than spray cans, but supposedly the paint is the same, just thinned down more in the spray. I do find that I get WAY more runs with cans than I do with the hvlp gun. If it is hot outside, I don't even thin it, just pour and spray.
 

jakemac

Well-known member
Joined
May 21, 2013
Messages
9,035
Location
New England
zkling

I was going to use the rustoleum paint, but last night I was looking over another box I painted and the rustoleum scuffs by running a finger nail across it so I ma going to have to buy some better quality paint.


How long did you let the paint cure before it was scuffed ?

Paint may dry over night, but it needs 72hrs to moderately cure and about a week to fully cure before it gets it's final hardness.
 
OP
C

Craftsman86

Well-known member
Joined
Jan 19, 2012
Messages
323
Location
Savage MN
It has been 3-4 weeks since I sprayed it. and it didnt remove the paint but rather you could see light scoffs from lightly running my nail across the front of the box. Looking back I should have only painted one of the drawers rather than completely finishing 3 of them. It looks like I will be sand blasting all of the paint off and starting over with it just have to order up some new primer.

Do you guys use a hardner of any kind with the rustoleum quarts? have you noticed that the paint is prone to chipping or scraping when its dry and cured? I am getting my process ironed out on the drawers on a box I already have but then will be doing a full resto on the one I pick up tonight. The side locker looks like a candidate for a good cleaning and then to buff the paint on it and use it.
 
OP
C

Craftsman86

Well-known member
Joined
Jan 19, 2012
Messages
323
Location
Savage MN
Do you generally buy it in the rattle cans or can you get it by the gallon to spray through a HVLP gun? I always seem to have runs with the cans and hate sanding them out. Do you have to mix that with a hardner or is it generally ready to spray if you do get it in the gallon.

Thanks for all the input
Craftsman
 
To avoid these ads, REGISTER NOW!

nine4gmc

Well-known member
Joined
Mar 24, 2012
Messages
14,357
Location
Dallas
I buy the rattle cans of primer and I only primer the bare metal, feathering out to paint when possible. I haven't stripped an entire big box, I only sand to bare metal where needed, usually the factory paint is good over most of the panel and I can just rough it all up good after blending the primer edges. If I had a project requiring more than 4 cans, I would buy a gallon from the auto paint store, you can even get it ready to spray from the gallons or mix ready with reducer etc.
 

nine4gmc

Well-known member
Joined
Mar 24, 2012
Messages
14,357
Location
Dallas
How long did you let the paint cure before it was scuffed ?

Paint may dry over night, but it needs 72hrs to moderately cure and about a week to fully cure before it gets it's final hardness.


And to add to that, some paint and primers require top coating within 30 minutes, or waiting 48 hrs between coats. Be sure to read the directions on all of the products you plan to use so you have a time line to spray. For instance, if it requires top coating within 30 minutes and it takes you an hour to prime everything, you'll need to wait the 48 hrs to paint or you will have issues.
 
OP
C

Craftsman86

Well-known member
Joined
Jan 19, 2012
Messages
323
Location
Savage MN
I called the red rooster in town as they work with paint often, and they tell me that the self etching is hard on spray guns and that's why its generally sold in the rattle cans. The guy I spoke with tells me its a royal PITA to clean a gun after spraying and the acid in the primer can deteriorate the seals and o rings in the spray gun. I think that's a nice way of him saying that they only carry rattle cans and not quarts or gallons of it.

Edit. The caller did come back on the line and advise that he can get me PPG Omni Etching in quarts for $24. but they dont stock it
 

nine4gmc

Well-known member
Joined
Mar 24, 2012
Messages
14,357
Location
Dallas
I forgot to mention, I have used the Rustoleum Bare Metal Primer in the quarts, it's white. I sold the equipment that got painted so I do not know how it held up but it did lay down smooth with no runs and filled minor imperfections.
 
OP
C

Craftsman86

Well-known member
Joined
Jan 19, 2012
Messages
323
Location
Savage MN
I picked up the box in this thread last night, and it is certainly in rough shape. This is going to be one hell of a project to try and get everything straight and flat. I don't know if there is a single side that doesn't need dents pounded or filled. 2 of the drawers have slides that no longer stay attached to the drawers themselves. When I get the current top box done that I am working on I will be tearing this one apart and will start another restoration thread for it. The top compartment is rusty and the hinge where it connects the lid to the box is now held in with machine screws. I think that I can straighten the hinge in a vice and reattach with rivets the way it was originally. I have been buying and restoring boxes to hone my skills in body work but may have bitten off a little more that I am ready for on this one. At least the box is small.

This box will be a good test of my body work abilities and my patience. I am going to try and get all of the metal flat and smooth again without using an abundance of body filler. I have a buddy that uses fiberglass resin to patch bad spots on a tool box, and input on this other than its a PITA to sand?

A couple of final questions:
Does Snap on still warranty drawer slides?
If the model # is not on one of the back corners where else would a guy look for it to know exactly what slides I need?
 

zkling

Well-known member
Joined
Jan 23, 2007
Messages
16,939
2 of the drawers have slides that no longer stay attached to the drawers themselves. The top compartment is rusty and the hinge where it connects the lid to the box is now held in with machine screws.

A couple of final questions:
Does Snap on still warranty drawer slides?
If the model # is not on one of the back corners where else would a guy look for it to know exactly what slides I need?

That *****. Pictures rarely tell the whole picture. Rivets or spot welds would be my preferred choice to fix the now screwed in hinge.

Does Snap on warranty drawer slides? This will depend on whom you talk to. Legally the warranty only applies to the original purchaser. However it really seems to depend on the mood of your driver or telephone sales rep to dictate your outcome. At worst I think they are ~$7 each. What is wrong with the slides you currently have? Are just the drawer stop tabs broken off? If so, those can be fixed pretty easily.

The model number is on the back, lower right hand corner when facing the back of the box. I am pretty sure it is a KRA58, from the late 80's to early 90's. Not sure on the letter designation that follows. The slides themselves should be stamped with a part number. Post some better pics, now that it is in your possession.
 
OP
C

Craftsman86

Well-known member
Joined
Jan 19, 2012
Messages
323
Location
Savage MN
I spent the afternoon working on the box, along with painting the other top box that I picked up a while back I have a restoration thread going for this box somewhere. In between coats of paint I went after this beast with my body hammers to try and get the hatch to close with out persuasion. The lip that runs around the bottom of the box was completely folded in on 3 sides to the point the box wouldn't even sit level on the garage floor. I had to take the lid off to try and get the top of the box square again so thats why it is missing in the pictures.

Looking at the corners on the top and bottom, the box looks as if it was in the bed of a truck all winter with the driver habitually fishtailing on every corner. This has consequently split the bottom corners so they will need to be welded up.

The other main area that I will need to focus is where the little drawers mount to the box, the welds at the front have broken loose causing them to sag into the top full width drawer making it very difficult to open. I ma thinking that after I get the rest of the drawers removed I should be able to drill out the broken weld and plug weld them back together.


I looked all over the box for a stamp of the model number but could not find it anywhere, and then finally in the bottom of one of the drawers was the "Snap on of Canada" sticker that is barely legible. I have a couple of pictures but its very hard to make out the model and serial numbers.


OP
C

Craftsman86

Well-known member
Joined
Jan 19, 2012
Messages
323
Location
Savage MN
Any one else care to chime in on the box? Or at least agree with the model #? How about some input on straightening the metal on the sides where I cant get a hammer inside the box? Finally any input on how to repair the sagging drawers would be appreciated/.

Thanls
 

zkling

Well-known member
Joined
Jan 23, 2007
Messages
16,939
Any one else care to chime in on the box? Or at least agree with the model #? How about some input on straightening the metal on the sides where I cant get a hammer inside the box? Finally any input on how to repair the sagging drawers would be appreciated/.

Thanls

What else are you looking for? Don't believe me on the model number? :bounce:
If it is a canada made box, they used goofy model numbers. USA it would correspond to a KRA58. Just look on the back it is stamped on there, it may be light but it is there. That is the only way you will know for sure the model number. Does it measure something like 26"Longx12"Deepx14.5"Tall?

Best advice I can say is to work slowly and think about how the hammer impacts are going to effect the entire structure. If you don't have proper body hammers, wrap a standard hammer in duct tape to avoid excessive marks. Use wood as a back up anvil or dolly.

Fixing the dents on the sides is going to be a challenge without really getting serious. As you have found out the double wall limits your access to the back side. You could use a stud welder, weld a stud, pull on the to remove dent. Same caution applies with the standard hammer when applying forces to not further harm the box.

Measure the diagonals of a square when trying to get the box square. Ideally they should be equal. Ex. the front opening, top, lid. Keep measuring and try to get everything symmetrical, and square. This is probably the best tip I can offer.

The middle supports for the little drawers are probably going to be the most pain. Really they should be removed straightened and re welded. However their alignment it pretty critical. They need to be parallel to the sides of the box otherwise the drawer will bind are they will be tapered. Once you get the box square, triple check it, check that the drawers do not bind and then weld up all the cracks.

That ***** the box has so many issues. From the original pics you posted it didn't look nearly that bad.

Did you pick up that side box as well? That looked like a super deal.
 
Last edited:
OP
C

Craftsman86

Well-known member
Joined
Jan 19, 2012
Messages
323
Location
Savage MN
I have no reason to doubt you, I ma ignorant when it comes to the model #'s unless it is right in front of my face. I was able to pick up the side locker and craftsman middle box and they have made a nice addition to my "tool box wall" in the garage. I just might have to wheel my motorcycle outside and clip some pictures to share. I have been hesitating as my KR1000 is roughly 80% done and I have been postponing finishing it for some reason or another. I was very happy to find the side locker as there is a massive dent in one side of the KR from the PO that I was not going to body fill the entire side to fix, and now no one can see it.

My original plan was to buy the side locker and middle box combo to sell the Craftsman and get a better deal on the locker, but it fits so nice under my top box lol. Now I need to hang my top locker and install a work bench light under it but thats a problem for a different day.

The more I look at the box in this thread, the easier I feel it would be to straighten the frame as much as possible and cover one side at a time in Epoxy resin then spend my time with the inline sander smoothing that out. I probably shouldn't have bought it as now I am looking for a welder (which I appreciate your comments on) to fix the corners on this box and repair the little drawer frames.

My dad came over and saw it and told me it was too far gone setting the stage for a challenge to prove to him that I can make this thing look brand new again. Damn my pride some times! I am still relatively new to the body work process but have a nice 7 piece snap on set of hammers and dollies to practice with. It would be nice to have a "stinger" or stud welder but that is not yet a part of my tool collection.

The slides in the box are just not hitting the stop tabs so i there is a fix for that I wont need to send them in for warranty, but should have them off tonight or this weekend depending on how nice it is outside and how the fish are biting.

As far as the model # on the box, I have a feeling that I will find it when I sand blast the thing as there is no evidence of it right now. Maybe in the end I will ave to swap out the lock core the PO put in it with my other top box and try and re sell it on CL to let someone else work with it, but then I would be admitting defeat and its still early for that.
 
To avoid these ads, REGISTER NOW!
Top Bottom