To avoid these ads, REGISTER NOW!

Tool box restoration

Craftsman86

Well-known member
Joined
Jan 19, 2012
Messages
323
Location
Savage MN
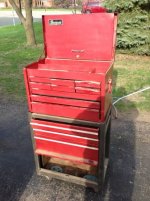
I bought the box pictured below on CL for $25 a while back, and am starting to restore it. The issue I have run into is the po did not like the dividers in the top of the box and decided to rip them out. The metal the dividers were welded to now sag and scrape the top drawer as it opens. I would hate to put a fresh paint job on the box just to have the one drawer scrape off and look like **** again. Any suggestions on what to do for this issue? I was thinking either drill out the rest of the welds that the po left behind and weld up new dividers in hope that doing so will reduce the sag. The second idea I had was to cut a new piece that would fit in the top of the box with dividers, and then cut out the old one leaving an inch or so around the perimeter to support the new plate that I make.

I will post pictures of the overall progress of the overall progress tomorrow, but so far the top 3 drawers have been blasted and primed (front and inside of the drawers). I pounded out the majority of the major dents but will leave it with some "character" marks. I plan on using Sunrise Red rattle can or ordering the same by the pint to spray with my HVLP for color.


To avoid these ads, REGISTER NOW!

zkling

Well-known member
Joined
Jan 23, 2007
Messages
16,939
Wow, fantastic box for $25!!! Definitely deserves a "you ****" award. :beer:

As for the top divider. I too have a box that the PO removed from the drawer. I think what a lot of folks fail to realize is that the divider is not really a divider but a stiffener that prevents the drawer from sagging.

What i did, and what I would recommend for you to do. Is to make a new divider, similar to the original. A bent piece of sheet metal (20ga or thicker), shaped like the letter "L" and rosette welded to the drawer. What you are doing is stiffening the drawer by increasing its resistance to bending (area moment of inertia, I).

As for the old welds, I would just carefully grind them flush. Since you will be repainting it anyway, now is the time to fix it the right way.

Right now, just place a straight edge across the bottom of the top and see how bad it is sagging in the middle. Hopefully the sheet hasn't stretched too much that it can be pulled back into position.

Got to appreciate the "upgrades" that the PO's made. :mad:
 

Packard V8

Well-known member
Joined
Mar 16, 2009
Messages
7,380
Location
Spokane, WA
Probably in the PO's demolition pulling apart the spot welds, he stretched the drawer bottom. Your idea of making new dividers and re-welding them will work. Bend tabs on the ends of the dividers so you can weld to the drawer sides as well.

If you know a good old time sheet metal guy, he could teach you how to shrink. I've seen it done by heating and then cooling with a wet cloth or water mist.

jack vines
 
OP
C

Craftsman86

Well-known member
Joined
Jan 19, 2012
Messages
323
Location
Savage MN
On the box I have, its not the drawer he ripped them out of but the compartment above the drawers. I don't have pictures of it right now, but will take some tonight after work. The top drawer scrapes the sagging metal when you open and close it. I feel that the "dividers" on the top were more to keep things away from the hinges so it will open and close easily. It seems to hang down just under 3/8 of an inch from where the po used a pry bar to rip the rosettes out. I am sure the metal was stretched to achieve his demolition.
 
OP
C

Craftsman86

Well-known member
Joined
Jan 19, 2012
Messages
323
Location
Savage MN
That picture doesnt show the mounds of pigeon poop that was all over the box, or the drawers that were full of tar that had dried all over it. I bought it as I am getting into automotive painting and body work so this seemed like an ideal project. I stared off with a DA sander and body filler before buying a $10 sand blaster (strongly recommend getting from HomeDepot.com as a side note) but after scraping and blasting the drawers the three I have in primer are looking great so far. I am already looking for a bottom box to set it on and I havent got this one half way done haha my garage is going to be lined in Snap on tool boxes before too long.

Could a guy upgrade the friction slides to ball bearing on this unit? Im sure pictures with the model number will help when I get them posted but figured I would ask.
 

zkling

Well-known member
Joined
Jan 23, 2007
Messages
16,939
http://minneapolis.craigslist.org/hnp/zip/3802041952.html

Now I found a free snap on box on CL, I only hope its still available after 4 hours. I may have another project ahead of me

Are you freaking serious? :drool: That is it, I am moving to MN. Know anyone looking to sell their house.
That free box looks to be in great condition. Around here that would be up for $200-$300!!!!

Free snap on tool box? That is a dream for many of us.

It doesn't look rusty at all.

FYI, the top is a 70's Snap on KRA59, 9 drawer chest. The bottom is a 3 drawer vintage craftsman a really good roller compared to the current craftsman offerings.

Could a guy upgrade the friction slides to ball bearing on this unit? Im sure pictures with the model number will help when I get them posted but figured I would ask.

Could a guy? Yes, possibly. Is it worth it? Not really. Nothing wrong with those friction slides. That is a good heavy duty top box. I think you will be more than pleased with properly lubed friction slides.
 
Last edited:
OP
C

Craftsman86

Well-known member
Joined
Jan 19, 2012
Messages
323
Location
Savage MN
I am keeping my fingers crossed that it is still available, but not going to hold my breath. There are tons of deals around here for little to nothing on stuff but most of the time it is gone within an hour or so. I would love to refinish that top box and put it next t othe one I am working on pictured in this thread. I wouldnt be surprised if someone picks it up and re-posts it for $100+
 
OP
C

Craftsman86

Well-known member
Joined
Jan 19, 2012
Messages
323
Location
Savage MN
The post on CL has been deleted already, I have attached the pics from the ad but they are not very big. I knew I should have been searching the net this morning at work haha
 

Attachments

  • Free I.jpg
    Free I.jpg
    1 KB · Views: 638
  • Free II.jpg
    Free II.jpg
    29 KB · Views: 99
To avoid these ads, REGISTER NOW!

rsanter

Well-known member
Joined
Dec 22, 2007
Messages
18,530
Location
visalia ca
To answer the first question
You have a couple options IMO
One is to make new dividers and plug or spot weld them in place. If you do this you can replicate the original locations or you could install them in locations that would work best for you now. Either way the benefit of having the dividers there will be a good thing.
Two would be for you to install a thicker plate like 12 or 14 ga material. You can just cut a piece and set it in there without welding it in but it would be best to weld in it. If it was me I would attach it with a couple of plug welds from the bottom side of the top material and then paint the whole works.

Bob
 

CNGsaves

Well-known member
Joined
Sep 26, 2012
Messages
13,233
Location
KS and OK
Well for finding those boxes on CL . . . . You **** !!

However, you HAVE A PROBLEM . . . it's your handle as I'm clearly reading it says you're . . .
only interested in Craftsman.

Therefore, please prepare those boxes for shipping and I'll take them off your hands since they are Snap-On. You wouldn't want to have those in your garage, now would you?? ;)

Just send me a PM where I should send the pre-paid shipping label. :D
 

Outlawmws

Well-known member
Joined
Aug 9, 2011
Messages
39,361
Location
The Badlands
Well for finding those boxes on CL . . . . You **** !!

However, you HAVE A PROBLEM . . . it's your handle as I'm clearly reading it says you're . . .
only interested in Craftsman.

Therefore, please prepare those boxes for shipping and I'll take them off your hands since they are Snap-On. You wouldn't want to have those in your garage, now would you?? ;)

Just send me a PM where I should send the pre-paid shipping label. :D

HEY! you're stealing my line! :evil:

:lol_hitti
 
OP
C

Craftsman86

Well-known member
Joined
Jan 19, 2012
Messages
323
Location
Savage MN
Thats a good point, I should change my handle. When I started on this forum I was a craftsman guy that waited for the sales and bought the things I thought were important. Now after GJ, I have been filtering out the Craftsman and upgrading to snap on. It all starts with a tool box and grows from there. Too bad I couldn't get the free top box from CL today, I was a few hours late on that deal.

Now you have me pondering what handle I would go with if I were to change
 

CNGsaves

Well-known member
Joined
Sep 26, 2012
Messages
13,233
Location
KS and OK
I was just kidding on your handle. Enjoy restoring the Snappy box for many years of future use.

Besides, your handle could be construed to mean "Craftsman style" of house, woodworking, or whatever.

Looking forward to pics of your toolbox as it progresses. Congrats on CL snag!
 

rsieracki

Well-known member
Joined
Mar 3, 2010
Messages
1,679
Location
Chicagoland Area
So sunrise red.... i did my kr555 in that, almost too perfect a match:drool:. seeing as you sandblasted i take it you painting the drawer sides and insides... i always worry how well that will 'wear' over time. and im debating on how and what to paint the taco wagon i have in my shop right now that im restoring. do youplan on painting the channel the the slides slide in with the rustoleum also ? i masked mine and left the original paint on them assuming that was more durable than my can of rustoleoum but idk:dunno:
 
OP
C

Craftsman86

Well-known member
Joined
Jan 19, 2012
Messages
323
Location
Savage MN
rsieracki

With the sand blasting, I did the inside of the drawers as the paint was flaking off and the drawer faces. I left the sides and slides as they are. I am just going to clean the hell out of the slides and grease them up.


This is where the PO ripped out the dividers.


I have only blasted and primed 3 of the 5 drawers


rsieracki

Well-known member
Joined
Mar 3, 2010
Messages
1,679
Location
Chicagoland Area
What did you prime with? i ask becasue i like the almost perfect of rustoleums sunrise red but id like something more durable/chip resistant... im thinking i may do mine in some type of epoxy primer so i can topcoat later with whatever paint i chose and ill know i have a good 'foundation'. my kr555 i did in runtoleum has some chipping and i stripped to bare metal, primed and atleast 2 coats of red... thats the reason for my concern.

also, is that a KR1000 in the bottom of the pic???... if so im jelous!

i have the same dewalt sander also

**edit, i see your can of rustoleum primer, ignore that portion**
 
OP
C

Craftsman86

Well-known member
Joined
Jan 19, 2012
Messages
323
Location
Savage MN
rsieracki

That is my trusty KR1000 the drawers are sitting on. I have had great luck with the rattle can primer. I used an epoxy base on the KR1000 and had great luck with it so far but I still need to finish painting it as well. I was torn between using the sunrise red in rattle can or through my HVLP gun, but when the gun needed a rebuild I decided to try spray cans.

The KR1000 is the 70th anniversary edition with the chrome Eagle on the bottom left drawer and chrome plates that run along the top and bottom of the box. Hopefully the parts for my spray gun will be in this week and I can finally finish the big box nearly a year and a half after I started the project. I bought it from a guy I work with for $1000 and it was half full of tools. I started a thread a long while back on the KR restore. It was in rough shape when I got it, but has been a great box after some fresh paint and a few sets of drawer slides.
 

rsieracki

Well-known member
Joined
Mar 3, 2010
Messages
1,679
Location
Chicagoland Area
I remember that thread... i love those big classic snap on box... if i found one for $1000 id have been all over that too.

i came home to a box of new slides from snapon on my front porch for my taco wagon im doing. im trying to find someone locally to sandblast it for me... i dont have a pressure pot or the space... granted buying the equiptment to sandblast will help for future projects but i have stuff everywhere and dont need to buy more lol.

my homedepot carries the sunrise red in quarts now(i dont recall them having it before). Good luck.
 
OP
C

Craftsman86

Well-known member
Joined
Jan 19, 2012
Messages
323
Location
Savage MN
rsieracki

Granted I have space to do the sand blasting, but I bought 3 of the blasters listed in the link below, and a bag of "Black Blast" silica sand to do the box in this thread. the guns were $10 and the black blast silica was $8 a bag. I layed out 3 tarps to catch the majority of the silica after it was sprayed, and then poured it through some screen taped on a 5 gallon bucket to filter and re-use. I have emptied the bucket and refilled it 7 times with 1 bag of silica. granted you loose some of it every time its a lot cheaper and less of a mess than not trying to catch it.

If you were to buy the blaster, media, respirator, goggles, and a cheap air dryer you would be in it all $40

http://www.homedepot.com/p/Husky-Sandblasting-Kit-HDS12600AV/100008764#.UZOHRqK-pKA
 

rsieracki

Well-known member
Joined
Mar 3, 2010
Messages
1,679
Location
Chicagoland Area
i have one or 2 of those sandblasters you linked already and a 5gal bucket or 2 of clean/used once sand. i spose i could rig up some tarps in the yard tied to the fence to help contain the mess.

i dont have a HVLP gun or primer though... if once has never painted with a gun before how difficult is it? like whats the learning curve? im thinking if i get a gravity feed from HD/husky or Hongkong Freight so i can do it myself.... maybe have maaco spray the color idk
 
Last edited:
OP
C

Craftsman86

Well-known member
Joined
Jan 19, 2012
Messages
323
Location
Savage MN
The KR1000 was my first experience with a HVLP gun, and I don't think that it is all that difficult. I am by no means a pro with it, but I did a ton of research on here and other sites and found that it turned out great. Depending on how big of a piece your going to paint, and how often you think you will use it, the gun is just the beginning of the things your going to need. I have a very nice Graco (Sharpe) mini HVLP and a Devilbiss FLG3 that I use for larger jobs. I have found painting to be a trial and error process that said I would recommend that you practice on something that is not a PITA to sand or sandblast so if there are runs or mistakes you dont spend days trying to work them out of the material.

When my Graco mini was put together wrong and I screwed up an Delrin O ring, I bought a HVLP detail gun from TCPGlobal.com for ~$30 and it worked well but not as nice to use as the Graco. The other piece of advise I have is to look at the cost of a rebuild kit for the gun your interested in as sooner or later it will have to be done. My Graco kit costs $50 the TCP Global spray gun kit is $8.95. But on the same note, the Harbor Freight gun is the same one that is sold at Northern Tool and numerous other retailers and it works great for epoxy primer (rebuild kit under $5 and a new gun $15). I have never had to rebuild the Devilbiss and that thing works like a charm every time. There are tons of options available on Ebay for a detail gun and primary gun for under the $200 point.

This is probably 10x the info you were looking for but I am slow at work today.

EDIT: If your willing to learn, I think that anyone can learn to paint if they are meticulous in the prep work and have a clean environment to work in. If there is a little dust in the final coat, Wet sand it and buff it out and you will do as good if not better than Maaco
 
Last edited:
To avoid these ads, REGISTER NOW!
Top Bottom