To avoid these ads, REGISTER NOW!

Toolbox lock jammed

jimgood

Well-known member
Joined
Aug 4, 2014
Messages
2,394
Location
Marshall, VA
So, my Kobalt toolbox was on my trailer and the other night I needed to get some tools out of it so I fumbled around in the dark trying to unlock the lower box. I used the wrong key and, after about an eighth of a turn, it jammed in the lock. Would not reverse. I resorted to pliers to apply more force and only succeeded in breaking the key off in the lock! :mad:

Before I call a locksmith, I thought I'd appeal to the collective wisdom of GJ to see if anyone has had a similar issue and knows how to solve it without destroying the box.

Thanks in advance.
 
To avoid these ads, REGISTER NOW!

unslow1

Well-known member
Joined
Mar 3, 2012
Messages
7,880
Location
Illinois
I have a Kobalt that the key was lost to. I grabbed the exposed lock housing and twisted the whole housing and it unlocked.
 
OP
J

jimgood

Well-known member
Joined
Aug 4, 2014
Messages
2,394
Location
Marshall, VA
I have a Kobalt that the key was lost to. I grabbed the exposed lock housing and twisted the whole housing and it unlocked.
LOL, that's worth a try. The lock is toast. The only problem is that all of the tools I'd need to "grab" the housing are in the locked portion of the box. I guess I could run to Tractor Supply and get some more tools. :lol_hitti
 
OP
J

jimgood

Well-known member
Joined
Aug 4, 2014
Messages
2,394
Location
Marshall, VA
I'm still locked out of the bottom of my toolbox. I went after it today, first by drilling out the lock. That was useless.

Then I went after the lock with a cut-off disc and cut it off flush with the surface. That got it out. Then I was left with a little hole. I tried feeling around in there but couldn't feel anything.

So I finally just cut out a larger hole so I could see what the hell was going on. The lock is simply attached to this long rod. The rod has an offset at the end that is supposed to hook into a slide plate at the back of the box and lift it (or maybe push it down) to lock/unlock the drawers.

I tried putting the rod back in place but can't get enough leverage to twist it. I'll have to try vice grips on it next.

Here's the rod. The end on the left goes to the back of the toolbox.

attachment.php


Here's the hole I cut.
attachment.php


Here's what I can see in the hole.

attachment.php


If I can get the rod back in place and can unlock the drawers with it, I'll weld a handle on it. I don't need the locks for security; just to keep the drawers from opening in transit.
 

Attachments

  • IMG_3613.JPG
    IMG_3613.JPG
    139.5 KB · Views: 712
  • IMG_3614.JPG
    IMG_3614.JPG
    73.5 KB · Views: 679
  • IMG_3615.jpg
    IMG_3615.jpg
    57.9 KB · Views: 681

PelicanPines

ALLIANCE MEMBER
Joined
Apr 30, 2014
Messages
38,112
Location
New Jersey, USA, Earth, My own reality
You could rivet a strip of diamond plate over that and install a new lock.

I have a bore camera... that woulda helped Seeing things.

You did well... it can be fixed.

Attach an angle iron to locking shaft to get the thing open for now.
 
OP
J

jimgood

Well-known member
Joined
Aug 4, 2014
Messages
2,394
Location
Marshall, VA
You could rivet a strip of diamond plate over that and install a new lock.

I have a bore camera... that woulda helped Seeing things.

You did well... it can be fixed.

Attach an angle iron to locking shaft to get the thing open for now.
I have a bore camera too. It's locked in the bottom of the damn toolbox! :lol_hitti

The only thing I'm concerned about is that rod is kind of flimsy. Then end is just two pieces of rod welded (shittily) together. It's really cheap. Plus I don't know which way to twist it.
 
OP
J

jimgood

Well-known member
Joined
Aug 4, 2014
Messages
2,394
Location
Marshall, VA
See the oval slot in the rod back there... stick something in that slot... and LIFT... it's a gravity lock.
Unfortunately, it wasn't that easy. I had to cut a hole in the back of the box to get to the mechanism that holds the drawers in order to lift it up. I damn near cut through the mechanism. :(

attachment.php


So, let's look at how this puppy is designed.

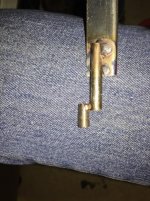
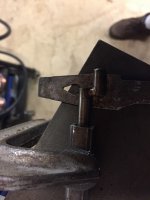
There's a flat frame of bars at the back of the box to lock the drawers. There are three vertical bars connected by a horizontal bar. The vertical bar in the center goes up through the thing with the oval slot and has a hole in it that the rod is supposed to go into (red arrow). Below the horizontal bar, the vertical bars go down behind the drawers and have bent tabs that hook into slots in the back of the drawers (what my finger is holding). Here, I'm lifting the frame up so that the hole is lined up with the oval slot. But when the rod is pulled out, like I did, the whole thing drops down and it's not possible to hook the rod into the hole again.

attachment.php


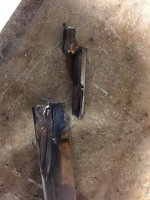
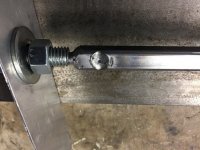
And here's what the end of that rod looks like. Like I said...cheap. I can do better than this.

attachment.php


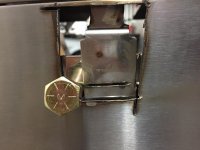
So, with the rod in place, it is easily twisted to raise and lower the mechanism.

attachment.php


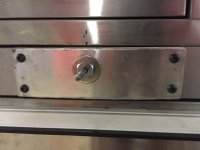
So now all I need to do is replace the lock with a "T" handle or something connected to the rod. I can cover the holes with some aluminum sheet and rivet them in place. I just need to make sure the rivets don't interfere with the locking mechanism. If I had SS MIG wire and pure argon, I'd weld those places where I accidentally cut the locking mechanism but I don't so it will have to do for now.
 

Attachments

  • IMG_3616.JPG
    IMG_3616.JPG
    101.8 KB · Views: 587
  • IMG_3621.jpg
    IMG_3621.jpg
    79.4 KB · Views: 579
  • IMG_3619.JPG
    IMG_3619.JPG
    83.3 KB · Views: 587
  • IMG_3618.JPG
    IMG_3618.JPG
    96.3 KB · Views: 574

natas2000

Well-known member
Joined
Jan 18, 2011
Messages
250
First thing NEVER call a Locksmith. You probably have a sawzall, cut a head size hole and shove your head in. You should be able to fix it then, or just off the top off the cabinet.
 
OP
J

jimgood

Well-known member
Joined
Aug 4, 2014
Messages
2,394
Location
Marshall, VA
You guys are funny.

Okay, first step. Repair the cut I accidentally made in the mechanism. It's **** grade stainless steel so I just used my regular MIG wire. Ugly but seemed to stick just fine. Ground it down about as much as I could tolerate. NOTE: the bolt is just there to hold the mechanism up while I weld it.

More later. It's our 23rd anniversary so SWMBO has decided we need to replace a closet door and paint a wall. No time for this tool box debacle!

attachment.php


attachment.php


attachment.php
 

Attachments

  • IMG_3624.JPG
    IMG_3624.JPG
    102.4 KB · Views: 441
  • IMG_3623.JPG
    IMG_3623.JPG
    100.4 KB · Views: 439
  • IMG_3622.JPG
    IMG_3622.JPG
    93.6 KB · Views: 435
OP
J

jimgood

Well-known member
Joined
Aug 4, 2014
Messages
2,394
Location
Marshall, VA
Took a quick break from work to make some progress on this.

Step two...cut the offset off the end of the rod so I can reuse it. I probably could have left it on the flimsy piece of folded sheet steel it was on but I have a better idea (I hope).

attachment.php


Step three...weld the offset rod end onto a piece of half inch square tube.
The paint can opener made a good enough shim to get the offset at the right height and orientation.

attachment.php


The orientation doesn't matter that much but it would have been nice if it came out of the tube straight. Oh, well. Good enough.

attachment.php


I "center" drilled a 1/4" hole through a 1/2" x 1 1/2" bolt on my drill press. This is going to be what replaces the lock. A 1/4" rod goes through the bolt and will be welded to the other end of the piece of square tube. Before I do that, I need to get a cover plate made up for the front of the toolbox. The bolt will go through the cover plate. Then I need to cut the square tube the right length to span from the end of the bolt to the back of the toolbox. The 1/4" rod will protrude through the bolt, out the front of the box and I'll mount some kind of removable handle on it.

attachment.php


That's all for today.
 

Attachments

  • IMG_3625.JPG
    IMG_3625.JPG
    133.6 KB · Views: 367
  • IMG_3626.JPG
    IMG_3626.JPG
    79 KB · Views: 366
  • IMG_3628.JPG
    IMG_3628.JPG
    93.6 KB · Views: 365
  • IMG_3629.JPG
    IMG_3629.JPG
    88.8 KB · Views: 363
OP
J

jimgood

Well-known member
Joined
Aug 4, 2014
Messages
2,394
Location
Marshall, VA
Here's the assembly mostly completed. The only thing left is to make a handle, install the assembly and attach the face plate with riv-nuts (just in case it needs to be removed again). Sorry, a couple of the pics are upside down. The GJ web site is flipping them.

attachment.php


The rod is plug welded on two sides plus welded at the end. I still need to grind down the bolt to adjust the length so that the face plate sits flush.

attachment.php


I need to decide on a handle and how to attach it. I'm leaning toward using a roll pin to attach it.

attachment.php
 

Attachments

  • IMG_3632.JPG
    IMG_3632.JPG
    114.6 KB · Views: 316
  • IMG_3630.jpg
    IMG_3630.jpg
    46.8 KB · Views: 18
  • IMG_3631.JPG
    IMG_3631.JPG
    105.7 KB · Views: 16
To avoid these ads, REGISTER NOW!
OP
J

jimgood

Well-known member
Joined
Aug 4, 2014
Messages
2,394
Location
Marshall, VA
Finished the face plate, got the bolt ground down to the final length, installed 1/4-20 riv-nuts and pan head screws. Apart from being off center, I think it looks really good.
For the handle, I'm going to use a piece of 1/2" round rod and cross drill it to fit over the little rod protruding out the front. Then I'll drill a smaller hole for a roll pin. So far, the only item I don't have on hand is a roll pin so I'll run up to TS and see what they have before I start on the handle.
I like the handle ideas from PelicanPines but I need to work with what I have on hand. I want this done today!

attachment.php
 

Attachments

  • IMG_3633.JPG
    IMG_3633.JPG
    78.5 KB · Views: 186
OP
J

jimgood

Well-known member
Joined
Aug 4, 2014
Messages
2,394
Location
Marshall, VA
Setback! :mad:

Had a feeling this was drill rod from the finish. Looks like welding it made it brittle. Tried to fit it in the hole in what will be my handle and it broke just twisting it into the hole.

attachment.php


Out of time this weekend. Will have to try to fix it later.
 

Attachments

  • IMG_3634.JPG
    IMG_3634.JPG
    124 KB · Views: 167
OP
J

jimgood

Well-known member
Joined
Aug 4, 2014
Messages
2,394
Location
Marshall, VA
I would agree but, in this case, there's no relationship between the axis of the shaft and the reason it broke.

Also, the position of the bolt in the front plate is centered in the toolbox. It's just the plate itself that's not centered. So the alignment between the hole in the mechanism at the back of the toolbox and the bolt at the front is good.
 

PelicanPines

ALLIANCE MEMBER
Joined
Apr 30, 2014
Messages
38,112
Location
New Jersey, USA, Earth, My own reality
The pain would have been to center the patch to the bolt... to the back latch... no matter tho. What you did looks fine. It will work as soon as you work out the shaft issue. Is it possible there was "angular stress" due to alignment?
 
OP
J

jimgood

Well-known member
Joined
Aug 4, 2014
Messages
2,394
Location
Marshall, VA
The pain would have been to center the patch to the bolt... to the back latch... no matter tho. What you did looks fine. It will work as soon as you work out the shaft issue. Is it possible there was "angular stress" due to alignment?
Yes, it's possible. Even probable. But the break occurred while I was holding the components in my hands, not while they were installed in the box. I was try to jam the rod (that broke) through the freshly drilled hole in the bigger rod that I intended to use for the handle. The angular stress was due to me trying to force the rod through the hole in an imprecise manner.

Anyway, I'm going to switch to 1/4" mild steel rod so I don't have to deal with embrittlement from welding. That small rod was hardened steel and not good for this application, especially since my ability to align everything perfectly is nil. I need wiggle room, fudge factor and adjustability.
 
OP
J

jimgood

Well-known member
Joined
Aug 4, 2014
Messages
2,394
Location
Marshall, VA
To fix my screw-up I cut off the end of the shaft that I made. I cut another piece of square tube to replace that. I also found a piece of 1/4" mild steel rod to use instead of the drill rod.

I found some square nuts that, with a tiny bit of filing, actually made a nice hammer-fit in the end of the square tube. I'm using these to align the rod more accurately. Once I hammered them into the tube ends, I drilled them out to 1/4" for the rod.

View media item 87836
View media item 87839
I also used a shorter bolt, which is why the replacement piece of square tube is longer than the one I cut off. The quarter inch holes I drilled are a slightly looser fit than those for the previous rod and I adjusted my drill press for better alignment. Still not perfect. Makes me wish I had a lathe.
 

PelicanPines

ALLIANCE MEMBER
Joined
Apr 30, 2014
Messages
38,112
Location
New Jersey, USA, Earth, My own reality
Looks a million times better... awesome. I have done that square nut filler in square tubing trick.

Wish I had a welder...

Edit... it looks like your work will outlast the box and the coming zombie apocalypse.
 
Last edited:
OP
J

jimgood

Well-known member
Joined
Aug 4, 2014
Messages
2,394
Location
Marshall, VA
Looks a million times better... awesome. I have done that square nut filler in square tubing trick.

Wish I had a welder...

Edit... it looks like your work will outlast the box and the coming zombie apocalypse.
Wait 'til I weld it. Then we'll see if it looks a million times better! :lol_hitti
 

PelicanPines

ALLIANCE MEMBER
Joined
Apr 30, 2014
Messages
38,112
Location
New Jersey, USA, Earth, My own reality
My FIL was a wonderful welder... his solution to a perfect weld...

1. Several grinders with different profiles to access everything
2. Blow your nose prior to welding (to prevent SNOT WELDS)
3. Wear breathing protection (so you don't die early and leave unfinished welds)
4. Bondo… Lots of bondo…
 

Mr_B

Well-known member
Joined
Nov 21, 2016
Messages
5,374
Location
Reading
less haste and cutting and could of opened that without all those holes .
Least it not a krl lol ...
 
Last edited:

PelicanPines

ALLIANCE MEMBER
Joined
Apr 30, 2014
Messages
38,112
Location
New Jersey, USA, Earth, My own reality
less haste and cutting and could of opened that without all those holes .
Least it not a krl lol ...

Oh, NOW he tells me!

I chose not to point that out... but yea... that front cut should never have happened. Woulda done a slice cut lower in the back and just lifted the bar... then taken out the drawers and fix everything.... by flipping it over onto my work table... where it was easy to access.

But hey... Hindsight is always 20/20... so... stop looking back at what could have been... make it better this time around.
 

Mr_B

Well-known member
Joined
Nov 21, 2016
Messages
5,374
Location
Reading
Yeh I overlooked this thread as thought it one from few days back .
Careful effort on twisting lock thus cam bar always easiest and no drama on stainless box as no paint and easy reform cylinder hole with clamp plates.
Second option if lock bars magnetic and cam rod detached is strong magnets help pull bar up and get one drawer open at very least
3rd option is as hole drilled in rear to access lock rod and pry it up .
4th option is just brute force one drawer open (hold drawer on ends to reduce front deforming and tab generally bends/busts welds on these cheap boxes) remove that drawer and access the lock bar .
Was a bit hog wild on this one lol, I would of cried if that a truck brand box :)
Looked tidy so still a shame but never mind won't get locked out of it again :)
 
OP
J

jimgood

Well-known member
Joined
Aug 4, 2014
Messages
2,394
Location
Marshall, VA
Well, all of your suggestions are great except for a couple of problems...All the appropriate tools to twist the lock or inspect inside the lock hole to understand the mechanism were locked in the box. With no understanding of a mechanism hidden inside a locked box, cutting a big-*** hole in it was the best solution I could come up with.
 

Mr_B

Well-known member
Joined
Nov 21, 2016
Messages
5,374
Location
Reading
Shame your cutting tool not in box too lol .
Forcing one drawer is a no special tools option & tends work well on the cheap boxes and once one drawer open and taken out you can get to lock bar better .
The locks all work pretty much same .
You would of been best borrowing or buying couple tools try twist lock assembly.
Was unlucky that whole cam bar fell out as that what messed you up .
 

Mr_B

Well-known member
Joined
Nov 21, 2016
Messages
5,374
Location
Reading
Job jobbed .
if you trailer your box will it stay locked with the vibration ...
 
OP
J

jimgood

Well-known member
Joined
Aug 4, 2014
Messages
2,394
Location
Marshall, VA
Job jobbed .
if you trailer your box will it stay locked with the vibration ...
I believe so. The lock mechanism is locked in it's resting position. I also biased the weight of the knob very slightly so that the heavier side is hanging down. We'll see the weekend of 11/10. When I was thinking about solutions, I was trying to figure out a way to add a spring loaded detent of some sort to prevent the handle from turning on its own but couldn't come up with anything simple. I may revisit this in the future. We'll see.
 
To avoid these ads, REGISTER NOW!
Top Bottom