Seem to have much time around the house.. I’m ready to start organizing what goes on/in all the shelves I’ve been building. A few years back I made an organizer for my paint cups that utilized drawer slides and wood/dowel stand-offs to keep them where I want them.

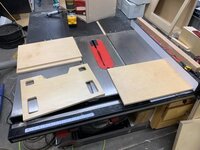
I’ve really liked how it works so I’ve decided to make additional organizers for those things which I use and need to access frequently. Since HDPE/Starboard machines really easily, I decided to use it to make all of the organizers and, instead of wood dowels for the stand-offs, I found these 1/4” aluminum threaded units I’ll give a try. I’m using 3/4-inch baltic birch as my fixture trays which allow me to swap in and out rough pieces and machine them as needed. Each blank is first drilled for mounting holes on the vise and then attached to the fixture board so the profile (and inner shapes) can be cut.
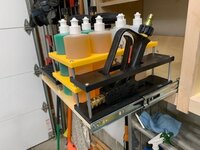
First organizer will be for my pressure washer stuff - foam cannons, soap bottles, nozzles, etc.

I’m able to cut fairly quickly. Full depth of cut (about 1/2 inch) and 3k rpm. I don’t run at excessive feed rates though as the lateral pressure on the material can be too much for the screws which affix the part to the fixture plate. I’ve been using the shop vac “dust collection” method for years and it works especially well on HDPE.

With the piece done, I then take it to the bench and use a hand router to break the edge. Nothing fancy, just a subtle break.

Each organizer is made of multiple layers so I have to think about how I want everything to come together in advance. The above piece is a lateral support for the foam cannon guns I have. Next is the main board which has the same profile for the soap cannons as well as provisions for the nozzles.

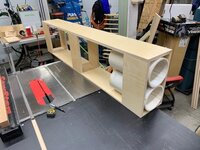
Skipping a bit ahead to test fit. The rack on the left can support 2 foam cannons which are fairly top heavy. The tall piece is spaced just right to prevent them from falling over. The yellow rack is for squeeze bottles we put our various soaps in and the right black rack is for a stubby pressure washer gun. During the test fit I learned that the yellow rack has a slight interference with the adjoining racks. All adjoining plates will need to be clearance by 3/16-inch.

Fortunately all of the pieces are the same length (or depth in relationship to the drawer assembly) so it was easy to put them back on the fixture and clearance them one at a time. If you look down I in the hold you can see the slight back-cut.

Re-assembled and ready to be loaded up.

Here’s how the foam cannon assembly works. At the very bottom is a piece that was cut only 3/8-inch deep as to create a pocket to collect water. This will allow us to not worry about damaging the wood drawer base if we don’t totally dry it before we putting it away. The cannon nozzle is most of the weight so it wants to tip forward making it want to rest against the upper support.

We have 2…not because we really needed 2, but because we’ve sometime washed multiple vehicles at a time…or used multiple foam cycles on a single car. The yellow rack is now (mostly) full of the soaps we use. The two currently loaded are Chemical Guys Honeydew and Meguiar’s Gold Class. I tend to use the Honeydew for the pre-wash and Gold Class for the 2 bucket wash. The 4 additional slots behind will be used for cheaper foams/wash one with wax and one just to quick-wash during the winter-is days.

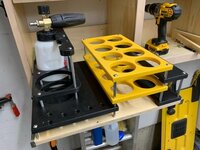
Here’s the stubby gun holder. Same principle is used with a lower plate not cut all the way through so water has a place to drain, collect if need be.

The nozzles loaded up and the drawer is ready for service. Much more organized.

Having more ideas now...thanks for following along.


 )
)