To avoid these ads, REGISTER NOW!

Tooltopia

loosewingnut

Well-known member
Joined
Oct 16, 2012
Messages
59
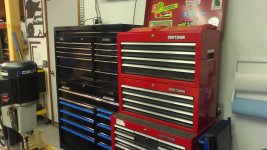
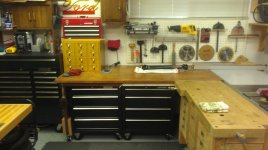
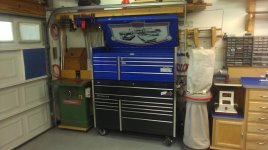
Hello there. I found this wonderful board and have been pouring through everyone's great garages and thought I would share mine with everyone. I really started to get into tools when I was a in high school and got a chance to take some shop classes. They instantly became my favorite classes. My parents started getting me tools for gifts- christmas, birthday, graduations, etc. They would get me craftsman tools because when normal people want the best tools around they got craftsman. My old man didn't even have the good stuff. He always had el cheapo brands, but my parents were like that, they always wanted their kids to succeed. I still have all of these tools 18 years later. They mean the world to me and every time I use them it brings back these memories. Normal people think it is weird, but it sure was nice finding a sight where people could really understand that.

My first career job out of high school was working as a mechanic. I got my start at a family owned Shell in a small community where everyone knew everyone. It was a lot of fun. I cut my teeth there. We did everything except engine and trans rebuilds. It was a great first job because one of the things all mechanics need- is tools. And I love tools! It helped with my accumulation of tools like no other job could have.
 

Attachments

  • IMAG0382.jpg
    IMAG0382.jpg
    105.3 KB · Views: 82
Last edited:
To avoid these ads, REGISTER NOW!
OP
L

loosewingnut

Well-known member
Joined
Oct 16, 2012
Messages
59
Here are some pictures of my first garage. When I was in college, I moved back in with my Grandpa to assist him after he fell and broke his hip. After a time, he had to be moved into assisted living and I stayed at his house while my parents decided how all that would play out. (Aside-Seeing my Grandpa in there and visiting him and being part of the discussions on what to do is one of those events that made me feel more grown up and really appreciate the kinds of decisions parents have to make about raising their children. That is a TOUGH job. Kudos to you good parents out there!)

I was allowed to rearrange the garage. I added a sub panel with the help of one of the electricians at work and my sister's boyfriend who was an electrician. Man, when they eventually broke up, that sure was a hard break up for me. I still miss that guy! We got along so well. Anyway, here is my first garage...
 

Attachments

  • dcp_0009.jpg
    dcp_0009.jpg
    154.8 KB · Views: 1,049
  • dcp_0005.jpg
    dcp_0005.jpg
    149.3 KB · Views: 1,396
  • dcp_0006.jpg
    dcp_0006.jpg
    149.2 KB · Views: 1,347
  • dcp_0007.jpg
    dcp_0007.jpg
    145.9 KB · Views: 1,212
  • dcp_0008.jpg
    dcp_0008.jpg
    150.9 KB · Views: 1,141
OP
L

loosewingnut

Well-known member
Joined
Oct 16, 2012
Messages
59
At this point in my life, I was really into woodworking. I had just purchased that awesome table saw you see there. (Sure wish they had the SawStop back then.) I had accumulated that cool Cornwell tools box limited edition. I was able to get it for $1000 from the tool guy because he had had that box on his truck for a couple of years and was basically just using it to store tools in. Our Cornwell Tools guy was great and I bought a lot of Cornwell tools. Not sure how many of you guys use Cornwell tools, but they are awesome. What they used to do is make some of their own tools- sockets, wrenches and then scour the globe looking for the best tools and then rebrand them, or sometimes not even rebrand them. They were the first tool truck company to have the Knipex pliers for instance. In terms of their quality, I think their wrenches are awesome, but I have only broken 3 sockets in my life and two were their 10mm 1/4" drive sockets. I wasn't even doing anything tough at the time. The other socket I broke was a Craftsman, but I was abusing that poor little guy.:sad:
 
OP
L

loosewingnut

Well-known member
Joined
Oct 16, 2012
Messages
59
Ok, well on to my new garage. My wife and I bought our first house together and I couldn't wait to move into my first garage. Sure wish it was about twice as big now though! It was a standard two car garage. The first thing I did was to dig, and dig, and dig a trench for the electrical. My house is on a slab and there is no attic, so it was dig, dig, diggity, dig. A 100' later, my dad, buddy and me had the trench dug. We also laid down extra wide conduit because I knew I would probably add sheds to my yard and would want to power them. Good thing I did too, but the sheds will come later in the thread.

I added a ton of electrical to the garage. I put in an overhead light circuit for the 12- 4' two bulb fluorescent lights. I added a 220v circuit on each of the side walls. I then wired in three outlet circuits. I put in a lot of plugs everywhere including the ceiling. I made it so that the top circuit all the way around the garage was on its own circuit, the medium height plugs were all on their own circuit and the lower plug was on its own circuit. I did this so that I could be at the same section of wall and have access to 4 different circuits. This makes it easy to plug in say a saw and dust collector at the same time.
 

Attachments

  • IMAG0214.jpg
    IMAG0214.jpg
    141 KB · Views: 766
  • IMAG0213.jpg
    IMAG0213.jpg
    143.7 KB · Views: 790
  • IMAG0211.jpg
    IMAG0211.jpg
    130.6 KB · Views: 799
  • IMAG0210.jpg
    IMAG0210.jpg
    137.5 KB · Views: 964
  • IMAG0215.jpg
    IMAG0215.jpg
    145 KB · Views: 800
Last edited:
OP
L

loosewingnut

Well-known member
Joined
Oct 16, 2012
Messages
59
Next came all the insulation. I put it everywhere, including the ceiling. I think the garage is the best insulated room in the house. Though I still need to insulate the garage door. I just have never gotten around to it. I them sheetrocked the walls, installed office ceiling panels on the roof and put in the overhead lights. I wanted the floor to look good, be rugged enough to last and not cost too much. I settled on the epoxy plan and like the results. 8 years later though, it is definitely looking a little beat up. I wonder if I can re-coat it? I added a little strip of black plastic around the base and I was ready to move tools in. Took me a ton of hours to do all this.
 

Attachments

  • IMAG0229.jpg
    IMAG0229.jpg
    141.8 KB · Views: 597
  • IMAG0243.jpg
    IMAG0243.jpg
    135.1 KB · Views: 563
  • IMAG0242.jpg
    IMAG0242.jpg
    129.6 KB · Views: 494
  • IMAG0241.jpg
    IMAG0241.jpg
    105.8 KB · Views: 556
  • IMAG0240.jpg
    IMAG0240.jpg
    111.4 KB · Views: 508
  • IMAG0238.jpg
    IMAG0238.jpg
    143.4 KB · Views: 560
  • IMAG0239EditNoName.jpg
    IMAG0239EditNoName.jpg
    144.9 KB · Views: 421
Last edited:

Kevin54

MEMBER EMERITUS
Joined
Jan 12, 2005
Messages
29,341
Location
Urbana, Ohio
Very nice. I really like how you built all of your tables and benched to match up with the saw. Great dual purpose!! Also it looks like you are very well organized. Kudos on that.

So do you have any pics of the woodworking items you have made other than your cabinets and such?
 
OP
L

loosewingnut

Well-known member
Joined
Oct 16, 2012
Messages
59
Very nice. I really like how you built all of your tables and benched to match up with the saw. Great dual purpose!! Also it looks like you are very well organized. Kudos on that.

Yeah, i made all the heights to match so that I could slide full sheets of plywood through my garage without having to move anything. Even my jointer and planer were set that way so I would always have infeed and outfeed support when needed. This also makes it easy to move big projects around.

So do you have any pics of the woodworking items you have made other than your cabinets and such?

I do. I will add some a little later in this post. I specialize in artistic type woodworking. I particularly like pieces that utilize the defects in wood. I have been spending most of my time doing automotive restoration in the last two years so I have evolved my shop to be better for that kind of work. I moved out much of my wood shop out back to my sheds and I will show those eventually.

Nice shop. I particullary like the Sjøberg table :)

I bought that top probably 12-15 years ago and built the base myself. It was my first real big project. It has the same setup on the other side too. I made it with a ton of small drawers to hold all me small parts like pen bushings and such.
 

Attachments

  • IMAG0222.jpg
    IMAG0222.jpg
    144.3 KB · Views: 374
  • IMAG0225.jpg
    IMAG0225.jpg
    122 KB · Views: 320
  • IMAG0220.jpg
    IMAG0220.jpg
    96.7 KB · Views: 350
  • IMAG0221.jpg
    IMAG0221.jpg
    131.3 KB · Views: 327
  • IMAG0228.jpg
    IMAG0228.jpg
    146.4 KB · Views: 351
  • IMAG0224.jpg
    IMAG0224.jpg
    142 KB · Views: 338
  • IMAG0227.jpg
    IMAG0227.jpg
    141.9 KB · Views: 349
OP
L

loosewingnut

Well-known member
Joined
Oct 16, 2012
Messages
59
I started out with my whole shop full of woodworking since that was my passion at the time. I had a jointer, drill press, sliding miter saw, band saw, dust collector, and shaper all in the middle of my shop too. I have since moved those out to my sheds to make more room for restoring my land cruiser. As the years moved along and I got further away from my time spent working full time on cars for a living, I really started to miss working on cars and using my mechanic's tools. Meant it was time for a project and I bought a used land cruiser.
I have since really gotten into robotics and electronics and welding. So my shop had to adjust to it. I am a big believer in keeping all of your tools accessible and available else you will never take the time to work if it is too much trouble just to get to the tool. I am also into having a place for everything. Otherwise I end up leaving too much **** on my table tops.
 

Attachments

  • IMAG0235.jpg
    IMAG0235.jpg
    142.9 KB · Views: 237
  • IMAG0241.jpg
    IMAG0241.jpg
    105.8 KB · Views: 248
  • IMAG0233.jpg
    IMAG0233.jpg
    111.5 KB · Views: 242
  • IMAG0231.jpg
    IMAG0231.jpg
    137.1 KB · Views: 277
  • IMAG0229.jpg
    IMAG0229.jpg
    141.8 KB · Views: 279
  • IMAG0232.jpg
    IMAG0232.jpg
    122.4 KB · Views: 291
  • IMAG0239EditNoName.jpg
    IMAG0239EditNoName.jpg
    144.9 KB · Views: 208
Last edited:
OP
L

loosewingnut

Well-known member
Joined
Oct 16, 2012
Messages
59
It took me a long time to figure out how to arrange my shop. Funny thing is I swear I spent about 50 hours just changing lay ups. I drew my shop and all my tools to scale and then just obsessively moved them around till I was able to squeeze them all in.
 

Attachments

  • IMAG0249.jpg
    IMAG0249.jpg
    147.9 KB · Views: 579
  • IMAG0266.jpg
    IMAG0266.jpg
    137.2 KB · Views: 235
  • IMAG0246.jpg
    IMAG0246.jpg
    143.9 KB · Views: 235
  • IMAG0245.jpg
    IMAG0245.jpg
    144.4 KB · Views: 231
  • IMAG0244.jpg
    IMAG0244.jpg
    125.7 KB · Views: 209
  • IMAG0242.jpg
    IMAG0242.jpg
    129.6 KB · Views: 225
  • IMAG0268.jpg
    IMAG0268.jpg
    146.4 KB · Views: 247
OP
L

loosewingnut

Well-known member
Joined
Oct 16, 2012
Messages
59
Here are some pictures of my table top. It is a bowling alley lane. A bowling alley went our of business and I was able to pick up about 3 bowling alleys for about $100 each. They are really nice looking and I was so excited because I had always wanted one for an assembly table. I just think they look so cool. One of the things I found out though is that only the front section of the bowling alley is the awesome rock maple. The rest of the alley is half doug fir and half maple. So, get the first part of the lane if possible. Also, they are full of big thick twist nails so if you need to cut them, be sure to keep some crappy circular saw blades on hand because those nails destroy the blades fast. I used maple and purpleheart to do the border on the bowling alley. I really want to redo the table under the pegboard with a bowling alley top, but just haven't ever gotten around to it. It takes a lot of work to prep them, plus the sections I have are 3-400 pounds and 10' long!
 

Attachments

  • IMAG0282.jpg
    IMAG0282.jpg
    134.4 KB · Views: 365
  • IMAG0279.jpg
    IMAG0279.jpg
    108.6 KB · Views: 277
  • IMAG0283.jpg
    IMAG0283.jpg
    103.4 KB · Views: 323
  • IMAG0268.jpg
    IMAG0268.jpg
    146.4 KB · Views: 283
  • IMAG0284.jpg
    IMAG0284.jpg
    113.3 KB · Views: 348
  • IMAG0274.jpg
    IMAG0274.jpg
    149.4 KB · Views: 317
OP
L

loosewingnut

Well-known member
Joined
Oct 16, 2012
Messages
59
A few more pictures.
 

Attachments

  • IMAG0237ModifiedNoName.jpg
    IMAG0237ModifiedNoName.jpg
    142.7 KB · Views: 446
  • IMAG0250.jpg
    IMAG0250.jpg
    147.3 KB · Views: 681
  • IMAG0251.jpg
    IMAG0251.jpg
    143 KB · Views: 646

SiGmA_X

Well-known member
Joined
Aug 13, 2005
Messages
1,111
Location
Portland, OR
I really like what you did with the small garage! You have a lot of good tools packed in there, nice work sir!
 

mwbailey

Well-known member
Joined
Jun 30, 2012
Messages
821
Location
Rock Hill, SC
Wow, what they said ^^!

I noticed in an early photo that your air compressor is on a shelf, then you "featured" it in another picture! My workshop (under construction) has a shelf that the builder constructed in the "mechanical room" for the water heater and compressor. I haven't mounted the compressor, yet. It's a Craftsman about 30 gallon size; looks about the same size as yours. I've been worrying about the thing walking off the shelf and/or using the shelf as a sounding board to increase the noise even more. What's your experience with the shelf?

Now, I must admit that your organization of tools reminded me of another post I saw (probably on GJ). The writer said he had "CDO" -- that's a more severe case of OCD, but with the letters in alphabetical order! I know what you mean about positioning your tools. I don't have nearly as many, but I just might be obsessing over the optimum arrangement. And, I'm NOT CDO, I don't care what anybody says.

Keep up the great work, and photos.
 

saryon7

Well-known member
Joined
Sep 23, 2012
Messages
87
Wow, what they said ^^!

I noticed in an early photo that your air compressor is on a shelf, then you "featured" it in another picture! My workshop (under construction) has a shelf that the builder constructed in the "mechanical room" for the water heater and compressor. I haven't mounted the compressor, yet. It's a Craftsman about 30 gallon size; looks about the same size as yours. I've been worrying about the thing walking off the shelf and/or using the shelf as a sounding board to increase the noise even more. What's your experience with the shelf?

In my first shop, I kept my compressor in a small insulated box that I made under a shelf. I definitely preferred it that way because it kept the compressor noise to a minimum. I always worried about it overheating though. In this shop I was older and had more tools and not as much room because of it. I decided that I would go this route because it basically takes up none of my usable space. After you mentioned it, I went over to check if my compressor had moved or shifted at all. It was in the same exact place that is always was. It has been there for 9 years and didn't move so I would say you are probably fine without having to worry about it walking off the shelf. If you are worried though you could just always screw a cleat or two down to keep it there. I recommend to have a drain hole in the shelf so that it is easy to drain the compressor of water. I added one after I realized it was a pain to drain. Also, those 3/8" hose reels go on sale at harbor freight frequently for about $60 with the coupon. It saves so many headaches from hoses everywhere and keeps the shop clean without hose reels everywhere. I actually want to add a spigot directly out to my front yard too, but that is a project for another day. In terms of it amplifying the sound or the sound vibrating the walls, I was very worried about that too. It does not seem to be louder than it just being in the room on the floor, nor does it seem to vibrate the walls at all either. It might even be a little quieter because my walls are insulated well and the ceiling is insulated and has office tiles for the ceiling which dampen noise. The compressor has rubber feet on it. My compressor is also a 30 gallon.

Now, I must admit that your organization of tools reminded me of another post I saw (probably on GJ). The writer said he had "CDO" -- that's a more severe case of OCD, but with the letters in alphabetical order! I know what you mean about positioning your tools. I don't have nearly as many, but I just might be obsessing over the optimum arrangement. And, I'm NOT CDO, I don't care what anybody says.

I am proud of my organization and you should be too. It is not a waste of time to spend time organizing. If you have the room, it isn't as important, but with a tight space if you aren't organized, you just won't work as often. I know several people who have those multitool shopsmiths and if I ask them if they are working on a project they give me some variant on " eh, I got to move the bikes or lawn mower, then convert to the lathe tool. I just haven't felt like all that just to work for an hour." My experience having easy access to all your tools translates into lots more work time.

Keep up the great work, and photos.

thank you very much :rocker:
 
Last edited:

Wingnut65

Well-known member
Joined
Apr 21, 2010
Messages
3,170
Location
Tampa Bay, FL
... It took me a long time to figure out how to arrange my shop. Funny thing is I swear I spent about 50 hours just changing lay ups. I drew my shop and all my tools to scale and then just obsessively moved them around till I was able to squeeze them all in.

... I am also into having a place for everything. Otherwise I end up leaving too much **** on my table tops.

Welcome to GJ, loosewingnut. You are going to fit in well here! :thumbup:

I love both generations of your shops. Very well organized and creative storage ideas. And that radial arm saw just blends in to the workbench and everything around it. Can't wait to see hoe you converted this wood shop to a mechanics shop!

As for your robotics, you will need to visit the Asylum and meet shopnut...

BTW, are we related... Us nuts need to stick together!
 
To avoid these ads, REGISTER NOW!
OP
L

loosewingnut

Well-known member
Joined
Oct 16, 2012
Messages
59
Welcome to GJ, loosewingnut. You are going to fit in well here! :thumbup:

I love both generations of your shops. Very well organized and creative storage ideas. And that radial arm saw just blends in to the workbench and everything around it. Can't wait to see hoe you converted this wood shop to a mechanics shop!

The radial arm saw stand came to me in a dream and I obsessively finished it over a two week Christmas vacation. They are an outdated tool, but I just love using them. One of my favorite woodworking tools.

As for your robotics, you will need to visit the Asylum and meet shopnut...

BTW, are we related... Us nuts need to stick together!

THanks for the compliments. We probably are related. Every family has that member that everyone else is embarassed of...That's me, lol:dunno::dunno:


Well, I am ready to tackle the next project in the garage. I have been getting into welding lately and am working on my welding degree. My cheap harbor freight welding cart was a nice quick fix to get my welder working, but I hated the squeaky wheels enough already to swap out the wheels. After searching the internet for ideas, I was inspired by a couple of carts I saw. One off the internet, and one off this site. I will post the inspiration pictures when I get back to my home computer, but for now here is some progress...

The inspectors are busy making sure everything meets AWS code. Notice how one is looking away? I slipped him some kibble for that favor:lol:
 

Attachments

  • IMAG0299.jpg
    IMAG0299.jpg
    86.6 KB · Views: 199
  • IMAG0302.jpg
    IMAG0302.jpg
    82 KB · Views: 232
OP
L

loosewingnut

Well-known member
Joined
Oct 16, 2012
Messages
59
Ok, here's the two carts that inspired my design. It actually turns out that both of them are from this site.:lol_hitti
 

Attachments

  • weldercart.jpg
    weldercart.jpg
    55.7 KB · Views: 251
  • user35315_pic12783_1320213237.jpg
    user35315_pic12783_1320213237.jpg
    89.9 KB · Views: 261
  • user35315_pic12781_1320213237.jpg
    user35315_pic12781_1320213237.jpg
    87.3 KB · Views: 231
OP
L

loosewingnut

Well-known member
Joined
Oct 16, 2012
Messages
59
Ok, a couple more updates on the welding cart. I am really getting excited about getting this cart going. I think it will be a great addition to my shop. Here is a picture of the old cart and a little more progress. Since I have a lot of woodworking tools around in my shop, I do all my metalworking and welding with the garage door open and in my driveway. I needed a welding cart that had a workstation attached. I am building this cart with a fold out system that will be approx 4' by 30".
 

Attachments

  • IMAG0319.jpg
    IMAG0319.jpg
    66.6 KB · Views: 132
  • IMAG0318.jpg
    IMAG0318.jpg
    112.8 KB · Views: 147
  • IMAG0316.jpg
    IMAG0316.jpg
    133.8 KB · Views: 126
  • IMAG0315.jpg
    IMAG0315.jpg
    60.4 KB · Views: 137

bcs1175

Member
Joined
Aug 31, 2012
Messages
18
Location
AZ
really like your garage, as soon as i can get rid of somethings i have stored for now in my garage this will be one i use as inspiration for my build.
 

Wingnut65

Well-known member
Joined
Apr 21, 2010
Messages
3,170
Location
Tampa Bay, FL
Nice progress on the cart, lw. By the looks of it, that workstation will be tall as well.

My cart is like your current one, but it is low enough that it fits under my workbench. But I'm interested in what you are planning.

Keep posting as you work.
 
OP
L

loosewingnut

Well-known member
Joined
Oct 16, 2012
Messages
59
Very nice. I really like how you built all of your tables and benched to match up with the saw. Great dual purpose!! Also it looks like you are very well organized. Kudos on that.

So do you have any pics of the woodworking items you have made other than your cabinets and such?


Here are a couple that were handy. I have a bunch more projects here, but they are our furniture and I need to pull the household stuff off them and put them in some good lighting to show them off. Full time work plus full time school has been killing me so as soon as i get some time I will post those others. I didn't used to be good at snapping pictures. I really wish that I had taken more pictures now.:lol_hitti Oh well... What good would hindsight be if you didn't make mistakes?
 

Attachments

  • IMAG0304-1.jpg
    IMAG0304-1.jpg
    77 KB · Views: 139
  • IMAG0306.jpg
    IMAG0306.jpg
    130.7 KB · Views: 128
  • IMAG0307.jpg
    IMAG0307.jpg
    134.6 KB · Views: 153
  • IMAG0308.jpg
    IMAG0308.jpg
    68.5 KB · Views: 121
Last edited:
OP
L

loosewingnut

Well-known member
Joined
Oct 16, 2012
Messages
59
Progress has been slow but steady. Lack of daylight has been taking its toll. I am including an updated picture with the top and bottom plate attached. I am hoping to have the caster system added today and pretty much have it ready for paint. Sure hope my casters don't develop flat spots.:beer:
 

Attachments

  • IMAG0331.jpg
    IMAG0331.jpg
    146 KB · Views: 78
OP
L

loosewingnut

Well-known member
Joined
Oct 16, 2012
Messages
59
Here are a few more pictures. I have been trying to knock out this project. The weather has been rainy and cold so it took me forever to get this thing painted. I almost have the main cart finished. I think tomorrow will be the day. Then I can start working on the table part of it. I tack welded up the tables for the side, but they fit too tight so I may have to cut them apart.
 

Attachments

  • IMAG0356.jpg
    IMAG0356.jpg
    43.4 KB · Views: 73
  • IMAG0355.jpg
    IMAG0355.jpg
    38 KB · Views: 79
  • IMAG0354.jpg
    IMAG0354.jpg
    37.1 KB · Views: 88
  • IMAG0352.jpg
    IMAG0352.jpg
    45.3 KB · Views: 87
  • IMAG0351.jpg
    IMAG0351.jpg
    53.6 KB · Views: 85
  • IMAG0350.jpg
    IMAG0350.jpg
    79.8 KB · Views: 88

gmt

Well-known member
Joined
Oct 14, 2012
Messages
251
Location
SoCal
The inspectors are busy making sure everything meets AWS code. Notice how one is looking away? I slipped him some kibble for that favor:lol:[/QUOTE]

Have you ever noticed that after the inspectors are done they leave what they were inspecting a little wet from their nose and tongue. :lol_hitti
Just kidding, my inspector does the same thing. Nice setup.
 
OP
L

loosewingnut

Well-known member
Joined
Oct 16, 2012
Messages
59
The inspectors are busy making sure everything meets AWS code. Notice how one is looking away? I slipped him some kibble for that favor:lol:

Have you ever noticed that after the inspectors are done they leave what they were inspecting a little wet from their nose and tongue. :lol_hitti
Just kidding, my inspector does the same thing. Nice setup.[/QUOTE]

Yeah, but they assured me a taste test of every joint ensures proper fusion. And that it tires them out and they need some extra food to carry on. They do good work, so I trust what they say :D
 
OP
L

loosewingnut

Well-known member
Joined
Oct 16, 2012
Messages
59
The cart is pretty much done. I still have one more piece to make. The tank needs a bar to hold it in place and it is almost ready to be welded up. It will attach to the bolts you can see in the rear of the cart towards the top of the tank. I am paranoid about the tank falling over and the valve getting knocked off so I made sure my design had a cage over the top of the tank and that the tank was tied into the cart.
The next steps will be to make the side table now.
 

Attachments

  • IMAG0368.jpg
    IMAG0368.jpg
    40.5 KB · Views: 82
  • IMAG0367.jpg
    IMAG0367.jpg
    43.7 KB · Views: 79
  • IMAG0366.jpg
    IMAG0366.jpg
    36.7 KB · Views: 65
  • IMAG0365.jpg
    IMAG0365.jpg
    52.2 KB · Views: 73
  • IMAG0364.jpg
    IMAG0364.jpg
    56.5 KB · Views: 77
  • IMAG0363.jpg
    IMAG0363.jpg
    46.5 KB · Views: 72
  • IMAG0362.jpg
    IMAG0362.jpg
    50.9 KB · Views: 78
OP
L

loosewingnut

Well-known member
Joined
Oct 16, 2012
Messages
59
The drawers are an all metal affair. We had a couple of them collecting dust at our school and thought they would be perfect for this project. I can't find any kind of company logo on them. I looked because I wanted to see if they could still be purchased. They are at least 20 years old and really high quality. The only downfall is that the ball bearings for the slides use plastic balls.
 
OP
L

loosewingnut

Well-known member
Joined
Oct 16, 2012
Messages
59
Super Sweet cart, the drawers are awsome. Why don't you just use a chain for the tank?

I don't really see any advantage to a chain other than there is no chance of it burning. The way it is set up now, it would be pretty tough for a molten spatter to reach the tie-downs. It doesn't show in the pics yet because I haven't finished the attached work tables, but there will be a welding screen between the tables and the welding cart. I am rather paranoid of the welding tank having the valve knocked off and becoming a missile. All the cheaper carts that I have seen with a chain seem to barely hold the tank. I would not trust them to hold the tank securely if say... the cart fell over. I wanted to make sure that if my cart fell over there isn't much chance of a rupture unless the tank contacted an elevated surface on its way over. The cart has a bar on the back to hold in the tank even if the straps failed.
 
OP
L

loosewingnut

Well-known member
Joined
Oct 16, 2012
Messages
59
I got a few more updates to add. I finished the tank retaining bar and got the 1st swing-out welding table fabbed up. I would have it painted as well, but it is raining and screwed up my plans.:mad: I went with a 1/4" thick top since that was the thickest our metal shop had in stock and craigslist wasn't turning anything up for me. Even though the common advice on here is to use 1/2" thick metal for the top, I am glad I didn't. The top is heavy. It adds a ton of weight to the cart. I was planning on storing the second extension on the cart too, but I may just leave it in the garage somewhere. I am still working on solutions for the legs for the foldout table. Will post em up when I figure something out.
 

Attachments

  • IMAG0372.jpg
    IMAG0372.jpg
    41.9 KB · Views: 33
  • IMAG0373.jpg
    IMAG0373.jpg
    82.6 KB · Views: 34
  • IMAG0371.jpg
    IMAG0371.jpg
    33.6 KB · Views: 30
OP
L

loosewingnut

Well-known member
Joined
Oct 16, 2012
Messages
59
I THINK YOU'RE HANDLE IS A GROSS MISNOMER...THERE'S OBVIOUSLY NOT A SINGLE LOOSE WINGNUT IN THE PLACE! :thumbup:

Not true! If that were so....where did these guys come from? hmm??

Confession: I had to take them out of the wingnut hardware drawer for the picture and I actually was able to leave them out about 30 seconds before their disorder made me put them back, lol.:dunno:

In all seriousness, my shop looks better in the pictures than it usually does. It is pretty rare that it isn't messed up from being in the middle of a project. Here are a couple pictures to prove it. And this is an easy welding cart project.
 

Attachments

  • IMAG0377.jpg
    IMAG0377.jpg
    119 KB · Views: 40
  • IMAG0379.jpg
    IMAG0379.jpg
    108.7 KB · Views: 34
  • IMAG0380.jpg
    IMAG0380.jpg
    92.1 KB · Views: 33
  • IMAG0376.jpg
    IMAG0376.jpg
    21.2 KB · Views: 14
Last edited:
To avoid these ads, REGISTER NOW!
Top Bottom