To avoid these ads, REGISTER NOW!

Trailer conversion

greenlizard

Well-known member
Joined
Dec 4, 2012
Messages
186
Location
Chapin, SC
I picked up a container/generator trailer at a govplanet auction in March. The generator sat down inside the frame rails on the 3/8” plates. The frame is all 8” channel with a GVWR of 12,000 lbs. It has four wheel electric brakes, drop axles, and a commercial wiring harness.
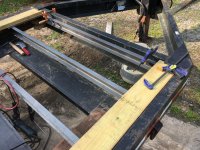
This pic shows the start of adding 3” channel cross members.
 

Attachments

  • D8303E96-5451-4B46-AB2A-CF0AAD4D2EC0.jpg
    D8303E96-5451-4B46-AB2A-CF0AAD4D2EC0.jpg
    155.6 KB · Views: 262
To avoid these ads, REGISTER NOW!
OP
G

greenlizard

Well-known member
Joined
Dec 4, 2012
Messages
186
Location
Chapin, SC
Adding more crossmembers. I found out quickly that my 7018 vertical up skills have been sorely neglected. My mantra: “Hold a tight arc, watch the puddle, keep moving.” Luckily, even a so-so weld is very strong. I did get better as I went along. The plan was to have the deck boards level with the perimeter frame rails.
 

Attachments

  • 60E92B95-C350-4D72-8877-DC006210F8FC.jpg
    60E92B95-C350-4D72-8877-DC006210F8FC.jpg
    156.4 KB · Views: 192
OP
G

greenlizard

Well-known member
Joined
Dec 4, 2012
Messages
186
Location
Chapin, SC
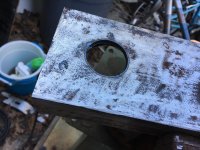
I decided to copy the ramp design on one of my son’s flatbed trailer. At the steel yard I picked up ten feet of 1.125 round bar. Only six feet were needed, but every time I cut things too close I end up short. This pic shows the hole for the round bar hinge pin. My plasma worked plenty well enough for this.
 

Attachments

  • 7F763984-7F0A-4037-BEDD-E5991C1BDB26.jpg
    7F763984-7F0A-4037-BEDD-E5991C1BDB26.jpg
    151.9 KB · Views: 138
OP
G

greenlizard

Well-known member
Joined
Dec 4, 2012
Messages
186
Location
Chapin, SC
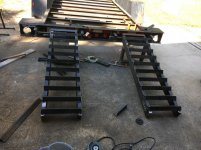
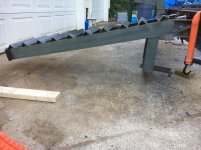
Got the ramps built. They are five feet long, 16 inches wide, and quite heavy. Most ramps of this type are more like 19 inches wide, but I want to be able to slide them to the outside to allow equipment to hang off the back of the trailer. The picture seem to show some distortion of the trailer when it is actually straight and square.
 

Attachments

  • 429CFC03-C015-4AA4-8308-D345C520CEEE.jpg
    429CFC03-C015-4AA4-8308-D345C520CEEE.jpg
    154.1 KB · Views: 155
  • 2A554C65-2180-488A-A4DD-DDCFA87A0563.jpg
    2A554C65-2180-488A-A4DD-DDCFA87A0563.jpg
    149.2 KB · Views: 162
OP
G

greenlizard

Well-known member
Joined
Dec 4, 2012
Messages
186
Location
Chapin, SC
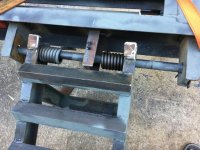
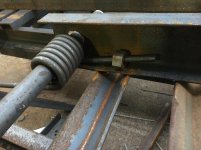
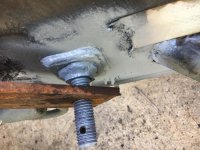
Due to the weight of the of the ramps I decided assist springs were a necessity. I welded in a large nut to keep the springs against the side rails. After further research I realized all of the commercial equipment trailers have three hinge supports instead of just two. No problem, the center support was easy to add.
Having two assist springs per ramp made the ramps easy to lift, but... they tended to rest about six inches off the ground. There are formulas available to calculate a perfect ramp length/weight vs spring strength, but eh, I added a piece of angle to the bottom of the ramps which was just enough weight to allow them to sit properly.
 

Attachments

  • 3CB453CE-C96F-4055-8733-CE6D1B70CD42.jpg
    3CB453CE-C96F-4055-8733-CE6D1B70CD42.jpg
    152.8 KB · Views: 133
  • E622B4E2-31F5-4685-A73B-5540EB3C04C2.jpg
    E622B4E2-31F5-4685-A73B-5540EB3C04C2.jpg
    148.5 KB · Views: 133
  • E2C7E134-B493-4764-9DBC-EBF3D5E4E7D7.jpg
    E2C7E134-B493-4764-9DBC-EBF3D5E4E7D7.jpg
    152.3 KB · Views: 129
OP
G

greenlizard

Well-known member
Joined
Dec 4, 2012
Messages
186
Location
Chapin, SC
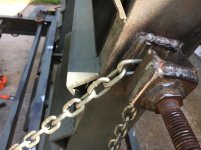
My original plan was to use chains to hold up the ramps for transport. After adding the chains I wasn’t satisfied with that solution, so I used some 2” x 1/4 flat bar as retention straps. I like that a lot better as it limits the bouncing of the ramps. So for now I have a belts and suspenders setup.
The last pic shows the result of using a thumb as an anvil. It was a nice light blue color. I may have said a bad word or two.
 

Attachments

  • C4A2ED30-E232-4C91-9CF4-DC6DD238415B.jpg
    C4A2ED30-E232-4C91-9CF4-DC6DD238415B.jpg
    97.6 KB · Views: 120
  • 94F1E2F4-0DF9-4272-8080-616117A3A408.jpg
    94F1E2F4-0DF9-4272-8080-616117A3A408.jpg
    158 KB · Views: 158
  • C9A77147-2ACD-4C91-8A2B-D155DB155BE0.jpg
    C9A77147-2ACD-4C91-8A2B-D155DB155BE0.jpg
    149.5 KB · Views: 134
  • 43795DAE-8E33-4CDF-80D6-66AA05A3D7BE.jpg
    43795DAE-8E33-4CDF-80D6-66AA05A3D7BE.jpg
    148 KB · Views: 135
  • 5873C40E-CACA-4B4E-B247-036C400421EF.jpg
    5873C40E-CACA-4B4E-B247-036C400421EF.jpg
    148.7 KB · Views: 134
OP
G

greenlizard

Well-known member
Joined
Dec 4, 2012
Messages
186
Location
Chapin, SC
I power washed it on a hot sunny day. Then wire wheeled the few rusty patches and spray primered them with a self etching Rustoleum from a can. The original paint is the toughest I’ve ever seen, so I removed as little as possible. After the primer I applied oil based Rustoleum with a brush. It’s a 20 foot paint job, but I think it turned out fine.

The first pic is just to show the size against my old Tundra. Bought nine 16 foot number 1 treated pine boards for the deck. The deck is 15 feet long so they were all trimmed to length. I used ACQ resistant 1/4x20 self drilling/tapping screws to fasten it down. Immediately I discovered it was more efficient to predrill the holes and let the screws only tap the threads. Doing it that way I only lost about 5 screws out of approximately 150 installed.
As it turned out the 2x8’s were the perfect width, no ripping required. That never happens to me.
 

Attachments

  • FAAD61CA-88F8-4B44-AF24-7751B3F8DD05.jpg
    FAAD61CA-88F8-4B44-AF24-7751B3F8DD05.jpg
    144.3 KB · Views: 184
  • EBCBD06E-8153-4E8E-A23D-074A74808039.jpg
    EBCBD06E-8153-4E8E-A23D-074A74808039.jpg
    152.4 KB · Views: 161
  • 1EFF6D55-E3AA-465A-A0D8-CA7ADB34B2D4.jpg
    1EFF6D55-E3AA-465A-A0D8-CA7ADB34B2D4.jpg
    152.6 KB · Views: 163
  • 0F617266-9AF4-4227-9541-1FF251CC2465.jpg
    0F617266-9AF4-4227-9541-1FF251CC2465.jpg
    153.5 KB · Views: 168
OP
G

greenlizard

Well-known member
Joined
Dec 4, 2012
Messages
186
Location
Chapin, SC
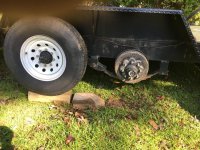
Had to replace one tire. Checked the electric brakes, the lights, replaced the existing six round plug with a seven blade connector. Never having had an electric brake trailer I did have to install a brake controller in my truck. This lead me to discover there is no color code standard for trailer wiring. Even within one manufacturers product line the colors vary. I used a Power Probe (yes, funny name) to figure out which wire was which. That was a bit tedious, but not difficult. Every existing light worked as it should. Who’d a thought that was possible? The brakes also work correctly.
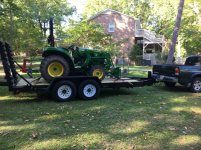
After a drive around the neighborhood to test the brakes, l loaded my tractor for a test run to a local gas station. Things worked very well. The trailer pulls straight, rides well, and brakes as it should.
It took me around 80 hours to get this done. Were I to do another, the time would be less than half that now that I have a better idea of how to go about it.

I’m calling this one done.
 

Attachments

  • 364A3D8B-EC89-41B6-93AB-54531B38F0D7.jpg
    364A3D8B-EC89-41B6-93AB-54531B38F0D7.jpg
    160.1 KB · Views: 180
  • F9A95E9E-E042-48B6-A414-8AE84FA25596.jpg
    F9A95E9E-E042-48B6-A414-8AE84FA25596.jpg
    156.3 KB · Views: 130

bored350

Well-known member
Joined
Mar 17, 2011
Messages
222
Location
Arkansas
How wide is that trailer, it looks quite narrow in the first picture.
OP mentioned 9 boards of 2x8, so 5 ½' between fenders? Looks narrow but not that narrow\(°o°)/

Anyone else but me bothered how some trailers get nice diamond plate armored looking fenders then the manufacturer puts a wimpy support in the middle that buckles as soon as any real weight is put on them?

OP, very nice refurb. Curious what the new weight is with your modifications.

Sent from my Moto G (5) Plus using Tapatalk
 
OP
G

greenlizard

Well-known member
Joined
Dec 4, 2012
Messages
186
Location
Chapin, SC
The trailer is 72” between the fenders. I haven’t yet weighed it, but I added around 600 lbs in steel and wood. My compact tractor is a fairly light load for the trailer at close to 4,000 lbs. The loaded weight is within the truck’s specs, but closer than it might seem. The tow rating for my 2000 Tundra Limited is 7200 lbs. With the tractor it’s got to be close to 6000 lbs towed weight. I’ll get it weighed soon.

Thanks for reading. It’s harder than it seems to think of what details add to the story and what’s just filler.

This picture is from the auction ad and was accurate.
 

Attachments

  • 20FDBA3F-6A8C-4F03-85E8-CBAA5CA0EFBE.jpeg
    20FDBA3F-6A8C-4F03-85E8-CBAA5CA0EFBE.jpeg
    95.4 KB · Views: 131
To avoid these ads, REGISTER NOW!

Muckin_Slusher

Well-known member
Joined
Apr 1, 2017
Messages
465
Location
Abitibi
Nice job. I love trailers

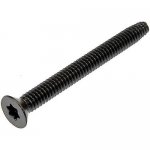
These are the cat's *** trailer deck screws. They're called floor screws. I've Reused ones that have been in service for years, they'll still come out and go back in. Don't ever remember breaking one.

Redline_TF02-225_image_1__95239.1562806596.jpg
 

Muckin_Slusher

Well-known member
Joined
Apr 1, 2017
Messages
465
Location
Abitibi
I like the look of those screws. How do they perform with treated deck boards?

Good question, never thought about that, but I don`t used treated boards.

I don't think they're specifically rated for treated boards, but a few years ago I redid my galvanized easy hauler snowmobile trailer, which had 1/2 inch PT plywood, and I was able to reuse a lot of the screws. That trailer's deck was 17 years old (and quite rotten). Some of the screws had broken over the years (when I said I don`t remember breaking one I meant on installation).

They were the small ones (1/4 inch).

I normally use 5/16 on deck boards 1 1/4 up to rough 2 inch thick, but not treated.

You do have to drill the correct size hole though, usually down to the 64th.
 
Last edited:

Outlander

Well-known member
Joined
Jul 30, 2010
Messages
5,154
Location
Quebec, Canada
I decided to copy the ramp design on one of my son’s flatbed trailer. At the steel yard I picked up ten feet of 1.125 round bar. Only six feet were needed, but every time I cut things too close I end up short. This pic shows the hole for the round bar hinge pin. My plasma worked plenty well enough for this.

^^ this :lol_hitti Which is why I have extra wood from projects as well!

Nice job on the modifications/improvements! I love the look of a freshly renovated & re-decked trailer!
 

NUTTSGT

Super Moderator
Staff member
Joined
Sep 14, 2009
Messages
51,109
Location
Northern Central Ohio
Had to replace one tire. Checked the electric brakes, the lights, replaced the existing six round plug with a seven blade connector. Never having had an electric brake trailer I did have to install a brake controller in my truck. This lead me to discover there is no color code standard for trailer wiring. Even within one manufacturers product line the colors vary. I used a Power Probe (yes, funny name) to figure out which wire was which. That was a bit tedious, but not difficult. Every existing light worked as it should. Who’d a thought that was possible? The brakes also work correctly.

Actually, there is a standard for trailer wiring.

Brown is the tail lights
yeLLow is left signal, remember the LLs for left
gReen is right signal, remember the R for right
white is ground

That's four pin, going to a seven pin,

makes red a power wire. I think most charge a trailer mounted battery with it

Many use black for electric brakes or blue.

If you have back up lights, I thin you need to find what your vehicle uses in it's harness at the plug side.

However, you did go from 6 pin to 7 pin. I've never heard anybody say anything nice about 6 pin wiring.
 

Attachments

  • TRAILER-WIRE-COLOR.pdf
    132.8 KB · Views: 21

matt_i

Well-known member
Joined
Mar 14, 2008
Messages
10,744
Location
SE Michigan
Great job!

Some brainstorm ideas to add: I added some lighting to the ramps on my gooseneck so that the people behind can see better.

Also I take the Thompson's water seal to the wood every couple of years. So far its working very well. I'm 16 years into it so far. Fluid film whatever I can to keep rust at bay and there are spots where the original paint has flaked. Try to pay closest attention to the neck as I feel like that's the greatest stress.

Does your GVW require a backup battery and a deadman-cable if the trailer runs away (battery applies full voltage to the brakes to stop the trailer).

I zip-tied an old soup can to the neck with a washer silver-soldered to the end and that's where the male plug stores to keep it out of the rain. To add insult to that idea, I now have some irritating bug or spider that nests in the slots of my 7 pin male plug every year packing them with mud (??) and requiring it to be cleaned out every time I use the trailer....I mean to goto the junkyard someday and see if I can get a 7 pin female from a truck and use that as a dummy just to protect the contact blades.

A spare tire and a bottle jack that can lift the entire trailer + full load is a good thing to keep with you.
 
Last edited:

bradpac

Well-known member
Joined
Sep 8, 2013
Messages
721
Location
Central TX
Very nice conversion. When towing with a 1/2 ton truck, it's nice to have an over qualified trailer so you can keep most of the weight on it and have good brakes.

I'll have to look on govplanet, i'm in the market for a 14k bumper pull so I can haul home some heavier old trucks to play with.
 

Woollaagarage

New member
Joined
Apr 17, 2013
Messages
1
Not bad. Post some pics when you put a real load on it, like a skid steer. You pretty much have a trailer to last you forever there. Very standard Dexter 7k axles/hubs, tires and excepting the sorta narrow deck, you can use it for everything. Add some stake pockets and you can even semi-enclose it.
 
OP
G

greenlizard

Well-known member
Joined
Dec 4, 2012
Messages
186
Location
Chapin, SC
This is actually a partnership with my son. He bought it, I then transformed it into a flatbed. The joke’s on him, though. His skidsteer is too wide to fit between the fenders. It is just right for my tractor.
 

driftpin

Well-known member
Joined
Dec 22, 2016
Messages
11,304
Location
Miami-Dade/Broward Co. Florida
Great job!

Some brainstorm ideas to add: I added some lighting to the ramps on my gooseneck so that the people behind can see better.

Also I take the Thompson's water seal to the wood every couple of years. So far its working very well. I'm 16 years into it so far. Fluid film whatever I can to keep rust at bay and there are spots where the original paint has flaked. Try to pay closest attention to the neck as I feel like that's the greatest stress.

Does your GVW require a backup battery and a deadman-cable if the trailer runs away (battery applies full voltage to the brakes to stop the trailer).

I zip-tied an old soup can to the neck with a washer silver-soldered to the end and that's where the male plug stores to keep it out of the rain. To add insult to that idea, I now have some irritating bug or spider that nests in the slots of my 7 pin male plug every year packing them with mud (??) and requiring it to be cleaned out every time I use the trailer....I mean to goto the junkyard someday and see if I can get a 7 pin female from a truck and use that as a dummy just to protect the contact blades.

A spare tire and a bottle jack that can lift the entire trailer + full load is a good thing to keep with you.

While I don't have any-need, nor any-space for a two-axle trailer, my little 4' X 10' single axle trailer with 13" wheels I use for yard debris and junk runs, and an occasional motorcycle move, I always carry a jack capable of lifting the loaded amount, and I carry at-least one spare tire, if I'm going more-than 50 miles-away, I carry two.
 
OP
G

greenlizard

Well-known member
Joined
Dec 4, 2012
Messages
186
Location
Chapin, SC
Great job!

Some brainstorm ideas to add: I added some lighting to the ramps on my gooseneck so that the people behind can see better.

Also I take the Thompson's water seal to the wood every couple of years. So far its working very well. I'm 16 years into it so far. Fluid film whatever I can to keep rust at bay and there are spots where the original paint has flaked. Try to pay closest attention to the neck as I feel like that's the greatest stress.

Does your GVW require a backup battery and a deadman-cable if the trailer runs away (battery applies full voltage to the brakes to stop the trailer).

I zip-tied an old soup can to the neck with a washer silver-soldered to the end and that's where the male plug stores to keep it out of the rain. To add insult to that idea, I now have some irritating bug or spider that nests in the slots of my 7 pin male plug every year packing them with mud (??) and requiring it to be cleaned out every time I use the trailer....I mean to goto the junkyard someday and see if I can get a 7 pin female from a truck and use that as a dummy just to protect the contact blades.

A spare tire and a bottle jack that can lift the entire trailer + full load is a good thing to keep with you.


Some great suggestions. I plan to coat the wood with Thompson’s after it drys for a couple of months. Also the idea of a dummy plug to keep creatures out of the 7 pin is one of those “Duh, why didn’t I think of that?” thoughts. I have to tape up all the exhaust openings in my boat motor every winter for that reason.

The GVWR of 12,000 lbs does require a battery breakaway if used for commercial purposes. I’m told it’s a really, really good idea to have such a system in any case. All larger boat trailers have a similar safety function. The existing ratty looking system with a dead battery didn’t fill me with confidence so I ordered a replacement. Will install it soon.

On the jack, I do have quite a bit of dual axle experience, though with boats. I used to carry a jack but have transitioned to a drive-on wedge that lifts one tire off the ground. Having changed trailer tires (three times!) on I-95 in Florida I have learned to be careful and to keep a close eye on tires and hubs. I do have a spare but am undecided where to place a mount. It may be just the truck bed.

The thumb update follows. A deep purple replaces the original sky blue. All in all I recommend skipping the experience.
 

Attachments

  • 0718AAF8-19CB-4065-ADB1-C54FA9EDF22E.jpg
    0718AAF8-19CB-4065-ADB1-C54FA9EDF22E.jpg
    43.2 KB · Views: 8
To avoid these ads, REGISTER NOW!
Top Bottom