To avoid these ads, REGISTER NOW!

Transforming Miter Saw Station

EastTXSierra

Member
Joined
Feb 4, 2011
Messages
17
This is my first post on the forum so I tried to make it a good one.
My work space is a small carport that isn't even large enough to park in so space is very limited. I am always trying to come up with ideas to cram more tools/storage/work space into it.

I came up with a design for a transforming miter saw station that gives me all 3.

Here it is...
It's a rolling cart that measures approx 24"W/22"L/38"H in the stored position which can be used as a small work table
miterstation1.jpg


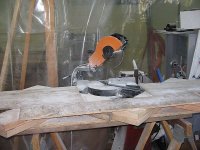
It can double as a 70"W/22"D work surface
miterstation2.jpg


And can triple as a miter saw station
miterstation3.jpg

miterstation4.jpg

The wings are supported by folding shelf brackets and are flush with the miter saw bed. The oval cutouts on the front give access to the carriage bolts that secure the saw to the platform and serve as a good place to put your pencils/squares/tape measures when cutting.

There is also a 16"W/20"L/5.5"D drawer for storing accessories and my orbital sander
miterstation5.jpg


For a little sawdust collection, I built a pair of folding supports that catch any dust kicked out the back of the saw. The dust then falls down into the empty space below the saw and can be vacuumed or swept out with a dustpan. It works pretty well for being so basic.
miterstation6.jpg


It was a pretty complicated engineering task and it wouldn't have turned out this good if it hadn't been for Google Sketchup. I also learned a few things while building it so I kind of want to build another one that would be even better.

Anyways, Thanks for lookin.
 
To avoid these ads, REGISTER NOW!

Hephaestus29

Well-known member
Joined
Mar 13, 2011
Messages
2,984
Location
Indianapolis
I'm not much of a woodworker, but I can appreciate the engineering in it. Nice build !
I like to watch This Old House you can get all kinds of ideas from that show.
 

ddawg16

Well-known member
Joined
Jul 11, 2008
Messages
21,005
Location
S. California
Good job....

How well does the back board keep the saw dust somewhat contained?

I did something similar a couple of years ago...I have a bit more room than you do so mine is fixed....the rip fence and top is in line with the radial arm saw....lets me cut some really long pieces....but....the saw dust mess behind is a btch to clean up....your setup looks like it would be easier...and you can roll it to your project.

IMG00123.jpg
 
OP
E

EastTXSierra

Member
Joined
Feb 4, 2011
Messages
17
Nice concept. I like it. Does the width of the cavity let the saw swing to a full 45 degree setting?

When planning the width of the deck, I wanted the sides to **** up to the saw so that the material would be supported along the full length. Unfortunately, the sides interfere with the saw's mounting holes, bevel lock handle and the miter gauge handle. But now that I think about it, I haven't used the miter gauge beyond 30 degrees since I built it. Anyways, that's a few of the reasons I want to build another one. I have a few design changes as well as material choices. I guess that's how it goes when you build something you've never seen before.

How well does the back board keep the saw dust somewhat contained?

I had my miter saw for at least a year before I built this and when I took the factory "dust collection bag" off the back of the saw, it was completely empty. So this works a lot better at preventing sawdust from being thrown out the back of the saw. I'm going to replace the back fabric panel with a clear shower curtain which should work better. I just used an old sheet when I built it to see if it would even work.
 

VolvoMan

Well-known member
Joined
Jul 6, 2012
Messages
88
Location
South Coast UK & Northern California (State Of Jef
That's a pretty cool project. I cheated and bought a Rigid "Saw Utility Vehicle" for my big radial arm saw, it's pretty cool though, folds down for storage, with nice big wheels for rough ground, and unfolds to a huge workstation with side support rollers about 6' from the blade each side. Course it helps I mostly use it outside so the dust just gets left on the ground to mulch.

I do however wish I had somewhere to tuck away pencils and tapes etc. I keep leaving them on the sawbench and can't find them under the sawdust.
 

Kev442

Well-known member
Joined
Jan 15, 2009
Messages
5,386
Location
Wi
Nice setup.
I tend to toss together my needs from scrap lumber willy-nilly. I decided I needed a miter saw stand this year, so last years table saw outfeed table became this years saw stand. So far, so good through hundreds of cuts.
 

Attachments

  • 2012-5-23 013c.jpg
    2012-5-23 013c.jpg
    62 KB · Views: 137

gahrajmahal

Well-known member
Joined
Dec 12, 2008
Messages
2,533
Location
Cincinnati, Ohio
Wow! I really like your design. I have a 12" miter saw that I keep on a lower shelf. I lug it outside and set it up on a plastic folding table. When cutting longer stock I put a couple of 2 x 4's on the table to support the stock, but I know when I am doing a big job the extra short pieces start to get stacked up and are in the way. If I could use your design I would improve the rotation access, as that is also the problem using my saw on the table. I think I would also like to add some fold down support legs to the "wings"as I would probably tip the whole thing over chucking 4 x 4's and other heavy stock up on your design. Your design would solve the heavy lugging problem. I often get my saw out without moving the car and am worried I will dent the car due to little clearance... Not from a small space, but too much **** in the garage.

Thanks for posting your project. I appreciate it.
 
Last edited:

rvr6000

Well-known member
Joined
Oct 3, 2010
Messages
1,072
Location
St. Paul, MN
I like the idea of the sawdust collection.....wish I would have thought of that for mine.

How do you like that Hitachi saw? I've had my Bosch slider for a few years now but I have to admit I'm really not all that impressed with it. Having a hell of a time keeping it square to the fence.
 
OP
E

EastTXSierra

Member
Joined
Feb 4, 2011
Messages
17
I like the idea of the sawdust collection.....wish I would have thought of that for mine.

How do you like that Hitachi saw? I've had my Bosch slider for a few years now but I have to admit I'm really not all that impressed with it. Having a hell of a time keeping it square to the fence.

The saw is nice. I chose Hitachi because my 4-1/2" angle grinder and my orbital sander are both Hitachi and theyre great. I also got it on sale for around $100. For my limited use it does great and I have no complaints about it. It sure beats the heck out of using a circ saw and speed square.

Nice Job! To help reduce the sawdust, I connected my shop vac to the miter saw where the bag goes. It gets a lot of the saw dust and its easy to remove the hose to vacuum up the rest.

Yeah I tried that, but for whatever reason, not much sawdust goes up the collection chute.
 

Squankum

Well-known member
Joined
Mar 28, 2011
Messages
7,719
Location
Southeast
The saw is nice. I chose Hitachi because my 4-1/2" angle grinder and my orbital sander are both Hitachi and theyre great. I also got it on sale for around $100. For my limited use it does great and I have no complaints about it. It sure beats the heck out of using a circ saw and speed square.

Yeah I tried that, but for whatever reason, not much sawdust goes up the collection chute.

Same here.:sad:
 
Last edited:

ckadams00

Well-known member
Joined
Sep 12, 2011
Messages
1,273
Location
Seattle, WA
Really like your design. That project has been one of my "needs" as I start to build some tool benches in my garage. Currently I just use my miter saw on the ground which *****. I'd like to build a similar cabinet that will double as an outfeed table for my cabinet saw. Couple of questions for you:

-is the drawer front in the first pictures just a panel? Looks like it is just there to close up the front when the saw is not is use? How does it attach?

-Can you list a few of your "improvements" you'd make if you built it again?

-How tricky it is to bolt the saw down? Does it require wrenches, etc? I'm going to try to design something that is quicker. . . or just bolt it to a board that fits into the top with a groove or something.

Thanks, nice design!
 
OP
E

EastTXSierra

Member
Joined
Feb 4, 2011
Messages
17
-is the drawer front in the first pictures just a panel? Looks like it is just there to close up the front when the saw is not is use? How does it attach?

-Can you list a few of your "improvements" you'd make if you built it again?

-How tricky it is to bolt the saw down? Does it require wrenches, etc? I'm going to try to design something that is quicker. . . or just bolt it to a board that fits into the top with a groove or something.

Thanks, nice design!

1. It's not really a drawer front. It's the back of the box that the saw sits on. The handle is there to help rotate the saw up into position.

2. Improvents I'd make: I'd start with better plywood. I'd make the cabinet more study with a face frame or something to help keep the sides from flexing. I'd make it a few inches larger in width and depth. That's just what comes to mind.

3. The saw is attached with carraige bolts. Fender washers and wing nuts secure it from the bottom. You access the wing nuts through the oval cutouts on the rotating platform.

Thanks for the compliments.
 
To avoid these ads, REGISTER NOW!

green.bubbly

Well-known member
Joined
Dec 14, 2008
Messages
2,156
Location
Lafayette, LA
Nicely done!

I may have missed it but how does the center table get lowered? I can not quite figure out how you convert it from a flat table top to a mitre stand?
 

wbrian63

Well-known member
Joined
Mar 31, 2010
Messages
843
Location
Houston, TX
Well done!

I take it the screw eyes seen in front are the pinning devices to keep the saw in position?

I made similar setup for my Dewalt 12" planer years ago, but the primary purpose was to allow me to store the assembly under my workbench. I made the top out of 3/4" mdf over a 2" wide x 3/4" poplar rim, so when upside down, the top made a dish. Not really usable for a worksurface.

If you do get around to redoing it, consider using MDF for the box. It's heavy as all get out, but it takes paint like a dream. I made the bottom of my planer stand out of a double-stack of 3/4" MDF - lots of extra ballast down low made it easy to attach casters and gave the stand lots of stability.

I use Confirmat screws I get from McFeeley's for all my 3/4" sheet-good work, even regular plywood. It takes a special drill bit to install these screws, but they grab like nothing else, and don't generally give you a problem with splitting the edge of the boards when joining face-to-edge (except in really crappy Home-Depot-sourced plywood...)
 

green.bubbly

Well-known member
Joined
Dec 14, 2008
Messages
2,156
Location
Lafayette, LA
Rotates on (2) 3/8" bolts. Locks in place with (2) 1/4" eye bolts


Ahh, I see. So when it is in the mitre saw position, it is just flipped upside down.

I would make one change. Instead of flipping that section for a flat top or mitre saw, I would leave it in the saw position. Replace your saw dust shield and with a flat top on hinges on the back. Then you could lift the top up and use it as the saw dust collection guide and close it back when you need a flat table top. That make sense?


In the pic below, make the piece outlined in red one assembly and have it hinged on the back. When needing to use the saw, simply lift that section up so that it stands up straight just like you current dust shield. You would need a rubber flap of some sort on the back to direct your dust where you need it to go.

Have the shelf that your saw sits on mounted in its correct position permanently.
 

Attachments

  • table.jpg
    table.jpg
    82.5 KB · Views: 68
OP
E

EastTXSierra

Member
Joined
Feb 4, 2011
Messages
17
Ahh, I see. So when it is in the mitre saw position, it is just flipped upside down.

I would make one change. Instead of flipping that section for a flat top or mitre saw, I would leave it in the saw position. Replace your saw dust shield and with a flat top on hinges on the back. Then you could lift the top up and use it as the saw dust collection guide and close it back when you need a flat table top. That make sense?


In the pic below, make the piece outlined in red one assembly and have it hinged on the back. When needing to use the saw, simply lift that section up so that it stands up straight just like you current dust shield. You would need a rubber flap of some sort on the back to direct your dust where you need it to go.

Have the shelf that your saw sits on mounted in its correct position permanently.

So youre saying have a fixed shelf the saw sits on with a hinged cover basically? So I would then have to pick the saw up and set it on the shelf? And where would you store the saw? The empty space below it?
 

green.bubbly

Well-known member
Joined
Dec 14, 2008
Messages
2,156
Location
Lafayette, LA
So youre saying have a fixed shelf the saw sits on with a hinged cover basically? So I would then have to pick the saw up and set it on the shelf? And where would you store the saw? The empty space below it?

Correct. The saw could still be stored in the empty space below although I am only now realizing that your saw stays attached even when in the storage position.
 
Last edited:

gahrajmahal

Well-known member
Joined
Dec 12, 2008
Messages
2,533
Location
Cincinnati, Ohio
Hi easttxsierra, I couldn't stop thinking of your awesome cabinet design and am going to build one for myself. One question, what manufacturer did you go with for your folding shelf bracket and would you use them again? Thanks.
 
Last edited:

John in OH

Well-known member
Joined
Jun 2, 2007
Messages
2,444
Location
SE Ohio & Eastern Virginia
Very clever design!! Nice work. And thanks for the extra explanation of rotation concept. I was befuddled as to how the front panel and saw shelf worked until you provided more info.
 
To avoid these ads, REGISTER NOW!
Top Bottom