To avoid these ads, REGISTER NOW!

Transmission Tunnel Restoration

brittf

ALLIANCE MEMBER
Joined
Jun 19, 2014
Messages
91
I'm installing a Ford Coyote engine and a Tremec T56 Magnum transmission into my 1967 Ford Mustang Fastback project. I read that with the proper clearancing on the transmission this combination would fit without needing to modify the tunnel. However, I was not able to get the angle necessary on the engine/transmission to properly match up with the rear end and have the u-joint angles cancel out. I'm running an independent rear end and I was told by my driveshaft vendor that getting the u-joint angles to cancel out was critical to a vibration free drivetrain. So, I cut out the top of the tunnel and raised it about 1.5 inches. This gives me about 3/4" clear over the top of the transmission. I was able to easily weld in strips of 18 ga. steel along the sides (with a little help from a body hammer). Now I need to do the four corners. These are more difficult due to the radiuses involved and the compound curves at the rear.


Passenger side, rear. Multiple radiuses and compound curves.


Drivers side, rear. Same issues.


In this photo you can see the front gaps to be filled. These should not be as difficult as the rear.

I've done a lot of fabricating in my life but not any metal shaping. I have limited tools and skills in this regard. I'm thinking of buy a set of handle dollies from Autobody Toolmart. These should give me a variable set of radiuses I can shape into the metal.


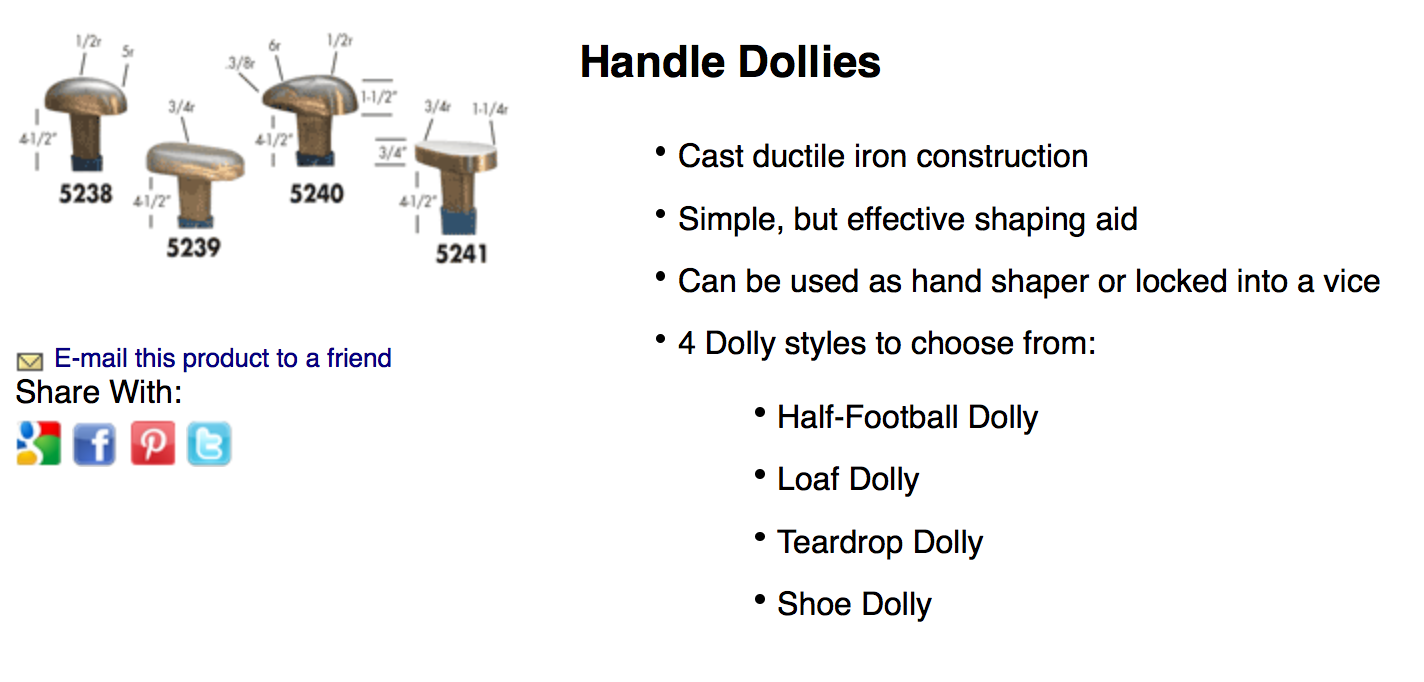
Handle dollies I'm thinking of buying.

Thoughts? Comments? Is there another approach? I've thought of purchasing a planishing hammer.

Thank you.


Britt :)
 
To avoid these ads, REGISTER NOW!

astroracer

Well-known member
Joined
Jun 22, 2005
Messages
3,001
Location
Mid_Michigan
Hi Britt, nice job on the rest of the build, looks good.
To fill your corners make some patterns out of heavy paper, like grocery bag or butchers paper. Take your time and make them fit like you want the steel pieces to fit, cutting and trimming and rolling it where needed. This will give a perfect flat pattern when it comes time to cut steel.
You don't need a planishing hammer to make these pieces. Look around your shop, do you have a welding bottle? Where is the cap? Use that as a form. I use an old bowling ball as a hammer form. Anything that has a shape that is close should be fair game. Even a piece of 4 x 4 with the shape ground into it will work.
Mark
 

North Run Grader

Well-known member
Joined
Jan 13, 2015
Messages
146
Location
Swan Hills, Alberta
Soft hammer into hard form, or hard hammer into soft form, will minimize any bad creasing when you are dishing. If you have a hitch ball with a round top they make an excellent dishing hammer/stake. If you have an old car inner tube, cut a length about 18 inches long, insert inside the leg of an old pair of jeans, fill with sand and use mechanics wire to twist the ends shup. It's not pretty, but will last long enough. Or if you have a long enough length of firewood to stand upright you can hammer, cut, or burn a dish the appropriate size.
 

LXCam

ALLIANCE MEMBER
Joined
Apr 23, 2013
Messages
19,153
Location
AZ
Those pieces don't need to be preformed. Cut you paper template like those guys suggested. Then tack your long inner piece up good. Then alternating top to bottom with single tacks, as you go just bend the metal around the curve. It'll fall into place from the heat of the weld and the curvature of the other tunnel pieces.
 

Stooge

Well-known member
Joined
Mar 24, 2013
Messages
3,533
Location
South Shore, MA
are you looking at getting into metal shaping/ doing more repairs on the horizon than just the transmission tunnel, or do you just need to do this and be done with it? rather than the set that you listed and you didn't mention what you have for hammers, I would be more inclined to buy one of those 6 or 7 piece hammer and dolly sets that include the general purpose, wedge and usually a heel dolly with a dinging, stretching and pick type hammers. Both Eastwood and Dagger Tools sell low to higher end kits depending on what fits your budget.
http://www.eastwood.com/autobody/hammers-dollies/kits.html?p=1

https://secure.wf-api.com/www.daggertools.com/3m5/body-hammers-dollies.html

I do have dollies similar to the 5239 and 5240 and I don't use them nearly as much as I thought I would and I usually end up using one of the general purpose or wedge dollies
 
To avoid these ads, REGISTER NOW!
OP
B

brittf

ALLIANCE MEMBER
Joined
Jun 19, 2014
Messages
91
I have not abandoned you. I apologize for taking so long to get back to the group but I've been involved in other tasks around the house and the shop.

I would like to thank everyone who took the time to read and respond to my original post. The information was very helpful. I'm now finally moving on to completing my tunnel restoration.


I was able to successfully patch the two front corners. I made a pattern using green masking tape, placed it on a piece of 18 ga. steel, cut it out and tacked it into place. I started at one end and gently massaged it into place making tack welds as I went. May not be the prettiest of work but I confess this is my first time taking on something this complicated.

Now on to the rear corners.


Taking the advice of those that responded I started with a plain brown paper bag.


I cut out a piece slightly larger than the hole I'm trying to patch.


Using magnets I held it in place making relief cuts where necessary so it would properly lay in place.


I traced the opening on the back side of the paper.


Here's the pattern after I traced it.


And cut out the pattern.


I laid the pattern on a piece of 18 ga. steel so I could see how much I needed to cut with my plasma cutter.


I placed the pattern on the piece of steel, held it in place with magnets and traced around it.


And, after the pattern was traced.


And, cut out the patch with my rotary shear.

Now the difficult part. I see two possible approaches from this point forward: 1) Tack the patch to the tunnel and massage it into place tacking as I go; or 2) Attempt to form the shape over whatever objects I have at my disposal in the shop and then weld into place.


Right now I'm thinking tack it in place along the bottom edge and the vertical area to the left and then slowly move it into place. My major concern is will the patch shrink/stretch enough where it's need to to fit properly. I'm thinking I could heat it with my oxygen-acetylene torch if necessary to make the metal move.

I would appreciate additional thoughts and comments.

Thank you.


Britt
 

LXCam

ALLIANCE MEMBER
Joined
Apr 23, 2013
Messages
19,153
Location
AZ
Just tack and bend as you go like I had suggested. I would however do your tacks closer together and you'll get a better radius. Also be prepared to trim it in place, you'll most likely grow a bit on one side if not two.
 

79cmc

Well-known member
Joined
Jul 28, 2013
Messages
100
Location
Camp Lejeune, North Carolina
I know nothing about fabricating, but what you're doing looks awesome (both the fabricating and the car build). You've either got a badass shop or work at a cool place.

I just installed a t56 into my 79 Monte Carlo, but I just used a big hammer and a cutoff wheel ha. No welding, lucky for me.

Keep up the good work!
 

rsanter

Well-known member
Joined
Dec 22, 2007
Messages
18,521
Location
visalia ca
Don't just tac and bend. Start to put some shape in it now before anything else.
You should be able to get a simple curve in the piece just by hand to match the larger forward curve. Then you can give the piece a little twist as needed to make the bottom and the front seams tight. Tac in place and then it will be way easier to get the last two seams to meet up as you need

Bob
 

astroracer

Well-known member
Joined
Jun 22, 2005
Messages
3,001
Location
Mid_Michigan
Just a suggestion. If you are planning to add shape before welding don't cut the piece out until you have the shape close. It's a lot easier to hold it by unimportant edges and the bigger piece is MUCH easier to manipulate.
Mark
 
OP
B

brittf

ALLIANCE MEMBER
Joined
Jun 19, 2014
Messages
91
Again, I want to thank everyone for their comments and suggestions. I decided to go with the tack in place, bend and tack as you go approach. I'm pretty satisfied with the results given that this is my first time. While not the correct attitude to take it will be covered by carpet and a console when I'm done.


Driver's side rear corner patch.


Passenger side rear corner patch.


View from the rear.

Now all I have to do is finish welding it up and grind down the welds. Not the most fun part of the job. :)

Again, my appreciation to everyone that took the time to read my post and comment.


Britt
 

R5P7Duster

Well-known member
Joined
Jan 16, 2016
Messages
58
Location
Menomonee Falls, WI
Looks awesome! Make sure you stitch weld it, so you don't get it hot and warp it. I'd hate to see all your hard work wasted.

Sent from my XT1254 using Tapatalk
 
To avoid these ads, REGISTER NOW!
Top Bottom