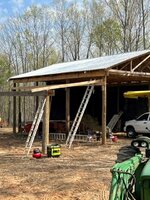
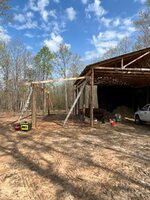
Hello everyone, I wanted to share my barn build the group to reflect what i would consider a true DIY building, including the trusses. There are a lot of thread about DIY/cheap barns, etc. (everyone wants to save money) this is my experience doing all the work myself and keeping this project as CHEAP as possible. I hope this thread helps others looking to do the same on a budget. I tried to take a bunch of pictures as well, I love pictures!
Disclaimer*** this thread is meant to share my experience with others. I wouldn't recommend anyone jumping in with both feet without knowing your limitations. While my education consists of an engineering degree, I am not an certified one. No plans were followed in the construction of this building, other than the trusses. My knowledge only allows me enough courage to make what I would consider an educated decision, whether they are right or wrong, you can debate.
Couple years ago I bought some undeveloped land, partially cleared (field) and partially wooded with the intention of building a home in a few years. In the meantime, I am growing hay for our animals and selling some to clients as well. The building will be used to house equipment as well as hay storage.
I started by renting an excavator ($2,200 for the week for a 30k lb machine) to clear the site for future home/barns, etc. setting the larger logs off to the side to take to the local mill who offers custom cut services. He charges $80 an hour to mill the logs however you please. It sounded high at first, but this guy gets a LOT done in a hour.
I knew roughly what size building I wanted, but a lot was dependent upon how many boards I got out of the lumber.
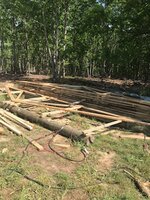
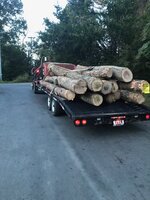
Here is one of the three loads I took to the mill on the first go-round. Two loads were about this size, the third came from a friends home that lost a very sizable Red Oak.

I work for the power company so I was able to get some old poles from work. After the owner at the mill concurred my "lumber wish list" was reasonable, given the logs i brought him, I decided on a 32 wide x 36 deep building. There will be a 16' lean-to off the left side, as well as a 16' lean-to off the back.
Poles being set - this took a full day. They are HEAVY. We slide the pole base near the holes and used my 75hp tractor with loader to scoop the end in the air, with a rope tied to the top going either way for balance. Lifted the pole in the air and they slide right in the holes. Added some concrete and braces and we left them be.
You will notice two of the poles for the lean to are removed in future photos since I changed my mind halfway through on dimensions, and forgot to move some of the stakes. Luckily after this photo was taken, my wonderful fiancé said "these posts don't look the same distance away." After I informed he she had no idea what she was talking about I ate my words and had to pull the incorrectly set poles.
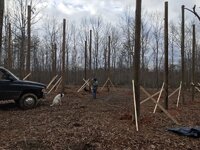
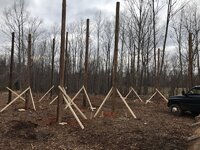
Clearing was done October 2020, poles sets Dec 2020. Now for the waiting game - the mill is slow getting orders out.
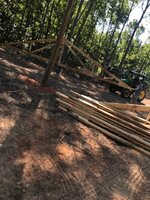
March 2021 - wood was finally ready! Out of the three loads of logs I brought, I got back two large trailer loads of misc sizes. Again, all per my request. The weird lengths were intentional with I cut the logs as I had a vision for the end product.
All of this lumber for was $600 having it custom cut.
(6) 2x12x20 oak - for lean to headers to span 18'
(12+) 2x12x12 oak - for headers between poles
lots of 2x6x18+ pine/poplar for trusses
lots of 2x4x18 pine for purlins
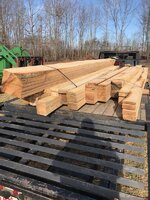


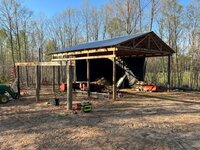
The poles for the main frame 32x36 portion of the barn are 12' spans, I wanted the barn to be high enough to stack three rounds bales. The ground falls a bit so the front is about 16' tall, the rear just under 18' (I will level things out a bit when I'm ready for gravel). I doubled up true 2x12 oak boards for the headers. There aren't many photos of the header board install as I did that mostly by myself - had to call in help for the headers towards the rear of the barn as the boards were too heavy and the tractor wouldn't reach that high.
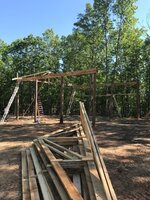
Single headers mostly up - as you can see poles were notched 4" to allow for width of two 2x12's
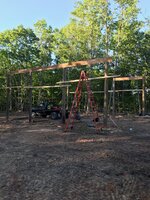
Doubled headers - drilled/through bolted to pole. Headers were then tied together with 3.5" ring shank nails and 4' timber lock style screws.

The website has limited me on photos for this post. The next we will get into building the trusses.
Disclaimer*** this thread is meant to share my experience with others. I wouldn't recommend anyone jumping in with both feet without knowing your limitations. While my education consists of an engineering degree, I am not an certified one. No plans were followed in the construction of this building, other than the trusses. My knowledge only allows me enough courage to make what I would consider an educated decision, whether they are right or wrong, you can debate.
Couple years ago I bought some undeveloped land, partially cleared (field) and partially wooded with the intention of building a home in a few years. In the meantime, I am growing hay for our animals and selling some to clients as well. The building will be used to house equipment as well as hay storage.
I started by renting an excavator ($2,200 for the week for a 30k lb machine) to clear the site for future home/barns, etc. setting the larger logs off to the side to take to the local mill who offers custom cut services. He charges $80 an hour to mill the logs however you please. It sounded high at first, but this guy gets a LOT done in a hour.
I knew roughly what size building I wanted, but a lot was dependent upon how many boards I got out of the lumber.
Here is one of the three loads I took to the mill on the first go-round. Two loads were about this size, the third came from a friends home that lost a very sizable Red Oak.
I work for the power company so I was able to get some old poles from work. After the owner at the mill concurred my "lumber wish list" was reasonable, given the logs i brought him, I decided on a 32 wide x 36 deep building. There will be a 16' lean-to off the left side, as well as a 16' lean-to off the back.
Poles being set - this took a full day. They are HEAVY. We slide the pole base near the holes and used my 75hp tractor with loader to scoop the end in the air, with a rope tied to the top going either way for balance. Lifted the pole in the air and they slide right in the holes. Added some concrete and braces and we left them be.
You will notice two of the poles for the lean to are removed in future photos since I changed my mind halfway through on dimensions, and forgot to move some of the stakes. Luckily after this photo was taken, my wonderful fiancé said "these posts don't look the same distance away." After I informed he she had no idea what she was talking about I ate my words and had to pull the incorrectly set poles.
Clearing was done October 2020, poles sets Dec 2020. Now for the waiting game - the mill is slow getting orders out.
March 2021 - wood was finally ready! Out of the three loads of logs I brought, I got back two large trailer loads of misc sizes. Again, all per my request. The weird lengths were intentional with I cut the logs as I had a vision for the end product.
All of this lumber for was $600 having it custom cut.
(6) 2x12x20 oak - for lean to headers to span 18'
(12+) 2x12x12 oak - for headers between poles
lots of 2x6x18+ pine/poplar for trusses
lots of 2x4x18 pine for purlins
The poles for the main frame 32x36 portion of the barn are 12' spans, I wanted the barn to be high enough to stack three rounds bales. The ground falls a bit so the front is about 16' tall, the rear just under 18' (I will level things out a bit when I'm ready for gravel). I doubled up true 2x12 oak boards for the headers. There aren't many photos of the header board install as I did that mostly by myself - had to call in help for the headers towards the rear of the barn as the boards were too heavy and the tractor wouldn't reach that high.
Single headers mostly up - as you can see poles were notched 4" to allow for width of two 2x12's
Doubled headers - drilled/through bolted to pole. Headers were then tied together with 3.5" ring shank nails and 4' timber lock style screws.
The website has limited me on photos for this post. The next we will get into building the trusses.
Last edited: