To avoid these ads, REGISTER NOW!

Truss Modification for Car Lift

lakeroadster

Well-known member
Joined
Jan 19, 2015
Messages
5,166
Location
Central Colorado
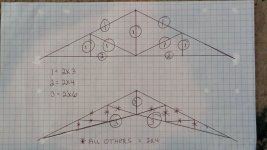
I ran a FEA on this today.

Hats off to LX-Markham. Slick design that is very strong..

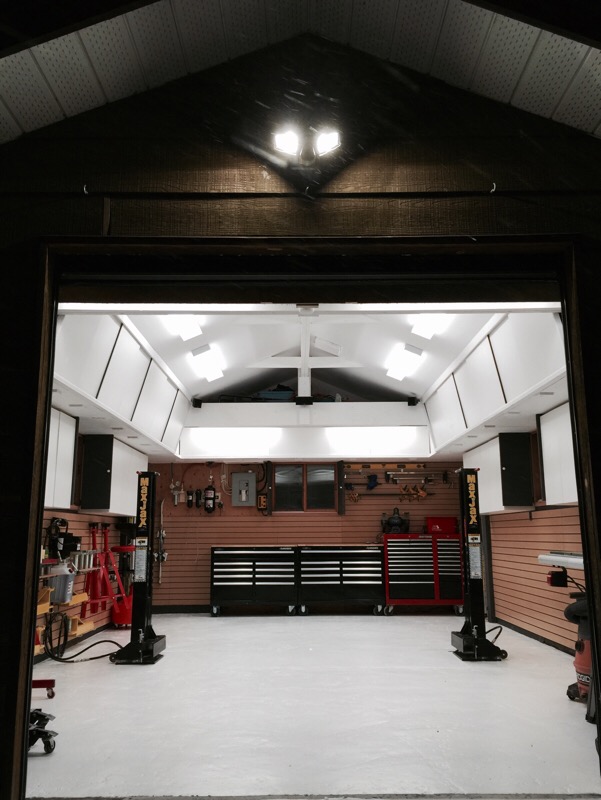
A little late to the discussion here, but I thought I would add what I did with my garage and the same problem.

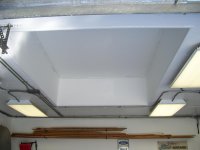
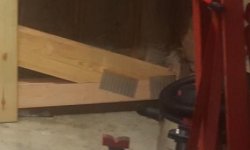
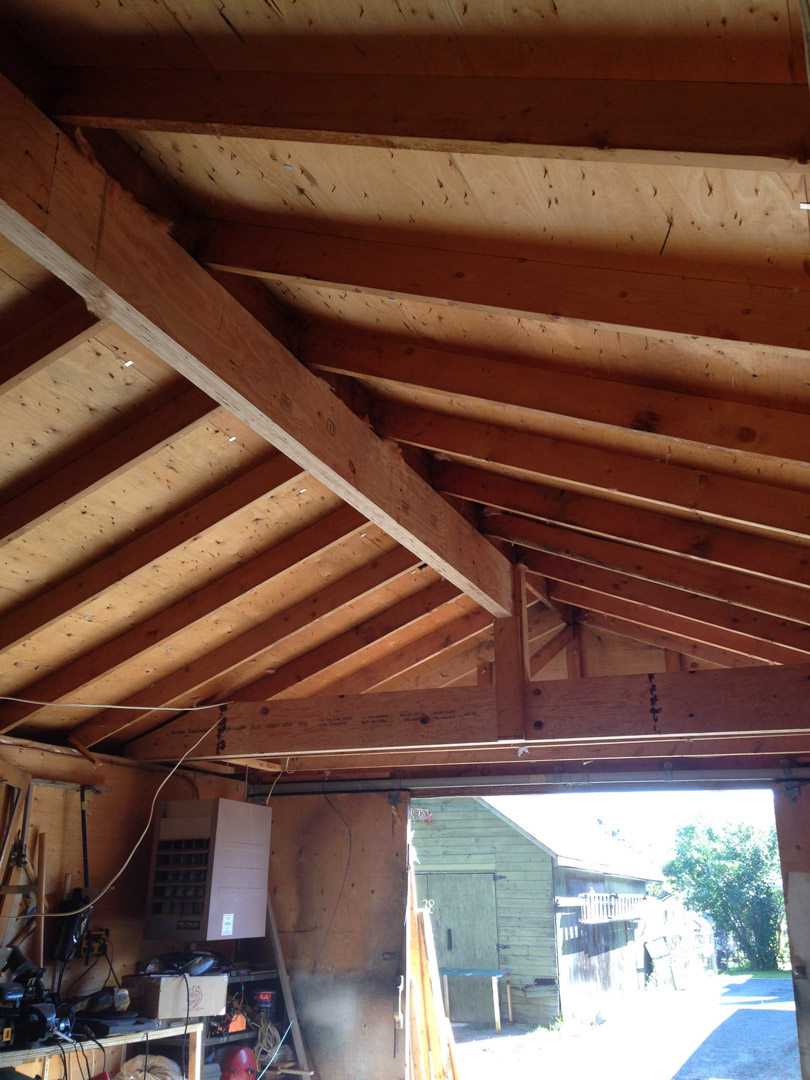
Added structural steel (2 horizontal beams and 2 end ties) around the base of the existing trusses, then sistered new rafters to the existing truss top chords. The steel frame prevents the rafter from spreading out. Then the truss bottom chords and diagonals were cut out. The whole thing was done in place without removing the roof.

garage-02_zpsc287a430.jpg


garage-05_zps00bf4806.jpg


IMG_1210_zpsd9eab511.jpg

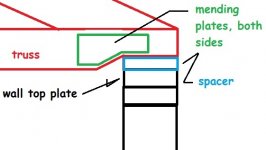
C250x23 (C10x15.3) fastened to the wall top plate.
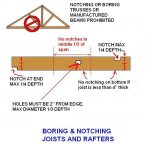
2"x8" rafters bearing on the wall top plate and notched into c-channel.

garage-08_zpsb849626a.jpg


The roof sheathing is still attached to the truss top chord. The new rafters pick up and support the truss panel points.

The channel is designed much like a wind girt: unsupported in the strong direction, and suspended from the rafters at every 4th one to prevent it from sagging.
 
To avoid these ads, REGISTER NOW!

R6 Racer

Well-known member
Joined
Feb 21, 2010
Messages
1,632
Location
Northern Ontario Canada
I have a simular issue. My plan is to change the bottom cord from a flat bottom to a scissor bottom. The bottom cord will have a 3/12 pitch & the roof has a 6/12 pitch. The trusses span 32 feet so I will end up with a peak that's 4 feet higher than before. I need 2 feet of additional height so with what I'm doing I get my 2 feet of height for a running 12 feet. Im doing 3 trusses that are at 24" centers giving me an 8' width.

I do not have the funds to get it engineered and I need to make sure that I have all the strength than I need. So I did a search for scissor trusses & have the basic design that seems to be the most common.

My plan is to attach 1/2" plywood to the existing trusses in the shape of the new scissor trusses. (filling the entire area the scissor will take up) Then I am going to stick frame the new scissor truss onto the plywood that will be attached to the existing truss. When the S.T. is completed I will cut off the bottom of the original flat bottom truss high enough so that I can attach a new bottom cord to whats left of the old flat bottom truss. effectively sandwiching the plywood between the old & new trusses & it will give me a double thick truss with full plywood rigidity.

This will give me all the structural integrity I need & then some. A small downside to this method is that it does leave me with an attic ventilation situation that isnt great but I do have a simple solution for it.

I wanted to have it done by now but I dont. So no pics. I might have to wait till spring now because snow is on the way here in a few days.
The attached drawing shows what I have now (top) & what I plan on putting in (bottom) with the 1/2" plywood between the 2.

There are many small details I have left out but thats the basics of my plan. if you want the details let me know.

Good Luck with yours.

Steve
 

Attachments

  • Garage Truss design.jpg
    Garage Truss design.jpg
    143.6 KB · Views: 180
OP
R

RyanEricW

Well-known member
Joined
Jan 14, 2012
Messages
85
So the design is a go. These came in today. Not sure wth I was thinking.....but gotta figure out a way to get these in place with the existing trusses in place.

The diagnal span is almost 7ft. The area I'm clearing out is 10ft wide. Brainstorming on how this is going to work. At least I was able to fit them in my garage

I already comverted over to a wall mount liftmaster garage door opener. Just gotta unhang the existing one, relocate some electric lines, and cut out the center beam in the 10' section to get started
 
Last edited:
OP
R

RyanEricW

Well-known member
Joined
Jan 14, 2012
Messages
85
Ill be using 2x6s for perlins with 2x8 or 2x10 joist hangers at each end. The hurricane ties are not designed to support load, but to resist uplift. So I'll be using hangers to secure the existing top chords to the perlins
 
OP
R

RyanEricW

Well-known member
Joined
Jan 14, 2012
Messages
85
I wanted to order the trusses in halves as suggested on here, but the engineer talked me out of it. Thinking about taking the truss plates out in the center and re-fastening the halves later somehow after they two ends are installed. Would make this job a million times easier.
 
OP
R

RyanEricW

Well-known member
Joined
Jan 14, 2012
Messages
85
Does your lift have casters? Seems like you could use your lift to erect the trusses.

Weight isn't so much a factor as the trusses are about 180lbs each. Two people navigating it are lifting about 90lbs each, not a huge deal.

The physical issue I have is my current trusses (where these have to be installed) are about 24" OC. There's not enough clearance to get them over both top plates.

Seems the easiest thing I can think of is just removing the gang nail plates and finding new heavier duty plates that I can screw in after both halves are up.

Any recommendations?
 

lakeroadster

Well-known member
Joined
Jan 19, 2015
Messages
5,166
Location
Central Colorado
I wouldn't alter the trusses by taking them apart. If you took the bottom chord off of one existing truss, adjacent to where the new truss goes, would that give you enough room to erect the new truss?
 
OP
R

RyanEricW

Well-known member
Joined
Jan 14, 2012
Messages
85
I wouldn't alter the trusses by taking them apart. If you took the bottom chord off of one existing truss, adjacent to where the new truss goes, would that give you enough room to erect the new truss?

No. As I stated in my last post, I would need to remove 3 or 4 trusses I plan on removing just to get the new trusses in, and that would leave 10' roof totally unsupported.

Right now, I have one heel of the truss sitting inside my 2x4 wall, the other end has an inch or two from hitting my garage door. Garage door sits a couple inches forward from wall as you would imagine. If I square it out right now, I'm at 6.5' wide, might be able to get that to 6' taking into the account the space of the garage door and to the wall, but that's still 3 trusses width and it would be tight.
 

lakeroadster

Well-known member
Joined
Jan 19, 2015
Messages
5,166
Location
Central Colorado
Previously we discussed no overhang on the new trusses, so I'm assuming that is how they were built.

Have you considered cutting out a portion of the wall top sill plate, creating a notch, to allow the new truss into position, and then replacing and reinforcing that area after the truss is located?

You can temporarily locate some cripple studs under the notch for strength.

So you set the one end of the new truss on the wall top sill plate. Lift the other end up through the notch and over into position.
 
OP
R

RyanEricW

Well-known member
Joined
Jan 14, 2012
Messages
85
Previously we discussed no overhang on the new trusses, so I'm assuming that is how they were built.

Have you considered cutting out a portion of the wall top sill plate, creating a notch, to allow the new truss into position, and then replacing and reinforcing that area after the truss is located?

You can temporarily locate some cripple studs under the notch for strength.

So you set the one end of the new truss on the wall top sill plate. Lift the other end up through the notch and over into position.

That's a good idea, you mean put 2x4 studs under each side of the area I would cut through completely, cut out just enough tonget it through, then re 2x4 the area for support? Or just notch without completely cutting through?
I just looked, I cannot do this on the garage door side as the torsion bar and spring assy is in the way. I could do this on the opposite side, but then I have to dismantle drywall, insulation, remove 2 large and long shelves full of liquids, etc.

As much as I hate to do it, installing in halves would be the least amount of work, and least amount of interference. If I do manageto get the truss in place, it may still get stuck on the nails for the roof sheathing. Going to be brainstorming a while before moving forward
 

larry4406

Well-known member
Joined
Jan 27, 2006
Messages
19,257
Location
Northern Virginia
I wanted to order the trusses in halves as suggested on here, but the engineer talked me out of it. Thinking about taking the truss plates out in the center and re-fastening the halves later somehow after they two ends are installed. Would make this job a million times easier.

Water under the bridge here but the engineer screwed you here as it was easier for him/her. A two piece truss with engineered splice is the ticket. I have done this.
 

lakeroadster

Well-known member
Joined
Jan 19, 2015
Messages
5,166
Location
Central Colorado
.That's a good idea, you mean put 2x4 studs under each side of the area I would cut through completely, cut out just enough to get it through, then re 2x4 the area for support? Or just notch without completely cutting through?

Yeah, notch whatever it takes to get it in place.

As for drywall, etc... I'd do that before disassembling those trusses.

. If I do manage to get the truss in place, it may still get stuck on the nails for the roof sheathing. Going to be brainstorming a while before moving forward

??? I thought the truss was designed to have the purlins below the top chord of the existing trusses? Therefore the top chord of the new trusses should be well below the sheathing and nails?

As previously discussed...

They will be "relatively easy" to install IF the truss designer takes the installation into consideration (see how big that "IF" is).

The new truss will not need the extensions for the overhang, and they could easily be designed to be 1-1/2" shorter in height from the upper chord to bottom chord at the wall top plate. This 1-1/2" would allow space to maneuver the truss into position. Once located sitting on the wall top plate then a 2 x 4 doubler could be placed under the truss.
 
Last edited:
OP
R

RyanEricW

Well-known member
Joined
Jan 14, 2012
Messages
85
Yeah, notch whatever it takes to get it in place.

As for drywall, etc... I'd do that before disassembling those trusses.


??? I thought the truss was designed to have the purlins below the top chord of the existing trusses? Therefore the top chord of the new trusses should be well below the sheathing and nails?

Heh, no the truss goes up all the way. Hence why I needed 2x10s. The 2x6s will be below the 2x4 top chords, so I needed the extra meat for the joist hangers

It's only clearanced about 1/2"
 
Last edited:

lakeroadster

Well-known member
Joined
Jan 19, 2015
Messages
5,166
Location
Central Colorado
Heh, no the truss goes up all the way. Hence why I needed 2x10s. The 2x6s will be below the 2x4 top chords, so I needed the extra meat for the joist hangers

Ugh. Ever seen a gable end truss used when there is an overhang? It's designed with less height than the other trusses, to allow a 2x6 to sit above the truss.

The designer could have used that concept, but made it a two ply truss, and designed it such that once you get it in place that it is lifted straight up and a wall top plate doubler would be slid under the truss.

All this makes it easier to get it into place.

:soapbox:
Sons-a-*******.... The truss designer is an imbecile... I've worked with guys like that for years... too many years. Designers that don't have the mechanical aptitude to change a tire on their own car.
:soapbox:
 
Last edited:
OP
R

RyanEricW

Well-known member
Joined
Jan 14, 2012
Messages
85
Ugh. Ever seen a gable end truss used when there is an overhang? It's designed with less height than the other trusses, to allow a 2x6 to sit above the truss.

The designer could have used that concept, but made it a two ply truss, and designed it such that once you get it in place that it is lifted straight up and a wall top plate doubler would be slid under the truss.

All this makes it easier to get it into place.

:soapbox:
Sons-a-*******.... The truss designer is an imbecile... I've worked with guys like that for years... too many years. Designers that don't have the mechanical aptitude to change a tire on their own car.
:soapbox:

Lol....I could always "gasp" table saw like 1" off my bottom chords. Problem solved. 2x5 bottom chords then lol
 

lakeroadster

Well-known member
Joined
Jan 19, 2015
Messages
5,166
Location
Central Colorado
Lol....I could always "gasp" table saw like 1" off my bottom chords. Problem solved. 2x5 bottom chords then lol

That is Verbotten! ... but since the lower chord of your new trusses span the entire bottom of the truss the notching makes more sense than disassembling trusses... :thumbup:
 

Attachments

  • truss mod.jpg
    truss mod.jpg
    34.1 KB · Views: 144
  • notching joists and rafters_w550.JPG
    notching joists and rafters_w550.JPG
    47.5 KB · Views: 163
  • Truss.jpg
    Truss.jpg
    10.4 KB · Views: 163
Last edited:
OP
R

RyanEricW

Well-known member
Joined
Jan 14, 2012
Messages
85
Heh, joking of course, would love to see someone attempt that with the mending plates in the way.

I'll be leaving them intact, and be using your method to get them over the wall plates.

Spoke to the engineer and confirmed they are 1" shorter height wise, and 2" shorter width wise. Would hire my contractor to come do this if he wasn't so busy right now, but getting a couple people over, this should be doable.

Keep you all updated

Thank you for the pictures, they are worth 1000 words
 

lakeroadster

Well-known member
Joined
Jan 19, 2015
Messages
5,166
Location
Central Colorado
Heh, joking of course, would love to see someone attempt that with the mending plates in the way.

I'll be leaving them intact, and be using your method to get them over the wall plates.

Spoke to the engineer and confirmed they are 1" shorter height wise, and 2" shorter width wise. Would hire my contractor to come do this if he wasn't so busy right now, but getting a couple people over, this should be doable.

Keep you all updated

Thank you for the pictures, they are worth 1000 words

A step in the right direction... but an inch less in height still raises the pucker factor quite high.

I'll rescind my evaluation of the truss designer.. once you tell us how well the install went. The devil is in the details, so to say :evil:

Be sure to take a lot of photo's for us.. Good luck and God Speed... :thumbup:

As for cutting the mending plates and the trusses... Take an angle grinder to the mending plates with a metal abrasive cut-off wheel (stinky job... do you smell something burning?). Then sacrifice a circular saw blade for the wood.
 
Last edited:
To avoid these ads, REGISTER NOW!
OP
R

RyanEricW

Well-known member
Joined
Jan 14, 2012
Messages
85
So first I had to remove the shelves and stuff. Added new shelving to accommodate the old stuff
 
Last edited:
OP
R

RyanEricW

Well-known member
Joined
Jan 14, 2012
Messages
85
Cut out the lateral support, removed electrical, etc. Cut top wall plate, notched the trusses 1" x 4" on one end only. It's tight as is, but wondering if I can get some shim under it or something to level it out.

Both installed, lift came into play and helped alot, and so did 3 other people lol
 
Last edited:
OP
R

RyanEricW

Well-known member
Joined
Jan 14, 2012
Messages
85
right side, same thing, cut a TON of stuff out, one was a board that was placed on the side of the top chord to hold a small piece of sheathing. Truss supports the edge now to that's not an issue.

This side got both of them in too. So now it's all the relatively easy stuff left/ Perlins and joist hangers
 
Last edited:

Denwood

Well-known member
Joined
Sep 22, 2014
Messages
4,190
Location
Thunder Bay, Ontario, Canada
So a bit late to this thread, but here are a few alternatives to new trusses. You were wise to let the truss designers manage the mods. I would not under any circumstances mess with a roof design without a truss designer or engineer's "stamp", regardless of permit.

You likely could have addressed the "lift" by gluing/screwing plywood to both sides of your existing truss in place following the engineered "new" profile, and then removing the "old" material as we did below to go from 8ft to 11ft. The trusses in figure 2 span 50 ft. These are stamped drawings, in a high snow load region. The truss design company I talked to first said new trusses would be required. Once the architect and structural engineer were tasked, the approved solution was completely done in place as below. Note that plywood, not OSB was spec'd!

truss.jpg


My third roof mod was for my small shop. This time a truss company spec'd the three beams required to remove 16 feet of truss ties. The beam installs were done in a few hours..very simple to install.

The first page of my build thread has all the details. I left a 4ft loft section at both ends so also installed cross beams to take the ridge load to side walls.

Truss ties at 8ft:
8ftceiling.jpg


Ridge and cross beams in. Later, two 2x6s were added at each cross beam/wall plate interface (four of them) to take load down to the concrete slab.
ridge3.jpg


Turned out pretty cool:

final1.jpg
 
Last edited:

coljar

Well-known member
Joined
Sep 26, 2010
Messages
6,243
Location
Belpre, Ohio
So a bit late to this thread, but here are a few alternatives to new trusses. You were wise to let the truss designers manage the mods. I would not under any circumstances mess with a roof design without a truss designer or engineer's "stamp", regardless of permit.

You likely could have addressed the "lift" by gluing/screwing plywood to both sides of your existing truss in place following the engineered "new" profile, and then removing the "old" material as we did below to go from 8ft to 11ft. The trusses in figure 2 span 50 ft. These are stamped drawings, in a high snow load region. The truss design company I talked to first said new trusses would be required. Once the architect and structural engineer were tasked, the approved solution was completely done in place as below. Note that plywood, not OSB was spec'd!

My third roof mod was for my small shop. This time a truss company spec'd the three beams required to remove 16 feet of truss ties. The beam installs were done in a few hours..very simple to install.

The first page of my build thread has all the details. I left a 4ft loft section at both ends so also installed cross beams to take the ridge load to side walls.

Truss ties at 8ft:


Ridge and cross beams in. Later, two 2x6s were added at each cross beam/wall plate interface (four of them) to take load down to the concrete slab.

Turned out pretty cool:

I don't have anything to add to the thread that hasn't already been said, but I wanted to say, I never get tired of looking at what a fantastic job you done on your garage Dennis.
 

sean Buick 76

Well-known member
Joined
May 7, 2013
Messages
3,221
Location
Edmonton Alberta
right side, same thing, cut a TON of stuff out, one was a board that was placed on the side of the top chord to hold a small piece of sheathing. Truss supports the edge now to that's not an issue.

This side got both of them in too. So now it's all the relatively easy stuff left/ Perlins and joist hangers

Great job on this, it is turning out really good! :thumbup:
 

lakeroadster

Well-known member
Joined
Jan 19, 2015
Messages
5,166
Location
Central Colorado
More progress... awesome.

Did the truss designer realize that both of the new trusses are supported by the existing garage door header?

This puts (2) concentrated load into the header, whereas previously it was spread out over the entire header.
 

Attachments

  • Header.jpg
    Header.jpg
    96.8 KB · Views: 160
  • header 2.jpg
    header 2.jpg
    112.2 KB · Views: 164
Last edited:

Denwood

Well-known member
Joined
Sep 22, 2014
Messages
4,190
Location
Thunder Bay, Ontario, Canada
I don't have anything to add to the thread that hasn't already been said, but I wanted to say, I never get tired of looking at what a fantastic job you done on your garage Dennis.

Col, thanks :) Ryan, didn't mean to hijack your thread...just throwing in ideas for folks reviewing this thread later.
 
OP
R

RyanEricW

Well-known member
Joined
Jan 14, 2012
Messages
85
More progress... awesome.

Did the truss designer realize that both of the new trusses are supported by the existing garage door header?

This puts (2) concentrated load into the header, whereas previously it was spread out over the entire header.

You actually brought up an interesting point I was going to ask the engineer monday. I thought it weird since the beginning that super thick header was capable of holding the trusses from the beginning.

I showed the engineer pictures and met with a few structural contractors and everyone said this was an easy job. The garage header was never even brought up into conversation.

I have 3 full trusses I'm removing from the header so that'll reduce the weight on the header in the middle. However in the long run there will be more weight centralized at 2 main points as you stated.

Each truss weighs 180lbs, so that's 90lbs added to each contact area, but theb doubled. So 180lbs added on each side.

That's not taking into account the 2x6s and hardware needed to mount these.

I'll be asking again Monday, as yes it's alot of weight, but the header is also super thick at least 6 2x4s. The new trusses are only 2' from the nearest vertical support on the right, and 4' on the left
 

Dr Stan

Well-known member
Joined
Nov 17, 2016
Messages
496
Location
Owensboro, KY
I'm dealing with virtually the same problem. When I built my 24 X 48 ft shop I only went with a 8' ceiling. I knew at the time that was a mistake, but went with it anyways to save $. I've sense acquired a '66 Plymouth Satellite convertible with a 383 HO and I'm more than tired of crawling under vehicles.

Recently purchased a Nussabaum (sp?) lift so I can the Plymouth and other vehicles and walk under them.

My solution; I'm raising the roof 4'. I'll also replace the 7/16 sheeting with metal clips with 3/4" tongue & groove. It was scheduled for this Fall, but my blasted foot had other plans. I'll reuse the trusses and not say anything to Building & Zoning as I'm not changing the foot print at all.

This will also allow me to build & install a traverse crane over 2/3rds of the shop and get my forklift into the shop. :)

Ya know hind sight is 20/20.

On edit: The idea of replacing the existing trusses with ones of scissor design sparked my interest. However the trusses alone would be almost $800 + delivery and I'd have to forgo the idea of a traverse crane. On top of that I would not be able to use the lift at its fullest height.
 
Last edited:

lakeroadster

Well-known member
Joined
Jan 19, 2015
Messages
5,166
Location
Central Colorado
You actually brought up an interesting point I was going to ask the engineer monday. .....

The roofing / support component weights are negligible, compared to the snow loads, wind loads, etc.

May not even be an issue... but it's prudent to have him run the numbers and have them on hand in case it's ever questioned.

Better safe than sorry.

The engineer will need to know the header configuration. Sometimes these headers will actually have a piece of steel in the center, with lumber on both sides. If you see that the header is bolted together, and not nailed or screwed, investigate further.

Curious... how wide is your garage door and what is the span of your trusses?
 
Last edited:

manwithtools

ALLIANCE MEMBER
Joined
Aug 24, 2015
Messages
13,857
Location
Lebanon, TN
Just curious, did the truss "engineer" (designer) instruct you to cut through the double top plate?
 
Last edited:

manwithtools

ALLIANCE MEMBER
Joined
Aug 24, 2015
Messages
13,857
Location
Lebanon, TN
I hope the wall the notch is against the house or other framed structure, or you just built a really nice hinge in that wall....

Top plates do more than support vertical loads as I'm sure you are aware.
 

manwithtools

ALLIANCE MEMBER
Joined
Aug 24, 2015
Messages
13,857
Location
Lebanon, TN
Step two is ....... replacing and reinforcing that area after the truss is located....

To do that properly requires jacking up multiple trusses to remove the weight from the top plate, then replacing a significant portion of the top plates with sufficient overlap with existing. Further, the original exterior sheathing is secured to those plates creating a shear plane, something he won't be able to duplicate without access to the exterior sheathing from outside. Maybe it's doable, maybe it's not, but a lot of work regardless. I think the overlap between double top plate joints are 48" minimum by code.

You guy's seem to be very trusting of each others understanding of all the factors in play, wish you all the best.
 
OP
R

RyanEricW

Well-known member
Joined
Jan 14, 2012
Messages
85
To do that properly requires jacking up multiple trusses to remove the weight from the top plate, then replacing a significant portion of the top plates with sufficient overlap with existing. Further, the original exterior sheathing is secured to those plates creating a shear plane, something he won't be able to duplicate without access to the exterior sheathing from outside. Maybe it's doable, maybe it's not, but a lot of work regardless. I think the overlap between double top plate joints are 48" minimum by code.

You guy's seem to be very trusting of each others understanding of all the factors in play, wish you all the best.

I reinforced both sides enough to get me by until next weekend. When I cut them, I literally saw no deflection.

I have access to the top wall plate from outside via my soffit. I'm going to reinforce both sides with steel plates, and top/bottom with wood. It'll be about 5 2x4s under the entire area for each notch, secured back to the top wall plate and foundation board.

Today I focused on getting all of my electricity hooked up back and outlets done. Added a motion sensor light to the side of my garage for now so the GF isn't scared to throw out the trash anymore lol
 
OP
R

RyanEricW

Well-known member
Joined
Jan 14, 2012
Messages
85
Step two is ...

You'd be proud, I'm only using 1 extension cord now (that's just so my lift motor can reach the outlet box) 2' away lol

Relocated all of the outlet boxes closer to the lights, so I didn't have to run any cords. I have no choice with the lift motor, as the cord that comes with it is only 1'...lol
 
Last edited:

buzz4041

Well-known member
Joined
Sep 13, 2011
Messages
730
Location
South Texas
Kind of like this maybe.
 

Attachments

  • Shop lift area.jpg
    Shop lift area.jpg
    134.6 KB · Views: 146
  • Shop lift area 2.jpg
    Shop lift area 2.jpg
    88.3 KB · Views: 119
  • Shop lift area 3.jpg
    Shop lift area 3.jpg
    95 KB · Views: 100
OP
R

RyanEricW

Well-known member
Joined
Jan 14, 2012
Messages
85
Engineer said that there's no worry about the garage door header as after all the webbing is cut out and perlins installed, there isnt going to be any more weight than there was originally. (Or at least it's a negligible difference)

The weight being centralized to 2 points isn't an issue either

He did say that placing a couple studs under the 2 ply trusses would be recommended since the top plate was clearanced. Planned on that

Everything is still looking good gents
 
To avoid these ads, REGISTER NOW!
Top Bottom