To avoid these ads, REGISTER NOW!

Trying to fix up my vise

wrench3047

Active member
Joined
Nov 25, 2011
Messages
31
02dba3df18304c5a04c33d0ba7e6fcf1.jpg

559c36ac8638fe13b47b7cf58278117d.jpg


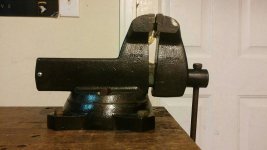
Trying to spruce this old vise up. Thought it was going to be easy paint and bolt it down. When I putting it back together I notice the jaws aren't lining backup. I've seen there are some guys on here that are pretty knowledgeable on vises. It may have been over tighted or dropped and tweaked the way the square pipe sits in the movable jaw. Is this pipe just pressed in? How could this be fixed?
5bf8cf8ff76b8a748bb7791dd7f37d6f.jpg

Thanks in advance.
 
Last edited:
To avoid these ads, REGISTER NOW!

drivesitfar

Well-known member
Joined
Oct 23, 2013
Messages
36,003
Location
Pacific Northwest
Wrench: you might want to go in and edit your post and maybe put a space in between the picture links so they show up on top of each other and not side by side. or maybe another member knows the fix if that doesn't work.

in any case it looks like your slide is bent from somebody hitting the vise with a BFH. fairly common abuse and if you have a press you might be able to take out the bend. some guys use a little heat, but it's not 100% it won't break when bending it back.

good luck
 
OP
W

wrench3047

Active member
Joined
Nov 25, 2011
Messages
31
I'd considered that. I don't have a press to pop it out, I have limited access to one though. If a couple hour fix would work that's what I was looking for. If its bound to tweak again after fixing it I'll do the quick fix.

Sent from my LG-D800 using Tapatalk
 

drivesitfar

Well-known member
Joined
Oct 23, 2013
Messages
36,003
Location
Pacific Northwest
Wrench: more of the vise guys look at the Vise repair 101 thread so post one picture per post if you can't figure out how to align your pictures on top of each other. that way you might hear a few more suggestions from the guys that repair their vises to sometimes be better than new.

the link is in my sig line under my posts

good luck
 
OP
W

wrench3047

Active member
Joined
Nov 25, 2011
Messages
31
Thanks, I'm on my phone. I can't navigate very well on the app

Sent from my LG-D800 using Tapatalk
 

2oolhound

Well-known member
Joined
Dec 18, 2010
Messages
5,918
Location
BC Canada
It looks like standard 2" od tubing which is readily available in 1/4" wall. I'm betting it was sweated into the dynamic jaw. You would have to heat in the oven to 300' then using a press and ice on the tube, press the tube out and replace it or turn it around. It should be a standard size but you should confirm that before working on it.

I'd also measure the od of the screw because you could probably beef up the tube with a short section of the next size down inserted inside the front section and still have room for the screw.

Of coarse all this trouble would only be worthwhile if you were looking for some entertainment. ducksface's sugestion or perhaps finding another vise may be more practical.
 
To avoid these ads, REGISTER NOW!
OP
W

wrench3047

Active member
Joined
Nov 25, 2011
Messages
31
Lately I'm not looking for efficient or fast. I'm enjoying learning, experimenting, practicing skills/ entertainment.
I will see if I can get time on the press, probably end up flipping the tube.
There appears to be about .25" + around the screw/nut assembly to beef it up.
Anyone in the Clarksville, TN area that know of a metal supplier that might have .5" wall square 2" tube?

Sent from my LG-D800 using Tapatalk
 

2oolhound

Well-known member
Joined
Dec 18, 2010
Messages
5,918
Location
BC Canada
Lately I'm not looking for efficient or fast. I'm enjoying learning, experimenting, practicing skills/ entertainment.

That's what many of us here do too. Make it your own. Beats watching tv.

Standard tubing jumps to 3/8" wall availability at 3" square but 1/2" wall is $pecial. I've seen some pretty thick trailer hitches though so you could check some trailer outfitters. If you file or grind the inner seam the next size down will fit tightly inside. You could drill some holes in the top and bottom of the outer tube and weld through to the inner tube and at the end to join them more solidly.
 
To avoid these ads, REGISTER NOW!
Top Bottom