To avoid these ads, REGISTER NOW!

Above 1200 Sq/FT TX hobby shop 40x40

Wokspaces above 1200 squarefeet.

jam0o0

Well-known member
Joined
Jul 14, 2009
Messages
244
Location
Katy, TX
This is my second shot at the right shop for me. close to finished picture:
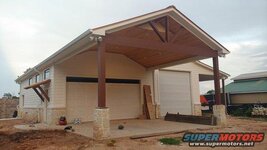
0828211942.jpg


First shop thread link:

The last shop was 25x40x12 with 9x9 doors on the short wall. All 2x6 stick framed and insulated with harde siding and big windows. My main complaints were not being able to get my trailer into the 9x9 doors and just in general not having enough space for 2 project vehicles, machine shop/fab shop area, and storage.

During the Covid BS I got to work from home for a few weeks. That taste of life without a 2-3 hr round trip commute sold my wife and I on leaving our perfect house and perfect neighborhood to find something closer to the part of town my career should stay in. Having kids really reset my priorities about being home more.


I had to cut down 2 nice oak trees. With 20 something trees on the property that was the best I could do.


The soil out here is really weird grey clay. The entire yard acts like a kids jump house when the dozer was trying to clear the pad. The ground would sink 6-8 inches and then go back up as the dozer went by. We ended up putting some better fill on top. When that didn’t help we added a pallet or 2 of lime and mixed it all in as well as we could a few feet down. The result firmed up really well.
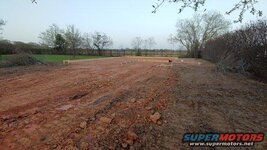
0323211928_hdr.jpg

the finished height of the shop is 24-30 inches above ground level. We are close to a bayou, and wile not technically in a flood plane, everyone in Houston who doesn't build up is just asking for their buildings to get water in them. IMO .
 
Last edited:
To avoid these ads, REGISTER NOW!
OP
J

jam0o0

Well-known member
Joined
Jul 14, 2009
Messages
244
Location
Katy, TX
I'm posting this after most of the construction is done. So we get a bunch of progress and them nothing since I'm very busy with work till around Christmas.

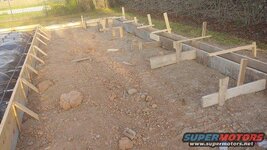
Here is the foundation before pouring. we decided on post tension since that's what the engineer and crew are used to doing, and added a thick area and rebar round where the lift will go. Also you can see the footer for the outside parking spot. That will be filled in with gravel when the rest of the construction is done.

0328211856.jpg
0328211856a.jpg
0328211856b.jpg
0328211856c.jpg
 
Last edited:
OP
J

jam0o0

Well-known member
Joined
Jul 14, 2009
Messages
244
Location
Katy, TX
jolly green - I love that you saved that piece of history.

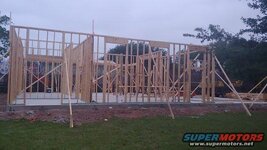
After those last pictures I left for a few weeks and came back to, framing. We had a miscommunication with the concrete guys. They got the garage door entry detail wrong. And they didn't brush finish the front outdoor area. If anyone knows a way to add texture to the already hard concrete let me know. No coatings that I know of will hold up the type of work that i do. (welding, heavy fab, plasma cutter, moving machine tools around, steel jack stands, sticky racing tires)

specs:
40x40 enclosed stick built with 2.6 walls.
12x40 lean to covered parking on the right wall
25x25 covered porch/working space in front of left bay

Left bay has an 18x9 door. Right bay has a 12x12 door. Left bay has 12ft ceilings. Right bay has 14ft ceilings.

The back 12 foot is walled off from the main indoor area. The left 12 ft is a yard tool storage area with a small 6x5 rollup door out the left side.

The rest of the 28 foot area is the machine shop and clean storage area.

I have a floor plan around here somewhere

0412211945.jpg

0412211952.jpg

We ended up with 2 or 3 full semis of wood for the hole thing.
 
OP
J

jam0o0

Well-known member
Joined
Jul 14, 2009
Messages
244
Location
Katy, TX
found my foundation plan and hopefully that sheds some light on layout
shop-foundation-drawing-clip-j.jpg
foundation beams are 12x30" with cables top and bottom.
5" foundation surface everywhere.

more framing:
0417211859.jpg
You can see the switch from what the contractor made up on the end of the porch above and what the drawing specified below. It's harder to see but they also placed the header for the lean to at the wrong height originally.

0427211920_hdr.jpg
house wrap was not my first choice. but again we picked what the guys were used to using.

0421211730_hdr.jpg
 
Last edited:
To avoid these ads, REGISTER NOW!
OP
J

jam0o0

Well-known member
Joined
Jul 14, 2009
Messages
244
Location
Katy, TX
so the framing and roof went up fast. it's hard to tell in a bunch of the pictures but we chose copper for the roof color. everyone else in the neighborhood has a bright roof on their buildings so we played along. I ended up being really happy with the bold color, with how bland the rest of the walls are.
0512211927_hdr.jpg

I wanted to do something different for texas with the air conditioning. Normally we have one central unit in the attic with a octopus mess of flex duct running everywhere. Every house i have ever lived in has had this style of ducting. I wanted as little surface area as possible in the duct system and to get the usually leaky unit out of the 140* attic. its only a shop, one run with vents on it in the shop space would have been fine with me. the unit is sitting on a shelf in the machine room and the ducts should be in the corner of the attic floor where the 12ft and 14ft ceiling meet, with full r30 insulation between the ducts and the hot attic. again we had a listening problem with the CG and got duct board instead of metal ducts. and they forgot about the insulation around them. and added 6 more vent locations. doubling the surface area of flex ducting. and doubling the amount of duct tape that will fall off soon.
0519211932.jpg

we are going to have a sink in this shop. having to go outside in the rain if i wanted to wash something got old fast in the last shop. here is our little one inspecting the plumbing ruff in.
0612211004.jpg

I guess I forgot to save a picture of the electrical or insulation. everything 120v is 12gauge, quad outlets every 8ft on all walls. plus up high on the front walls for wall mount openers. 240v 50amp plugs on front wall, machine shop room for phase converter and lawn room for air compressor.
 
OP
J

jam0o0

Well-known member
Joined
Jul 14, 2009
Messages
244
Location
Katy, TX
0612211025.jpg

little guy checking the electrical box before power was run to the building.

here are the plywood walls.

0612211022_hdr.jpg

0612211022a_hdr.jpg

I had dry wall in the last shop and after 5 years I had really gotten tired of bumping things into the wall and having stuff pull out of the wall. I got a good deal on the plywood from my neighbor. the ply is all left over from protecting the floor of a commercial build wile it was getting the inside repainted. Just don't look at the in the wall side.

We did drywall on the ceiling cause I wanted to try to help with keeping the shop brighter. I'm not sure we did enough and am already thinking about painting the ply wood. Up high at least.


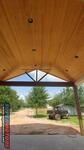
this was the contractors idea to do the tongue and groove under the porch. I'm still not sold on the weird ceiling layout but man i really think the wood looks good.
0612211023_hdr.jpg
 
OP
J

jam0o0

Well-known member
Joined
Jul 14, 2009
Messages
244
Location
Katy, TX
All of the construction happened on a compressed time line. We were trying to get the new shop built so i could get all my junk out of the old shop so we could get the house on the market. With the walls done and the electrical finished we were ready to move. The doors were and are still an issue. We ordered the insulated garage doors in May. We got a mid Oct delivery date. Since I wasn't going to miss out on the summer sales season for houses we decided to get temporary doors. We found a local guy with a used 18' wide door for sale. It was the wrong height but close enough to keep the rain out. We also got a commercial 12x12 roll up new. I got assurances we could sell it when the real stuff showed up. These might have been the best extra spending we did. It allowed me to get the old house on the market in July and get out of it at the peak of the market.

I'm still looking for the rest of the first day of moving stuff pictures. I had palletized all the parts and small tools that i could. I filled the 3 car house garage and all of the available floor space in the old shop. The day started out bad with a buddies truck breaking down on the freeway 5 miles from the old shop with his trailer. We rescued him and got to work.

58906.jpg

58904.jpg

We worked all day but we loaded all 3 of my buddies' 18ft car haulers and one short flat bed truck. plus my trailer for the forklift. By this time we had gotten the broken truck running again, kinda. drove in the RAIN to the new place where the dirt drive was a swamp. we loaded the flatbed and his trailer worth of pallets into the new house garage. My wife was not happy about losing her garage for who knows how long. The other two guys let me keep their trailers. One of my new neighbors let me barrow some tarps to cover everything outside. And I had to return the forklift. Zero pallets made it into the new shop.


Fast forward 2 weeks for the rain to stop and everything to dry out. and i moved a few of the larger things that were stuck behind other things. The kids love playing in the Model A body.
0801211941a_hdr.jpg

Over the next 2months I moved everything off the trailers into the shop with a pallet jack. The GC moved the pallets from the house garage into the new shop for me. I also broke down, moved, and set back up all the shelving and pallet racking by hand.

then in Oct we accepted an offer on the old house/shop. I had a deadline to get everything out. This time I rented a fork lift again. But i got one with long forks and hired a hot shot. I had everything on pallets and ready to go on saterday and used sunday to load, move and unload.

1031211033a.jpg

We filled every inch of that 40 foot trailer, and the last pallet of plate steel still hung off a foot or so. This time the weather was clear and We had no significant issues.
 

zmotorsports

ALLIANCE MEMBER
Joined
Oct 20, 2009
Messages
21,575
Location
Northern Utah
That's a good looking shop from the outside. Congratulations on the new home and shop. Looking forward to seeing the inside come together with layout and organization.

Your previous shop sounds similar to my old shop where it basically turned into a 1-car shop after acquiring more machining and fabrication equipment. My old shop was 34x34 and could barely fit one vehicle in it to work on. You will love having more space.
 
To avoid these ads, REGISTER NOW!
Top Bottom