
You are using an out of date browser. It may not display this or other websites correctly.
You should upgrade or use an alternative browser.
You should upgrade or use an alternative browser.
Tx Saltbox update
- Thread starter TheShrine
- Start date
04silvy
Junior Member
Join Date: Sep 2011
Posts: 2
Default Question for you
I first want to start out by saying that i love the garage. Your garage truly is amazing and still very work friendly. I have a question for you about your garage door with the angled tracks. I have a silmilar setup in my garage to clear my 4 post lift. I just cut the tracks on mine to a 45 and cleared perfect. My door originally came with extension springs and i just stretched them a little farther and used a pair of channel locks to keep the door up when pulling in and out. (I dont use this door every day). I was given a torsion sping off of a door that was the same size and similar weight. I tried to tighten the spring back up to where it was but it broke in the process. Now im on the hunt for a new spring. I read in another post that you just added a second spring to your setup and it worked fine. Does the door stay up by itself? How easy does it open? Also how did you know what spring to add? Did you just add the same spring you already had or add a lighter one. I looked at one of the pictures on your "finishing of the shrine" and i couldnt tell if there was one or two springs there. Sorry for the long winded Pm but im just a little lost on how to figure out what spring or springs i need. I can take all the measurements and weigh the door just need to know who to look to for parts.
04silvy, look at the pictures below. Your question has been asked before. It was beginners luck. I picked the rails off the shelf based on my roof's angle and asked for a spring double the strength/size of the one my door called for. I installed it, adjusted the tension to hold door in the full up position and that was it. I have openers and have no need to use clamps or other assistance to maintain a full open position.


You can see from these pics that a full open position is easily maintained.


I hope this helps. Let me know if I can be of further assistance....and thanks for the compliments....and yes, it is very "work friendly" for what I do.
Junior Member
Join Date: Sep 2011
Posts: 2
Default Question for you
I first want to start out by saying that i love the garage. Your garage truly is amazing and still very work friendly. I have a question for you about your garage door with the angled tracks. I have a silmilar setup in my garage to clear my 4 post lift. I just cut the tracks on mine to a 45 and cleared perfect. My door originally came with extension springs and i just stretched them a little farther and used a pair of channel locks to keep the door up when pulling in and out. (I dont use this door every day). I was given a torsion sping off of a door that was the same size and similar weight. I tried to tighten the spring back up to where it was but it broke in the process. Now im on the hunt for a new spring. I read in another post that you just added a second spring to your setup and it worked fine. Does the door stay up by itself? How easy does it open? Also how did you know what spring to add? Did you just add the same spring you already had or add a lighter one. I looked at one of the pictures on your "finishing of the shrine" and i couldnt tell if there was one or two springs there. Sorry for the long winded Pm but im just a little lost on how to figure out what spring or springs i need. I can take all the measurements and weigh the door just need to know who to look to for parts.
04silvy, look at the pictures below. Your question has been asked before. It was beginners luck. I picked the rails off the shelf based on my roof's angle and asked for a spring double the strength/size of the one my door called for. I installed it, adjusted the tension to hold door in the full up position and that was it. I have openers and have no need to use clamps or other assistance to maintain a full open position.
You can see from these pics that a full open position is easily maintained.
I hope this helps. Let me know if I can be of further assistance....and thanks for the compliments....and yes, it is very "work friendly" for what I do.
Thank you so much for your very detailed reply. I had thought about posting my question to this thread just in case others needed help with a similar issue...but didnt want to "muck" up your thread. I will probably just end up doing the same and get a much stronger spring and adjust it from there. I plan on running an opener as well.
One last question for you. If you didnt have the opener would the door stay up or close all of the way? Or does your opener do some of the work? With the amount that I will use mine I'm sure i will be fine if there is a litte extra stress on the opener when going up or down. Thanks again and have a good one.
One last question for you. If you didnt have the opener would the door stay up or close all of the way? Or does your opener do some of the work? With the amount that I will use mine I'm sure i will be fine if there is a litte extra stress on the opener when going up or down. Thanks again and have a good one.
Thank you so much for your very detailed reply. I had thought about posting my question to this thread just in case others needed help with a similar issue...but didnt want to "muck" up your thread. I will probably just end up doing the same and get a much stronger spring and adjust it from there. I plan on running an opener as well.
One last question for you. If you didnt have the opener would the door stay up or close all of the way? Or does your opener do some of the work? With the amount that I will use mine I'm sure i will be fine if there is a litte extra stress on the opener when going up or down. Thanks again and have a good one.
Again, "beginners luck", both my doors will open with a simple tug and remain fully open without the assistance of the opener.
I'll go out today and take specific pics of the 2 different springs I used so you'll have a reference. It's been a couple of years and remember no great difficulty BUT the procedure is dangerous and can cause some pain if care isn't taken!! Be extremely careful!
vr4joe
Well-known member
Wow, just wow! Read your whole thread and I am amazed at your garage setup. Its the perfect size and very efficient. This is very inspiring to me ( 26 year old car nut and architect ) to work hard to be able to build something like this for myself. I probably would never leave the garage! ")
Wow, just wow! Read your whole thread and I am amazed at your garage setup. Its the perfect size and very efficient. This is very inspiring to me ( 26 year old car nut and architect ) to work hard to be able to build something like this for myself. I probably would never leave the garage!
Thanks vr4joe. Your kind words are appreciated. The Shrine is a unique space and it is a good thing to know that it inspires others.
Thanks again!
Thank you so much for your very detailed reply. I had thought about posting my question to this thread just in case others needed help with a similar issue...but didnt want to "muck" up your thread. I will probably just end up doing the same and get a much stronger spring and adjust it from there. I plan on running an opener as well.
One last question for you. If you didnt have the opener would the door stay up or close all of the way? Or does your opener do some of the work? With the amount that I will use mine I'm sure i will be fine if there is a litte extra stress on the opener when going up or down. Thanks again and have a good one.
04 silvy,
Here are the pics......
This is the door and spring w/ the flat ceiling>>

And this is the door and spring w/ the vaulted ceiling>>>

There is a significant difference in the size of the 2 springs.
Hope this helps!


mwbailey
Well-known member
Hello "Shriner", Sorry about the hail damage but might be OK if insurance covers it.
Thanks, also, for private message, but as you suggested, here's a question on the Forum: Is there any (if so, how much?) insulation between the work area and the upstairs loft?
Thanks, also, for private message, but as you suggested, here's a question on the Forum: Is there any (if so, how much?) insulation between the work area and the upstairs loft?
Omphaloskeptic
Well-known member
Dang, too bad about the hail damage! Are you going with the same type of roof material, or is there a better solution on the market? I wonder if the insurance company has any recommendations considering it would be in their best interest to pay you to get a better product so they don't have to cough up the cash after the next hail storm? How big were those hail stones anyway? Even if you have to pay extra out of pocket to have a better product installed, the insurance company might give you a break on your premium and/or deductible; besides, it is 'THE SHRINE' after all! lol
Hello "Shriner", Sorry about the hail damage but might be OK if insurance covers it.
Thanks, also, for private message, but as you suggested, here's a question on the Forum: Is there any (if so, how much?) insulation between the work area and the upstairs loft?
Sorry about the delay but this one got by me mwbailey.
There is insulation between the levels to reduce noise levels only. There is an upper and lower AC/Heat unit and the entire structure is insulated so temp control is not an issue.
Dang, too bad about the hail damage! Are you going with the same type of roof material, or is there a better solution on the market? I wonder if the insurance company has any recommendations considering it would be in their best interest to pay you to get a better product so they don't have to cough up the cash after the next hail storm? How big were those hail stones anyway? Even if you have to pay extra out of pocket to have a better product installed, the insurance company might give you a break on your premium and/or deductible; besides, it is 'THE SHRINE' after all! lol
It's a funny story....I was sick w/ the "Cedar Fever" and hadn't gone out to The Shrine for several days. A neighbor, out for a walk in the hills, actually called me about see'n the damage. We had a really bad wind storm a few days earlier. When I went out to look at it I saw shingles scattered about and the "hole" in the roof. It was about 8 shingles total so I knew it wasn't go'n to be an insurance job. I called 3 roofers to get quotes and all 3 mentioned "hail damage" was my big problem....not just a few missing shingles. Apparently, on July 13, 2012 there was a "recorded Hill Country hail storm" that I was unaware of. We have 365 days to report damage sooo...The Shrine's get'n a new roof and the main house as well!
I've considered a tin roof like most of my neighbors but everyone has pings in their roofs from hail damage so I'm in consideration mode. The insurance company could care less what I do. A check showed up for the 2 roofs....more than would be needed to replace them....no questions asked! The kicker is...I've got 365 days to make the repairs...I can cash the check anytime!
Geeez, either they needle you to death on the simplest items or they throw money w/ abandon.


madoc1
Well-known member
understand about the roof. it comes with the territory i think. would you tell who carries your insurance? i use germania and when i had hail damage they held the check (it was over 10k) until the work was done.
understand about the roof. it comes with the territory i think. would you tell who carries your insurance? i use germania and when i had hail damage they held the check (it was over 10k) until the work was done.
That's interesting.........mine is Germania as well.....almost 20K.....? They are "holding a depreciation fee" until the work is done but that is a few hundred dollars.

Dunno??
madoc1
Well-known member
thx. i like germania and had no problem with them it about 3 yrs. ago, so i guess policies change.
Abcitydiver
New member
- Joined
- Nov 10, 2013
- Messages
- 1
First let me say - WOW. well thought out. Well executed. WELL DONE! I want to focus in on your camper lift, sorry if I am resurrecting an old subject for you! Could you possibly ad some detail on the frame you built to support the shell, as well as the chain and connectors. Thanks again for your post, its been enlightening
First let me say - WOW. well thought out. Well executed. WELL DONE! I want to focus in on your camper lift, sorry if I am resurrecting an old subject for you! Could you possibly ad some detail on the frame you built to support the shell, as well as the chain and connectors. Thanks again for your post, its been enlightening
Thanks for the compliment! Also, I'm always willing to talk about The Shrine.
As for the frame, I had specific needs in mind. I am disabled and spend some of my days unable to stand...much less lift and install a 200 lb. topper/camper. My "work around" was to measure the dimensions of the camper and cut 1" square channel tubing 4" longer than the width of the front and back of the camper. That extra 4" would give me room to drill and attach eye bolts on each end for the cables and not risk marring the surface paint during the lifting. Then I simply drilled a hole centered in each front and back tube and attached another 1" square channel to keep the distance true, front to back, while in the air. The center channel length was driven by 2 other things: 1) the width of my tool box that stays on the lift when my camper is on the truck and 2) the folded dimensions of my JEEP's soft top. The soft top almost always stays on the lift.
Once those dimensions were established, holes were drilled and eye bolts installed. I used braided steel cable (300 lb.) and cut 4 equal lengths, put loops on all ends, used crimp connectors and tested the balance with a few 2X4s. It is surprisingly "self balancing".
The engineering was relatively simple or I'm just lucky but there are some important tips I can make. To keep the braided cable from marring the camper surface while suspended I used insulated pipe wrapping and that proved insufficient. The weight of the camper eventually compressed the foam to paper thinness and almost scratched the camper surface. My fix was to insert the braided cable in PEX tubing then wrap that in the foam pipe wrap. The displacement of the weight between the PEX and the foam was just right and remains effective after 5 + years.
Finally, the lifting procedure is this: I use a small floor jack to lift the front section (From the inside of the camper) just enough to insert the front tube w/ eye bolts facing up, then lower the camper on to the tube. Then I move the jack to the back (tail gate area) and lift it just enough to insert the rear tube. While the rear is lifted and the front is down (stable) I then attach the center "truing" tube to the front then the rear then, and only then, do I lower the the jack and attach the cables to the eye bolts and winch. It can be off a couple of inches front to back. It doesn't matter..it'll level itself out once it is the air. Also, if you are lifting the camper be sure you have a hand on the unit BEFORE you lift. If you are not parked exactly centered/below the lifting motor when you lift you could find the camper lifting and swinging toward your rear window. A little swing goes a long way if not controlled. Lowering is easier in that you can set it down exactly where you want it with a little tug here and there.
I used a Harbor Freight winch w/ a self locking mechanism and merely extended their 10' length operation cord to 30 feet. My ceiling is 24' high and the extra length gives me the ability to walk around the the camper as it lowers ensuring a perfect landing.
I hope this helps and thanks again for the compliments!


HOTFR8
Banned
What are the plans for the lights ?
What are the plans for the lights ?
I'm gonna spend way too much money and time restoring them to hang in the shop!! I thought they were unique and would be a challenge to find parts. Come to find out....they're everywhere and have web pages dedicated to parts and restoration.
Oh well...it'll be a fun project.
HOTFR8
Banned
So, when finished what plans ?
Grizz1963
Well-known member
Still love your whole set up mate.
Those lights are rather special
I wish mine was old and metal.
Bought these two, then made a very good one from them, and sold the second one for a decent profit making mine "free" and became mates with the mad man who bought it off Ebay from me..... WINNER

I also have an old municipal parking meter I bought for sensible money a couple of years ago for the garage.
Those lights are rather special
I wish mine was old and metal.
Bought these two, then made a very good one from them, and sold the second one for a decent profit making mine "free" and became mates with the mad man who bought it off Ebay from me..... WINNER
I also have an old municipal parking meter I bought for sensible money a couple of years ago for the garage.

Still love your whole set up mate.
Those lights are rather special
I wish mine was old and metal.
Bought these two, then made a very good one from them, and sold the second one for a decent profit making mine "free" and became mates with the mad man who bought it off Ebay from me..... WINNER
Thanks!!
My light housing appears to be aluminum. They are very light. I plan to sand blast them soon. I'll know exactly what they are made of after that.


Grizz1963
Well-known member
Washed them down and cleaned the internals. Didn't realize the was a bulb specific to traffic lights?!


I would guess Wattage is specific to light intensity through lenses.
Also, maybe bulbs are engineered to survive extended "on/off" cycles.
Wheelin204
New member
I realize that it has been asked and answered , but could you give me the measurements in the lift area specifically the wall to the right post. The reason I ask is I've been planning 15'-18' of vaulted ceiling for my lift which is 12 feet wide. You had said it was 23' feet wide but it looks so much narrower in the pictures.
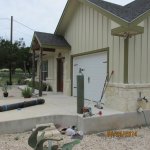
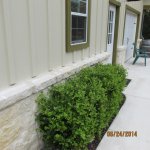
After 5 years The Shrine needed a RE-DO on the siding.
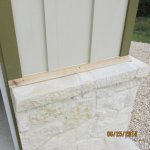
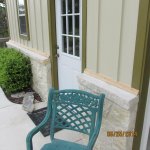
The top stones weren't at an angle that allowed the water to run away from the building so I had them all pulled, cleaned, and reinstalled at the correct angle.
Then we inserted Cedar trim between the stone and the Hardi-Panel. Perfect timing......we got an inch of rain before the day was over!
The top stones weren't at an angle that allowed the water to run away from the building so I had them all pulled, cleaned, and reinstalled at the correct angle.
Then we inserted Cedar trim between the stone and the Hardi-Panel. Perfect timing......we got an inch of rain before the day was over!
Attachments


HOTFR8
Banned
Nice to see an update. I always like watching this topic.
Sunbimmer
Well-known member
I decided to do some corrugated metal wainscoting in my garage and used your thread for inspiration , still love everything about your garage 
, still love everything about your garage 


HOTFR8
Banned
Looking good once again.
BRIANBB
Well-known member
Looking good. So how loud is hail on a tin roof? We were in Fredericksburg this past weekend and got hit by a ton of hail.


Grizz1963
Well-known member

Now you're talking.
Love the hoist beam.