To avoid these ads, REGISTER NOW!

Below 265 SQ/FT Unconventional Post & Beam Shed Build 12'x14'

All workspaces below 265 squarefeet.
OP
M

MegaVan

Well-known member
Joined
Dec 17, 2020
Messages
274
Location
Ohio
That could be a very cool cabin or playhouse for kids/grandkids
I can't get into it too much, but there have been a fair number of little hands helping on this project over the months. They love it.

Also it turns out the diagonals make it a lot easier for a kid to climb to the loft or roof.

Not saying how I know.
 
To avoid these ads, REGISTER NOW!

Chrisb62

Well-known member
Joined
Jul 30, 2019
Messages
1,093
Location
southwest fl
Don't forget the 100% cool factor.......shame to cover up the structure shell, but waiting to see what the outside looks like.
Still really liking this look. Be careful it is not immediately taken over by SWMBO .
 
OP
M

MegaVan

Well-known member
Joined
Dec 17, 2020
Messages
274
Location
Ohio
@Chrisb62 - Thanks. I think the exterior looks great, and since the interior will remain exposed for now, it's all good. My wife knows that the shed is off limits for her shenanigans until after the barn is wrapped up.

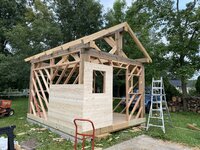
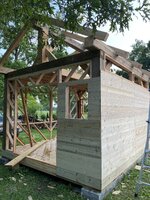
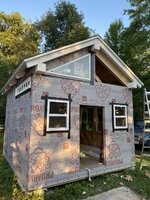
For the sheathing I elected to use 1x12, 1x8, and 1x6 rough sawn pine board. Believe it or not this was cheaper than ply-wood at the time of purchase. Since then these boards have gone up 200% in pricing. For some reason the 1x material seemed to be the last to go up, and is now the last to come down in price. One advantage to these is that they are super light and manageable. Obviously, it does take longer to assemble and does require more fasteners ($20 worth maybe?).

The first row of sheathing was a combination of pressure treated left over from the floor and cedar left over from a different project. I used the cedar at the door openings as it will be easier to access if it starts to rot.

The boards have a rough side and a planed side. I put the rough side facing the interior.
IMG_6644.JPG

A bit more done on the exterior, you can see the PT and the cedar here:
IMG_6646.JPG

A speed square helps keep the nails in line with the studs (45 degrees) - the longest part was just running back and forth to the basement to do the cuts on the miter saw:
IMG_6648.JPG

Front quarter view:
IMG_6649.JPG

More done on the rear side:
IMG_6650.JPG

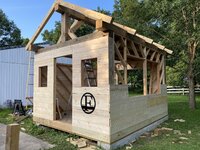
All done on the rear side (almost):
IMG_6654.JPG

Next - came across a small problem that I'll address in the next post. Wrapped up the walls.
 
OP
M

MegaVan

Well-known member
Joined
Dec 17, 2020
Messages
274
Location
Ohio
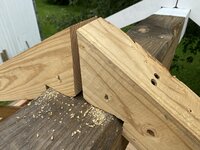
I found that one of the timber screws in one of the rafters had sheared in two while I was working at this time. This was a bit of a surprise as these are highly rated and supposed to be good for this purpose. My guess is that the excessive summer heat/cool cycles and the exposure to rain led to this failure, but that's just my best guess.

I rectified the issue by putting a second timber screw in and adding two 4" screws toe-screwed into every rafter. Just to make sure they don't go anywhere.

IMG_6657.JPG

Our dog, Ellie, remained blissfully ignorant of my plight:
IMG_6674.JPG

Wrapped up the front and started on the south side:
IMG_6655_LI.jpg

A nice view where you can pretend everything is finished even though it's not:
IMG_6656_LI.jpg

I'm apparently missing some photos here. There were times that I had to push to avoid rain and such and came up short. So - I painted the exposed wood portions with the cheapo barn paint from Home Depot. It may not be the best but it's available quickly and locally, and since I don't have to paint the whole thing every year it should be reasonable to re-do - especially since the majority are in low wear areas.

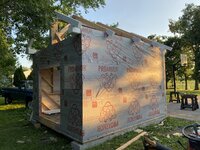
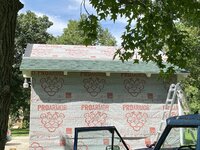
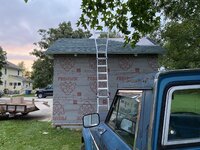
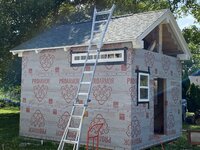
At some point I finished closing in the south side, then I chose to use Owens Corning Pro-Armor roofing underlayment for the wrap. Now some will likely say this is wrong or it doesn't breathe enough or a multitude of other things - but a roll is 1,000 sq ft and I only needed ~250 sq ft for the roof. So rather than not finish two different rolls of material I chose to use this twice. It is more weather resistant than Tyvek and is there to keep the sheathing dry until the vinyl siding goes on. Bottom line - it's a shed - I made the call that it should be fine.
IMG_6658.JPG

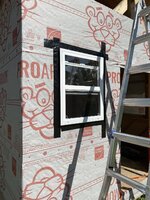
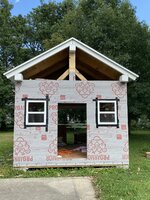
I went ahead and left the wrap over all openings until I could get the windows in:
IMG_6659.JPG

IMG_6662.JPG

I ran out of pine sheathing and had to use it up above the transom windows - then lined the ridge post with pine scraps to keep it flush with the rest of the wall:
IMG_6663.JPG

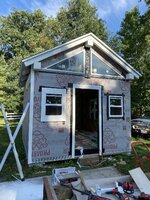
Finally got the walls all wrapped up, right up to the rafters:
IMG_6675.JPG

With the walls complete and dry-ish - I moved on to the roof sheathing.
 

mike93lx

ALLIANCE MEMBER
Joined
Dec 9, 2013
Messages
37,928
Location
Richmond, VA
Covering all that with vinyl feels like a crime. Cedar shakes or board and batten feel like a better fit for the quality and effort put in
 
OP
M

MegaVan

Well-known member
Joined
Dec 17, 2020
Messages
274
Location
Ohio
I thought the pine was finished siding. :(
I would have enjoyed that, but unfortunately the carpenter bees chew up the soft wood pretty quickly around here.

A couple extra notes on the sheathing - I wanted to run it diagonally - the same as the house, but due to length limitations at the time of purchase, that would have required a really high scrap rate. One of the reasons I moved to diagonal studs.

I can see the benefit of plywood from the racking resistance, how quickly it can be put up, and overall strength, no more cupping boards…. But man I love the way pine looks :)

Bottom line, I can see why building has adapted the way it has, but I wouldn’t change what I’m doing even with that knowledge.
 
  • Like
Reactions: 555

pickles

Well-known member
Joined
Jan 31, 2010
Messages
791
Location
Chicago
Mega, That’s a great looking bulldog. We had one for twelve and a half years. Her name was Pickles (ergo my screen name too).
 
OP
M

MegaVan

Well-known member
Joined
Dec 17, 2020
Messages
274
Location
Ohio
@pickles - She's a pretty good pup. She doesn't listen to me as well as she does to the wife. It's all good though. She's the wife's dog. She's 6 years old, bulldog lifespans seem to be all over the place.

@mike93lx - You're right - that is good. You'll see what I mean though.

Ok I don't have a ton of photos of this part, but I started on the windows. These utility style windows are from Menards, 24"x30" - built in J-channel (cut off later). They were cheap. Maybe $40-50 each. Single pane. One thing I found out is they have no spring or support to hold the window open. I have plenty of scraps around to do that but I'll look for a more elegant solution over the winter.
IMG_6827.JPG

Opening for the transom window:
IMG_6847.JPG

Transom window in place. This window was also from Menards 72"x12". Maybe $100-120 each. These windows were awful. I wouldn't recommend them to anyone. The panes rattled around in the frame, the above dimensions were the rough opening, but the actual slots for the screws / nails were at 12" on center, so it was nearly impossible to get them installed nicely. In the end the two were a little off compared to each other due to it.... just a real pain and poor quality. I used to make sky-lights and this was just plain unacceptable.
IMG_6848.JPG

For flashing I used four (4) rolls from Home Depot of some 6" wide butyl tape - this stuff was super nice.
IMG_6850.JPG

I can't seem to find any exterior shots, but these were some of the windows I was stoked to try. These are from Lowes - 48"x48" double pane argon filled sliders for $98 / each. They had a reasonably large mounting flange. One major issue I had is they came in a bit large. Actual dimensions were 47 7/8" in each dimension at the frame, I had to trim the corner welds to get them to slide in at all. In the future I'd double check the size before framing - I just didn't have that luxury due to Covid and inventory issues.
IMG_6878.JPG

Nice sunset across the road (for this area anyway):
IMG_6851.JPG


I need to sort through my folders to see what was next ... but I think it may be siding. Some of the siding / trim type stuff is going to be a bit mixed up, but that's just life.

EDIT: I just realized I skipped roof sheathing. Looks like that's next.
 

Chrisb62

Well-known member
Joined
Jul 30, 2019
Messages
1,093
Location
southwest fl
I was really enjoying this till it got out of order...........


Just kidding.......

Are the transom widows Aluminium or Vinyl framed...if Vinyl they have to have more clearance due to thermal expansion and contraction which may explain the loose feel. If Aluminum.....:dunno:....bad construction or training the new guy day?
 
OP
M

MegaVan

Well-known member
Joined
Dec 17, 2020
Messages
274
Location
Ohio
@Chrisb62 - They are vinyl - I would mostly agree with you - but it's the holes that were incorrect, not the frame. I thought I had photos from when I was complaining to my father, but that must have been a video call or something. I'll see if I can illustrate:

1635156966572.png

The vinyl frame was 11-11.5" as would be appropriate - the problem was that the slots on the mounting flange were - center to center - exactly the same as the rough opening height. This meant that there was really no wood to connect to - you could hit a stud on top, or on bottom, but not both. I ended up using longer (3" pan head screws) at an angle to get securely mounted.

This was a common issue on the build - I didn't have a good storage space for all these items, so I built according to the specifications that the vendor stated - but then the manufacturer didn't actually build to the specifications. Now that I'm gaining dry space it will be easier to make sure I have items on site before framing - then build to the actual. A general theme here was lack of responsibility and ownership. I understand a cheap window having a lower quality of materials - but it shouldn't have a lower quality control level from any manufacturer, let alone a US vendor (all my windows were made in the USA except the utility windows were unknown country of origin - and they fit fine).

Hopefully that makes more sense.

@mike93lx - Not completely done - just mostly. I tried not to take too much good weather time to document this here. I'd rather use the rainy weather days to update this. I'm trying to get sealed in by snowfall and I've had a couple extra distractions that have kept me from working on the shed or updating the thread, so ... busy. Right now it's at the stage that from the street people think it's done.
 

Chrisb62

Well-known member
Joined
Jul 30, 2019
Messages
1,093
Location
southwest fl
Fully understand your explanation and got no answer other than WTF......just don't know.
If you had the windows before the framing, you could have adjusted opening size.....but having to wait ** number of weeks kills that chance.
 
OP
M

MegaVan

Well-known member
Joined
Dec 17, 2020
Messages
274
Location
Ohio
I utilized 2x8x12' tongue and groove untreated boards for the roof sheathing. This gives the strength over the 4' on center 4x6 rafters.

The first two were painted on all sides before install as they will be exposed after everything is finished. I used the table saw to square off the face of one side.

IMG_6676.JPG

Note the 2" hanging over each end because I had to cut down the 16' beams - I think this result came out OK:
IMG_6679.JPG

Working with material this thick is a little tricky. That came on two fronts. One was that the mill did a pretty poor job:
IMG_6696.JPG

For real - how is this ok? Second, natural warping of the boards makes it a lot harder to close up gaps. A deck board bender would be ideal, something like this:
1635158612910.png

But guess what - anything I could find with a reasonable lead time only fit 1-1/2" to 2-1/2" joists/rafters, not 3-1/2" like I had. With two to three week lead on one that would work I resorted to some redneck engineering.

I had some LedgerLok lags left over, cut a circle in a spare 2x8, drilled a hole off center, and added 5 lags to be used for leverage. Now none of that makes sense with just words so here's what I'm saying:
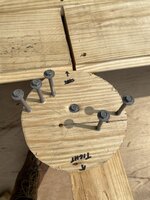
IMG_6692.JPG

I place the "start" up against the board needing the gap closed - The "tight" side is about 1" farther from the lag to the edge. As the circle is rotated it effectively acts as an inclined plane to put continuous pressure on the board until the gap is closed:

IMG_6691.JPG

Screw, twist, nail, unbolt, repeat. It was a process, but worth it to have all the gaps closed up. Each board got 1 screw and 3 nails per rafter.

Here are the boards laid out - my wife graciously offered to paint the exposed ends for me. All paint was applied with 2 coats.
IMG_6695.JPG

Prepped:
JEFN3093.JPG

Almost there:
IMG_6694.JPG

There was impending (and current) rain - so I put the underlayment on the roof pretty quickly as I finished. There is drip edge applied to the first board before the underlayment was applied. It's some nice 2" stuff I found at HD that covers the 2x8 very nicely and provides a clean look.
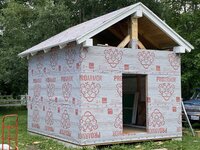
IMG_6790.JPG

So finally it was dried-ish-in.

I really can't stress enough that I'm not a professional on this stuff - I'm doing this so I can understand the concerns and complications that come from building, and try my hand at some design work. The majority of my learning has come one project at a time and from good forums like this one (I've seriously been lurking for years.... YEARS).

I did not lay ice and water shield. I debated back and forth a LOT - but in the end, the underlayment I chose is an extremely weather resistant polymer type that should prove effective for this small of a structure, especially if it remains unheated.
 
  • Like
Reactions: 555
OP
M

MegaVan

Well-known member
Joined
Dec 17, 2020
Messages
274
Location
Ohio
I suppose now it's time for me to complain about ownership, responsibility, training, and laziness again.

I chose Owens Corning Duration Chateau Green shingles for the shed. I chose these because they were one of the few green shingles in stock in the US when I ordered. I went with the Duration shingles because I'm not a roofer, and I've never shingled, and having a durable stripe showing me where to nail and preventing me from blowing through any shingles seemed like a good idea. It was a good idea. The shingles were great.

Menards was not.

The closest inventory was in Michigan so (one state away) so naturally they chose to wait for the manufacturer to ship from the factory. This was then sent to a distribution center where Menards packaged my materials (ridge + standard shingles) together and shipped them.

Like this:
IMG_6809.JPG

Of the many things that I've seen shipped over the years.... I just can't comprehend screwing up shipping shingles.
IMG_6812.JPG

Here's the other side:
IMG_6810.JPG

I understand everyone was short staffed, and I'm sure this was some rookie strapping it, but this is about $2 worth of scrap wood away from being fine. Companies should be training guys and not just throwing them on the job. Naturally the forklift worker was confused why I was taking so many photos. Because I guess this must just be normal.

In the end I only had to scrap half of one shingle after they sat out in the sun a while. I didn't pursue any kind of compensation. Guess I'm just not that guy.

They asked why I needed to cut into the siding box on site.
IMG_6811.JPG

Golly. Why would I need to check a box with $1,200 of siding that comes in looking like this?
IMG_6813.JPG

Fortunately not too bad.

Just more frustration and feeling like no one cares.
 

Trapps

ALLIANCE MEMBER
Joined
Feb 10, 2017
Messages
2,004
Location
The Detroit Zoo
I special ordered some closet doors from Menards. The third shipment arrived undamaged. Perhaps they've done the cost analysis and are choosing to roll the dice.

I love the store for many reasons and they have a strong selection at reasonable if not good pricing. Just know one is rolling the dice on anything ordered.

Shed looks great; I love the big timber approach.
 
OP
M

MegaVan

Well-known member
Joined
Dec 17, 2020
Messages
274
Location
Ohio
I special ordered some closet doors from Menards. The third shipment arrived undamaged. Perhaps they've done the cost analysis and are choosing to roll the dice.

I love the store for many reasons and they have a strong selection at reasonable if not good pricing. Just know one is rolling the dice on anything ordered.

Shed looks great; I love the big timber approach.
They're great for a lot of things. Many times I get lumber that is orders of magnitude better than competitors for 20-30% less. They stock V-groove pine from a lumber mill that was in my hometown in Maine. Lots of things to like.

SOME special order things, exterior doors, some of the windows I got (coming up) - really not many easier ways to get mildly custom items like those. Also their selection of solid wood interior doors is pretty unusual.

Many of the timbers and boards that I ordered (nearly all those special order wood items on the post frame, rafters, and roof decking) are actually no longer available on their site. Not sure what happened. I was able to get a decent deal on all of those compared to framing lumber. I like to imagine that some desk jockey was so busy changing the price on 2x4's and 2x6's that they didn't think about the larger stuff.
 
To avoid these ads, REGISTER NOW!
OP
M

MegaVan

Well-known member
Joined
Dec 17, 2020
Messages
274
Location
Ohio
Use your imagination a bit. I got started on the roofing.

As I've said more than once. I'm not a roofer.

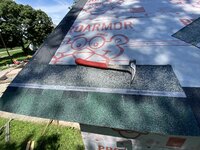
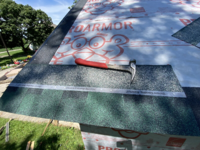
I got the starter shingles down around the edges per the install instructions. I used MAZE Hot Dipped nails. These were impressive. In two 5 lb boxes I only had one dud nail. It was a 1" instead of 1 1/2". Owens Corning acted as an enabler by giving me a dummy proof strip to nail into. I went ahead and did the hurricane nailing pattern because ... well why not. I had the time.
IMG_6824.JPG

I did absolutely everything I could from the ladder. I don't have too much of a problem with heights, but the rapid drop associated with them I'm less than thrilled about.
IMG_6826.JPG

I really struggled using a knife to cut the shingles. Dulling, gumming, etc. It was a pain. I should have bought the special utility knife blades. But I didn't. Then some angel on this forum suggested old tin snips.

Guess what I have in a tool box full of tools I got for $5 at a yard sale? Old lousy tin snips that will never cut tin again.
1635214540763.png

I gave it a try and .... WOW. Like butter. These things were so floppy whatever you tried to cut just folded, but a shingle, it was perfect as the grit just fell between the shears. I was impressed.

This picture doesn't show everything, but my ankles were KILLING me. I almost gave up here. Looked for some alternatives. Some way to end the pain. I thought I was going to have to do those safety boards that they use on steep roofs. But this roof is only 30 degrees, like 7/12 or something. This couldn't be right.
IMG_6853.JPG

Garagejournal saved me again. Turns out I'm incompetent and using my boots, even though they had phenomenal grip, caused a lack of articulation in my ankles. I switched to running shoes and had no more troubles. Any more than a normal human anyway.

There it is, first half of the roof finished at an unmentionably slow pace:
IMG_6856.JPG

I kept ducking into the house to try to finish it when it wasn't blistering hot - cloudcover, shade, early mornings ... anything to avoid that radiating roof heat.

I'm not a roofer.
 

Chrisb62

Well-known member
Joined
Jul 30, 2019
Messages
1,093
Location
southwest fl
1635242535308.png
Did you remove the plastic strip that covers the tar under those nails, only mention because i heard you are not a roofer.
 
OP
M

MegaVan

Well-known member
Joined
Dec 17, 2020
Messages
274
Location
Ohio
1635242535308.png
Did you remove the plastic strip that covers the tar under those nails, only mention because i heard you are not a roofer.
That's the rumor.

Nope. Left the cellophane. There's some nice fine print on there that says "do not remove". I went out on a limb an decided that I should not remove it.
 

Chrisb62

Well-known member
Joined
Jul 30, 2019
Messages
1,093
Location
southwest fl
My apologies, here in the windy south (hurricanes) always remove cellophane.... up north not required and not recommended.

Should have informed myself better before speaking.
Back to my corner now........
 
OP
M

MegaVan

Well-known member
Joined
Dec 17, 2020
Messages
274
Location
Ohio
Interesting. Did not know that. FORTUNATELY - not in a hurricane region.

With my newfound sneakers providing a boost to my speed, I finished the other side in just one day. I know that's still slow, but I was probably trying to get it too "right". I've been told roofing is a "good enough" sport.
IMG_6868.JPG

All wrapped up. I wasn't completely sure how to overlap the drip edge. I made it up as I went along.
IMG_6870.JPG

Here with the rigid ridge vent installed (HD sourced):
IMG_6871.JPG

All the ridge shingles installed:
IMG_6873.JPG

I used copper nails for the fascia overlap:
IMG_6875.JPG

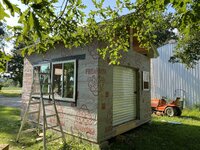
Starting to feel like a little building:
IMG_6876.JPG


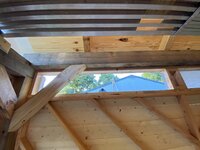
A view of the inside:
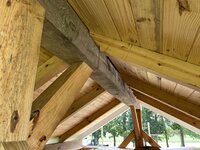
IMG_6874.JPG

Overall very pleased with the "feel" of things.
 

captain14

Well-known member
Joined
Dec 19, 2012
Messages
7,070
Location
Near College Park Maryland 20740
I like the work so far. When I did my 8x10 shed years ago, I took my time and did one side of the roof per day and had a friend come
Over on the third day to knock out the ridge vent and cap. This was the days before the youtube training channel.

Do you have the door(s) and material on hand
For the gables?
 

Robey5

Well-known member
Joined
Jan 18, 2010
Messages
406
Location
North of Detroit, Mi
I have to agree that it can be frustrating when you know that people just don’t care (as evidenced by that banding job). What really blows my mind is that when you are doing things like that - you are paid by the hour. Take your time and do it right (from my perspective). No more progress since December?
 
OP
M

MegaVan

Well-known member
Joined
Dec 17, 2020
Messages
274
Location
Ohio
@captain14 - I absolutely do, I actually just got the last gable end closed in this past weekend.

@Robey5 - As far as the main barn, no. I'll touch base with Geobarns in a month or two as I wrap things up on the shed. Right now I'm just stashing cash as I work on the shed.

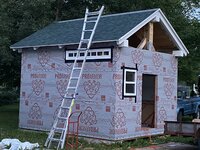
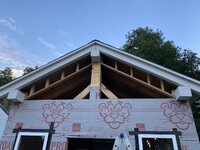
So - I wanted to try to do something real special for the gable ends of the roof and show off all those beams.
IMG_7020.JPG

I ordered custom triangular windows to match the roof pitch and opening from Menards. Now these were about $240 each at the time of order, which is expensive for a shed. However, when I looked at the cost of framing @ $7 / 2x4, ply-wood at $60/sheet (or the 1x equivalent sheathing), house wrap, the expensive siding I used ... The cost delta wasn't as much as it really should have been. So basically because COVID already made things expensive I went ahead and took that $50 leap to do something new.

Here is the left window installed. These are dual pane argon filled vinyl windows with a reasonable mounting flange and the holes in the right place.
IMG_7033.JPG

A slightly different view (with sheathing boards on the right side):
IMG_7034.JPG

And here we are with both windows in:
IMG_7045.JPG

And the door is in too! So regarding the door. I went to Menards to get the cheapest paintable door with an upper window they had.

My wife went with me.

She said, "What is wrong with this one that matches the basement door we did last winter?". I said, "It's $300 more".

You can see how that turned out. How lucky am I though? To have my wife tell me TO spend more on things.

Enclosing this side of the shed was the priority as nearly all driven rain comes from that side. Since closing the front, not a single raindrop came in the back.
 

mike93lx

ALLIANCE MEMBER
Joined
Dec 9, 2013
Messages
37,928
Location
Richmond, VA
Wild that windows can be comparable to framing and sheathing.

Good call on them and the door. Going to look nice
 

wreckdiver1321

Well-known member
Joined
Aug 12, 2021
Messages
1,039
Location
Billings, MT
Great work, that shed is turning out fantastically well! With all those windows, you'll barely need lighting on a sunny day. Though you may need some A/C haha.

Great work, love watching it all come together.
 
OP
M

MegaVan

Well-known member
Joined
Dec 17, 2020
Messages
274
Location
Ohio
@mike93lx - Yes. I think things have tapered off a bit since then. It's probably not so comparable now.

@wreckdiver1321 @captain14 - It's a lot of sun. I'll know next summer how hot it gets - hopefully the ridge vent helps keep things circulating.

90% sure I moved to the inside next too since it was finally pretty dry.

I got one of these to utilize for larger items:
1635263779487.png

I wanted green. I got white. Inventory. Lead time. Covid. It's fine.

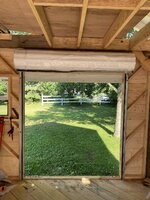
What wasn't fine were the dimensions. I have a beam and loft at 7'10' height. This door requires 15-16" clearance for the roll above the door frame. I got a 6'x7' door. The math is no good.

I did the obvious thing and immediately modified the door.

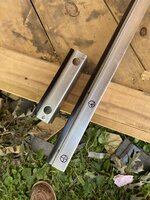
I marked out the correct amount to remove from each rail:
IMG_6882.JPG

Sawzall was the tool of choice:
IMG_6883.JPG

Now of course I had cut off the mounting holes. So I transferred the hole locations to the new "bottom" of the rail, drilled pilot holes:
IMG_6884.JPG

And final holes:
IMG_6885.JPG

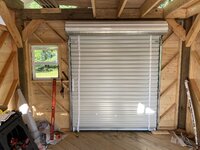
Laid it out on the floor in front of the opening (note: I had to scab in extra 2x4's because while I did not need them STRUCTURALLY, I did need them for mounting the rails):
IMG_6887.JPG

I raised this into place by myself. I cannot emphasize enough how much you should do this with two people. This was dumb. It worked but it was dumb.
IMG_6888.JPG

Continued...
 
Last edited:
  • Like
Reactions: 555
OP
M

MegaVan

Well-known member
Joined
Dec 17, 2020
Messages
274
Location
Ohio
Continued...

Spun the door around a couple times to load the tensioner, then lowered and installed the door stops:
IMG_6890.JPG

And the other one:
IMG_6891.JPG

Outside shot - the door latch won't work presently - when the final height of the sill/threshold is set I will cut a slot for it:
IMG_6893.JPG

Inside - Note the special locking mechanism (a lag into the floor - bottom right):
IMG_6894.JPG

And a wide angle shot of the interior with both south side windows:
IMG_6895.JPG

The door did require another adjustment to the tension at a later date. About half a rotation more of tension.

At this point I started working on siding and trim. Had to make the front look pretty so I could feel good when I pull in the driveway.
 
OP
M

MegaVan

Well-known member
Joined
Dec 17, 2020
Messages
274
Location
Ohio
That looks great! I'm always surprised there aren't more of those roll-up doors around.
The biggest problem I anticipate is mice. Lots of fields around and as other areas get colder and colder the shed could look more and more appealing.

Edit: What I mean to say is these don't seal particularly well and that could lead to some rodent issues.
 

wreckdiver1321

Well-known member
Joined
Aug 12, 2021
Messages
1,039
Location
Billings, MT
The biggest problem I anticipate is mice. Lots of fields around and as other areas get colder and colder the shed could look more and more appealing.

Edit: What I mean to say is these don't seal particularly well and that could lead to some rodent issues.
That's a great point, plus they have basically zero insulation value.

Do you have a plan to deal with the little monsters?
 
OP
M

MegaVan

Well-known member
Joined
Dec 17, 2020
Messages
274
Location
Ohio
We have. He's less than thrilled. He actually is really terrible at catching anything. Our other cat is a better mouser but I found Diego first.

So I started working on trim next as with most vinyl siding you would apply the J-channel or trim and then slot the pieces in. Turns out that wasn't so right, but it doesn't change the order things happened.

I chose to go with PVC trim with a wood grain finish. I really want this thing to be low maintenance and look good for a long time. I don't care for J-channel and found the idea kicked around here of using Aztek something or other with a rabbet cut out already.

I'm cheap (ish) and lead time and Covid so I got the discount stuff at Menards, which is still as expensive as a small hoard of toilet paper was in April 2020. Again, trying to figure out if this kind of stuff is what I'd like to use on the main house some day.

I started by cutting off the integrated J-channel on my cheapo windows:
IMG_7049.JPG

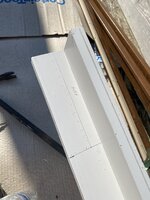
I started from the left with the corner piece and worked my way across. The corner pieces were tough to get the rabbets done on. I also had to be careful to notch out the corner for the beams. MOST trim is 5/4 thickness:
IMG_7048.JPG

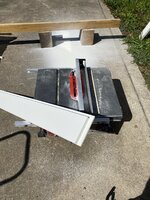
Early in the project I got a M18 table saw for a good deal. I have to say I've been super impressed... runs forever even on the smaller batteries. It's crazy how far battery and motor tech has come in the past 10 years. Here's a 5/4x6" for above the door:
IMG_7047.JPG

Here's one of the utility window sides tacked in place:
IMG_7052.JPG

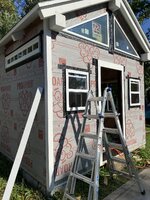
A general view with the door trim and corner trim in place, also the first piece of vinyl siding starter strip (bottom left):
IMG_7050.JPG

A couple pieces ready to go:
IMG_7051.JPG

An overall view with more done:
IMG_7053.JPG

Around this time I got a real door knob and deadbolt for the door. I mean if anyone wants to break in there are 7 easier ways but hey. Got it re-keyed to match the house. It's slick:
IMG_7071.JPG

At this juncture I switched to applying some of the siding and realized I'd made a mistake and my life would be painful for a few hours.
 
  • Like
Reactions: 555
OP
M

MegaVan

Well-known member
Joined
Dec 17, 2020
Messages
274
Location
Ohio
So regarding the siding, I would 100% have preferred to utilize Eastern Cedar shingles on this build. Two big problems I had, carpenter bees love cedar unless you coat it, and cedar doesn't take paint particularly well. Once you paint it it's a constant battle of chasing it. I've seen it on the coast. The best applications are always raw and naturally weathered.

An additional consideration was that I would want it to match the house (remember the house has always been yellow - just 105 years).

Anyhow there are a lot of other options out there but I chose Certainteed Cedar Impressions in Autumn Yellow. This stuff is not cheap at about $18 / panel. It literally feels like covering the shed in $20 bills.

That being said this stuff is THICK, easily 5x thicker than the vinly siding currently on the home. It's durable and looks pretty reasonable, and on top of that should be low maintenance for a real long time. Here is a bit laid out just rough on the floor:
IMG_7044.JPG

As I started I quickly realized this stuff has almost no flex to it. It's not like standard vinyl siding where you can just pop it into the channel. Also my trim is far more rigid than J-channel. One real nice thing though is these panels are very manageable to put up with just one person. Also they recommend working from right to left. There is a reason. Do it the way they say:
IMG_7054.JPG

On the left here I had to jam and pry these pieces in then try to get a couple roofing nails in there (I used the remaining MAZE nails). The right side with no trim I could just mark the layout with permanent marker, then install the trim:
IMG_7073.JPG

Here is the cutout on the right side (no trim) - I cut new slots in with a oscillating multi tool and drill bit. This was annoying, but required for a secure connection:
IMG_7074.JPG

Foolproof and to scale drawing of the cutouts required for over the door:
IMG_7076.JPG

Prep for a slot:
IMG_7079.JPG

Slot:
IMG_7080.JPG

Much of the front finished up - note the lack of trim on the right because I realized my failure:
IMG_7081.JPG

Getting real close to that "coastal shack" feel.
 
To avoid these ads, REGISTER NOW!
Top Bottom