To avoid these ads, REGISTER NOW!

Under hood service tray build

superbovine

Well-known member
Joined
Apr 4, 2017
Messages
63
Location
Vero Beach
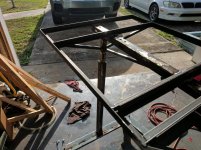
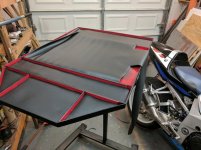
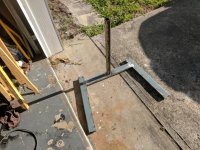
Just a quickie, but I got a bored this weekend and still have about two bed frames worth of metal laying around taking up space so I decided to build a service tray for working under the hood of cars. Saw one of these on the SO truck a few weeks back and thought it was a good idea so I stole it :D

Still in progress, but shouldn't take too much to complete from here.


Https://m.imgur.com/LQPpykR
https://m.imgur.com/TLqkqKa
 

Attachments

  • IMG_20170507_180535.jpg
    IMG_20170507_180535.jpg
    143.6 KB · Views: 257
  • IMG_20170514_191246.jpg
    IMG_20170514_191246.jpg
    147.2 KB · Views: 337
Last edited:
To avoid these ads, REGISTER NOW!
OP
S

superbovine

Well-known member
Joined
Apr 4, 2017
Messages
63
Location
Vero Beach
Thanks, that's a great idea I'll look into once the basics are all done. The work surface has about two feet of adjustment with just a basic slide pin, half a dozen positions about 4.5" apart.
I have some bracing to do before I get into tweaks... Want to reinforce the base at the sides of the upright and the work surface laterally still. I might overlap the legs with some angle over the seam as there is a bit of flex there under heavy load.
Then customization is on! Maybe a flexible arm with a light clamp on the end.
 

Thumper68

Well-known member
Joined
May 16, 2013
Messages
5,134
Location
Duluth MN
Very cool I built one a few years back out of a old piece of hospital equipment adjustable height the try was on a arm and a light on a flex arm, with a battery charger built into the base with a couple of extra outlets.

I decided it took up to much floor space so it is out in the shed, if I need it I will bring it back in.


OP
S

superbovine

Well-known member
Joined
Apr 4, 2017
Messages
63
Location
Vero Beach
I like the adjustable part.

I found mine will not work when the front is on stands :sad:

That's super clean looking though! Adjustability is a must for me as I work on a wide range vehicles plus frequently have them at different heights on the lift to help my back out a little.

Very cool I built one a few years back out of a old piece of hospital equipment adjustable height the try was on a arm and a light on a flex arm, with a battery charger built into the base with a couple of extra outlets.

I decided it took up to much floor space so it is out in the shed, if I need it I will bring it back in.

That thing is insane! Very cool especially the articulating arm, but I could see how it could be impractical when not in use. Major conversation piece though, never seen anything like that before!
 

RogueFab

Well-known member
Joined
Jun 27, 2013
Messages
430
Location
Oregon
Wow. That is nice. Like having an assistant there to hold tools and shine a light for ya' !
 

2oolhound

Well-known member
Joined
Dec 18, 2010
Messages
5,918
Location
BC Canada
I like the adjustable part.

I found mine will not work when the front is on stands :sad:

Have you thought of cutting the upright posts in half and adding tight fitting tubing to the inside or outside to give some adjustment?

Nice ideas guys, like the light idea. I could see a fluorescent type light glowing from under the tray as well as a positionable light on a flex arm that you could aim.
 

steel 35

Well-known member
Joined
Feb 20, 2011
Messages
2,105
Location
Between the PNW and the Emerald Triangle
Have you thought of cutting the upright posts in half and adding tight fitting tubing to the inside or outside to give some adjustment?

Nice ideas guys, like the light idea. I could see a fluorescent type light glowing from under the tray as well as a positionable light on a flex arm that you could aim.

Not yet but now I may! It might fit this old junker if I just raise the back it's that close.
 
OP
S

superbovine

Well-known member
Joined
Apr 4, 2017
Messages
63
Location
Vero Beach
Not yet but now I may! It might fit this old junker if I just raise the back it's that close.

I'd cut it off near the top of the uprights and weld in a narrower tube to the top section so it can slide into the bottom. Then on the uprights drill a hole at the top and weld a nut to it and use a bolt to tighten the slip pipe wherever you need it.
:rocker:
 

2oolhound

Well-known member
Joined
Dec 18, 2010
Messages
5,918
Location
BC Canada
I'd cut it off near the top of the uprights and weld in a narrower tube to the top section so it can slide into the bottom. Then on the uprights drill a hole at the top and weld a nut to it and use a bolt to tighten the slip pipe wherever you need it.
:rocker:

That's what I meant to say... :eek: honest.

(…more like I wish I'd thought of that!) it's the best fix :thumbup:


That looks like a great design,I cant even tell you how many tools I've left behind in engine bays.

Reminds me of what I hate about skid plates, nothing goes right through.
 
OP
S

superbovine

Well-known member
Joined
Apr 4, 2017
Messages
63
Location
Vero Beach

I just elaborated, I smelled what you were cooking :beer:


I put the last divider in the tray tonight and added some bracing to the bottom bar... Everything is L channel of some sort that I boxed, and the bottom stuff is really flexible pre-boxing so I figure that will help prevent any questionable welds from popping under stress just in case. I can almost put all my weight on the end of the tray before it starts to tip and no creaks (the bed frame bars flex of course), so I think I'll call it okay.
I didn't really anticipate working on this again until this weekend (clearly an at-home project) and didn't take any pictures before it got too dark for a decent pic. I'll try to snap one after work tomorrow.
 
To avoid these ads, REGISTER NOW!

XLR99

Active member
Joined
Mar 2, 2014
Messages
30
Location
Medina, OH
Cool ideas! I like the thought about lights on the underside also!

That thing Thumper has looks like the base for a surgical microscope.
 

2oolhound

Well-known member
Joined
Dec 18, 2010
Messages
5,918
Location
BC Canada
That's funny you mention. I sat on the end of mine as soon as I finished welding & bent it. I weighed 250 so I know I am good, cant lift but a fraction of that now. :thumbup:

These things have been reminding me of the topside dollys that were posted recently. We should make them combos, trays and dollys
 

Thumper68

Well-known member
Joined
May 16, 2013
Messages
5,134
Location
Duluth MN
Cool ideas! I like the thought about lights on the underside also!

That thing Thumper has looks like the base for a surgical microscope.

Very well could be, I found it stripped down in a hospitals disposal area, they put stuff out there for anyone to haul away.
 
OP
S

superbovine

Well-known member
Joined
Apr 4, 2017
Messages
63
Location
Vero Beach
Squeezed in a quick hour or so tonight after work. Got some marginally unnecessary support braces installed (more for looks than anything since the angle is so extreme... it just needed a little oomph in the looks down there), and can now definitively put all my weight on it with no creaks or pops so long as I am not on the very end (tips over with that much weight on the end). It can hold me dead center on it just fine.
I cut the panels for the trays out and dropped them into place for a photo. I think I am going to try using some regular construction adhesive I have laying around and see how it does rather than spending ~$30 for a new tube of panelbond for something that isn't terribly important.
I am thinking about forgoing the nice paint job on this one and doing a bedliner coating or something similar perhaps.
attachment.php

attachment.php
 

Attachments

  • 2017-05-16 18.21.15.jpg
    2017-05-16 18.21.15.jpg
    147.5 KB · Views: 702
  • 2017-05-16 18.31.27.jpg
    2017-05-16 18.31.27.jpg
    108.5 KB · Views: 707

RLYoung

Well-known member
Joined
Jan 16, 2011
Messages
147
Location
Arizona
Very nice. I have the Blue Point one and it's one of those things I don't know how I worked on **** without it...

Cool little project.
 
OP
S

superbovine

Well-known member
Joined
Apr 4, 2017
Messages
63
Location
Vero Beach
Well, that's infuriating. I have exactly... not enough drawer liner to finish. Oh well, I'll think of something.
I ended up using some Liquid Nails construction adhesive on the insert panels and it satisfied like always. I coated the whole thing in some aerosol bedliner material which worked out OK, then masked off the inside quickly to shoot some aerosol red in there to break up all the black a little. I think its good enough... I will probably shoot some (aerosol) clear over it but that's about it. Just need to figure out what I'm doing with the giant *** section I can't adequately cover with drawer liner. I knew I should have started there, I'm sure I could have made it last enough based on the scraps I have :(

attachment.php
 

Attachments

  • 2017-05-17 20.56.12.jpg
    2017-05-17 20.56.12.jpg
    113.6 KB · Views: 286
OP
S

superbovine

Well-known member
Joined
Apr 4, 2017
Messages
63
Location
Vero Beach
Alright, I got more pissed about the drawer liner and took it all out.
I made use of some more of the aluminum punch out I used in the snap on end cabinet build to put in the bottom instead. Probably be a ****** to clean, but that's what pressure washers are for.
They are just laying in there in the picture, but I drenched the bottom in paint and then put weights on top to see if I can make it stick from paint alone. If not I will figure something else out... when perfectly flat the red shines through nicely, so I'd like to preserve that if possible.
attachment.php


{edit}
This looks ideal!
http://www.ebay.com/itm/High-Intens...-w-Flexible-Adjustable-Magnetic-/252753319696
...but not for $80. That magnet base and arm for a dial indicator is like $15 from HF, so there's got to be a cheaper option out there than $80.
 

Attachments

  • 2017-05-18 19.32.14.jpg
    2017-05-18 19.32.14.jpg
    152.8 KB · Views: 265
Last edited:
Joined
Apr 15, 2016
Messages
6
Good job I like it. We work on mostly trucks in the shop and we are going to build a couple that go around 55 inches tall to clear most diesel trucks. Can't see spending 200 on SO and then have to cut it to make go taller. Goo
 
To avoid these ads, REGISTER NOW!
Top Bottom