To avoid these ads, REGISTER NOW!

Update: Rustoleum epoxy-shield first half done

flynavy812

Active member
Joined
Apr 13, 2019
Messages
36
Location
Oklahoma
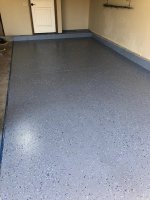
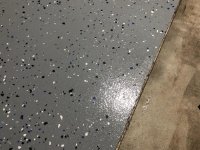
Wanted to start a new thread to update my decision, as well as provide future updates for how its holding up. After MUCH back and forth, I decided to use the kit I already own. Shea recommended I combine both kits to get a more thick application, so I did. For what its worth, all of my kits were tinted "gunmetal gloss" but to be honest, looks just like the standard grey. The guys at Lowes just put it under machine and hit a little code, probably like those fancy Coke machines. Didn't seem to do much.

My biggest issue was not knowing how much is too thick or too thin, so I ended up having A LOT of product left over. This half of my garage is roughly 210sq ft, I had at least a half gallon left from a 1.5 gallon total start.

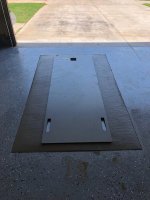
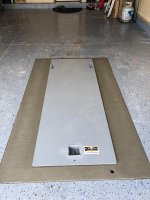
I do plan on applying the clear coat, and my plan is to buy two rustoleum clear kits at about 90.00 each after my military discount at Lowes. What is surprising to me is they are 100% solids according to their data sheet. I had no idea. So I plan to lay it down generously to hopefully provide even more protection. I also plan on buying some sort of car specific mat to avoid any further issues. I'll only be here 4 years so I want it to look good when I go to sell. If it means using a mat or two, so be it. I really couldn't justify a 500.00 purchase for the really nice kits, when you add all of this up, I'm probably not going to be THAT far off one of those kits so who knows maybe I'll regret this hard but it is what it is.

So far I've spent...

70.00 on 2.5 and 1 car garage kit of epoxy-shield water based.
~30.00 in materials and prep
~200.00 will be spent on the clear coat.

So roughly 300.00 all in. I probably could of done just a 100% solids application with chips for roughly 380.00. Many brands were in that price range. At this point I can't do much.
 

Attachments

  • IMG-1704.jpg
    IMG-1704.jpg
    150.3 KB · Views: 323
  • IMG-1705.jpg
    IMG-1705.jpg
    153 KB · Views: 281
  • IMG-1706.jpg
    IMG-1706.jpg
    136 KB · Views: 281
To avoid these ads, REGISTER NOW!

ford33

Well-known member
Joined
Feb 26, 2011
Messages
2,118
Location
Chicago, IL. USA
Looks nice. You did a nice job with the chips and the color choice.

Put a reminder on your calendar and send a picture update every year for the next four years with comments about what work is being done in the garage. That will get a lot of interest from the group.

The epoxy always looks nice the first day. The real test is how it holds up to your use in the garage.

Thanks for posting.
 

MBlackFF

Member
Joined
Apr 21, 2019
Messages
7
Location
California
Nice, did you use the epoxy-shield clear? I was looking at either that or the Rustoleum polyurea clear which a lot of people on here are suggesting...once I figure out the damn issue I’m having with different shades of grey
 
OP
F

flynavy812

Active member
Joined
Apr 13, 2019
Messages
36
Location
Oklahoma
Nice, did you use the epoxy-shield clear? I was looking at either that or the Rustoleum polyurea clear which a lot of people on here are suggesting...once I figure out the damn issue I’m having with different shades of grey

I bought two of the kits and haven't put it down yet. According to their specs, its 100% solids which surprised me. Recommended at 2.5-5mils to get 2.5-5mils dry film. I'm using one kit per side, and each side of my garage is roughly 220sqft if you include all the trim.
 

MBlackFF

Member
Joined
Apr 21, 2019
Messages
7
Location
California
I bought two of the kits and haven't put it down yet. According to their specs, its 100% solids which surprised me. Recommended at 2.5-5mils to get 2.5-5mils dry film. I'm using one kit per side, and each side of my garage is roughly 220sqft if you include all the trim.

Yeah I was thinking of going with that but after reading through a few threads on here I’m second guessing it. Yours turned out nice, did you happen to see mine in the most recent thread? So frustrating!
 
OP
F

flynavy812

Active member
Joined
Apr 13, 2019
Messages
36
Location
Oklahoma
Yeah I was thinking of going with that but after reading through a few threads on here I’m second guessing it. Yours turned out nice, did you happen to see mine in the most recent thread? So frustrating!

I see what you mean, that's weird. I definitely have some "off" areas on mine where I realized I had a ton left so I started going a little bit thicker, but not anything like that. You could always reach out to Rust-Oleum and ask. They get a lot of hate but they do seem to at least respond and try to resolve issues it seems.
 
OP
F

flynavy812

Active member
Joined
Apr 13, 2019
Messages
36
Location
Oklahoma
Clear coat for first half is on. Super worried I had an out-gas issue, but after getting down and really looking closely, I don't think its that. I even took a needle to an inconspicuous area and it doesn't "pop". I think it is in fact the anti-skid additive that gives this appearance. Its so shiny and clear that these sand like particles look like bubbles. Not sure what it will look like when its cured. Its been about 6 hours since applying and it still looks very wet. I didn't feel like I applied it that thick so I'm hoping that's not the issue either.

I hope this turns out well, but to be quite honest if I could start again I would have bought the 500.00 kit from one of the vendors and stopped worrying as much. You can bet my next house that I'm in longer will have the good stuff.
 

Attachments

  • IMG_1729.jpg
    IMG_1729.jpg
    154.6 KB · Views: 211
OP
F

flynavy812

Active member
Joined
Apr 13, 2019
Messages
36
Location
Oklahoma
Floor looks good. Anti skid in full effect, it spread well and the whole floor is definitely skid proof. Missed a few tiny areas I might sand and touch up when I finish second half.
 
OP
F

flynavy812

Active member
Joined
Apr 13, 2019
Messages
36
Location
Oklahoma
Curious why you chose the epoxyshield clear instead of using a poly?

Keeping it within the brands lineup, didn’t want to risk something possibly happening. Not sure if that’s the best logic but that’s how I decided.

Got everything moved over and started prep on other half today. Lots of little paint spots I had to pressure wash off. There is a large oil stain and a lot color/black **** came up from the pressure washer which was nice. Next I’m going to degrease hard and basically repeat what I did on the other side.
 
To avoid these ads, REGISTER NOW!
OP
F

flynavy812

Active member
Joined
Apr 13, 2019
Messages
36
Location
Oklahoma
Hey guys... 670 views... thanks for reading. I know there is someone out there like me reading these forums at 2AM obsessing over what they should do, so I do hope this helps.

I have officially finished the garage. Its been way bigger of a project than I ever expected but I learned a ton.

My biggest takeaway from this project and I have no shame admitting it: I probably came in 200-250.00 cheaper than a kit from a supplier on this site. That would have included higher quality materials, and a prime coat. My next house will absolutely have something better put on. It will be even easier because the garage will be empty prior to us moving in. I really hope this holds up, but if it doesn't in the 4 years I'll be here, its a huge learning point. I knew the risks associated with this product and I accepted them.

I did the second half without my wifes assistance, I got excited and shes out of town so I went for it. Had a narrow gap in the weather and had to act fast. I need to work on slowing down and having patience, because things got messy quick. I spilled some new epoxy on the already done side, so there are a few matte looking areas that I'll have to deal with.

The clear coat is an absolute pain to see, it really is. I used one full kit per side, I strongly believe this is NOT enough to do 500 sqft of covered concrete. I did end up having roughly .5 gallons left of colored epoxy, again. I can only lay it on so thick so I don't think I wasted any. Each half of the garage is around 220 sq ft so its really like using one of their 1 car kits. The one kit was 10.00 on clearance so I'm not too upset about that.

The color appears to match 95% if not 100%. I was really concerned about this since I did it in stages. I initially mixed all three gallons together and then split them up, I think it came out well.
 

Attachments

  • IMG-1784.jpg
    IMG-1784.jpg
    149.5 KB · Views: 158
OP
F

flynavy812

Active member
Joined
Apr 13, 2019
Messages
36
Location
Oklahoma
Also, thanks again to Shea at allgaragefloors. Seriously, what a good dude, we had quite the email chain going on and he really answered all questions I had.
 

dolphans1

Member
Joined
May 6, 2019
Messages
5
Location
Texas
Hey guys... 670 views... thanks for reading. I know there is someone out there like me reading these forums at 2AM obsessing over what they should do, so I do hope this helps.

I have officially finished the garage. Its been way bigger of a project than I ever expected but I learned a ton.

My biggest takeaway from this project and I have no shame admitting it: I probably came in 200-250.00 cheaper than a kit from a supplier on this site. That would have included higher quality materials, and a prime coat. My next house will absolutely have something better put on. It will be even easier because the garage will be empty prior to us moving in. I really hope this holds up, but if it doesn't in the 4 years I'll be here, its a huge learning point. I knew the risks associated with this product and I accepted them.

I did the second half without my wifes assistance, I got excited and shes out of town so I went for it. Had a narrow gap in the weather and had to act fast. I need to work on slowing down and having patience, because things got messy quick. I spilled some new epoxy on the already done side, so there are a few matte looking areas that I'll have to deal with.

The clear coat is an absolute pain to see, it really is. I used one full kit per side, I strongly believe this is NOT enough to do 500 sqft of covered concrete. I did end up having roughly .5 gallons left of colored epoxy, again. I can only lay it on so thick so I don't think I wasted any. Each half of the garage is around 220 sq ft so its really like using one of their 1 car kits. The one kit was 10.00 on clearance so I'm not too upset about that.

The color appears to match 95% if not 100%. I was really concerned about this since I did it in stages. I initially mixed all three gallons together and then split them up, I think it came out well.

Looks great !!!!
 
OP
F

flynavy812

Active member
Joined
Apr 13, 2019
Messages
36
Location
Oklahoma

The icing on top is Lowes sent me an 80.00 rebate. Its 40.00 per kit and I though it excluded clearance, not complaining.

I spent a total of 339.00 on materials including equipment, and I'm getting 80.00 from Lowes which we all know I would have spent there anyways so I am counting that towards the cost overall. So effectively around 260.00 to do the whole floor with clear coat. Time will tell. I plan on updating this post often, I really appreciate a good update so I plan to provide one for this great community.
 

dolphans1

Member
Joined
May 6, 2019
Messages
5
Location
Texas
The icing on top is Lowes sent me an 80.00 rebate. Its 40.00 per kit and I though it excluded clearance, not complaining.

I spent a total of 339.00 on materials including equipment, and I'm getting 80.00 from Lowes which we all know I would have spent there anyways so I am counting that towards the cost overall. So effectively around 260.00 to do the whole floor with clear coat. Time will tell. I plan on updating this post often, I really appreciate a good update so I plan to provide one for this great community.

You did an outstanding job. Looks like the old terrazzo flooring they did in the 60's when America Was Great !!!!
 
OP
F

flynavy812

Active member
Joined
Apr 13, 2019
Messages
36
Location
Oklahoma
Everyone likes a good update right?

Floor is holding up OK, it gets dirty VERY fast. I contribute this to our dusty clay soil, and that I'm doing a ton of yard work constantly in and out with different equipment. If I wasn't doing this as much, I do believe it would be much cleaner. We used a steam mop to get it clean and it did a great job. Key notes below.

-Gets pretty dirty like mentioned above
-Definitely some scratches here and there from not being careful moving stuff.
-I definitely regret trying to freehand caulk the expansion joints, its much harder than I thought and it looks pretty crappy in some areas.
-My wife has parked in here probably 5-10 times now that I got her a new car, so far no issues... time will tell.
-I missed a few areas of clear so there are some minor rough areas, but it hasn't been a problem.


I had a storm shelter put in today and I was extremely worried my hard work would be ruined. They use a wet saw to cut the shape of the shelter, excavate, and then drop the shelter in and back fill with concrete. I asked them to skip the final pressure washing to prevent any damage and that I would clean up, so these photos are before I've had a chance to clean. They chipped one of the corners of the cuts and its very small, I was expecting much worse. Coincidentally, all of their shelters come epoxied in the same grey as my floor, with color chips... how neat!

I'll continue to provide updates as I feel. If you don't hear from me, the floor has failed and I'm too ashamed to admit it.
 

Attachments

  • IMG-2004.jpg
    IMG-2004.jpg
    112.7 KB · Views: 91
  • IMG-2005.jpg
    IMG-2005.jpg
    88.5 KB · Views: 86
  • IMG-2006.jpg
    IMG-2006.jpg
    109.9 KB · Views: 97
  • IMG-2007.jpg
    IMG-2007.jpg
    152.8 KB · Views: 102
OP
F

flynavy812

Active member
Joined
Apr 13, 2019
Messages
36
Location
Oklahoma
Another update, wow where did the time go?! The floor has held up great! I’m a little sad to go, but excited to coat a new garage. I told myself the next time will be a higher quality kit and I’m sticking to that. There’s a ton of companies selling these kits. What’s the latest and greatest these days?
 
To avoid these ads, REGISTER NOW!
Top Bottom