Osram Nightbreaker H4 is also certified and seems even more common than the Phillips as a retrofit in older cars, at least where I live.Thanks for pointing these out - I wasn't aware of them.
There are a lot of LED replacement bulbs on Amazon and other places that have bad reputations. The general consensus is that they cause a lot of glare when put in standard H4 or H1 housings.
Philips, on the other hand, is a real company that I tend to trust. Unlike many other LED replacement bulbs these are actually certified - in parts of Europe. I can't find anything on US DoT certification for them. Online reviews look good, which is encouraging. The reviews focus on beam pattern and glare and agree that Philips got it right.
Right now for old cars using 5-3/4" or 7" headlights it looks like the choices are:
1. Holley RetroBrite. Complete headlight assembly designed for LEDs. US DoT certification - fully legal. Good reviews. $800 for 4 headlights.
2. Philips Ultinon. H4 and H1 replacement bulbs. Old cars require replacement reflectors/housings like Cibie, Koito, or Hella that use H4 or H1 bulbs. Certification in some European countries. Price around $150 for a pair of bulbs. Bulbs and reflectors around $500 for 4 headlights. Doesn't look like they would fit in my headlight pods.
3. Hella replacement headlights. Sealed beam compatible replacements that use H4 or H1 bulbs (bulbs included). European E-code certification. Price around $200 for 4 headlights.
4. Sealed beam halogen headlights. Full US DoT certification. The standard replacement for the last 30 years. Around $50 for 4 headlights.
5. Cheap aftermarket LED or HID bulbs in a standard housing: Please don't!

You are using an out of date browser. It may not display this or other websites correctly.
You should upgrade or use an alternative browser.
You should upgrade or use an alternative browser.
Upgrading Old Car Electrical System
- Thread starter rdoty
- Start date
Jehannum
Well-known member
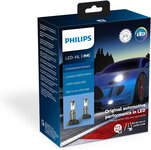
If you have the space for them, yeah. That's a non-starter for my Z, but they might work in my GTO.Philips LEDs is a great upgrade. I have these in my old Suburban (9005/9006) housing. Reduced current draw, light aimed at the street with a sharp cutoff line.

I'll add a choice for H4 bulbs. Toyota sells a kit with two Japanese-made Koito lamps, plus bulbs, harness, and relays for roughly $20 a pair, part number 81110-60p70. The Koitos are good quality
You will want to purchase from a Toyota dealer (I ordered from Toyota Parts Overstock, in Lakeland, FL) Many of these kits are on ebay from resellers overseas wanting $18 plus outrageous shipping, which is not a deal.
Discussed on the Grassroots Motorsports forum here: https://grassrootsmotorsports.com/forum/grm/if-anyone-needs-h4-headlights/265435/page1/
For some reason, the photos on the Toyota sites are not representative. The photos shown on the Grassroots Motorsports thread and the eBay listings are representative of the headlights kit I received.
You will want to purchase from a Toyota dealer (I ordered from Toyota Parts Overstock, in Lakeland, FL) Many of these kits are on ebay from resellers overseas wanting $18 plus outrageous shipping, which is not a deal.
Discussed on the Grassroots Motorsports forum here: https://grassrootsmotorsports.com/forum/grm/if-anyone-needs-h4-headlights/265435/page1/
For some reason, the photos on the Toyota sites are not representative. The photos shown on the Grassroots Motorsports thread and the eBay listings are representative of the headlights kit I received.
Last edited:
I would second these. I have 2 sets awaiting my Jeep project rebuild.I'll add a choice for H4 bulbs. Toyota sells a kit with two Japanese-made Koito lamps, plus bulbs, harness, and relays for roughly $20 a pair, part number 81110-60p70. The Koitos are good quality
You will want to purchase from a Toyota dealer (I ordered from Toyota Parts Overstock, in Lakeland, FL) Many of these kits are on ebay from resellers overseas wanting $18 plus outrageous shipping, which is not a deal.
Discussed on the Grassroots Motorsports forum here: https://grassrootsmotorsports.com/forum/grm/if-anyone-needs-h4-headlights/265435/page1/
For some reason, the photos on the Toyota sites are not representative. The photos shown on the Grassroots Motorsports thread and the eBay listings are representative of the headlights kit I received.
alwaysFlOoReD
Well-known member
I ordered a set from a Calgary, Canada, Toyota dealer. $49.00 taxes in. We'll see when they get here.
A quick update: after installing the Hella's I upgraded the bulbs to Sylvania 9003 SilverStar Ultra High Performance Halogen Headlight Bulbs – these got good reviews as one of the brightest bulbs available without getting into the 100 watt offroad lights. They are noticeably brighter than the standard H4 bulbs.
With the new bulbs in place and darkness fallen I headed out on a test drive. On low beam the road 10 feet in front of the car was brightly lit. On high beam I could clearly see the tops of trees. Hmm, looks like there is room for improvement...
When rebuilding the suspension I installed heavy duty rear leaf springs, which raised the rear. The headlight pods have been off and on the car several times and the guts of the pods, which include mounting for the headlights, have been in and out. Not to mention that the headlight pods were sent out to be rechromed. The Hella headlights might not point exactly the same place as the original sealed beam bulbs. It would be amazing if the headlight aim hadn't changed.
Pull the car into the garage and shine the headlights on the back wall. Yup, low beams point down and hi beams point up. Grab a screwdriver and get after the adjuster screws.
Once things look good on the back wall head out for a test drive. I can see! Good pattern from the low beams and a good pattern from the hi beams. Oncoming cars aren't flashing their headlights at me, so the headlights don't seem to be aimed too high.
Not quite as good as modern cars, but much better than it was. The Imperial is now comfortable to drive at night!
And before anyone says anything, yes, I should have adjusted the headlights two years ago...
With the new bulbs in place and darkness fallen I headed out on a test drive. On low beam the road 10 feet in front of the car was brightly lit. On high beam I could clearly see the tops of trees. Hmm, looks like there is room for improvement...
When rebuilding the suspension I installed heavy duty rear leaf springs, which raised the rear. The headlight pods have been off and on the car several times and the guts of the pods, which include mounting for the headlights, have been in and out. Not to mention that the headlight pods were sent out to be rechromed. The Hella headlights might not point exactly the same place as the original sealed beam bulbs. It would be amazing if the headlight aim hadn't changed.
Pull the car into the garage and shine the headlights on the back wall. Yup, low beams point down and hi beams point up. Grab a screwdriver and get after the adjuster screws.
Once things look good on the back wall head out for a test drive. I can see! Good pattern from the low beams and a good pattern from the hi beams. Oncoming cars aren't flashing their headlights at me, so the headlights don't seem to be aimed too high.
Not quite as good as modern cars, but much better than it was. The Imperial is now comfortable to drive at night!
And before anyone says anything, yes, I should have adjusted the headlights two years ago...
msharley
Well-known member
Hey R,
Fantastic "chronicle" of your MoPaR Electrix Journey!
Am sure this thread is need of a "sticky" for resurrecting the Electrical Side of things in "Vintage/Classic" cars/trucks!
Label Makers, Wire, Terminal, Powered(blame) Windows & fusing selections...!
How I missed this thread...up to now? (I'm an idjit).....Great, great info/pics from you & all that have posted! Even the QUESTIONS are a great source of knowledge....(I distinctly remember...........forgetting THAT!) LOL!!
Keep up the great work! (Labour of Love??) LOL!
Later, Mark
Fantastic "chronicle" of your MoPaR Electrix Journey!
Am sure this thread is need of a "sticky" for resurrecting the Electrical Side of things in "Vintage/Classic" cars/trucks!
Label Makers, Wire, Terminal, Powered(blame) Windows & fusing selections...!
How I missed this thread...up to now? (I'm an idjit).....Great, great info/pics from you & all that have posted! Even the QUESTIONS are a great source of knowledge....(I distinctly remember...........forgetting THAT!) LOL!!
Keep up the great work! (Labour of Love??) LOL!
Later, Mark
partsguy5768
Well-known member
- Joined
- Dec 12, 2024
- Messages
- 347
There is a bunch of universal wiring kits out there and some car specific. They all work well and are not that expensive. Example used this one just a few months ago on my parts chaser.. https://www.speedwaymotors.com/12-C...ing-Harness-125-Piece-Grommet-Kit,466081.html easy easy.I’m restoring an old car – a 1963 Imperial. Yes, I’ve had my head examined. I have one.
One of the biggest weaknesses in older cars is the electrical system. These were typically marginal from the factory and don’t age well. Marginal size of wire, corrosion in connectors, switches, and wire, as well as 50 year old insulation all combine into a lurking dragon waiting to pounce at the worst possible time.
It is easy to find horror stories about melted connectors, burnt wiring, dash fires, and engine fires in old cars. Plus the reliability problems of things simply not working or not working well.
In addition to the steady weakening of the electrical system as it ages, demand for power increases. Traditional headlights have been replaced with high power quartz headlights. Radios have been replaced with infotainment systems – a modern infotainment system with a big amp can require more power than the entire car did in 1963! In addition there are more electrical devices in use today than 50 years ago.
I’ve really gotten used to the headlights in modern cars. I’m reaching the point of “enhanced maturity” where I don’t see as well at night as I used to, and powerful headlights are more a necessity than a luxury. The original headlights in the Imperial looked like they were using actual candles!
The Imperial came with a 35 amp alternator; air conditioned cars like mine were upgraded at the factory to a “high capacity” 40 amp alternator. In comparison, modern cars typically have 100+ amp alternators with many exceeding 200 amps.
Fortunately something can be done about this!
I’m using two main references: first is a set of tutorials on the Bodenzord website going into great detail on how to build a modern wiring system. These tutorials are superb and have cost me a lot of money in parts and tools.
The second is Daniel Stern Lighting which provides a lot of insight into upgrading lighting systems. This site is complementary to the Bodenzord site and makes clear the importance of wire size, relays, grounding, and headlight and bulb selection.
These two sites educated and inspired me to plan significant upgrades to the Imperial wiring, including:
This is just an introduction to the project - I will be posting updates on the actual work in the coming weeks.
- Think about and design a set of modifications and improvements to the electrical system.
- Upgrade the factory under-dash fuseblock to a modern fuseblock. The original fuseblock contained six glass fuses. The new fuseblock has 20 ATC Mini fuses on two separate buses – 10 switched/accessory and 10 unswitched/always on. Each bus is driven with 40 amps of power through new wiring.
- Bypass the ammeter. This is perhaps the greatest weakness of old Mopars – the entire electrical load is routed through a gauge in the instrument cluster. I’m bypassing the ammeter and routing most loads through new wiring. The only downside is that the ammeter no longer shows charging status. I will be adding a voltage meter as part of the upgrades – voltage meters are actually more useful in determining what is going on with the electrics.
- Changing how power is delivered from the alternator and battery to the rest of the electrical system.
- Upgrading the firewall bulkhead connector to a modern waterproof design.
- Adding a new under-hood fuse and relay block.
- Moving heavy loads like headlights from the factory wiring to new wiring.
- Moving all heavy loads from switches to switch/relay configurations.
- Installing new upgraded wiring for major circuits – typically one to two sizes heavier wire for each circuit.
- Redesigning the alternator circuit with larger 60 amp alternator, heavier wiring (go from 12ga to 6ga), and a solid state voltage regulator.
- Upgrading the grounding system. Many electrical problems, especially in older cars, are due to poor grounds. The grounds are just as important as power!
- Labeling everything to simplify troubleshooting and to help me when I have to work on something in a couple of years.
Attachments

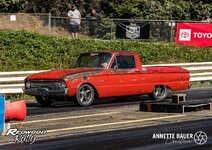

Bit of patina on that. That is a really well done engine bay! Looks like that truck might be a bit of a street sleeper...There is a bunch of universal wiring kits out there and some car specific. They all work well and are not that expensive. Example used this one just a few months ago on my parts chaser.. https://www.speedwaymotors.com/12-C...ing-Harness-125-Piece-Grommet-Kit,466081.html easy easy.
partsguy5768
Well-known member
- Joined
- Dec 12, 2024
- Messages
- 347
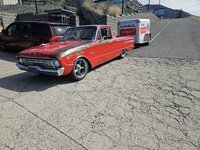
Lol runs in the 11.9s 1st time out of the box this last September at the redwood ralley. Will run 11.5s I predict when I can get back to the drag strip and do some tuning and learn to drive it as I hurt the trans 2nd gear ( txk 5 speed) 1st day of the ralley. Still managed to run 11.9 on the 4th and 5th day of the ralley with a hurt trans. Very mild combination and is my parts chaser. Not close to a race car. Fun ride. This is my " clean" engine compartment on my 68 I built before this ride..Bit of patina on that. That is a really well done engine bay! Looks like that truck might be a bit of a street sleeper...
Attachments


Last edited:
Sir, you are an artist under the hood!Lol runs in the 11.9s 1st time out of the box this last September at the redwood ralley. Will run 11.5s I predict when I can get back to the drag strip and do some tuning and learn to drive it as I hurt the trans 2nd gear ( txk 5 speed) 1st day of the ralley. Still managed to run 11.9 on the 4th and 5th day of the ralley with a hurt trans. Very mild combination and is my parts chaser. Not close to a race car. Fun ride. This is my " clean" engine compartment on my 68 I built before this ride..
partsguy5768
Well-known member
- Joined
- Dec 12, 2024
- Messages
- 347
Maybe... if so the slowest artist in the world... takes me forever to get anything doneSir, you are an artist under the hood!
Ohmthis
Well-known member
Rdoty, I assume the new lights use the same style plug correct?
Yes, the H4's use the same 3 pin plug as the old style sealed beam headlights.Rdoty, I assume the new lights use the same style plug correct?
I was worried about heat buildup in the headlight pods so I used ceramic connectors. Unfortunately the ones I got don't seem to make a strong connection with the headlight bulb. I'm considering trying to locate some good quality standard connectors and replacing them.
Ohmthis
Well-known member
Can the actual wire connectors be removed from the plug and replaced with better quality ones?
Ohmthis
Well-known member
Depending on the type and size, you have a bunch of options.do you have a picture of the connector plug?Good question - I hadn't thought of that. Any thoughts on where to get better connectors? Amazon and Rock Auto probably aren't the best sources...

ToolsRCool
Well-known member
What are you running for a replacement alternator? Sorry if I missed it.
I ended up with a 65 amp alternator and solid state voltage regulator for a 1972 Imperial. The year was somewhat arbitrary - I wanted a matching alternator and voltage regulator from after the switch to solid state regulators and before any other changes occurred. So far so good. There are times when I definitely outsmart myself...What are you running for a replacement alternator? Sorry if I missed it.
ez-duzit
Well-known member
These look like cheap imports.This is the one I got from Amazon:
The individual plugs are somewhat loose on the bulb.
ez-duzit
Well-known member
This is not the place to save money.
Jehannum
Well-known member
If you run a pin tool down the bottom of the "T" slot, you can extract those wires from the back, and then replace them with better quality terminals.This is the one I got from Amazon:
The individual plugs are somewhat loose on the bulb.
That'll be chasing tiny gains though.
ez-duzit
Well-known member
Buy quality.I agree. Do you have a suggestion for better ones?
Ohmthis
Well-known member
Those are uninsulated locking female spade connectors. Mouser, digikey, and other electronics suppliers will have good quality ones. The problem is you’ll only need a dozen and the shipping will far outweigh the benefits. Are the bulbs loose on the terminal or plug? You can remove them and slightly mash the terminal closed. What size wire? If I have some I’ll send you 10 or so.
Hmm, good point. I was thinking that this was some flavor of special connector. The wire is 14ga. If you have some spares I would appreciate it.Those are uninsulated locking female spade connectors. Mouser, digikey, and other electronics suppliers will have good quality ones. The problem is you’ll only need a dozen and the shipping will far outweigh the benefits. Are the bulbs loose on the terminal or plug? You can remove them and slightly mash the terminal closed. What size wire? If I have some I’ll send you 10 or so.
Looks like I need to place another connector order! I was just thinking that I really should get some good spade connectors.
Ohmthis
Well-known member
Measure the width of the terminal and pm me with where I can send them.
If anybody is interested in this upgrade kit and having trouble getting them I just got four sets from here, it was only $83 total with shipping for all four sets. I kept ordering them from various dealers and then 2-10 days later the dealer would email me a out of stock notice, these guys shipped the next day. Also as mentioned they have the wrong picture on their site, same as all the dealers I looked at. https://parts.toyotasandiego.com/parts/toyota-headlamp-assembly-8111060p70I'll add a choice for H4 bulbs. Toyota sells a kit with two Japanese-made Koito lamps, plus bulbs, harness, and relays for roughly $20 a pair, part number 81110-60p70. The Koitos are good quality
You will want to purchase from a Toyota dealer (I ordered from Toyota Parts Overstock, in Lakeland, FL) Many of these kits are on ebay from resellers overseas wanting $18 plus outrageous shipping, which is not a deal.
Discussed on the Grassroots Motorsports forum here: https://grassrootsmotorsports.com/forum/grm/if-anyone-needs-h4-headlights/265435/page1/
For some reason, the photos on the Toyota sites are not representative. The photos shown on the Grassroots Motorsports thread and the eBay listings are representative of the headlights kit I received.
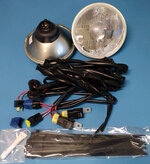
Here is a picture of what you get as it seem hard to find one that shows the whole kit. Plugs into your existing headlight bulb connector and connects to your battery so your old wiring doesn't have any load besides switching the relays, and you do not need to modify or cut anything. Also comes with built in fuse holders and fuses, as well as pre-installed H4 bulbs. Even comes with zip ties and dielectric grease. Really nice upgrade kit for basically anything that uses two 7" round headlights, especially for about $20.If anybody is interested in this upgrade kit and having trouble getting them I just got four sets from here, it was only $83 total with shipping for all four sets. I kept ordering them from various dealers and then 2-10 days later the dealer would email me a out of stock notice, these guys shipped the next day. Also as mentioned they have the wrong picture on their site, same as all the dealers I looked at. https://parts.toyotasandiego.com/parts/toyota-headlamp-assembly-8111060p70
Ohmthis
Well-known member
What are the wattage on the bulbs? I love the idea of brighter lights, I’m not down with harnesses. I do understand that this an upgrade kit. I also understand that without the correct size wire and fuses/relays you will not get the wanted light output.
They are H4 bulbs so you can find pretty much anything you want power wise. The bulbs that come in it are the correct H4 60/55w rating though.What are the wattage on the bulbs? I love the idea of brighter lights, I’m not down with harnesses. I do understand that this an upgrade kit. I also understand that without the correct size wire and fuses/relays you will not get the wanted light output.
In a previous post I documented problems with the courtesy lights coming on when they weren’t supposed to. I fixed this problem. Several times. In September it came back. The courtesy lights were coming on and staying on, busily draining the battery.
Thoroughly frustrated I parked the car, disconnected the battery, threw a car cover over it, and moved on to other projects.
Last week I decided it was time to tackle this problem again. Pull the car cover off and reconnect the battery. Yup, the courtesy lights are on.
The first step was to spend a couple of hours spelunking through the wiring diagrams in the Factory Service Manual. With a somewhat better understanding of how things are connected dive into the car.
Starting with a brute force approach I pulled the fuse for the dome light. Which also powered the tail lights, rear turn signals, and brake lights. The tail lights went out and the courtesy lights remained on. Not what I expected.
Pulling the main fuses that power all of the interior circuits turned off the courtesy lights – but nothing else did. After several hours of electrical troubleshooting – also known as electrical frustration – I called it quits for the day before something bad happened.
Going back the next day I started with again studying the wiring diagrams. OK, let’s take a close look at this: the dome light, front door courtesy lights, and map light all come on when you open the doors, so they are all on the same circuit. So why can’t I find the dome light on the wiring diagram?
Background info: The dome light isn’t installed. The dome light housing, without a dome light lens, was in the trunk when I bought the car. And you can’t find the lens anywhere - it is one of the most un-obtainable parts for this car. I never installed the dome light – it is sitting in a box of parts somewhere. So I haven’t actually seen the dome light work.
Just a minute – there is the dome light, buried in tiny print in the corner of the wiring diagram. It isn’t part of the same circuit as the courtesy lights and map light. Huh. Well, that changes things. No wonder pulling the fuse had no effect! Bit in the **** by my assumptions yet again.
Pull the trim panel in the passenger footwell and study the wiring there. Everything looks OK…
Push in the door switch – and the lights go out. Odd… Close the door. And the lights get dimmer but stay on. Interesting! Play with the door. If you push on the door hard the lights go out. Open the door a fraction of an inch and the lights come back on. This is looking like the switch is right on the edge of on/off when the door is closed.
Get a thin piece of wood and tape it to the door where the switch touches as a shim. And now the courtesy light go on and off like they are supposed to.
This could explain the symptoms I’ve been seeing and fix the problem. But I’ve been here before. I’ll make a permanent shim since this is clearly a contributing factor. Hopefully this is the final fix – but I’m going to keep my eye on it.
The next project is replacing the door card on the front door. This will give me access to the inside of the door - I will double check all of the wiring inside the door while the door card is off.
Thoroughly frustrated I parked the car, disconnected the battery, threw a car cover over it, and moved on to other projects.
Last week I decided it was time to tackle this problem again. Pull the car cover off and reconnect the battery. Yup, the courtesy lights are on.
The first step was to spend a couple of hours spelunking through the wiring diagrams in the Factory Service Manual. With a somewhat better understanding of how things are connected dive into the car.
Starting with a brute force approach I pulled the fuse for the dome light. Which also powered the tail lights, rear turn signals, and brake lights. The tail lights went out and the courtesy lights remained on. Not what I expected.
Pulling the main fuses that power all of the interior circuits turned off the courtesy lights – but nothing else did. After several hours of electrical troubleshooting – also known as electrical frustration – I called it quits for the day before something bad happened.
Going back the next day I started with again studying the wiring diagrams. OK, let’s take a close look at this: the dome light, front door courtesy lights, and map light all come on when you open the doors, so they are all on the same circuit. So why can’t I find the dome light on the wiring diagram?
Background info: The dome light isn’t installed. The dome light housing, without a dome light lens, was in the trunk when I bought the car. And you can’t find the lens anywhere - it is one of the most un-obtainable parts for this car. I never installed the dome light – it is sitting in a box of parts somewhere. So I haven’t actually seen the dome light work.
Just a minute – there is the dome light, buried in tiny print in the corner of the wiring diagram. It isn’t part of the same circuit as the courtesy lights and map light. Huh. Well, that changes things. No wonder pulling the fuse had no effect! Bit in the **** by my assumptions yet again.
Pull the trim panel in the passenger footwell and study the wiring there. Everything looks OK…
Push in the door switch – and the lights go out. Odd… Close the door. And the lights get dimmer but stay on. Interesting! Play with the door. If you push on the door hard the lights go out. Open the door a fraction of an inch and the lights come back on. This is looking like the switch is right on the edge of on/off when the door is closed.
Get a thin piece of wood and tape it to the door where the switch touches as a shim. And now the courtesy light go on and off like they are supposed to.
This could explain the symptoms I’ve been seeing and fix the problem. But I’ve been here before. I’ll make a permanent shim since this is clearly a contributing factor. Hopefully this is the final fix – but I’m going to keep my eye on it.
The next project is replacing the door card on the front door. This will give me access to the inside of the door - I will double check all of the wiring inside the door while the door card is off.
Wiz02
Well-known member
@rdoty , I'm reaching pretty far into the way back machine, but I seem to remember something about door jamb switches "automagically" setting their travel, the first time that you close the door.
Now I'm not sure if that applies to your vehicle or not but the switches used to be cheap and not worth messing around with shims.
I did a quick eBay search for your Imperial and you can now buy what was a $2 part for $20. They look just like the ones that I remember and they might work more reliably than yours even if you do shim it.
Just a thought.
Now I'm not sure if that applies to your vehicle or not but the switches used to be cheap and not worth messing around with shims.
I did a quick eBay search for your Imperial and you can now buy what was a $2 part for $20. They look just like the ones that I remember and they might work more reliably than yours even if you do shim it.
Just a thought.