To avoid these ads, REGISTER NOW!

Utica Tools display cabinet

NJ Marty

Well-known member
Joined
Oct 20, 2014
Messages
1,157
Picked this great display cabinet up today at a sale. Might have been a hardware store display and think it might date to the 1940's. All of the fasteners to hold the tools to the back are missing with just a few halves left on the back of the display.
Does anyone know what these fasteners are called? I would like to get some so I can start filling it up.
 

Attachments

  • 001.jpg
    001.jpg
    126.9 KB · Views: 290
  • 023.jpg
    023.jpg
    139.3 KB · Views: 249
  • 003.jpg
    003.jpg
    139.8 KB · Views: 265
  • 004.jpg
    004.jpg
    130.7 KB · Views: 239
  • 005.jpg
    005.jpg
    144.1 KB · Views: 208
  • 010.jpg
    010.jpg
    125.8 KB · Views: 194
  • 011.jpg
    011.jpg
    131.5 KB · Views: 172
To avoid these ads, REGISTER NOW!

alinc100

Well-known member
Joined
May 26, 2013
Messages
3,027
Location
Dearborn,MI
Picked this great display cabinet up today at a sale. Might have been a hardware store display and think it might date to the 1940's. All of the fasteners to hold the tools to the back are missing with just a few halves left on the back of the display.
Does anyone know what these fasteners are called? I would like to get some so I can start filling it up.

Marty,
Those are called t-nuts or tee-nuts. We use 'em all the time .If you know what thread size you need I may be able to drop a handful in a padded envelope. You'd still need some type of bolt/machine screw from the front.
 
OP
N

NJ Marty

Well-known member
Joined
Oct 20, 2014
Messages
1,157
NJ pretty cool how much did it set you back?
I got it for $25, it was covered in a thick layer of dust when I brought it up with my other items. It was all grimy and they were glad I was taking it away.
 
OP
N

NJ Marty

Well-known member
Joined
Oct 20, 2014
Messages
1,157
Outstanding !! :rocker: :drool:
Utica's were/are top notch tools. :thumbup:

They sure are top notch. I have a minty pair of Utica 41-6 cutters to start filling the cabinet. I have a long way to go but it will be fun.
 

boro_boy70

Well-known member
Joined
Mar 29, 2009
Messages
627
Location
Whitesboro(Utica), NY
Very nice find!! These cabinets used a small machine screw, with a kind of square shaped "washer" to hold the pliers to the board. I'll try to take some pics when I get home later today. Nice cabinet, if you ever want to get rid of it let me know. I live near the old Utica Tools factories and collect old Utica stuff.
 

twertsy

Well-known member
Joined
Jan 5, 2014
Messages
6,726
Location
Reedville, VA
They sure are top notch. I have a minty pair of Utica 41-6 cutters to start filling the cabinet. I have a long way to go but it will be fun.

I might be able to help you out Marty ............... if you have some stuff to trade? I have a drawer full of (doubles) Utica pliers that are NOS in the box.
 
OP
N

NJ Marty

Well-known member
Joined
Oct 20, 2014
Messages
1,157
Very nice find!! These cabinets used a small machine screw, with a kind of square shaped "washer" to hold the pliers to the board. I'll try to take some pics when I get home later today. Nice cabinet, if you ever want to get rid of it let me know. I live near the old Utica Tools factories and collect old Utica stuff.
I saw that they used a type of square washer to hold the tools on and was thinking of using some kind of carbide inserts.
 

Attachments

  • popoi.jpg
    popoi.jpg
    9 KB · Views: 50
OP
N

NJ Marty

Well-known member
Joined
Oct 20, 2014
Messages
1,157
I might be able to help you out Marty ............... if you have some stuff to trade? I have a drawer full of (doubles) Utica pliers that are NOS in the box.

Thanks for the offer and I am always up for a trade. Let me know what you are interested in and I will see what I have.
 

boro_boy70

Well-known member
Joined
Mar 29, 2009
Messages
627
Location
Whitesboro(Utica), NY
I saw that they used a type of square washer to hold the tools on and was thinking of using some kind of carbide inserts.

They are also not a flat washer, they have a curve to them. The pegs in the middle where the adjustables go, use an L shaped peg. Here is a couple of pics showing the washers, and the pegs. Also a couple of catalog pics showing a couple of cabinets. One from 1952 - catalog #66, and the second one from 1960 catalog #67 showing a wire holder securing the pliers to the board. Something like that might be easier to make.
 
Last edited:
OP
N

NJ Marty

Well-known member
Joined
Oct 20, 2014
Messages
1,157
They are also not a flat washer, they have a curve to them. The pegs in the middle where the adjustables go, use an L shaped peg. Here is a couple of pics showing the washers, and the pegs. Also a couple of catalog pics showing a couple of cabinets. One from 1952 - catalog #66, and the second one from 1960 catalog #67 showing a wire holder securing the pliers to the board. Something like that might be easier to make.

Thanks for the info and pictures. I was hoping to find pictures like the ones you posted. And after seeing the pics I have the fencing pliers to go in the cabinet. Darn the cabinet I have is the first with red felt, no fencing pliers.
 
OP
N

NJ Marty

Well-known member
Joined
Oct 20, 2014
Messages
1,157
Alinc100, here is a picture of the size of the tee nuts.
Thanks again.
 

Attachments

  • 018.jpg
    018.jpg
    134.3 KB · Views: 60

LesserSon

Well-known member
Joined
Feb 7, 2016
Messages
5,062
Location
PA USA
RESURRECTION, anyone?
Wow, I checked for a general Utica thread, but there isn’t one. Ten specific threads. This one is the best fit for what I want to post.
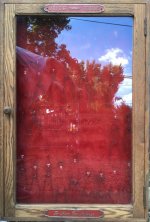
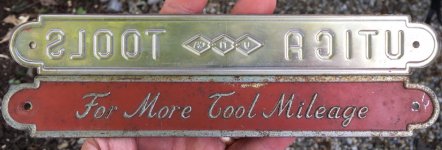
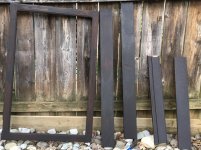
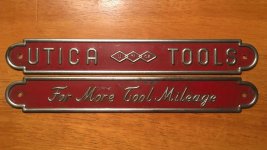
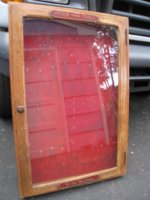
Last Sunday I picked up a UTICA display case, same model as NJ Marty’s, but not in so fine a condition. It’s missing ALL of the bolts and clips, and the pin to one hinge. The metal advertising plaques have surface rust, faded paint, on the face side, but retain perfect tin on the backsides. The light finish is gone, the glue has failed, and there’s a mildew stench to the back board. My guess is the WET summer heat we’ve had played a part in that. Sad to say, I paid three times what Marty did. The vendor said it came from a closing hardware store in Bloomsburg PA.
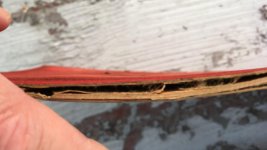
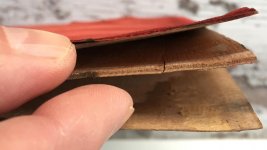
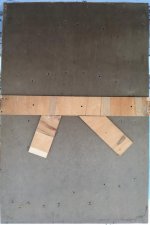
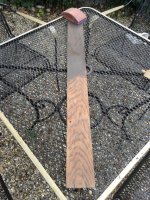
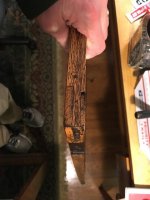
So, making lemonade, I plan to refinish the whole thing. I prefer darker oak, so that’s where I’ll be taking it. The back, which I was drying out in the sun to mitigate the mildew, is now delaminating, which encourages thoughts of total replacement. If I can get the red velour off the veneer, I may be able to reattach it to a new plywood back.
 

Attachments

  • 4069A6FE-8BFA-4F0C-ADC4-ACD9C050474B.jpg
    4069A6FE-8BFA-4F0C-ADC4-ACD9C050474B.jpg
    96.9 KB · Views: 71
  • 239E0B57-20F2-456A-8869-E3B648B36506.jpg
    239E0B57-20F2-456A-8869-E3B648B36506.jpg
    82.2 KB · Views: 63
  • E67637BF-1DFB-4408-8F00-74AC900ACBDC.jpg
    E67637BF-1DFB-4408-8F00-74AC900ACBDC.jpg
    84.8 KB · Views: 58
  • D6E311FD-55FC-49E0-AED9-2127DF7F4ADC.jpg
    D6E311FD-55FC-49E0-AED9-2127DF7F4ADC.jpg
    112.8 KB · Views: 64
  • A4775B6E-7ED5-4280-998D-38DEE1D7D783.jpg
    A4775B6E-7ED5-4280-998D-38DEE1D7D783.jpg
    80.9 KB · Views: 60
  • 58934C7C-9D54-41FB-8E97-DAE398A80B77.jpg
    58934C7C-9D54-41FB-8E97-DAE398A80B77.jpg
    84.6 KB · Views: 59
  • FB93D1EB-E7F3-49D8-BC74-D7CE8BED85F0.jpg
    FB93D1EB-E7F3-49D8-BC74-D7CE8BED85F0.jpg
    146.9 KB · Views: 70
Last edited:
To avoid these ads, REGISTER NOW!

LesserSon

Well-known member
Joined
Feb 7, 2016
Messages
5,062
Location
PA USA
Here’s removing the perfect glass, the back panel. The plywood V-reinforcements provide something for L-screws to bite into, supporting the adjustable wrenches. The side-to-side piece has three holes bored through in very symetrical pattern. There is no other apparent means of hanging the unit vertically, so I think that the holes served that purpose. Thus, the back panel supports the weight of the tools and the case itself. I’m more convinced than ever that this unit will get a fresh back panel!
The 1963 Utica catalog describes this case in some detail on page 15. Like Marty’s, this is version “A” with the 10” gas pliers number, not “B’” with the fence pliers. The good news: I already had the gas pliers!
Some unwelcome supervision from a lantern fly. Saw my first one last fall near Boyerstown PA. Now they’re everywhere around here.
 

Attachments

  • A1377506-5187-43D8-A724-ADAF78503C45.jpg
    A1377506-5187-43D8-A724-ADAF78503C45.jpg
    69.3 KB · Views: 82
  • F152CC13-185D-4541-A5E8-148A320B10EF.jpg
    F152CC13-185D-4541-A5E8-148A320B10EF.jpg
    72.3 KB · Views: 78
  • 4812377C-3A84-4AD6-AA6B-49EF0316D306.jpg
    4812377C-3A84-4AD6-AA6B-49EF0316D306.jpg
    51.8 KB · Views: 57
  • 11E94E7D-FB12-4692-87C5-34BD503F15ED.jpg
    11E94E7D-FB12-4692-87C5-34BD503F15ED.jpg
    168.2 KB · Views: 58
  • B703CF86-BD9A-43ED-B7A1-59DC5777F83B.jpg
    B703CF86-BD9A-43ED-B7A1-59DC5777F83B.jpg
    62.9 KB · Views: 52
  • D4F74F18-9DC8-46B3-8F55-B84E76D0529C.jpg
    D4F74F18-9DC8-46B3-8F55-B84E76D0529C.jpg
    104 KB · Views: 77
Last edited:

Stuart in MN

Well-known member
Joined
Sep 8, 2005
Messages
23,112
Location
Minneapolis
I wonder if you could get the lettering printed on a fresh sheet of velour with a big inkjet or laser printer...may be something worth talking to a local graphics shop about, rather than trying to clean up the stinky and dirty original.
 

LesserSon

Well-known member
Joined
Feb 7, 2016
Messages
5,062
Location
PA USA
One thing for sure: I was right to be cautious about dousing it in alcohol. There were a few bits that stuck to the wood corner glue blocks when I removed them. Today (first shellac-friendly weather since I bought it) I wiped them down with alcohol, and the red stain bled into the paper towel I was using.
That’s a good idea about replacing the back. If I go the route of duplicating the original, I could do the silkscreen myself, though those numbers are awfully small... could also check out availablity of white transfers. I think I’ve seen them in office supply stores. But I may make a custom back for the Utica pliers I have, rather than strictly the ones on the list. I already decided I’d prefer the earlier pressed-diamond grips over the smooth-handled ones contemporary with the case. And in that spirit, I began work on the sides and door, with the idea of making the case look older than it really is.
I began by knocking the four sides apart with a rubber mallet, then pulling the ten rusty finish nails out with end nippers. (I wish they had been Uticas, but all I have is PS&Ws!) I will be leaving the four remaining nails in the door, where they function as pins in the joints. Next, I drenched and scrubbed the pieces with alcohol. The whitish “bleach”-ing substance did not dissolve, but some of the uneven patches if it did come off the surface. Maybe it’s paint, maybe it’s lacquer.
Next, I slopped a good amount of dissolved 78rpm records (they were broken) to cover the remaining white “bleach” in the open grain. To my eye, this wound the look of it back about 100 years. So after it dried, I started sanding with 220grit sandpaper to ease the look forward a bit. My goal is to make it look like it had a shellac finish that darkened with age. Next will be clear shellac - maybe some tint - but I need daylight for that.
 

Attachments

  • 9BA4E902-14E7-413F-9E17-C0016C4D3EA3.jpg
    9BA4E902-14E7-413F-9E17-C0016C4D3EA3.jpg
    154.1 KB · Views: 67
  • A38CCA90-BF62-4AB5-8C45-428DA4398E37.jpg
    A38CCA90-BF62-4AB5-8C45-428DA4398E37.jpg
    155.1 KB · Views: 62
  • B68B0D75-ED4A-435A-9BEE-3A47880191B5.jpg
    B68B0D75-ED4A-435A-9BEE-3A47880191B5.jpg
    79.1 KB · Views: 48
Last edited:

notlob

Well-known member
Joined
Aug 19, 2013
Messages
1,384
Location
norcal
Nice display cabinets! Utica pliers and adjustable wrenches are among my favorites.

Here's the page LesserSon mentioned from Utica Tools catalog 63D:

attachment.php
 

Attachments

  • Screenshot Utica Pliers - 63D.jpg
    Screenshot Utica Pliers - 63D.jpg
    129.5 KB · Views: 431

Stuart in MN

Well-known member
Joined
Sep 8, 2005
Messages
23,112
Location
Minneapolis
I haven't bought any recently but you should be able to get Chartpak or Letraset rub-on transfer letters at any arts supply store. They can be a little fiddly to put down in a nice straight line. However, looking at your original backing, it appears the letters on there now are covered up when the pliers are in place anyway so maybe you don't even need them.
 

mikebaker1129

Well-known member
Joined
Oct 16, 2014
Messages
1,576
Location
Huffman,TX
Nice find!
I wish I had the talent to do some restoration projects you guys tackle.
No cool displays like that in this part of the country.
 

LesserSon

Well-known member
Joined
Feb 7, 2016
Messages
5,062
Location
PA USA
Dissolving 78s is not my invention: there was a PBS show called Furniture on the Mend out of Philly, I used to watch on WHYY, when I lived closer. I think they were “ebonizing” something. I also saw them use a wash of rusty water on oak one time, which gives a look I think would be appropriate to a tool cabinet (the acid converts the red oxide to black, almost metalic, oxide), but it’s not the look I’m going for here.
Applying it specifically to red oak to simulate the natural darkening of shellac in the open grain (which would take many decades), I thought of by myself. But I don’t think I invented it. If I were going to use polyurethane on it, I would have used black oil stain, and gotten the same effect.
Now the pieces have one coat of clear shellac. This will allow me to better guage whether it needs some tone-balancing. I think it does. Two pieces are very light on the inside, where the other two are much darker. There are still a few traces of the whitish stuff showing on the light ones, too. So probably monkey around with that next time I get a chance.
 

Attachments

  • 52CBD78A-0DB5-4EC2-B773-39E90EF36FBD.jpg
    52CBD78A-0DB5-4EC2-B773-39E90EF36FBD.jpg
    159.2 KB · Views: 64

LesserSon

Well-known member
Joined
Feb 7, 2016
Messages
5,062
Location
PA USA
Today, after the requisite RAIN, the air dried a bit, so I took advantage to sand the base coat and tone down the two lighter bits. Then a coat of shellac. Next will be glueing it back together.
Meanwhile, I’ve been picking at the rust on the two tin signs. A few mishaps with the tip of my blade hitting the paint, but overall, success. The couple marks on the back make it clear the orginal color was more vermillion than brick, and has faded. I guess I could repaint it, but that would make the extra care I took scraping the rust off the letters a waste of time. But now those letters have every chance of rusting again. Thinking of clear-coating the signs as they are now. Worste case would be the red paint blisters. Best case, the bare steel stays bright for a long time.
 

Attachments

  • 345EECD9-6D7A-4247-832C-D7BEEFE07145.jpg
    345EECD9-6D7A-4247-832C-D7BEEFE07145.jpg
    147.9 KB · Views: 63
Last edited:

LesserSon

Well-known member
Joined
Feb 7, 2016
Messages
5,062
Location
PA USA
I decided to assemble the four sides last night, after only two coats of shellac. I know from experience that it’s easier to finish the separate pieces, but assembly usually marrs that perfect finish anyway. I used four Stanley corner clamps (the little cheap aluminum ones) to align the pieces while applying Titebond II wood glue, then a ratcheting bandclamp to hold it together and a small clawhammer to replace the rusted finish nails with new ones. After using a Goodell Bros spiral push drill to make pilot holes, I added six more nails where I felt it needed them, and may yet add four more. Then I took off the band clamp so it wouldn’t wrack the frame.
I laid it out with other parts to see how it will look. Not bad. I think I should restore the four glue blocks, though from the way they all failed, I don’t think they contribute much strength to the whole. I will work on a few more coats of shellac, then get serious about the velour back panel.
 

Attachments

  • 39434C22-2B12-4B68-828B-D66BA2586696.jpg
    39434C22-2B12-4B68-828B-D66BA2586696.jpg
    81.2 KB · Views: 50
  • 02CF470C-DC35-46EF-B0B8-B65255F280DF.jpg
    02CF470C-DC35-46EF-B0B8-B65255F280DF.jpg
    146.1 KB · Views: 49
  • AF44B6B4-02B7-4346-A65C-26FB3BA5CE3C.jpg
    AF44B6B4-02B7-4346-A65C-26FB3BA5CE3C.jpg
    143.8 KB · Views: 66
Last edited:

Private Lugnutz

Well-known member
Joined
Mar 30, 2012
Messages
30,574
Location
The Authentic Jersey Shore
Looks beautiful, LS!

Did you see the $800-tagged Crescent/Red Devil version I spotted a few weeks ago? Link here. A little older, but note the similarities, right down to the style and placement of the metal placards. I would bet my next paycheck that Crescent and Utica were using the same supplier for their QSWO-and-glass hardware store display cases.
 

LesserSon

Well-known member
Joined
Feb 7, 2016
Messages
5,062
Location
PA USA
I am not a betting man, Lugz, but I might take that bet. The dimensions on the Utica are 22-1/8x32-13/16x3, made from 3/4” thick stock. But the differences in dimension are not why I respectfully disagree.
It very well could be the metal hanging clips were from a common source (I’d sure like to find some, as I have zero), but I think most of the similarity of the remaining parts, including the tins (I’ve been thinking these could be reproduced by craftng a pair of dies, using the existing signs as a template) extends from the their identical function.
In material and detail, the cabinets are not so alike. I would want to see the Crescent in person to be sure, but I will take your word on it being QSWO. The Utica material is plain sawn red oak (the one board that shows radial flecks notwithstanding - plain sawing inevitably produces some boards with the same figure as quarter sawn, as the saw cuts near the center of the log); the open capillaries in the endgrain confirm mine’s red - no tyloses here. Red oak is somewhat more available and slightly inferior to white oak. I think the original finish on the Utica case was intended to make it look more like white oak. The back panel of the Crescent case looks like it might be oak-veneer plywood? The Utica is something closer to birch or poplar plywood with that red velour face.
Details-wise, there is a thumbnail edge on the inside of the Utica door frame, likely routed after it was assembled. The Crescent door looks to have a square edge. The main components of the Utica case are essestially scaled-down doorjamb, a ubiquitous form readily duplicated with basic woodworking machines. And the joints are pretty simple, and not particularly strong: a mitred lap joint with the merest housing tongue for alignment for the frame, and a completely open mortise and through tenon for the door. I’d love to see what they used on the Crescent. I’m not disparaging the workmanship; just pointing out there’s no proprietary methods or tooling in the construction. The wooden components require only basic skills, one or two common router bits, and a table saw.
Well, that’s my analysis: because I think these cases could have been constructed in any in-house or independent woodshop in the country, I don’t think there’s sufficient reason to believe were produced in the same shop.
 

Attachments

  • 06B3F29E-B06C-44CE-AA04-5B5AD43CF4BB.jpg
    06B3F29E-B06C-44CE-AA04-5B5AD43CF4BB.jpg
    124.4 KB · Views: 34
  • B010528D-F7C2-470B-9F19-449B023D36EE.jpg
    B010528D-F7C2-470B-9F19-449B023D36EE.jpg
    117.2 KB · Views: 32
  • B310F4A8-3D84-4BEE-A4B2-30D470254263.jpg
    B310F4A8-3D84-4BEE-A4B2-30D470254263.jpg
    85.9 KB · Views: 32
  • 1DC3146B-08F1-4D42-A903-3EE35A58CCA4.jpg
    1DC3146B-08F1-4D42-A903-3EE35A58CCA4.jpg
    64.4 KB · Views: 43
Last edited:

LesserSon

Well-known member
Joined
Feb 7, 2016
Messages
5,062
Location
PA USA
BTW, I think I identified a nice replacement for the red velour back panel - suede-faced matboard blank. Now if I can just find a piece for less than $40...
 

Stuart in MN

Well-known member
Joined
Sep 8, 2005
Messages
23,112
Location
Minneapolis
I checked around a bit online and that suede mat board does look pretty good, but as you say $40 seems to be the going price for a piece that's big enough. I wonder if a simple piece of velour cloth glued to a plain mat board would work, but that can be tricky as the glue can soak through and ruin the front of the cloth.
 

LesserSon

Well-known member
Joined
Feb 7, 2016
Messages
5,062
Location
PA USA
I will get something, somehow. There are rolls of adhesive-backed velvet, too, but the dimensions aren’t quite right unless you order it directly from the manufacturer in China!
Update: I have found both the cloth and the matboard of adequate size for about $30. That’s better, but I can be a cheap ******* at times, so I’m not done shopping yet.
Plus, having reassembled it, I remembered that I meant to trim up a spot where the recess for the back panel wasn’t in one plane. Now, I’ll have to add wood, which will be harder to disguise.
Further Update: No, I took some measurements and changed my mind. The mating problem at two corners is because of nonparallel milling in the original construction, leaving an excess (tapered) width of 1/16” on one corner and a whopping 1/8” at the other. It would have been easier and better to use the fence on the table saw to correct the non-mating widths, but I can still do it with a straightedge and a utility knife. No need to add (and color-match) wood. The result will be the back will sit in one plane without putting uneven presure on the sides of the two bottom corners.
Another Update: Yeah, the utility blade strayed, taking a litte extra off, because I didn’t have my straightedge secured. It still came out okay. I’ve decided to buy a roll of adhesive-backed cloth and apply it to 3/16” hardwood plywood for the back. The roll will have about 2-1/2 times the amount I need, so if I don’t screw it up, I can use the extra to duplicate this case for some of my other tools. And still have some for other projects.
Here’s glueing up the corner-bracing glue blocks. I have zero faith in them, because the grain runs perpendicular to the frame. The glue must inevitably fail as the wood expands and contracts with seasonal humidity changes. But they are part of the original construction, so I feel they should stay. I won’t put any in my reproduction.
 

Attachments

  • 89F613AE-6979-4519-A186-87C74E79AE93.jpg
    89F613AE-6979-4519-A186-87C74E79AE93.jpg
    161.1 KB · Views: 35
Last edited:

notlob

Well-known member
Joined
Aug 19, 2013
Messages
1,384
Location
norcal
For some lucky folks...

attachment.php
 

Attachments

  • Utica tools life of riley ad.jpg
    Utica tools life of riley ad.jpg
    31.5 KB · Views: 542
To avoid these ads, REGISTER NOW!
Top Bottom