To avoid these ads, REGISTER NOW!

UV flashlight and dye for oil leak

cgrutt

Well-known member
Joined
Mar 4, 2016
Messages
8,350
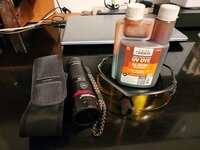
So wife's car has a pretty bad oil leak which I haven't had any luck tracking down. Ordered a UV flashlight and dye should be here tomorrow going to try to sort it out. Hopefully valve cover and not one of the two oil pans, which will probably mean pulling motor again...

I went back and forth trying to pick a flashlight. I must of had the UV Beast V3 in my cart half a dozen times. I finally settled in on a Darkbeam that was about $30 less expensive but I think it may actually be more powerful than the UV Beast. The Darkbeam has 6 4-core 365nm LEDs and claims to be 80W. It also can be used as a USB backup. Anyway just using to try to identify source of leak so should be good enough. I also have several UV lights that came with my windshield repair kit that I can try if needed.

Had no idea about which dye to use. I wound up buying a 8 oz bottle of the same stuff sold at Harbor Freight. Harbor Freight wanted almost $10 for 1 oz; I got 8 oz for $32 on Amazon instead. Supposedly USA made by Tracer Products.

Any thoughts or suggestions on light, dye or process is greatly appreciated. Haven't started yet so if there are better products I'd love to hear about them. Otherwise will post how the stuff I bought works after I get them.
 
To avoid these ads, REGISTER NOW!
OP
C

cgrutt

Well-known member
Joined
Mar 4, 2016
Messages
8,350
So this thing is so cool. Tracked down leak in 5 min (after cleaning motor for an hour lol). Lower oil pan not that big of a deal. Highly recommended.

DarkBeam B97 and Leak Finder dye.

20250920_175312.jpg

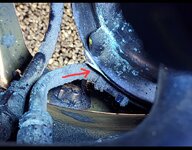
Smaller leak top corner of lower pan.

Screenshot_20250920_180313_Gallery.jpg


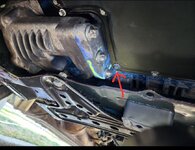
Main leak back corner lower pan.


Screenshot_20250920_180317_Gallery.jpg
 
OP
C

cgrutt

Well-known member
Joined
Mar 4, 2016
Messages
8,350
It looks like you have a handle on it but, I was going to suggest cleaning the area real god before adding dye/test driving/looking for the leak.
Yes I did what I could sprayed a whole can of Gunk engine clean, flushed with a ton of water then wiped everything I could reach with a micro fleece. It's been leaking for a long time and there was alot of oil on bottom of engine and frame. I couldn't figure out where it was coming from before the dye, I actually thought it was coming from higher up on engine or main seal. This dye and light worked much better than I expected should have bought it a long time ago.
 
OP
C

cgrutt

Well-known member
Joined
Mar 4, 2016
Messages
8,350
So I ordered the sealant from ECS on Thursday to my surprise it was just delivered today (Sunday). Looks like I will be pulling pan tomorrow.

Just a PSA in case anyone cares, Mercedes uses Henkel 5970 but branded as Mercedes. A tube is generally about $50. Turns out BMW uses same stuff (branded BMW) and is usually slightly less expensive ($45 or so). Well it just so happens Volkswagen/Audi uses it too. I purchased from ECS for $32. It's all the same stuff inside so went with the least expensive label.

20250921_122359.jpg
 
OP
C

cgrutt

Well-known member
Joined
Mar 4, 2016
Messages
8,350
So decided to flush motor used Liqui Moly engine flush. Ran it at idle for 15 min and drained. Shame because I just changed oil about two weeks ago. New filter and six qts of STP 10w30. I was a little short so threw in about a quart of Marvel Mystery Oil that I had in garage. Let that run for about 10 min and drained again. Changed filter again but left it empty and will pull pan tomorrow and see if I can clean it up enough to reseal. Not sure why it was leaking hoping for some more insight after I get the pan off. I run Mobile 1 0w40 in this car with the Mobile 1 filter. Will use that after I get pan sorted out. More tomorrow...
 
Last edited:
OP
C

cgrutt

Well-known member
Joined
Mar 4, 2016
Messages
8,350
Ugh, read the TDS on the sealant and they recommend seven day cure before putting into service... wondering if thats why it leaked (if I didn't allow it to cure the last time I did this). Trying to decide if I should use the Henkel and let it sit a week or just buy some regular RTV at parts store.
 

purplezr2

Well-known member
Joined
Jun 1, 2010
Messages
5,299
Location
Central MN
Ugh, read the TDS on the sealant and they recommend seven day cure before putting into service... wondering if thats why it leaked (if I didn't allow it to cure the last time I did this). Trying to decide if I should use the Henkel and let it sit a week or just buy some regular RTV at parts store.
Cure is based on thickness if I'm reading the graph correctly. Also it is liquid cure per the description mean it likely needs to be submerged to cure if I understand correctly.
 
OP
C

cgrutt

Well-known member
Joined
Mar 4, 2016
Messages
8,350
Cure is based on thickness if I'm reading the graph correctly. Also it is liquid cure per the description mean it likely needs to be submerged to cure if I understand correctly.


Thanks. I'm not really following where you're coming up with having to be submerged? It begins curing immediately upon exposure to "atmospheric moisture" i.e. moisture in air. As far as seven days Im getting that straight from general instructions, which doesn't appear to be based on thickness. In any event its not thick at all bead is probably 2-3 millimeters but it squished out to minimal thickness when the pan is attached to block (in this case its actually an upper oil pan).

General instructions:

Screenshot_20250922_122721_Chrome.jpg

Anyway got pan detached now trying to figure out how to actually remove it its kinda stuck within frame. Going to be fun applying sealant and getting it back where it belongs before sealant begins to set up. It was also glued pretty tight not sure why it leaked. It was installed when engine was out and I was pretty careful hoping to avoid situation I find myself in now...
 
OP
C

cgrutt

Well-known member
Joined
Mar 4, 2016
Messages
8,350
Well just got done fingers crossed. Where large leak was there was no evidence of residual sealant in far corner and the thread was slightly stripped bolt wasn't very tight. I put in a helicoil and got it tight. Problem was it was in a really tight spot and took me forever I hope the new sealant adheres. Going to let it sit a day or two before filling with oil. Guess I'll have to wait and see...

Good news is engine appeared very clean inside. Not sure if that means much but happy it wasn't full of sludge. Vehicle has about 220k miles on it.

20250922_131157.jpg
 
To avoid these ads, REGISTER NOW!
OP
C

cgrutt

Well-known member
Joined
Mar 4, 2016
Messages
8,350
The 7-day wait on TDS was killing me I broke down and filled the oil, brought engine up to temp and checked oil. For some reason I think this car takes a little more oil than called for in spec (either that or dipstick is off). Anyway have a pan under car and checked for leaks after about 15 min so far so good not a drop on the ground! Going to let wife use the car a few days before buttoning up lower panels. Now I want to put dye in my son's car...

ETA I think the 7-day cure is manufacturer CYA. There were several charts on TDS and full cure goes out to 21 days. But another chart shows cure level by thickness. It shows cure after 2 days to about 5mm. This is just a sealant between two flat parts the thickness has to be a small fraction of a mm. Willing to bet even dealer doesn't wait 7 days on an oil pan swap. Guess time will tell but feeling pretty good it will be fine.
 
Last edited:

bwringer

Well-known member
Joined
Jan 1, 2013
Messages
10,318
Location
Indianapolis
The 7-day wait on TDS was killing me I broke down and filled the oil, brought engine up to temp and checked oil. For some reason I think this car takes a little more oil than called for in spec (either that or dipstick is off). Anyway have a pan under car and checked for leaks after about 15 min so far so good not a drop on the ground! Going to let wife use the car a few days before buttoning up lower panels. Now I want to put dye in my son's car...
That's damn near every car and motorcycle I've ever worked on. No clue why, but dumping in the amount called for in the manual for an oil and filter change usually brings it just above the lower line, never more than halfway.

Yes, I know about thermal expansion.

I want it full, dammit, so I always add a little more to bring it just below full cold and right at full when hot.

Maybe the spec is intended to be a "safe" amount; even if you rush the oil change and don't let it drain fully, it won't end up overfilled, and it'll have enough to get by.


I find putting a coating of baby powder on freshly cleaned parts is better at tracing leaks.
Cheap store brand foot powder spray works even better. Smells like toes, though, especially when it gets hot.
 
Last edited:
OP
C

cgrutt

Well-known member
Joined
Mar 4, 2016
Messages
8,350
That's damn near every car and motorcycle I've ever worked on. No clue why, but dumping in the amount called for in the manual for an oil and filter change usually brings it just above the lower line, never more than halfway.

Yes, I know about thermal expansion.

I want it full, dammit, so I always add a little more to bring it just below full cold and right at full when hot.

Maybe the spec is intended to be a "safe" amount; even if you rush the oil change and don't let it drain fully, it won't end up overfilled, and it'll have enough to get by.
You bring up a good point normal oil change leaves a ton of residual oil in motor maybe manufacturer spec takes that into consideration. I had the pan off there wasn't much left in this case. It wasn't even registering at 8.5 qts I wound up putting close to ten.
 

MOS3522

Well-known member
Joined
Nov 6, 2022
Messages
1,791
Location
Colorado
Cheap store brand foot powder spray works even better. Smells like toes, though, especially when it gets hot.


Shoot that's what I meant. Lamisil spray. Gosh darn my brain is getting old.

The reason I like that better is because it leaves tracks where the leak flows making it easy to pinpoint the source. The UV dyes work great at finding pinholes in hoses, but on pans or fittings I prefer powder.
 

Vinny

Well-known member
Joined
Jul 14, 2011
Messages
633
Location
Simi Valley, CA
You bring up a good point normal oil change leaves a ton of residual oil in motor maybe manufacturer spec takes that into consideration. I had the pan off there wasn't much left in this case. It wasn't even registering at 8.5 qts I wound up putting close to ten.

Some service manuals I've seen give different fluid amounts depending on what you're doing. Like an oil change, oil change and oil filter, or full drain (cover off like you're doing) requires different amount of oil to be put in.
 

bwringer

Well-known member
Joined
Jan 1, 2013
Messages
10,318
Location
Indianapolis
Shoot that's what I meant. Lamisil spray. Gosh darn my brain is getting old.

The reason I like that better is because it leaves tracks where the leak flows making it easy to pinpoint the source. The UV dyes work great at finding pinholes in hoses, but on pans or fittings I prefer powder.

Excellent point.

If I'm being lazy, I find that UV often allows me to see where the fresh oil is coming from even if there's old oil around (but if its a really bad mess, you should still clean things up). Foot powder requires things to be clean and dry, but will make the tiniest leak instantly apparent.
 

240sxguy

Well-known member
Joined
Jan 6, 2009
Messages
1,158
Location
Madison, wi
Bmw?

I just used dye and a cheap uv light off Amazon to find a power steering leak in my armada. Glad I did because the leak was in a different spot than I anticipated!
 
OP
C

cgrutt

Well-known member
Joined
Mar 4, 2016
Messages
8,350
Bmw?

I just used dye and a cheap uv light off Amazon to find a power steering leak in my armada. Glad I did because the leak was in a different spot than I anticipated!
Mercedes. Shouldn't have been leaking I must have screwed something up when I put engine back together after I replaced balance shaft. This particular motor has no gaskets its pretty much glued together with the Henkel 5970.
 
To avoid these ads, REGISTER NOW!
Top Bottom