

scott mckelvey
Member
- Joined
- Aug 9, 2012
- Messages
- 6
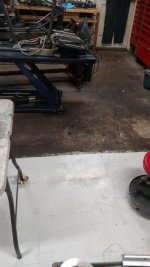
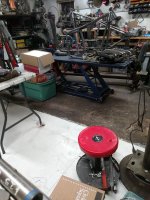
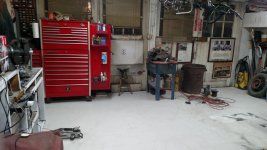
After 7 years of working on this garage floor, I couldn't take it. But $ and time limited options. I finally decided to take a stab. It's not that perfect, but it's sooo much better, and I'm more than happy with the result.
Goals:
-Smooth surface for easy cleanup of debris. I do a ton of welding and grinding, so pits and cracks just collected Everything. Any real cleanup between projects was a major endeavor.
-Smooth surface for easily wiping up spills.
-Solid light color (no checkerboards, no flecks) for easily finding things, like like dropped nuts and washers.
-Light colored surface for better light in garage.
-I also had a 1" gap around the pad between it and the foundation. This collected all manner of ****, plus air and water.. so I wanted to fill that at the same time
-aside from cost, i didn't like the idea of a floating racedeck tile because I didn't like the idea of a cess pool forming below it.
Obstacles:
-Garage is pretty full, and I'm actively working in it: I moved stuff around and some outside and did it in halves.
-Pitting of varying degrees: one side was worse than the other. I experimented first on the good side by just gluing tiles down. For the most part it was fine, but the larger voids quickly were a problem once is I started rolling things around.
-Uneven cracks: I ground them flush as much as possible with one of those $40 diamond cup wheels on a 4.5" angle grinder.
-Not level: the pad is slightly sloped, and I actually like it for draining water and cleanup. The tiles done care.
-Oil stains: I'd already spilled things like paint etc in the past. I noticed that even with the oil and dirt, it clung well (maybe because the surface was so rough). So I decided to try side 1 (the better side) by just sweeping, vacuuming, and applying adhesive. Side 2 I swept, vacuumed and poured two coats of leveling compound. No real issues with either, but it was WAY easier to apply adhesive to a smooth surface.
Materials
-armstrong VCT: I kept checking Craigslist for a deal on some. I finally saw that home depot had the oyster color for $.60 per tile. That was as cheap as anything on craigslist, and easier.
-1 large bucket of adhesive: like $35, and I used half of it, maybe.
-1 adhesive trowel, like $7
-2 bags of leveling compound and a squeegy.
-Box cutter and ruler for cutting tiles
-1 bag of quick setting mortar mix to fill the big voids.
Lessons &thoughts (this is for indoor surface, and it's not like I'm a contractor getting paid to do an install for someone).
-Surface should be smooth as possible, but the tile is reasonably forgiving. If you have a pretty smooth pad already, I'd let it rip.
-i wouldnt go crazy worrying about etching, and deep cleaning the concrete. The adhesive seems to do a sufficient job regardless.
-Nice because you can always replace a tile down the road.
-Id do as much adhesive as you can lay down and tile at once. Drying won't be really be an issue, and it's a pain to have to get good coverage later next to the tiles, without getting adhesive on them. Plus if theres old adhesive that eventually dries on the edges, you'll have to deal with that.
-Dont over do it on glue. And let it setup before doing tile.
-The tiles are fairly brittle, so it's only necessary to the extent that there are no sharp changes in slope or divots, etc. Beyond that, I would only worry about leveling to the extent that it bothers you.
-If u get the Armstrong tiles at home depot the project cost can't be beat
Overall- I wish I'd done it sooner. The ease of cleanup and extra light alone are worth the effort.
Goals:
-Smooth surface for easy cleanup of debris. I do a ton of welding and grinding, so pits and cracks just collected Everything. Any real cleanup between projects was a major endeavor.
-Smooth surface for easily wiping up spills.
-Solid light color (no checkerboards, no flecks) for easily finding things, like like dropped nuts and washers.
-Light colored surface for better light in garage.
-I also had a 1" gap around the pad between it and the foundation. This collected all manner of ****, plus air and water.. so I wanted to fill that at the same time
-aside from cost, i didn't like the idea of a floating racedeck tile because I didn't like the idea of a cess pool forming below it.
Obstacles:
-Garage is pretty full, and I'm actively working in it: I moved stuff around and some outside and did it in halves.
-Pitting of varying degrees: one side was worse than the other. I experimented first on the good side by just gluing tiles down. For the most part it was fine, but the larger voids quickly were a problem once is I started rolling things around.
-Uneven cracks: I ground them flush as much as possible with one of those $40 diamond cup wheels on a 4.5" angle grinder.
-Not level: the pad is slightly sloped, and I actually like it for draining water and cleanup. The tiles done care.
-Oil stains: I'd already spilled things like paint etc in the past. I noticed that even with the oil and dirt, it clung well (maybe because the surface was so rough). So I decided to try side 1 (the better side) by just sweeping, vacuuming, and applying adhesive. Side 2 I swept, vacuumed and poured two coats of leveling compound. No real issues with either, but it was WAY easier to apply adhesive to a smooth surface.
Materials
-armstrong VCT: I kept checking Craigslist for a deal on some. I finally saw that home depot had the oyster color for $.60 per tile. That was as cheap as anything on craigslist, and easier.
-1 large bucket of adhesive: like $35, and I used half of it, maybe.
-1 adhesive trowel, like $7
-2 bags of leveling compound and a squeegy.
-Box cutter and ruler for cutting tiles
-1 bag of quick setting mortar mix to fill the big voids.
Lessons &thoughts (this is for indoor surface, and it's not like I'm a contractor getting paid to do an install for someone).
-Surface should be smooth as possible, but the tile is reasonably forgiving. If you have a pretty smooth pad already, I'd let it rip.
-i wouldnt go crazy worrying about etching, and deep cleaning the concrete. The adhesive seems to do a sufficient job regardless.
-Nice because you can always replace a tile down the road.
-Id do as much adhesive as you can lay down and tile at once. Drying won't be really be an issue, and it's a pain to have to get good coverage later next to the tiles, without getting adhesive on them. Plus if theres old adhesive that eventually dries on the edges, you'll have to deal with that.
-Dont over do it on glue. And let it setup before doing tile.
-The tiles are fairly brittle, so it's only necessary to the extent that there are no sharp changes in slope or divots, etc. Beyond that, I would only worry about leveling to the extent that it bothers you.
-If u get the Armstrong tiles at home depot the project cost can't be beat
Overall- I wish I'd done it sooner. The ease of cleanup and extra light alone are worth the effort.
Attachments
-
 IMG_20161119_232927629.jpg144.3 KB · Views: 271
 -
 IMG_20161119_233513.jpg146.1 KB · Views: 257
 -
 IMG_20161119_233802.jpg142.6 KB · Views: 262
 -
 IMG_20161126_231107192.jpg141.6 KB · Views: 251
 -
 IMG_20161128_230212027.jpg144.2 KB · Views: 259
 -
 IMG_20161128_230309139.jpg147.7 KB · Views: 238
 -
 IMG_20161129_214701871.jpg142.1 KB · Views: 248
Last edited: