To avoid these ads, REGISTER NOW!

Vert's Garage & Project Adventures

vertguy

Well-known member
Joined
Apr 6, 2010
Messages
1,261
Location
SE WI
Thought it was time to share some of my garage fun starting with my golf cart upgrades.

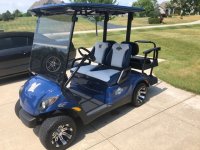
We decided to get a cart 2 years ago and found this electric ‘12 Yamaha that was in excellent shape as it was used exclusively for playing golf by the original owner (he lived on a private course, always garaged, etc). It had a lot of exterior work done including a paint matched roof, custom front seats, windshield, front/rear light kit and 10 inch wheels. My only change thus far was to swap out the golf club rack for a rear seat along with a heavy duty set of rear springs.

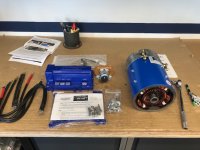
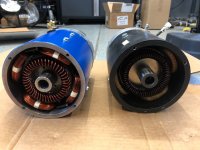
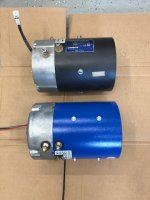
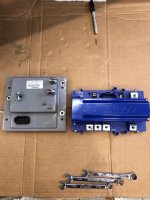
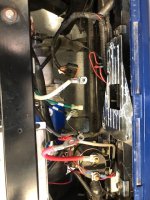
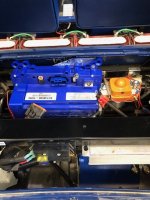
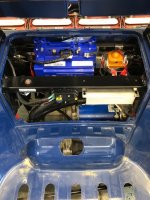
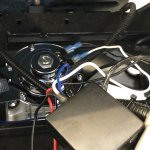
The 2 year mark into a hobby before modding starts seems to be a theme for me as I did the same thing with my ’07 Mustang (maybe it correlates with getting bored). Just like my car, the cart "needs" a power boost as our neighborhood has some hills and it struggles at times. During my searches, I found a Yamaha "guru" that had some great power upgrade options and the back ordered parts just arrived.
 

Attachments

  • Cart 1.jpg
    Cart 1.jpg
    114.5 KB · Views: 55
To avoid these ads, REGISTER NOW!
OP
V

vertguy

Well-known member
Joined
Apr 6, 2010
Messages
1,261
Location
SE WI
The kit includes an upgraded 9.5 hp motor, aftermarket controller and custom tunes. It was refreshing to see the "made in the USA" logo for both the controller and motor. This set up should easily get me into the mid to upper 20s mph. I plan to tackle this tomorrow and with the temps in the 90s, the new window AC will definitely make this a bit more enjoyable.
 

Attachments

  • Plowman riot kit.jpg
    Plowman riot kit.jpg
    117 KB · Views: 57
Last edited:
OP
V

vertguy

Well-known member
Joined
Apr 6, 2010
Messages
1,261
Location
SE WI
Cranked up the new window AC while we ran an errand yesterday morning and started the upgrade in a nice and cool environment. It took a bit longer than anticipated thanks to the rather vague instructions... some of which were flat out wrong. To gain access to the tight motor area it required removing the rear seat, a couple lower covers and eventually the roof as I had to pull out the passenger side roof drain tube to eliminate a tight fit when installing the new motor.

Although both motors weigh about the same amount (~60 lbs), it is obvious the new one is much more beefy based on the exposed windings. I had to get pretty creative to remove the motor given its weigh and needing to swap it from the bottom. First up was to put the cart on jacks stands, then I used a strap from a ratchet strap as a sling.

Removing the old one fairly was easy, but I had to grab my wife to help install the new one by putting a little pressure from the top with the strap while I jockeyed it around from underneath. I figured the motor install was tough part as the rest seemed easy enough... wrong! This is where the instructions lacked as the new controller and solenoid were both much larger than the originals and would not mount as outlined in the instructions. It mentioned using one of the stock solenoid mounting holes and to use a self starting screw for the other.

After cussing at it for a while and stepping away to clear my head, I realized there were 2 self starting screws in the supplied hardware kit. And there was plenty of room to shift the solenoid to the right, so problem solved. After installing the new 4 gauge battery cables and getting things back together, we took a couple runs around the neighborhood... holy ****!! Even driving it at less than half pedal, you feel the snappy torque improvement along with speeds that were already higher than the old max.

Baseline max speed was 13 mph, new speed at part throttle was 20 :rocker:

Now the challenge is to keep out of the throttle during the 50 hour break in period... easy enough for me, but my wife and others like our kids could be a challenge.
 

Attachments

  • IMG_1687.jpg
    IMG_1687.jpg
    94.1 KB · Views: 37
  • IMG_1688.jpg
    IMG_1688.jpg
    107.9 KB · Views: 33
  • IMG_1690.jpg
    IMG_1690.jpg
    90 KB · Views: 30
  • IMG_1689.jpg
    IMG_1689.jpg
    93.9 KB · Views: 29
  • IMG_1691.jpg
    IMG_1691.jpg
    118.2 KB · Views: 28
  • IMG_1692.jpg
    IMG_1692.jpg
    134.1 KB · Views: 29
  • IMG_1697.jpg
    IMG_1697.jpg
    114 KB · Views: 36
Last edited:

jblnut

ALLIANCE MEMBER
Joined
Jan 17, 2015
Messages
7,041
Location
In the Middle of MN
Souping up a golf carts seems like a perfectly good use of time and money to me !!

There is a dude out near us that put a 1,000cc motor out of a junked Polaris Sportsman in an old Harley Davidson three wheel golf cart. It is all kinds of fun and rather stupid to drive with all that power !!
 
OP
V

vertguy

Well-known member
Joined
Apr 6, 2010
Messages
1,261
Location
SE WI
Vert's Garage & Project Adventures

Souping up a golf carts seems like a perfectly good use of time and money to me !!

There is a dude out near us that put a 1,000cc motor out of a junked Polaris Sportsman in an old Harley Davidson three wheel golf cart. It is all kinds of fun and rather stupid to drive with all that power !!


Yeah, once the motor break in is done I plan to get the “fun tune” loaded along with adding a personality switch. I can keep it tame for yard work and flip that switch when we go cruising the hood!

Now if I had your space on the farm, that could be whole different story in how to approach the next set of mods to the cart. I am actually from the twin cities and have several retired uncle farmers from your area... most recently in Springfield. My cousin and her husband have a spread I think in Owatonna.

Sent from my iPad using Garage Journal
 
Last edited:
OP
V

vertguy

Well-known member
Joined
Apr 6, 2010
Messages
1,261
Location
SE WI
Although not garage related, but given the crazy heat index here on Sunday, this is how spent some of our indoor time.

We made a run up to Door County WI (thumb area) last Wed. for sour cherries. This area is one of the top producers of sour cherries in the country, so we try to make a run every year or 2. These cherries work great for pies/pastries, but we mainly get them for making cherry bounce.

What is bounce?? It is a homemade sipping cordial that is made with sour cherries, sugar and your booze of choice. You add the 3 ingredients into jars, shake once a day for about a week, then wait for the magic... which usually takes around 3-4 months. So just in time for the holidays.

For us, we typically do bourbon and vodka (my favorite is bourbon). And as with past years, we did a couple holiday bourbon versions for old fashions with cinnamon sticks, cloves and orange peels. These are obviously very popular with the family as we usually pass out a jar for our Christmas gift. This year we bought 20 lbs of cherries and ended up with 15 quarts of bounce including 1 that I labeled as moonshine (we used some Everclear type booze) along with a couple quarts of pie filling :D
 

Attachments

  • Bounce 2020.jpg
    Bounce 2020.jpg
    106.8 KB · Views: 31
Last edited:
OP
V

vertguy

Well-known member
Joined
Apr 6, 2010
Messages
1,261
Location
SE WI
I had to do some unplanned repairs on Thurs. with the house furnace drain after almost falling on my *** when I was walking out of the basement utility room. I looked down and notice I was leaving wet foot prints on the finished floor. Thankfully there was only a small amount of water that was isolated to a small area between the furnace and chest freezer.

I had to get back to work, but suspected the furnace condensation line to the floor drain was suspect. Sure enough, when I went back down for a deeper look I saw water weeping out of the top/open pipe where the line drops in from my RO unit. A quick trip to Menards for some PVC fittings and pipe, followed by a quick fix to build a new one. The PVC cutter that of course was a must have after seeing one on GJ came in handy. While I was at it, I added a tee and new vertical drain on the other side for the RO to clean up the area.

I cut open the old line and 14 years of crude had indeed built up.

Awesome weather weekend with low humidity, so it is perfect time to knock out some maintenance tasks in the garage including an oil/filter change on the Mustang and deal with a "clunk" on the lawn tractor that I am fairly sure is the root cause of taking out 2 hydrostatic lines last year. Fairly sure I saw the rear end moving slightly when going quickly from reverse to forward. Hoping it is just a loose/missing bolt.
 

Attachments

  • IMG_1702.jpg
    IMG_1702.jpg
    95.5 KB · Views: 28
  • IMG_1703.jpg
    IMG_1703.jpg
    95.3 KB · Views: 29
  • IMG_1704.jpg
    IMG_1704.jpg
    61.4 KB · Views: 28
  • IMG_1705.jpg
    IMG_1705.jpg
    64.4 KB · Views: 36
OP
V

vertguy

Well-known member
Joined
Apr 6, 2010
Messages
1,261
Location
SE WI
The race ramps do make oil change much easier when you don't have a lift. After wrapping that up, I confirmed my suspicions with the mower... found all 3 mounting bolts for the transmission to frame were loose on the right side. It was a simple fix as they are accessible without removing anything, so the fix took no time.

This explains why I had 2 hydraulic lines crack last year that I "fixed" with a custom made hydraulic hose from NAPA. I found the other side loose during those repairs and in hindsight I should have checked both sides. What's interesting is all these bolts used nuts with nylon inserts, so they obviously did not work as intended.
 

Attachments

  • oil change 2.jpg
    oil change 2.jpg
    109.8 KB · Views: 35
  • oil change.jpg
    oil change.jpg
    87.4 KB · Views: 32
To avoid these ads, REGISTER NOW!
OP
V

vertguy

Well-known member
Joined
Apr 6, 2010
Messages
1,261
Location
SE WI
Finally had some time to knock out a little project for our son and his fiance. Their original fall wedding plans got shuffled around due to the current environment, so I was tasked with building an arbor for their new plan with a small outdoor ceremony in Oct. It seemed simple enough after finding some great ideas online, but it was a bit more complicated since it needed to break down and fit in our Edge.

The worst part was getting the angles right on the top along with having to hand cut since the miter saw would not work (I hate geometry). Got it close initially, but had to do some touch up with the sander since the cuts were not perfectly straight. It is held together by 6 carriage bolts (top and side supports) and is surprisingly stable as I initially thought a cross brace would be needed. Next up is a quick coat of stain.

Thought I could wrap up a couple other little projects with the golf cart tomorrow, but I need to chase down some power issues at our rental as the washer is tripping the GFCI (which I just replaced earlier this week).
 

Attachments

  • Arbor.jpg
    Arbor.jpg
    98.4 KB · Views: 27
  • Arbor 2.jpg
    Arbor 2.jpg
    97.6 KB · Views: 29
  • Arbor 3.jpg
    Arbor 3.jpg
    105.2 KB · Views: 28
Last edited:
OP
V

vertguy

Well-known member
Joined
Apr 6, 2010
Messages
1,261
Location
SE WI
Ahhh... a weekend with no plans so I decided to clean up our neglected cars. The Mustang was recently foam washed, so it just need a little paint correction the hood from self-induced light scratches followed by a quick liquid wax (more work is needed on the hood). I then moved onto my DD Honda for its first real wash/wax since I upgraded from the '07 back in Jan. Of course my wife was quick to point out I spending an awful lot of time on the 2 cars we drive the least. She had a good point since the Mustang is a weekend/fair weather cruiser and I have not been to the office since March, so the Honda is rarely driven (think I have filled it up 4 times since buying it in Jan.).

I felt a bit guilty, so I spent some time cleaning the wheels and tires on the wife's Edge as it was pretty clean otherwise. But in doing so I realized the wheels (which are simple chrome covers) are in need of some polish. So once the weather cools a bit, I will tackle those.

Next up was staining the arbor. Although the kids wanted brown, I had to use some semi-transparent that did not hide the nice grain in the cedar. They seemed happy with the photos, so this project is wrapped up and ready for their big day in Oct. My plan worked out great as it took just a couple minutes to reassemble it after staining and breaks down into small pieces that will fit it in any of our cars.

Wrapped up the day by adding a couple accessories to the golf cart including a UBS port that was swapped in place of a useless cig lighter. Yeah, I could of just used an adapter, but this looks cleaner and has a nice rubber cover. And to amuse the grand kids (and probably irritate the neighbors) I installed a horn. I tried to borrow an idea using a remote under the steering wheel and hard wired to the center button, but there was not enough space in my adapter. So I just installed the horn and hung the remote on the key chain. This is probably a better plan anyhow since it is easy to "remove" the remote if they get out of hand with using it :lol:
 

Attachments

  • cart horn remote.jpg
    cart horn remote.jpg
    108.6 KB · Views: 23
  • cart horn.jpg
    cart horn.jpg
    107.8 KB · Views: 26
  • USB port.jpg
    USB port.jpg
    97.8 KB · Views: 25
  • Arbor stained.jpg
    Arbor stained.jpg
    115.5 KB · Views: 24
  • Honda wash.jpg
    Honda wash.jpg
    101.3 KB · Views: 24
  • Honda waxed.jpg
    Honda waxed.jpg
    62.2 KB · Views: 24
Last edited:
OP
V

vertguy

Well-known member
Joined
Apr 6, 2010
Messages
1,261
Location
SE WI
Vert's Garage & Project Adventures

Also had a flashback moment when I found these paint can tools while digging through my tool box. We frequented a fairly close Wards when I lived in CO back in the late 80’s and early 90’s and it appears I bought paint there[emoji3]ec1d0a7731c0555924b117d0204bf795.jpg

They also had an outlet and being fairly broke back then, we bought everything from furniture to appliances from that store. Yet another old school chain that is long gone.


Sent from my iPad using Garage Journal
 

Attachments

  • ec1d0a7731c0555924b117d0204bf795.jpg
    ec1d0a7731c0555924b117d0204bf795.jpg
    83.8 KB · Views: 0
Last edited:

jblnut

ALLIANCE MEMBER
Joined
Jan 17, 2015
Messages
7,041
Location
In the Middle of MN
Please do not think no one is following alone ... I sure am !!

What are you using to make that sweet sticky looking foam on the cars ?? I'd love to use that on everything from my Jeep to our tractors. It looks like it sticks around nicely !!

There is a guy up here that installed a semi air horn on his golf cart. It's on the roof right out in the open with a small 12v compressor under the seat and a 2-3gal tank. It is quite the thing to watch when someone is lining up a putt and that thing goes off lol.
 
OP
V

vertguy

Well-known member
Joined
Apr 6, 2010
Messages
1,261
Location
SE WI
Vert's Garage & Project Adventures

No worries as you can tell by my 10 year post count, I am more of reader than a poster and not worried about it :lol:


I use a foam cannon like this one on the power washer along with some concentrated car wash cleaner. I bought 2 gallons during a sale several years ago from Chemical Guys (citrus wash and honeydew snow foam), which using 2 oz per wash should last more than a life time. Think one of the two is supposed to help remove top coatings like waxes and sealants.


https://www.amazon.com/dp/B07X8F5QVC/?tag=atomicindus08-20
 
Last edited:
OP
V

vertguy

Well-known member
Joined
Apr 6, 2010
Messages
1,261
Location
SE WI
Vert's Garage & Project Adventures

There is a guy up here that installed a semi air horn on his golf cart. It's on the roof right out in the open with a small 12v compressor under the seat and a 2-3gal tank. It is quite the thing to watch when someone is lining up a putt and that thing goes off lol.


Yeah, I am sure that helps break their concentration! Even this one is surprisingly loud, so we will see how long this one lasts before grandpa proclaims the horn “broke”.


Sent from my iPad using Garage Journal
 

Jayman17

Well-known member
Joined
Feb 6, 2017
Messages
3,806
Location
Seattle, Wa
That arbor is an interesting shape, I've only seen upside down "U" shaped ones before. Are they going to use it with flowers as a background at your son's wedding?

Jay
 
OP
V

vertguy

Well-known member
Joined
Apr 6, 2010
Messages
1,261
Location
SE WI
Vert's Garage & Project Adventures

That arbor is an interesting shape, I've only seen upside down "U" shaped ones before. Are they going to use it with flowers as a background at your son's wedding?


Jay


Yep, it will be a decorated backdrop for the outside ceremony/vows. From what I was told, this style is popular right now.


Sent from my iPad using Garage Journal
 
OP
V

vertguy

Well-known member
Joined
Apr 6, 2010
Messages
1,261
Location
SE WI
The weather finally turned and it is perfect for getting some projects knocked out. I decided to tackle a set of extensions for my workmate. Fairly sure someone on GJ posted something like these and I found a good article with dimensions. The arms are cut offs from my new MDO plywood garage bench top and the cleats were from a maple butcher block back splash I saved from a kitchen remodel at the rental house. So the only material I had to purchase was a 3ft piece of 3/4 inch oak dowel.

And in typical GJ fashion this project resulted in some new tools as I picked up a small set of forstner bits, which worked great for drilling nice and precise holes (especially for the cleats).

I also installed the new DP vise on the column which should come in handy down the down road.
 

Attachments

  • WM extensions.jpg
    WM extensions.jpg
    61 KB · Views: 13
  • DP vise.jpg
    DP vise.jpg
    95.8 KB · Views: 10
To avoid these ads, REGISTER NOW!
Top Bottom