To avoid these ads, REGISTER NOW!

Vintage Brown Brockmeyer bench grinder

shawnh68

Member
Joined
Feb 15, 2026
Messages
8
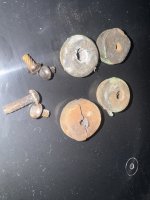
This grinder came from Vandenburg Air Force base and was used at one of the missile launch sites my grandmother’s neighbor worked at in Lompoc. It’s sat for decades but hums perfectly when fired up. It’s a piece of history and family heir loom for me. One of the feet broke off. I assumed at first it’d be an easy fix but the screws that hold in the rubber feet are not like anything ive seen. I went to remove the other three and only one came out and the other two broke off. I think my only and best shot at replacing the feet is to take it a machine shop and have them drill out the three broken ones and cut new modern threads in all four corners and just use standard Off the shelf replacements. Anyone have any other ideas or input or any Knowledge of this beast? The inventory labels for the us government tell me the years this thing was in service and who the contractor was (Convair). IMG_1905.jpegIMG_1904.jpegIMG_1906.jpeg
 
To avoid these ads, REGISTER NOW!

tym

Well-known member
Joined
Mar 5, 2016
Messages
2,446
Location
MA
Those look more like a press-fit brad or rivet than a screw. If the holes go all the way through the base, you could through-bolt new feet in place without modifying the grinder.
 

Zrxrunner

Well-known member
Joined
Jan 14, 2018
Messages
522
Location
Eastern Iowa
I agree on the press in screws. Look just like a larger version of what usually holds datatags onto the craftsman grinders. I would just get some longer and next size down capscrews when you mount it to the bench or stand, and sandwich some new rubber feet in between. Otherwise, could probably just run a drill through to clean up the holes and easy tap job for new hardware
 

olddog1

Well-known member
Joined
Mar 28, 2025
Messages
68
Drive screws are hardened, so they can't be drilled out. If the holes are blind so you can't drive them out, the broken-off ones can be a real chore to get out. If there's enough material, I have been able to chain-drill a few very small holes right at the edge of the broken screw so you can tap it over into the space left by the drilling. Then you can fish the broken end out. Fill the hole with JB Weld or something similar and after it cures, drill a new hole of the appropriate size for a new drive screw. Good luck! Nice grinder!
 
OP
S

shawnh68

Member
Joined
Feb 15, 2026
Messages
8
Thanks everyone for the fast answers and ideas! i Cannot get to the other side of the cast base so it’s blind. I’ve wanted to mount it on a stand and with four mountain holes I may be able to just sandwich in four rubber feet versus replace the screw. I was going to try and drill them out and use a screw removal tool but if they’re hardened then that’s probably not a viable solution.
 

senlow

Well-known member
Joined
Apr 26, 2008
Messages
2,245
Location
Wheat Ridge, Colorado
Since you are bolting the grinder to a stand the rubber feet serve no purpose. The rubber feet will not isolate the grinder from the stand because the attaching bolts couple the two pieces. You have removed the feet, so just bolt the grinder to the stand.
 
OP
S

shawnh68

Member
Joined
Feb 15, 2026
Messages
8
Since you are bolting the grinder to a stand the rubber feet serve no purpose. The rubber feet will not isolate the grinder from the stand because the attaching bolts couple the two pieces. You have removed the feet, so just bolt the grinder to the stand.
Just to be sure I’m getting this right, bolting it to a stand means the feet are in no way the point of connection to anything and therefore serve no purpose to absorb or dampen any vibration from the grinder itself? not Having a pedestal to bolt it to to test the points of contact, I was assuming that if I booted it to my workbench that the rubber feet would still be in contact with the work bench surface and therefore would still act as some type of dampener.
 

senlow

Well-known member
Joined
Apr 26, 2008
Messages
2,245
Location
Wheat Ridge, Colorado
The rubber feet would act as a spacer between the stand and grinder. The bolts will couple the two and allow the grinder to transmit vibration from the grinder to the stand.

If you feel a need to isolate the grinder from the base, something like this https://www.mcmaster.com/products/v...fe-easy-install-vibration-damping-grommets~~/ could work. The mounting bolts do not make direct contact with the grinder or the stand.
 
To avoid these ads, REGISTER NOW!
OP
S

shawnh68

Member
Joined
Feb 15, 2026
Messages
8
Great suggestions! I’m starting my Craigslist and Facebook search for a quality stand for this beast. When the first rubber foot broke off it started walking away when I used it and I had already concluded I wanted a dedicated stand for it. I’ll shelf the idea of fixing the feet. Thanks all!
 

willy3486

Well-known member
Joined
Jan 14, 2010
Messages
1,594
Location
Middle Tennessee
Deja Vu. I just got one of these today. It was at a flea market and the guy said he would take 20 for it, As hard as I tried to convince myself not to get it I couldn't convince myself to leave it. So it came home with me. I haven't plugged it in, the wire looks bad. So if I get a chance I will test it with a good cord. If it works I plan to redo it and probably paint it black. I plan to make it my main grinder and make a stand for it. The one I have been using I may set it up to sharpen blades and such. If yours is like the one I found its larger than many out there today and looks like it can really work good. Great find.
 

bugzilla46310

Well-known member
Joined
Feb 4, 2023
Messages
147
Location
Demotte, IN
How about a picture of where the rubber feet were. A Dremel tool with the right bit and some patience should get the broken screws out.
 

willy3486

Well-known member
Joined
Jan 14, 2010
Messages
1,594
Location
Middle Tennessee
I have a question on the one you have about the power button on your grinder. The switch on yours do you have to push it in when its in the on position to work? On mine you have to push it all the way to the off position then push it on and press in before it comes on. It works similar to a breaker in a electrical panel . I didn't know if this was normal or the switch is going out. I took the bottom off and put on a newer cord to see if it runs. It ran fine as far as I could tell. I plan to restore it this summer and make a stand.

If you need info here is a link to the company that made it.
 
OP
S

shawnh68

Member
Joined
Feb 15, 2026
Messages
8
I have a question on the one you have about the power button on your grinder. The switch on yours do you have to push it in when its in the on position to work? On mine you have to push it all the way to the off position then push it on and press in before it comes on. It works similar to a breaker in a electrical panel . I didn't know if this was normal or the switch is going out. I took the bottom off and put on a newer cord to see if it runs. It ran fine as far as I could tell. I plan to restore it this summer and make a stand.

If you need info here is a link to the company that made it.
Hey Willy,
sorry for the delay one responding. I took a pic that will hopefully answer your question. It’s pretty obvious the cord has been changed somewhere in the past, but I think the actual switch is original. There are no other “switches” besides what you see. i moved this thing around a bit on my bench today, I’d forgotten it weighs a ton, guessing 65 lbs. hope this helps.
 

Attachments

  • IMG_1977.jpeg
    IMG_1977.jpeg
    727.8 KB · Views: 8
OP
S

shawnh68

Member
Joined
Feb 15, 2026
Messages
8
Wow that Convair sticker is so cool..
I thought so too. In fact, it has several from the various years of inventory. I’d love to refurbish it but the stickers and patina make me want to just leave it as is. When I brought it home I was showing it to my wife and explaining the stickers at the Atlas project and family history associated with the launches at Vandenburg, somewhere in my enthusiasm she walked away unbeknownst to me…..:)
 

willy3486

Well-known member
Joined
Jan 14, 2010
Messages
1,594
Location
Middle Tennessee
Hey Willy,
sorry for the delay one responding. I took a pic that will hopefully answer your question. It’s pretty obvious the cord has been changed somewhere in the past, but I think the actual switch is original. There are no other “switches” besides what you see. i moved this thing around a bit on my bench today, I’d forgotten it weighs a ton, guessing 65 lbs. hope this helps.
Thanks for the reply, no problem on just getting back. I probably won't get to rework it until may or later. I took mine apart to check it out. I wanted to see if it run. I put a temp cord on it and tried it out. It had one glass shield but the other was missing. Both sides were missing from the covers. It had one light on the stone side. I plan to put tubing over wires going into the windings to protect the original wire from cracking and shorting. Then I will replace all other wires. I also plan to repaint it and make a stand.
 

Attachments

  • IMG_9017.JPG
    IMG_9017.JPG
    465.4 KB · Views: 7
OP
S

shawnh68

Member
Joined
Feb 15, 2026
Messages
8
Mine came with the side shields that I added back on when a bought a new stone and brushes. I do have the fences for one side but no glass shields. Since I’ll be grinding mower blades and such, I’d like a glass shield. Please let me know if you find a place to acquire the missing parts.
 

willy3486

Well-known member
Joined
Jan 14, 2010
Messages
1,594
Location
Middle Tennessee
Mine came with the side shields that I added back on when a bought a new stone and brushes. I do have the fences for one side but no glass shields. Since I’ll be grinding mower blades and such, I’d like a glass shield. Please let me know if you find a place to acquire the missing parts.
The side covers I will probably fabricate along with making a new glass shield holder for the side that is missing. As far as the glass I will probably just make one out of thick plexiglass or a piece of glass. I have some plexiglass from a old LCD display I will probably cut. Many LCDs have a plexiglas piece in the layers and I have one that may work. one of the things I like to do is figure out how to fabricate parts that are missing on stuff I restore.
 
To avoid these ads, REGISTER NOW!
Top Bottom