
You are using an out of date browser. It may not display this or other websites correctly.
You should upgrade or use an alternative browser.
You should upgrade or use an alternative browser.
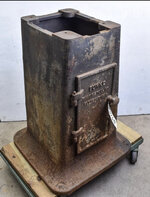
Vintage Burke machine base repurposed into drill press stand
- Thread starter Burn1
- Start date


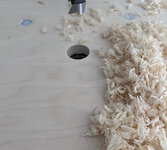
Using 1/4 steel plate, drilled some holes in each corner matching up to the chip tray's existing cast holes.
Yes, realize the small drill press table was real sketchy during this operation.
Got it done using several drill sizes along the way.
Yes, realize the small drill press table was real sketchy during this operation.
Got it done using several drill sizes along the way.
Attachments


isb cornbinder
Well-known member
I had not heard of BURKE until I saw this vice for sale on CL. $40 is the number I think I remember. It took very little refreshing to get the vice to like new. I have decided to replace the hard jaws with aluminium. I need to make "T" nuts for the swivel base.
Attachments


Last edited:
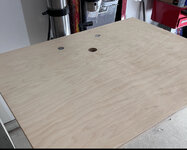
For next operation needed a much larger surface area supporting the heavy chip tray while drilling & tapping.
The lip around the tray's edges made it a little more difficult based on the clamps I had on hand.
Birch plywood work surface was quick to make and can be stored & re-used for drilling larger items/projects.
Simple t-nuts did the trick for providing flush threads.
The lip around the tray's edges made it a little more difficult based on the clamps I had on hand.
Birch plywood work surface was quick to make and can be stored & re-used for drilling larger items/projects.
Simple t-nuts did the trick for providing flush threads.
Attachments

Since cast iron tray was not square/flat on the bottom, did not want to use just threaded bolts/nuts to secure the steel plate to tray.
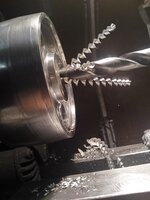
Required drilling holes oversize, threading, and using Time-Sert. Prefer Time-Sert brand and very easy to use.
Drill, chamfer top of hole(insert will then sit flush), thread, and install.
Hole was drilled to correct size, inserted tap in drill press and ran several revolutions by hand(machine powered-off).
Once threading was started perfectly straight, finishing tapping with a t-handle/tap by hand.
Attachments


Last edited:
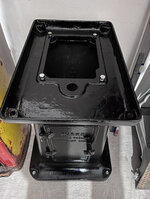
Now that steel plate is bolted to the tray, added threaded stand-off's by drilling holes where the drill press base will line up.
Then bolted from underneath and finished off by tack welding each insuring over time the standoffs don't loosen.
Measured all this 2x to insure the alignment was all correct.
Then bolted from underneath and finished off by tack welding each insuring over time the standoffs don't loosen.
Measured all this 2x to insure the alignment was all correct.
Attachments

Last edited:
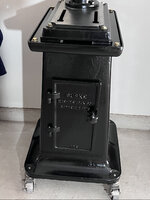
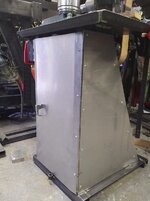
Drill press base attached to Burke base.
Also drilled/installed Time-Sert inserts for vintage casters w/threaded stems.
She is rock solid, but easy to move around when needed.
If drill press is changed out someday, simple change/modify of a steel plate to whatever is mounted to this Burke base.
Also drilled/installed Time-Sert inserts for vintage casters w/threaded stems.
She is rock solid, but easy to move around when needed.
If drill press is changed out someday, simple change/modify of a steel plate to whatever is mounted to this Burke base.
Attachments


Last edited:
Garage Junkie
Well-known member
Nice job! And I like your powder box too.
isb cornbinder
Well-known member
Decent job.
I made a base for my 100 year old Canedy Otto drill press. I placed the motor under the drill press and made some "cone" pulleys for speed change. The flat base is a 24 inch square .250" thick mild steel. I cut angle iron with beveled corners and welded them around the base plate. I had to make a flat belt pulley for the final drive leather belt. In one of the pictures there is a third "cone" pulley. It will become another part of the final drive and give more speed options.
Do I need this? Not in the classic way for drilling. I need these projects to keep my brain alive.
Attachments
-
 Canedy Otto FLAT BELT PULLEY DRILLING.jpg60.2 KB · Views: 117
 -
 CANEDY OTTO.jpg59.7 KB · Views: 87
 -
 CANEDY OTTO CABINET 1.jpg57.7 KB · Views: 79
 -
 CANEDY OTTO WAITING FOR PAINT.jpg144.6 KB · Views: 70
 -
 CANEDY OTTO CABINET DOOR OPEN 2.jpg163.7 KB · Views: 62
 -
 TOP DRIVE PULLEY AND LEATHER BELT.jpg30 KB · Views: 63
 -
 LOWER BELT DRIVE LEATHER.jpg85.4 KB · Views: 68
Have aquired a second Burke base and drip tray. Threaded base for screw-in casters as well and fitting steel plate inside the drip tray as before. This time, it will be used as a reloading station presses & a Wilton vise stand. and/or quick change converted for brass case trimming duties, . More detail in the coming month.
Attachments
Jayman17
Well-known member
That drill press base turned out real nice! Great job
whateg01
Well-known member
I love seeing old bases used for stuff like that!
LOL!
Thanks LXCam.
Took me a few years to find them both and get them down South.
Seems many came from the great North. Two acquired were located in Detroit and CT/NJ region.
Maybe more older industrial/manufacturing shops in those areas?
Hardest part was finding a missing chip tray for one of them. They can get separated or broken/cracked over time.
Base can be used on its own, but really like larger tray area & extra height it adds to column/base. Took me a minute to figure out how to secure the steel plate within chip tray, but once outer holes were threaded, mounting plate is rock solid.
Hatch door and lower shelf are great for storing drills and accessories and items.
For the second one, reloading dies and accessories.
rmack898
Well-known member
That base is from a Burke #4 horizontal mill. This is the only picture I have on this computer, it was from moving in day 3 years ago.
Nice job on the re-purposing.

Nice job on the re-purposing.
"What drill press is that? Almost looks like a Nova?"
Thanks and you are correct. Its the Nova benchtop variable speed.
Should have bought one when they first came out.
I’m done changing pulleys. Dial-in speed for material and go.
All I need for materials and projects I work on.
Enjoyed the project and work area is a single car garage, being able to move it is helpful.
PugetDude
ALLIANCE MEMBER
Turned out great!Drill press base attached to Burke base.
Also drilled/installed Time-Sert inserts for vintage casters w/threaded stems.
She is rock solid, but easy to move around when needed.
If drill press is changed out someday, simple change/modify of a steel plate to whatever is mounted to this Burke base.
Nice drill index, too.