To avoid these ads, REGISTER NOW!

Vintage Snap on restorations 1st post!

jn50308401

Well-known member
Joined
Sep 7, 2015
Messages
315
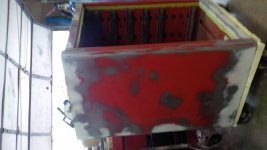
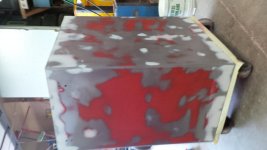
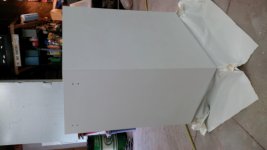
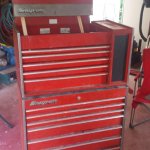
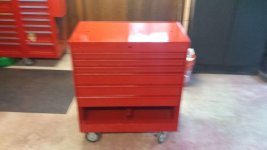
Good evening everyone, I would like to introduce myself and my projects. I got the bug to restore an old Snap on tool box (just about the only way I can afford one), so I would like to share my projects. One KR557F that I did over the last few months and a recent pick up a matching KR537D and KR557D. Here's some teardown from over the weekend. It's not pretty but, it's solid..

Sent from my SCH-I545 using Tapatalk
 

Attachments

  • uploadfromtaptalk1441677034912.jpg
    uploadfromtaptalk1441677034912.jpg
    122 KB · Views: 308
  • uploadfromtaptalk1441677082484.jpg
    uploadfromtaptalk1441677082484.jpg
    137.3 KB · Views: 282
  • uploadfromtaptalk1441677100530.jpg
    uploadfromtaptalk1441677100530.jpg
    127.4 KB · Views: 315
To avoid these ads, REGISTER NOW!
OP
J

jn50308401

Well-known member
Joined
Sep 7, 2015
Messages
315
Thanks and thanks! Here's the KR557F finished a few months ago before and after.

Sent from my SCH-I545 using Tapatalk
 

Attachments

  • uploadfromtaptalk1441678751917.jpg
    uploadfromtaptalk1441678751917.jpg
    138.4 KB · Views: 322
  • uploadfromtaptalk1441678793132.jpg
    uploadfromtaptalk1441678793132.jpg
    131 KB · Views: 282

jn503084

Well-known member
Joined
Sep 6, 2015
Messages
68
Location
Virginia Beach VA
Very cool. I just finished restoring my box. Time consuming, but very worth it!
Yes the top box is kicking my **** right now. I power washed and scrubbed tons of grease out but every little nook and cranny had gunk in it. The only bonus was the 14MM Snap on short combo wrench stuck with grease to the bottom of the top chest..
 

jn503084

Well-known member
Joined
Sep 6, 2015
Messages
68
Location
Virginia Beach VA
Thanks for the welcome! I almost bought a 70's vintage Craftsman stack from the estate of a retired Marine, who evidently also used the box as his auxiliary liquor cabinet.. There was enough hooch hidden in the drawers to throw one heck of a party!
 

bsg1

Well-known member
Joined
Sep 3, 2015
Messages
303
Location
so cal
congrats on some great finds. your boxes look great; the whole set-up looks good. i clean things up, but no repaint; the purist affliction plagues me still.
 

Hammer1963

Well-known member
Joined
Jan 2, 2011
Messages
2,048
Location
Kentucky
Great project! I'm in the process of doing the same. The finished box looks good. Curios, what paint did you use?
 
OP
J

jn50308401

Well-known member
Joined
Sep 7, 2015
Messages
315
congrats on some great finds. your boxes look great; the whole set-up looks good. i clean things up, but no repaint; the purist affliction plagues me still.

Thanks, I've enjoyed the challenge of working on them. I love the patina old boxes get, but this set was rough, so new paint it is..

Sent from my KFSOWI using Tapatalk
 
OP
J

jn50308401

Well-known member
Joined
Sep 7, 2015
Messages
315
Great project! I'm in the process of doing the same. The finished box looks good. Curios, what paint did you use?

Thanks ! I'm used Rustoleum Sunrise red in the can. I used most of a quart of color and 1/ 1/2 cans Rustoleum Rusty metal primer. My spray equipment is embarrassing and primitive, I'm limited by my compressor but it works for these little jobs. I sprayed with a Harbor Freight HVLP gun and my poor abuse Norhtern Tool brand 30 gallon compressor

Sent from my KFSOWI using Tapatalk
 

Hammer1963

Well-known member
Joined
Jan 2, 2011
Messages
2,048
Location
Kentucky
Thanks ! I'm used Rustoleum Sunrise red in the can. I used most of a quart of color and 1/ 1/2 cans Rustoleum Rusty metal primer. My spray equipment is embarrassing and primitive, I'm limited by my compressor but it works for these little jobs. I sprayed with a Harbor Freight HVLP gun and my poor abuse Norhtern Tool brand 30 gallon compressor

Sent from my KFSOWI using Tapatalk

It looks great regardless of what type of spray gun and compressor you used! I have been leaning towards using the Rustoleum Sunrise red as well and after seeing your results, that's what I'll be using too
 
OP
J

jn50308401

Well-known member
Joined
Sep 7, 2015
Messages
315
It looks great regardless of what type of spray gun and compressor you used! I have been leaning towards using the Rustoleum Sunrise red as well and after seeing your results, that's what I'll be using too
Thanks!, I'm a mechanic by training, so paint and body work is mostly an exercise in frustration for me. Rustoleum Sunrise Red looks a touch too red for a true Snap on red (which looks more orange to me) but the price is right and it works. I found thinning with acetone and spraying the Rustoleum works best.

Sent from my SCH-I545 using Tapatalk
 

toolchaser

Well-known member
Joined
Apr 6, 2008
Messages
803
Location
Greenville, GA
JN, are the lid supports intact on your box? They seem to be a common problem on that series box. I guess I must be "vintage" since I bought a Rick Mears edition of that box new when I started turning wrenches.
 

jn503084

Well-known member
Joined
Sep 6, 2015
Messages
68
Location
Virginia Beach VA
JN, are the lid supports intact on your box? They seem to be a common problem on that series box. I guess I must be "vintage" since I bought a Rick Mears edition of that box new when I started turning wrenches.

Toolchaser, my box has a broken hinge on the right hand side(facing the front of the tool box). The rivets started to pull out out of the box tool. These have to be about the crummiest piece of the box. The lid is very heavy and those hinges just can't handle it.

Snap On didn't have any part numbers for replacement hinges, which is no great loss to me. I think I'm going to play with re-engineering something that is a little more sturdy. A set of gas struts or something like that would be better.

Nah, you're only as "vintage" as you feel :thumbup:
 
OP
J

jn50308401

Well-known member
Joined
Sep 7, 2015
Messages
315
Top box is in primer and the cabinet is wet sanded. The lid got 4 coats of primer. I finish wet sanding tomorrow.

I drilled out the rivets for the hinge that attaches to the box as I was tired of having to worry about getting a broken finger from the dang thing. I also removed the side door.

It made it much easier to move the cabinet around and I got all the nooks and crannies in the top of the chest primered.

Hopefully this nice low humidity weather will continue so that I can get some paint on this thing!


Sent from my SCH-I545 using Tapatalk
 

Attachments

  • uploadfromtaptalk1442280336266.jpg
    uploadfromtaptalk1442280336266.jpg
    139.2 KB · Views: 144
  • uploadfromtaptalk1442280620300.jpg
    uploadfromtaptalk1442280620300.jpg
    141.6 KB · Views: 129
OP
J

jn50308401

Well-known member
Joined
Sep 7, 2015
Messages
315
First color on my top box. I went out on a limb with the color with Rustoleum Safety Red. It has a little more orange to the color than the Sunrise Red and it sprayed very nicely. It looks more authentic to the Snap on red, which always had an orange tint to it to me. Thinned with Duplicolor acetone, the paint dried to the touch in about 2 hours.

Sent from my SCH-I545 using Tapatalk
 

Attachments

  • uploadfromtaptalk1442453410855.jpg
    uploadfromtaptalk1442453410855.jpg
    141.5 KB · Views: 148

Hammer1963

Well-known member
Joined
Jan 2, 2011
Messages
2,048
Location
Kentucky
Looking good! What ratio are you using on paint to acetone and what length of flash time have you been averaging between coats?
 
To avoid these ads, REGISTER NOW!
OP
J

jn50308401

Well-known member
Joined
Sep 7, 2015
Messages
315
@Hammer.. I confess I didn't really measure.. I played with the acetone until the paint started running like thin oil off my paint stir smoothly, if that makes sense. this stuff seems thicker than regular rustoleum as well. I strained the paint before mixing, it's like elmers glue!

For the acetone It was probably 4 ounces in the mixing cup. It sprayed really well, so I did 4 light coats on the five drawers, the main cab and the small drawers. I'm guessing 4 or 5 minutes between coats. It was dry to touch in about 2 hours.
Unfortunately, I have some bugs that decided to kamikaze into a few spots, so some spot sanding/touch up is going to be in order. More tomorrow...

Sent from my KFSOWI using Tapatalk
 
Last edited:

jn503084

Well-known member
Joined
Sep 6, 2015
Messages
68
Location
Virginia Beach VA
No problem! I really like the Rustoleum Pro paint. It worked a lot better than regular Rustoleum. I think the color is much closer to the original Snap On color. I'll take a pic of the drawer sides that I got some overspray on, the color matches pretty well to the paint that is hidden inside the tool box. Fun fact, on the back wall of the inside of the box, there is hardly any paint! I'm going to have to complain to SO :)
 

Hammer1963

Well-known member
Joined
Jan 2, 2011
Messages
2,048
Location
Kentucky
No problem! I really like the Rustoleum Pro paint. It worked a lot better than regular Rustoleum. I think the color is much closer to the original Snap On color. I'll take a pic of the drawer sides that I got some overspray on, the color matches pretty well to the paint that is hidden inside the tool box. Fun fact, on the back wall of the inside of the box, there is hardly any paint! I'm going to have to complain to SO :)

No paint ........ NO WAY!
 
OP
J

jn50308401

Well-known member
Joined
Sep 7, 2015
Messages
315
Funny thing happened tonight.. ugh! I had a few runs that wet sanded out perfectly, but center piece of sheet metal on the front of the top chest had some bugs lad in it while the paint was drying. I started wet sanding and the paint burned through on the edges I was working. No big deal, I picked up a can of spray paint to touch up.

I masked the box off, prepped the area for touch up and let the spot dry just like I did with my other box(using standard rustoleum ). Using the Rustoleum Pro red I shot one light coat and blamo, the paint crazed and wrinkled!!! So I spent his evening scrapping paint ,primer glazing putty off with a razor blade. [emoji26]

My only guess is that the solvents in the spray paint re activated the can paint I sprayed.
Love and learn..


Sent from my SCH-I545 using Tapatalk
 

Hammer1963

Well-known member
Joined
Jan 2, 2011
Messages
2,048
Location
Kentucky
Not a good thing at all. I've had about the same experiences with non catalysed paints. What a headache!
 
OP
J

jn50308401

Well-known member
Joined
Sep 7, 2015
Messages
315
Not a good thing at all. I've had about the same experiences with non catalysed paints. What a headache!
My wife just talked me off the ledge....
It ***** but hobbies have set backs so I'll take the fun with the pain.
That knowlege and a couple of cold ones are getting me through it...[emoji482]

Sent from my SCH-I545 using Tapatalk
 
OP
J

jn50308401

Well-known member
Joined
Sep 7, 2015
Messages
315
Ugh.. ALL the paint is either soft or peeling. Back to the drawing board..

Sent from my SCH-I545 using Tapatalk
 

Hammer1963

Well-known member
Joined
Jan 2, 2011
Messages
2,048
Location
Kentucky
I found a catalyst for this type of paint at Tractor supply. Majic brand at $15.00 or so for a half pint. I tried some spray outs with the catalyst added vs straight out of the can Rustoleum and there is a huge difference. Tremendously quicker dry times and has a nice appearance as well.
 

jn503084

Well-known member
Joined
Sep 6, 2015
Messages
68
Location
Virginia Beach VA
I found a catalyst for this type of paint at Tractor supply. Majic brand at $15.00 or so for a half pint. I tried some spray outs with the catalyst added vs straight out of the can Rustoleum and there is a huge difference. Tremendously quicker dry times and has a nice appearance as well.

Cool, we finally have TSC's around here. I got the layers of failed paint off just in time for the tropical depression to kill any chance of painting. Ugh!

I'm going to try out a hardener this time around, be more patient between coats and pray for the best. The Rustoleum Pro is waaaay harder than regular Rustoleum on the parts of the box that set up. It was tougher to scrap and sand, so I'm going to stick with the Safety red. I think the color is much closer to the SO color than Sunrise Red. Pics tomorrow.. promise!
 

blocke

Member
Joined
Jun 24, 2013
Messages
24
Wow, nice work. Bummer that re have to start over. I just picked up my kra combo, still in the process of cleaning and stripping. Where can you purchase the "pro" rustoleum?
 
OP
J

jn50308401

Well-known member
Joined
Sep 7, 2015
Messages
315
"Progress" today.. scrubbing out the bottom chest and it's filthy drawers. I bought some LA's Awesome cleaner at my local Ollies discount store (1.89/bottle!). This stuff kicks a**! Cleaned the drawers up nicely, with not too much scrubbing.

The top chest is sanded and I riveted the lid back on, the paint inside the box set up and cured fine. Oh well..


Sent from my SCH-I545 using Tapatalk
 

Attachments

  • uploadfromtaptalk1443377065957.jpg
    uploadfromtaptalk1443377065957.jpg
    135.1 KB · Views: 74
  • uploadfromtaptalk1443377114942.jpg
    uploadfromtaptalk1443377114942.jpg
    126.5 KB · Views: 66
  • uploadfromtaptalk1443377154228.jpg
    uploadfromtaptalk1443377154228.jpg
    149.9 KB · Views: 69
OP
J

jn50308401

Well-known member
Joined
Sep 7, 2015
Messages
315
Wow, nice work. Bummer that re have to start over. I just picked up my kra combo, still in the process of cleaning and stripping. Where can you purchase the "pro" rustoleum?
Blocke : I got the Rustoleum Safety Red at Lowes, they have cans, quarts and gallons. It's cheaper to use the quart or gallon to get the paint you'll need. There is a guy on here that painted a Snap On taco cart with something like 50 cans of spray paint! I used the Rustoleum rusty metal primer which is good stuff thinned out with acetone and sprayed out of a gun.

Sent from my SCH-I545 using Tapatalk
 

Hammer1963

Well-known member
Joined
Jan 2, 2011
Messages
2,048
Location
Kentucky
jn50308401

I have my little Snap-on KRA2007 roll cab about ready to paint. Repaired tons of surface rust from being in a fab shop with grinding sparks being constantly sprayed on it and several dents along with a few mysterious 24 grit grind patches on the box. I sprayed it with 2 part epoxy etching primer followed by 2K primer today. I hope to get around to painting it within a couple of weeks. The price was right so it will be worth it in the end.
 
OP
J

jn50308401

Well-known member
Joined
Sep 7, 2015
Messages
315
jn50308401

I have my little Snap-on KRA2007 roll cab about ready to paint. Repaired tons of surface rust from being in a fab shop with grinding sparks being constantly sprayed on it and several dents along with a few mysterious 24 grit grind patches on the box. I sprayed it with 2 part epoxy etching primer followed by 2K primer today. I hope to get around to painting it within a couple of weeks. The price was right so it will be worth it in the end.

Sounds like you're doing way nice work! Drop some pictures our way, I'd love to see how it looks..

Did you prime the drawers inside and out? I fear the bottom chest is going to need all the drawers primed and painted inside and out. The rust, dents and general crud peeled a lot if the paint inside the drawers.

I have a heck of a time working with the drawers as they are so awkward to coat. I guess if I had the option hanging the drawers would be the best route.
jn50308401

I have my little Snap-on KRA2007 roll cab about ready to paint. Repaired tons of surface rust from being in a fab shop with grinding sparks being constantly sprayed on it and several dents along with a few mysterious 24 grit grind patches on the box. I sprayed it with 2 part epoxy etching primer followed by 2K primer today. I hope to get around to painting it within a couple of weeks. The price was right so it will be worth it in the end.


Sent from my SCH-I545 using Tapatalk
 

Hammer1963

Well-known member
Joined
Jan 2, 2011
Messages
2,048
Location
Kentucky
I may post some photos this weekend if I do not forget. As far as working with the drawers, I am lucky on this one. They are in good shape which is odd considering how rough the outside was. On a few past tool chest/cab restores, I have taken Ajax, Comet or Barkeeper's friend and used a fine maroon Scotchbrite pad and abraded them and cleaned them simultaneously by adding a bit of water to makie a thin paste and going over them thoroughly and flushing them with water. Blow them dry and use a wet on wet prime and paint process to say time plus chemical adhesion is far superior.
 
OP
J

jn50308401

Well-known member
Joined
Sep 7, 2015
Messages
315
I may post some photos this weekend if I do not forget. As far as working with the drawers, I am lucky on this one. They are in good shape which is odd considering how rough the outside was. On a few past tool chest/cab restores, I have taken Ajax, Comet or Barkeeper's friend and used a fine maroon Scotchbrite pad and abraded them and cleaned them simultaneously by adding a bit of water to makie a thin paste and going over them thoroughly and flushing them with water. Blow them dry and use a wet on wet prime and paint process to say time plus chemical adhesion is far superior.
That's a good idea to do Comet/Bar Keeper's Friend to get the drawers clean. Mine was beat inside and out!

My other box I did this summer was like that too, the insides of the drawers were mint, clean as a whistle but the outside was gross.

Sent from my SCH-I545 using Tapatalk
 

MShaw

Well-known member
Joined
Mar 2, 2015
Messages
1,013
Location
York, Pa.
When you are looking at the quality of older so boxes, in the early sixties so stopped buying from Metal Box and Cabinet (MBC) and started making them.
At the time the local so dealer would not sell the so product as the quality was so poor. He continued selling MBC until the quality of so improved. It took a matter of years.
 

Hammer1963

Well-known member
Joined
Jan 2, 2011
Messages
2,048
Location
Kentucky
jn50308401 here are a few photos of the KRA2007 tool cab in progress. I do not take any initial photos but you can get in idea of the amount of rust and dings from the filler areas. Most of what you see were surface rust areas that were in the form of worm holes like you'd find in hardwoods. I removed the rust and used a skim coat of 2 part filler known as Half Time
 

Attachments

  • IMG_20150927_150620.jpg
    IMG_20150927_150620.jpg
    143.3 KB · Views: 53
  • IMG_20150927_150539.jpg
    IMG_20150927_150539.jpg
    142.4 KB · Views: 60
  • IMG_20150927_164516.jpg
    IMG_20150927_164516.jpg
    152 KB · Views: 59
To avoid these ads, REGISTER NOW!
Top Bottom