To avoid these ads, REGISTER NOW!

Vinyl Siding Damage! How Much Trouble?

knucklebusted

Banned
Joined
Jan 22, 2010
Messages
629
Location
Bowling Green, KY
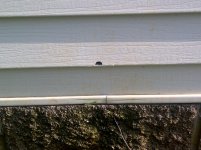
We had a really bad storm today and it blew a limb into my garage, damaging the vinyl siding. How hard is this going to be to fix for a non-vinyl guy with enough tools to hurt himself? I have the siding popper, whatever it is to get in and disconnect the interleaving. I may have some scrap siding from where it was built if I can section in a smaller piece.

What does the bottom piece do? Do I need to worry about replacing it or can I just caulk it or something?;
 

Attachments

  • Bowling Green-20120426-00012.jpg
    Bowling Green-20120426-00012.jpg
    146.8 KB · Views: 93
To avoid these ads, REGISTER NOW!

jack stand

Well-known member
Joined
Feb 29, 2012
Messages
3,358
Location
Lakes Region Maine
The hardest part of the repair is tracking down the replacement panel. So many manufactures out there and they are all usually changing their panel "profile" or texture and colors, and even if you find the exact siding, after a few years (fading) in the sunlight, the repair sticks out like a sore thumb! Unless this (minor) damage is right by the entry door for all to see, I'd caulk it with the best matching color that you can find and walk away. If you do have a scrap pc. stick your siding tool into the bottom of the panel above the panel to be repaired. this is the easiest to do at a seam (vertical) where 2 panels lap together. Pulling down while sliding the tool horizontally will "un zip" the bottom of that panel. While holding (bending) that loosened panel upward, remove the nails from the top of the damaged panel to be relaced. A general rule is to keep your seams as far apart from each other as you can for appearance. You can cut the damaged panel to this legnth to avoid replacing the whole panel. Once you replace and nail the damaged panel, use your tool in reverse, pulling down and hooking the panel above. This will be easiest to do on a warm day in the sun. Older vinyl can get kinda brittle, esp. in the cold. You'll make the repair (legnth) from the damaged area to the closest existing seam, left or right. You'll also have to cut the height to match the repaired pc. This will come off the bottom of your replacemet panel, just measure or match up with the old. The bottom pc is called J channel, I'd just caulk that up! Use a common pair of snips and a razor knife for cutting. Good luck, once you get it apart it's obvious.
 
Last edited:

toymn6366

Well-known member
Joined
Dec 19, 2007
Messages
1,096
Location
georgia
not hard,finding replacement is the hardest part had to replace five pieces baseball busted that nobody throw
 
OP
K

knucklebusted

Banned
Joined
Jan 22, 2010
Messages
629
Location
Bowling Green, KY
The hardest part of the repair is tracking down the replacement panel. So many manufactures out there and they are all usually changing their panel "profile" or texture and colors, and even if you find the exact siding, after a few years (fading) in the sunlight, the repair sticks out like a sore thumb! Unless this (minor) damage is right by the entry door for all to see, I'd caulk it with the best matching color that you can find and walk away. If you do have a scrap pc. stick your siding too into the bottom of the panel above the panel to be repaired. this is the easiest to do at a seam (vertical) where 2 panels lap together. Pulling down while sliding the tool horizontally will "un zip" the bottom of that panel. While holding (bending) that loosened panel upward, remove the nails from the top of the damaged panel to be relaced. A general rule is to keep your seams as far apart from each other as you can for appearance. You can cut the damaged panel to this legnth to avoid replacing the whole panel. Once you replace and nail the damaged panel, use your tool in reverse, pulling down and hooking the panel above. This will be easiest to do on a warm day in the sun. Older vinyl can get kinda brittle, esp. in the cold. You'll make the repair (legnth) from the damaged area to the closest existing seam, left or right. You'll also have to cut the height to match the repaired pc. This will come off the bottom of your replacemet panel, just measure or match up with the old. The bottom pc is called J channel, I'd just caulk that up! Use a common pair of snips and a razor knife for cutting. Good luck, once you get it apart it's obvious.

Cool! I have an old scrap piece in the attic. The damage is on the far side of the man door and the least seen side of the garage, nearest the tree line. I'll see if I can figure it out now that I know the trick. I watched the dude put it all up many years ago when I had it built but I don't remember much of it.

Thanks
 
To avoid these ads, REGISTER NOW!

jack stand

Well-known member
Joined
Feb 29, 2012
Messages
3,358
Location
Lakes Region Maine
I forgot to mention that you'll need to duplicate the "factory" end, that is the removal of some of the top (hook and nailing edge) and bottom, back of the replacement pc. in any situation (lap) where there is not at least one of these factory lap ends. not rocket science, just copy. A factory end on both (under and overlapping) panel is best, but not nec.
 

vpogv

Well-known member
Joined
Mar 26, 2012
Messages
62
Location
NW OH
That little amount I would caulk it. Doesn't look bigger than a nickel.
 
To avoid these ads, REGISTER NOW!
Top Bottom