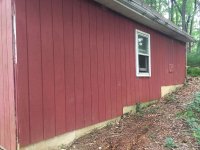
I'm removing the old rotting T1-11 from my workshop and installing new sheathing, tyvek and vinyl siding. How should I install the vinyl with the stepped foundation. I'm new to this so I don't know the usual tips or techniques.


You are using an out of date browser. It may not display this or other websites correctly.
You should upgrade or use an alternative browser.
You should upgrade or use an alternative browser.
Vinyl siding install help needed
- Thread starter mepstein
- Start date


AMCguy
Well-known member
You begin at the lowest elevation using starter strip, but when you get to the first step you transition to using J trim.
Glenn
Glenn
Chevy-SS
Well-known member
There may be a way you can avoid the 'steps'. A vinyl guy would know.
Last edited:
BillK
Well-known member
Cant help with the siding install but I would leave the T111 and use it for sheathing. Just patch the spots that are no good.
Sluggo0018
Active member
I agree with BillK and AMCguy. I vinyl sided my entire two story colonial house solo quite a few years ago and left the T1-11 siding in place. Where it was rotten or warped, I replaced it with the same thickness of plywood. Find the lowest point of the existing siding with a water level and then lay it level from that height.
Use starter strip and start at the lowest level of siding. Then handle the transitions with the J molding.
Vinyl siding is pretty simple and goes quickly once you get that first course set. Keep the roofing nails loose and let the siding panels float. Only a few specialized tools are needed and the results are pretty good and maintenance free. It transformed my house, going from dark brown T1-11 to white vinyl with dark green shutters. Took me most of the summer working alone, but the final product was very rewarding.
Before I started my project, I obtained a thick book on the subject of installing vinyl siding that I read. It gave me confidence to start the project. I cant seem to locate it right now. I will keep looking. If I do find it, I would be willing to send it to you if you are interested.
PM me if you have any questions.
Dustball
Well-known member
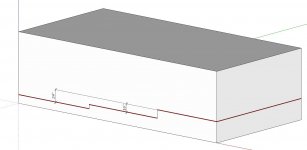
Since the majority of the perimeter seems to be at the topmost "step", I'd use that as the reference line. Make a reference line all the way around the buulding and install the starter strip at that upper step. Measure down from that reference line in 8" increments to install the starter strips on the lower steps. Use j-channel to cap the exposed ends.
Last edited:
Cant help with the siding install but I would leave the T111 and use it for sheathing. Just patch the spots that are no good.
My first house was a rancher with red T1-11. We sided right over the existing T1-11 and it came out great.
Originally I was going to do the same on my workshop. Unfortunately, this T1-11 is in bad shape. There is no overhang on the back and it's been getting soaked on the top seams for years It's brittle and rippled and I can pull it apart with bare hands, so all that has to come down. I can see daylight through different areas of the siding and then their were the mice that were living behind the insulation. I pulled off the interior paneling, pulled out the insulation and bleached, powerwashed and sprayed mold and mice chemicals on the framing but the siding has to go. It's 30 years old so it's had it's time.
Part of the rehab will be installing a mini-split and rock wool so I expect the rehabbed interior and exterior will fare better for the next 30 years.
Since the majority of the perimeter seems to be at the topmost "step", I'd use that as the reference line. Make a reference line all the way around the buulding and install the starter strip at that upper step. Measure down from that reference line in 8" increments to install the starter strips on the lower steps. Use j-channel to cap the exposed ends.
That's the tip I was looking for. Now I have a plan. Thank you!
Milton Shaw
Well-known member
- Joined
- Feb 11, 2011
- Messages
- 4,835
Cut with saw blade reversed worked best for me when I did mine. Otherwise it tore and cracked like crazy with fine tooth blade even. Not to hard work but don't nail the roofing nails all the way down the siding has to move with temp change or it will buckle.
gagecalman
Well-known member
Since the majority of the perimeter seems to be at the topmost "step", I'd use that as the reference line. Make a reference line all the way around the buulding and install the starter strip at that upper step. Measure down from that reference line in 8" increments to install the starter strips on the lower steps. Use j-channel to cap the exposed ends.
I don't understand this but I'm not a siding expert.
Siding has a lip at the top so the next course will lock in (just like the starter strip). If you have a starter strip all the way around at the topmost step you will wind up with a starter strip and a lip on the siding coming up from a lower point.
What do you do if you measure down in 8" increments to install the starter strips on the lower steps and you have 1" of T-111 showing?
Maybe I'm missing something.
I think you start at the lowest point and use J-channel on the upper steps as already mentioned.
Jlbc212
Well-known member
It's a good idea as suggested that you place a full piece of siding around the greatest area of the perimeter. If necessary you can cheat on the lower steps. Do this by placing one full row along the bottom edge. Cheat by nailing another piece of starter strip right over the first row of siding at the height you need to obtain an even row with the row at the greatest area of the perimeter. Lots of old colonial houses with lap siding have the first several rows spaced closer together. The reveal between the first and second rows instead of being 4" might be just 1" or 2" or 3" or whatever you need to level it out. It actually adds a nice touch.
I just finished vinyl siding a large addition on my son's house. I was working mostly alone and didn't feel up to constantly setting up and breaking down a heavy cross cut saw. One evening while perusing the Milwaukee tools at Home Depot I spotted a 12 volt 3" circular saw. I bought it. It comes with three 3" circular blades. One for cutting metal, another for cutting tile and masonary and the last for I don't know because I never looked at it or used it. Surprisingly the diamond impregnated blade for cutting tile worked like a charm in cutting the vinyl. I set up a couple of saw horses with two 6"x 6" timbers I had laid across the horses and some pieces of scrap wood perpendicular to the timbers. I was able to lay a stack of siding onto the improvised work bench. The saw came with a blade guide, but I soon found I could easily cut a nice line by just following a pencil line. Beside cutting the vinyl to length the saw worked super in making all those necessary cuts I needed to make along the length of the siding. The other great thing about the saw is that it's so light weight and easy to use that I found I could make great trim cuts with it while I was up on staging. The only issue I had with was the batteries, but that's a whole another story. I'm use to Makita's.
I just finished vinyl siding a large addition on my son's house. I was working mostly alone and didn't feel up to constantly setting up and breaking down a heavy cross cut saw. One evening while perusing the Milwaukee tools at Home Depot I spotted a 12 volt 3" circular saw. I bought it. It comes with three 3" circular blades. One for cutting metal, another for cutting tile and masonary and the last for I don't know because I never looked at it or used it. Surprisingly the diamond impregnated blade for cutting tile worked like a charm in cutting the vinyl. I set up a couple of saw horses with two 6"x 6" timbers I had laid across the horses and some pieces of scrap wood perpendicular to the timbers. I was able to lay a stack of siding onto the improvised work bench. The saw came with a blade guide, but I soon found I could easily cut a nice line by just following a pencil line. Beside cutting the vinyl to length the saw worked super in making all those necessary cuts I needed to make along the length of the siding. The other great thing about the saw is that it's so light weight and easy to use that I found I could make great trim cuts with it while I was up on staging. The only issue I had with was the batteries, but that's a whole another story. I'm use to Makita's.
Dustball
Well-known member
I don't understand this but I'm not a siding expert.
Siding has a lip at the top so the next course will lock in (just like the starter strip). If you have a starter strip all the way around at the topmost step you will wind up with a starter strip and a lip on the siding coming up from a lower point.
What do you do if you measure down in 8" increments to install the starter strips on the lower steps and you have 1" of T-111 showing?
Maybe I'm missing something.
I think you start at the lowest point and use J-channel on the upper steps as already mentioned.
Here's a sketch with the starter strips in red. I'm assuming the height of the steps correspond to the number of blocks per row. 1 block = 8 inches = 1 piece of vinyl siding. I'm saying start with the uppermost step because that wraps around three sides of the building.
Attachments
with all the changes in elevation, I would go with vertical or board & batten siding
matt_i
Well-known member
You begin at the lowest elevation using starter strip, but when you get to the first step you transition to using J trim.
Glenn
I feel like in this scenario it would be best to use the J-channel all over. Including the short verticals.
I would reside with OSB, then a water resistive barrier ala Tyvek housewrap or the many many competitors.
Then the siding.
Since the J is going to catch *everything* coming down (instead of the starter which is going to let it ride over, I'd drill some larger holes into the bottom/lower surface of it it, 1/4" to 3/8" at intervals along the way to let it empty out.
I used GRK 1" cabinet screws for my vinyl. Difficult to put in too tight as you can back off the screw and still maintain grip.
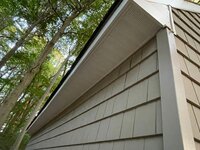
Flashing the window is going to be important. If you like photos I have some for you
")
Page 5 of my build has the "sled" i used for cutting the vinyl with a std circ saw.
https://www.garagejournal.com/forum/showthread.php?t=319602&page=5
Page 6 has some details about flashing the window, I like to use trim coil to guide drips running down the side-channels of the windows to the next "hook" in the siding where there are holes to release it.
https://www.garagejournal.com/forum/showthread.php?t=319602&page=6
rburke65
Well-known member
Do Not drive the roofing nails “home”. This is why they use the term “hang” siding. It has to expand and contract. And don’t “****” your ends into your corners or “J” channel. I THINK you wasn’t to keep the edge back 3/8”....I’m sure someone will correct me if wrong. I did a 2 story duplex by my self almost 50 years ago and it still looks good. Good luck...you can do this...and oh....get a book and read up on this project.
nadogail
Well-known member
If vinyl siding is anything like HardiPlank, I found that the GECCO Clamps I purchased were well worth what I paid for them.
For a neophyte, they made my first ever HardiPlank job look very professional when It was completed.
For a neophyte, they made my first ever HardiPlank job look very professional when It was completed.
couch67
Well-known member
try to get jtrim the same colour as the siding, the defacto white might stand out too much
try to get jtrim the same colour as the siding, the defacto white might stand out too much
I agree
east_tn_emc
Well-known member
DONT buy the siding from a big-box store. Find a siding supplier to buy from. They will have better quality and selection and will be CHEAPER.
Find a local tool rental that has a metal brake for rent. You will need it for some trim work with the coil stock for areas like the soffit.
Doing siding is not very difficult. I enjoyed siding my workshop. You will remember your jr high school geometry teacher as you work progresses.
Find a local tool rental that has a metal brake for rent. You will need it for some trim work with the coil stock for areas like the soffit.
Doing siding is not very difficult. I enjoyed siding my workshop. You will remember your jr high school geometry teacher as you work progresses.
Jlbc212
Well-known member
DONT buy the siding from a big-box store. Find a siding supplier to buy from. They will have better quality and selection and will be CHEAPER.
Find a local tool rental that has a metal brake for rent. You will need it for some trim work with the coil stock for areas like the soffit.
Doing siding is not very difficult. I enjoyed siding my workshop. You will remember your jr high school geometry teacher as you work progresses.
Another alternative to using a metal brake and aluminum coil stock is PVC trim boards. Azek is one brand, but there are more reasonably priced brands.
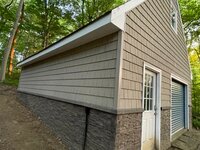
So it’s been a while but I finally tackled the project and feel like I’m on the home stretch. Still have soffit and facia to finish but that’s just another week of after work, work. I saw someone had posted a garage very similar to what I wanted - but didn’t know how to explain. So I just copied it the best I could. I’ve never sided or done a project like this so it took me a bit to get the courage to just dive in. I’m happy with the results so far. No “step” in the siding and no exposed foundation.
Attachments


tipsy
Well-known member
That looks really nice!
Wow, that's looks fantastic!So it’s been a while but I finally tackled the project and feel like I’m on the home stretch. Still have soffit and facia to finish but that’s just another week of after work, work. I saw someone had posted a garage very similar to what I wanted - but didn’t know how to explain. So I just copied it the best I could. I’ve never sided or done a project like this so it took me a bit to get the courage to just dive in. I’m happy with the results so far. No “step” in the siding and no exposed foundation.
What is the stone product?
Little bit better shot from my deck.
Novik Stone from the big box stores. It was on sale and the cheapest “stone look” plastic panel that I could find.
It wasn’t easy to install the siding on a downward slope. There’s no way to install a horizontal starter strip. But I’m happy with the look and my wife is happy I got rid of the eyesore view from the house.
The cedar shake looking vinyl is Certainteed brand. I had a bunch left over from my house. Installers tried to make off with it (all paid by me) before I pulled it from their truck and stored it away till now.
Started on the inside.
Attachments


I have a plan for the inside wall “steps”. I’ll mount a flat board at the height of the highest block completely around the inside. Then run a wall below the shelf and above the shelf to get a similar horizontal break to the outside.
Looks fantastic!! And nice bike man cave! I've accumulated a bunch too. Got a specialized ebike - tube creo - last year and love it. My oldest is a 1972 fuji special road racer. Never gets used - more of a collector's item. Between my wife and me, we have the fuji, specialized, a giant hybrid, cannondale hybrid, two litespeed road bikes... and I think that's it!
That’s my overflow. All the good bikes are in the house. I used to run a bike shop and have been riding and racing all my life.Looks fantastic!! And nice bike man cave! I've accumulated a bunch too. Got a specialized ebike - tube creo - last year and love it. My oldest is a 1972 fuji special road racer. Never gets used - more of a collector's item. Between my wife and me, we have the fuji, specialized, a giant hybrid, cannondale hybrid, two litespeed road bikes... and I think that's it!
DGZRT
Well-known member
You did an excellent job 
couch67
Well-known member
Looks great mepstein! Awesome space too!
bluedog225
Well-known member
Looks great. You might be surprised how much an awning, or even a 6” drip edge tucked under the siding will help the splash onto the doors.
captain14
Well-known member
Very nice work. How long did it take you once you got started?
The garage looks great.
How much roof overhang on the gable ends?
The garage looks great.
How much roof overhang on the gable ends?
About two months now. Had to install roll up door, man door, siding, window, etc. mostly after work and weekends when it’s not raining. I’m slow and I had to take one side of the lower section off just to reinstall because it wasn’t level.Very nice work. How long did it take you once you got started?
It also took me a while to start because I wanted the sides to finish into the soffit with a full panel. I didn’t want a 2” panel instead of the full 14” height. Adding the ledge between the top and bottom made the dimensions come out right - hopefully.
Also, these panels take longer to install than regular vinyl siding but they are a lot tougher and in my opinion, better looking.
Thanks. I’m very happy I finally started the projectThe garage looks great.
None. I would have wanted some but I couldn’t think of any good way to add it. I might revisit when I put on a new roof. The trim is all plastic and all the openings have drip edge so I’ll just live with it for now.How much roof overhang on the gable ends?
nadogail
Well-known member
My Gecko Clamps paid for themselves in the time and labor saved on the first job I used them on.
How the hell do you use a gecko clamp on vinyl siding?My Gecko Clamps paid for themselves in the time and labor saved on the first job I used them on.
The type of siding I used comes in 14x63 panels. Each panel snaps into place, next to and over top the previous one. No additional clamps needed.
The one thing that really helped me get the job done was buying a safety harness. I’m a chicken about working on ladders. I was much more productive when I didn’t have to worry about injury or death. It made finishing up the gable end fun and easy. Best $50 purchase I could have made for the project.
The one thing that really helped me get the job done was buying a safety harness. I’m a chicken about working on ladders. I was much more productive when I didn’t have to worry about injury or death. It made finishing up the gable end fun and easy. Best $50 purchase I could have made for the project.
kaymccampbell
Well-known member
Lovely. Looks like my place. One little thing. Since you've got the stone right at ground level, make sure to till in a lot of ant n termite poison all the way around, or the little devils will use your siding as a stairway to the nice tasty wooden bits.
nmk_61802
Well-known member
Little bit better shot from my deck.
Novik Stone from the big box stores. It was on sale and the cheapest “stone look” plastic panel that I could find.
It wasn’t easy to install the siding on a downward slope. There’s no way to install a horizontal starter strip. But I’m happy with the look and my wife is happy I got rid of the eyesore view from the house.
The cedar shake looking vinyl is Certainteed brand. I had a bunch left over from my house. Installers tried to make off with it (all paid by me) before I pulled it from their truck and stored it away till now.
Started on the inside.
Care to share any details and or pictures of how you handled the transition from Novik to standard lap vinyl siding? Looks like you have some sort of cap stone, similar to traditional stone/ brick work. I am considering doing similar to my house, but can't find many details on how to handle the transition between the two different siding products.
Edit: Just stumbled upon the Novik Ledge buried on their site, which I think is probably the product you used.
Yes, Novik cap stone. It made for a nice transition. The cedar look panels are just laying on top of the nailing flang. No starter strip. The cedar panels are very rigid and have plenty of nails in them. At least two nails into studs per panel. It’s been on my house for over a decade so I don’t see any problem with the installation. But I’m no pro.
paredown
Well-known member
N+1! Good to see another bike aficionado on GJ!. (I've been a bike guy since forever--short stint in shops and racing BITD.) Really nice job on the siding--I think the level line/stone below/shingle above looks excellent. Quite the improvement.That’s my overflow. All the good bikes are in the house. I used to run a bike shop and have been riding and racing all my life.