Uncle Bob
Well-known member
First a little qualifier, my post count would imply I’m a newb around here, but actually I joined almost 10 years ago and did some posting back when, but apparently through the years of internet stuff and software changes my older posts disappeared. I am not a GJ junkie however, but I do find it a useful tool and a good reference source. It’s in that light that I’m doing this thread as I found it difficult to find meaningful info on the Viper Pro 72 box. No, I’m not shilling for the company, I’m not getting paid for this write up, I’m a real garage rat like most of you.
As with so many things in life, the choice of a tool box is VERY subjective. We each establish loyalties in our life and set priorities based on our perspectives. So, obviously this presentation is based on my priorities, yours may differ, but for those who are doing research on a larger, roll around tool box I hope what I say will help you in your process. Those professional technicians who live in the world served by tool trucks have a point of view, those of us that are backyard “hacks” probably have a different one. Getting info from the internet can be educational as well as a waste of time, it’s the challenge we must work through. I’m not interested in bashing anyone else’s choices or bragging up mine, just laying out how I got here.
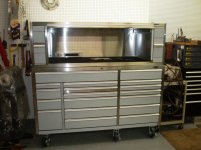
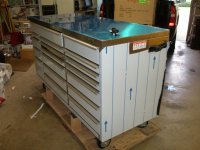
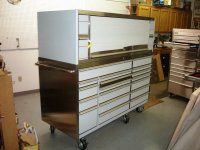
Getting tired of having tools layered in my 41” stacked box, I decided I needed (isn’t it funny how easily we use that word) a bigger tool box. Fortunately there are lots to choose from, but that also presents some challenges. Which one is “best”? One of the most frequent referrals here on GJ is Strictly Tool Boxes, and for good reason. Their website is very informative. Their comparison charting tool answers questions and teaches important factors all in one presentation. If you call them you’ll very likely get a cheerful person who has good knowledge of their products. They have earned a good reputation for prompt shipping and follow up. Had I not chosen the Viper I would have bought one of their offerings. So why the Viper Pro 72? At this point in time it came down to a value judgment. High on my list of requirements was drawer layout and amount of drawer space. Added benefits of the Viper were all six wheels being swivel for the kind of maneuverability needed in my shop, and convenience. As for information their website isn’t as good as STB, but a phone call answers all your questions, especially when you can talk to the owner of the company as I did. As of this date they are running what I consider a killer deal. A 72 x30, 18 drawer unit WITH a hutch and “free” shipping that includes lift gate service. The materials/features are very comparable to some of the best of the import/non-tool truck choices, and at $2600 in black, or $2800 in all stainless there’s a lot of bang for the buck. Quite frankly, at their “normal” price, near a couple grand more than the current sale offer, I wouldn’t have given Viper a second thought.
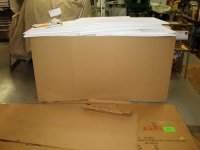
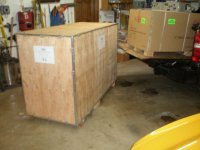
I’m going to follow this with a series of pictures to give you a feeling for what you would get if you order one of these. First off, this box, and any comparable or supposedly better box of this size is HUGE and HEAVY. Think about your work space, not just the width, but also when you have the drawers at full extension. In this case, with the drawer fully out it’s roughly 58” from the wall to the drawer face. That’s a lot of real estate, particularly in a home garage. Second is the logistics of delivery and set up. I missed taking a pic of the palletized assemblage as it came off the truck, but since it has the hutch it ends up with the base unit in it’s crate with the crated hutch stacked and banded on top. Great for ease of shipping but perhaps a challenge when you get it delivered. If you work in a shop with several good buddies nearby, no sweat. If like me you are home during the day when most of your neighbors (poor fellas) are at work you need to figure a different way. I have my loving bride to help, but she is somewhat skeptical of this kind of deal, and always thinks we need to invite over a dozen or so guys with small hats and big necks. First I managed to convince the driver of the delivery rig to use his pallet jack to roll the massive shipping unit into my garage from the curb area. Roughly 75 feet, and all I had to do was listen to a couple of his stories. Once in the garage I had to get a little creative. I backed the pickup into the stall, cut the binding bands and with the brides help we slid the hutch pallet into the truck bed as it was only about a 16” drop. I’m not sure how much the palletized hutch weighs, but glad we could slide it as we weren’t gonna lift it (I’m an old arthritic fart, and she’s younger but ……………well, you know). Then the disassembly of the wooden crate around the base unit. Very well packaged I’d say. Roughly 1/4” plywood with metal rails around the edges that interlocked for strength. That was followed by a cardboard box then a layer of foam over the plastic bagged tool box. Though the lower pallet portion showed some forklift abuse, the body of the crate was undamaged and intact. Happily the box inside was undamaged as well. The only assembly required was the attachment of the handles at each end. Knock out the bracing around the wheels, and the support blocks underneath and the base unit was ready to roll off the pallet. I then rolled the base unit over to the tailgate of the truck where we’d unpacked the hutch unit. That was wrapped in cardboard and foam, with a less substantial pallet base, but then it wasn’t intended to get the same sort of heavy handling the base unit gets. With the base unit on the floor and the hutch in the bed of the 4x4 truck on it’s pallet I only had to lift the hutch about 6” to get it on top of the base box. Now, I’m a tad fussy and didn’t want to risk damaging the top of the base box so I used some ¾” dowel stock I had on hand to make rollers so that I could easily slide/roll the hutch into position (remember the hutch was too heavy for us to lift). Well, it worked like a charm and we had the whole rig stacked and ready to roll into it’s space. As you can see in the pictures, I went for the stainless steel model. For the mere $200 difference it was worth it to me. Now it does have some requirements that some would see as high maintenance, but hey………what the heck. You’ll see in the pics that the protective vinyl is still on the drawer faces as well as the box sides and top. It takes a while to peel all that off, especially on the drawer fronts as it wraps around the edges which makes the peeling a bit more tedious. Order the black powder coated one and you probably won’t have to mess with that, and the cleanup of the adhesive left behind. One other point of logistics to consider, especially for the home user, you’re going to have quite a pile of foam sheet, cardboard, and plywood when you’re done unpacking. Disposal could get interesting.
(Due to text limit, see next entry)
As with so many things in life, the choice of a tool box is VERY subjective. We each establish loyalties in our life and set priorities based on our perspectives. So, obviously this presentation is based on my priorities, yours may differ, but for those who are doing research on a larger, roll around tool box I hope what I say will help you in your process. Those professional technicians who live in the world served by tool trucks have a point of view, those of us that are backyard “hacks” probably have a different one. Getting info from the internet can be educational as well as a waste of time, it’s the challenge we must work through. I’m not interested in bashing anyone else’s choices or bragging up mine, just laying out how I got here.
Getting tired of having tools layered in my 41” stacked box, I decided I needed (isn’t it funny how easily we use that word) a bigger tool box. Fortunately there are lots to choose from, but that also presents some challenges. Which one is “best”? One of the most frequent referrals here on GJ is Strictly Tool Boxes, and for good reason. Their website is very informative. Their comparison charting tool answers questions and teaches important factors all in one presentation. If you call them you’ll very likely get a cheerful person who has good knowledge of their products. They have earned a good reputation for prompt shipping and follow up. Had I not chosen the Viper I would have bought one of their offerings. So why the Viper Pro 72? At this point in time it came down to a value judgment. High on my list of requirements was drawer layout and amount of drawer space. Added benefits of the Viper were all six wheels being swivel for the kind of maneuverability needed in my shop, and convenience. As for information their website isn’t as good as STB, but a phone call answers all your questions, especially when you can talk to the owner of the company as I did. As of this date they are running what I consider a killer deal. A 72 x30, 18 drawer unit WITH a hutch and “free” shipping that includes lift gate service. The materials/features are very comparable to some of the best of the import/non-tool truck choices, and at $2600 in black, or $2800 in all stainless there’s a lot of bang for the buck. Quite frankly, at their “normal” price, near a couple grand more than the current sale offer, I wouldn’t have given Viper a second thought.
I’m going to follow this with a series of pictures to give you a feeling for what you would get if you order one of these. First off, this box, and any comparable or supposedly better box of this size is HUGE and HEAVY. Think about your work space, not just the width, but also when you have the drawers at full extension. In this case, with the drawer fully out it’s roughly 58” from the wall to the drawer face. That’s a lot of real estate, particularly in a home garage. Second is the logistics of delivery and set up. I missed taking a pic of the palletized assemblage as it came off the truck, but since it has the hutch it ends up with the base unit in it’s crate with the crated hutch stacked and banded on top. Great for ease of shipping but perhaps a challenge when you get it delivered. If you work in a shop with several good buddies nearby, no sweat. If like me you are home during the day when most of your neighbors (poor fellas) are at work you need to figure a different way. I have my loving bride to help, but she is somewhat skeptical of this kind of deal, and always thinks we need to invite over a dozen or so guys with small hats and big necks. First I managed to convince the driver of the delivery rig to use his pallet jack to roll the massive shipping unit into my garage from the curb area. Roughly 75 feet, and all I had to do was listen to a couple of his stories. Once in the garage I had to get a little creative. I backed the pickup into the stall, cut the binding bands and with the brides help we slid the hutch pallet into the truck bed as it was only about a 16” drop. I’m not sure how much the palletized hutch weighs, but glad we could slide it as we weren’t gonna lift it (I’m an old arthritic fart, and she’s younger but ……………well, you know). Then the disassembly of the wooden crate around the base unit. Very well packaged I’d say. Roughly 1/4” plywood with metal rails around the edges that interlocked for strength. That was followed by a cardboard box then a layer of foam over the plastic bagged tool box. Though the lower pallet portion showed some forklift abuse, the body of the crate was undamaged and intact. Happily the box inside was undamaged as well. The only assembly required was the attachment of the handles at each end. Knock out the bracing around the wheels, and the support blocks underneath and the base unit was ready to roll off the pallet. I then rolled the base unit over to the tailgate of the truck where we’d unpacked the hutch unit. That was wrapped in cardboard and foam, with a less substantial pallet base, but then it wasn’t intended to get the same sort of heavy handling the base unit gets. With the base unit on the floor and the hutch in the bed of the 4x4 truck on it’s pallet I only had to lift the hutch about 6” to get it on top of the base box. Now, I’m a tad fussy and didn’t want to risk damaging the top of the base box so I used some ¾” dowel stock I had on hand to make rollers so that I could easily slide/roll the hutch into position (remember the hutch was too heavy for us to lift). Well, it worked like a charm and we had the whole rig stacked and ready to roll into it’s space. As you can see in the pictures, I went for the stainless steel model. For the mere $200 difference it was worth it to me. Now it does have some requirements that some would see as high maintenance, but hey………what the heck. You’ll see in the pics that the protective vinyl is still on the drawer faces as well as the box sides and top. It takes a while to peel all that off, especially on the drawer fronts as it wraps around the edges which makes the peeling a bit more tedious. Order the black powder coated one and you probably won’t have to mess with that, and the cleanup of the adhesive left behind. One other point of logistics to consider, especially for the home user, you’re going to have quite a pile of foam sheet, cardboard, and plywood when you’re done unpacking. Disposal could get interesting.
(Due to text limit, see next entry)
Attachments


Last edited:
 Hell yeah! For the money I still feel it’s a lot of bang for the buck. Features and stated materials it stacks up VERY well against the best that STB sells at a bit more, or quite a bit more depending on how you value the hutch. Is it as good as the tool truck units? I would say it’s competitive with the lower end ones that the big boys have brought out to fend off the import stuff. Probably not as good as the best that the tool guys sell, but then this is ½ to ¼ the price. Sure, some folks will tell you you can find used boxes of higher quality for the kind of money this one costs, but while it’s possible, it’s not probable unless you’re willing to wait and work a long time for that opportunity to pop up where some guy is desperate enough to take a low offer. At least in my part of the country. I’ve watched for a few weeks and haven’t seen anything comparable in size and drawer layout for less than $5k in a used box. I’m sure there are better deals from time to time, but it’s not a regular occurrence. Time has value to some of us, and that’s also part of the equation.